Constructive Feedback
For in-progress or completed build photos. Give and get contructive feedback!
Carried away by Rwanda carriers!
Heatseeker64
Visit this Community
New South Wales, Australia
Joined: October 05, 2008
KitMaker: 307 posts
Armorama: 305 posts
Posted: Sunday, February 01, 2009 - 12:16 PM UTC

Quoted Text

Great work on the buckets. I have reservations on 4 Radios as the 1780 only has control functions for three C (Primary TX/RX), A (TX/RX) and B (RX - typically a 125 or 160. The 524 (46/47) was usually carried as the primary radio and if only one was carried it is invariably a 524.
Wayne, the hatch locking mech you show was only introduced in 1994 as a knee jerk reaction to a stolen APC (The fact it was stolen by someone with the keys to the vehicle was irrelevant.) They were an utter lady to fit and caused all sorts of problems.
Cheers
Al


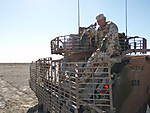
Thanks for the feedback - about the only radio reference I have for Niner was that it had four aerials, and an interior shot shows sandbags on the floor in 1966, so the interior is representative, and only glimpses can be seen in any case. Looking though the top hatch, the most visible features are the sandbag fllor and seats, and the radios appear as indistinct blobs.

All of these builds are basically tests to burn up some of the accessories of varying quality I've had loitering about for the last couple of decades and learn some of the tricks needed to build a good Aussie Bucket.

I plan to build a fully detailed series of M113A1s in Somalia during Op Solace in 1993, putting in to practice what I have learned from these "basic fun" builds.

All that said, I still reckon that a sound base kit of an M113 is still sorely lacking, and I am at a loss as to why a decent representation of this common and readily accessible vehicle has not come to pass.

The Academy M113 has some nice bells and whistles, but the fuel cell is waaaay oversized, and you need to use the Tamiya top deck and engine hatch if you're going to build an "A1".

The T50 turrets are hit and miss, and the best I have used so far is the very good Aussie Armour offering, but I am yet to take a look at the Firestorm and latest Mousehouse turrets (watch for a review soonest).

To start to build a decent M113A1, you really need to "cross kit" the Tamiya and Academy kits, and I don't like the way the front lights in either is represented.

One big saving grace with the Academy kit is that you get rubber band and indy track links - the band track can be used to replace the woeful Tamiya track which is void of inner face detail, when fitting teh shrouds (the tracks are too tight, but the shrouds hide the top run), and the indy links are great for spares (the Aussie carriers in Rwanda had two lots of four on front, and a length of 10 stowed under the open cargo hatch.

Meanwhile, the Tamiya interior has a one piece engine access hatch, but the bench seats are unusable - meaning you need to use the Academy items, which aren't quite right, but better.

Regardless of which base kit you use, neither has a fuel cell that looks like anything I have ever seen! The Mousehouse replacement is a cheap, no fuss and accurate fix.

The Tamiya trim vanes are too short and unuseable. The Academy ones are spot on dimensionally, but earlier examples have detail differences.

And, yes, the driver's hatches in Rwanda and Somalia did not have the "spider lock" - I have clear evidence of this in photos. which I will scan and post sometime soon.
WayneB
Visit this Community
Victoria, Australia
Joined: July 22, 2008
KitMaker: 141 posts
Armorama: 130 posts
Posted: Monday, February 02, 2009 - 09:10 AM UTC
Mick,

You are correct, I see in the reference picture with the trooper painting the vehicle that there is indeed no spider locking mechanism. I stand corrected. Nice pictures by the way.

Do you still work with Aust&NZ Defender. Any chance of getting them to do some walk arounds? I’m working on an ARVL at the moment and am really struggling to find good quality reference pics. The 10 pages you get when you google ARVL can only take me so far.

Jason,

2 part engine access panel - now I know what you mean!!!! Damn academy kit. I want to second Mick’s motion that the academy kit is bananas. We need complete remake of the M113!!!!

Al,

Thanks for the date on the mod to introduce the spider lock. 1994 was before my time I was not aware of the date on that one.

And one additional question for the RAEME Radio Mechanic involved in this conversation. If Mick’s M113 has 3 x radios fitted to the VIC 1 harness can he run the 4th radio off vehicle power and not connect it into the harness? You know what I mean, it can only be used off the face of the set?

W
kriegsketten
Vendor
ECHELON
Visit this Community
Singapore / 新加坡
Joined: November 12, 2007
KitMaker: 283 posts
Armorama: 177 posts
Posted: Tuesday, February 03, 2009 - 02:12 AM UTC
Mick,

Please, please, please tell me you're the proud owner of the white UN M113s in Rwanda pictures at the beginning of the post!!!! I've been looking high and low for the owner because I've had a stack of decals sitting around waiting for the instructions to be completed. I need those images to complete it.... If you are the owner, please contact me at [email protected]... I'm going to help you complete your marking needs! Today must be my lucky day... I was actually searching for Modelkasten M113 tracks on the internet and the search (one of the links) ended up here!

Lawrence Goh
Echelon Fine Details
Heatseeker64
Visit this Community
New South Wales, Australia
Joined: October 05, 2008
KitMaker: 307 posts
Armorama: 305 posts
Posted: Tuesday, February 03, 2009 - 02:32 AM UTC

Quoted Text

Mick,

Please, please, please tell me you're the proud owner of the white UN M113s in Rwanda pictures at the beginning of the post!!!! I've been looking high and low for the owner because I've had a stack of decals sitting around waiting for the instructions to be completed. I need those images to complete it.... If you are the owner, please contact me at [email protected]... I'm going to help you complete your marking needs! Today must be my lucky day... I was actually searching for Modelkasten M113 tracks on the internet and the search (one of the links) ended up here!

Lawrence Goh
Echelon Fine Details


Yes, I did take them back in Kigali in September 1994 ... I'll send you an e-mail.
Heatseeker64
Visit this Community
New South Wales, Australia
Joined: October 05, 2008
KitMaker: 307 posts
Armorama: 305 posts
Posted: Tuesday, February 03, 2009 - 03:09 PM UTC
Well, it looks like the Rwanda carrier project just got streamlined - it turns out that Echelon Fine Details have produced a set of decals for these very vehicles based on pictures I had posted on the Mouse House site a few years back.

Echelon needed a few pics for their instruction sheet ... I recently donated the bulk of my photo archive to the Australian War Memorial (see my blog: http://heatseeker.blog.com/ for details) but I did keep a few pics in my personal collection, which I just scanned.

Anyway, Lawrence Goh at Echelon needed some pics, and I need a few decal sheets for my project, so everyone's a winner!

Needless to say, keep an eye out for Echelon's Aussie United Nations M113A1 Carriers in Rwanda 1994-1995 decal set in coming months! (and my reiview on Armorama)

Moving along with this ever-growing thread, here's some freshly scanned pix of the Rwanda carriers:

Here is one of the crews in 31A ... note the driver's hatch and light above the turret guns. The racks for the ammo liners are empty because this pic was taken within the Aussie UN headquarters at Kigali - normally there would be .30 cal liners on the driver's side of the vehicle and .50 cal liners on the other side. A starter cable is coiled under the driver's hatch and the relocated aerial mount can be plainly seen. Interestingly, this vehicle is 31A (ARN 134192, the subject of my project) but the bloke in the turret is Sergeant Steve Lennon, who was the APC section commander ... I would have thought that Callsign 31 would have been his mount, and 31A the section 2IC:


Here is 31 Alpha (134192) and 31 Bravo (134348):


Callsign 31 (134500) ... note the hanger on the side of the hull for a coil of barbed wire and the aabsence of the 3/4 Cav Scorpion under the callsign on the trim vane:


31 Bravo from the front. Note the Scorpion on the trim vane:


Another shot of 31 Alpha ... note the .50 cal ammo box on the side of the turret - there is provision to mount another on the other side. A tow cable is attached to a shackle and draped over the starboard side front lights and the trim vane. The Scorpion is in a different position to the previous picture. Note the holes where the belly armour had been fitted when the vehicle was in Vietnam::


Anyway, back to my burgeoning APC project!
jasmils
Visit this Community
Queensland, Australia
Joined: December 23, 2003
KitMaker: 1,016 posts
Armorama: 745 posts
Posted: Tuesday, February 03, 2009 - 09:30 PM UTC
G’day Mick,
I just spoke to Steve, and he said the reason that he is in 31A is because the cars were being rotated thru the Quick Reaction Force (QRF) at that time.

You are correct his normal mount was 31.
Call Signs for the Troop were 31, 31A, 31B and 38 (fitter).
No belly armour was used as there was no requirement for it (higher’s idea), even though the mine threat was quite high. Same for the flex .30cal. No requirement.

A bit more on radios.
Al you might be able to confirm, that 2 1780's could be fitted allowing 4 RT524's.


Cheers Jason

Heatseeker64
Visit this Community
New South Wales, Australia
Joined: October 05, 2008
KitMaker: 307 posts
Armorama: 305 posts
Posted: Friday, February 06, 2009 - 11:56 PM UTC
A few more from the ... Cpl Luke Entink in Callsign 61 in Baidoa in January 1993. The track is an M125A1 mortar with open .50 cupola, but note that the driver's hatch has the sliver from it to clear a T50 turret:


And for something completely different - some mud cam ... you won't have to worry about a smooth finish, or marking for that matter - if you apply these schemes!


newfish
Visit this Community
England - West Midlands, United Kingdom
Joined: June 23, 2008
KitMaker: 2,329 posts
Armorama: 2,110 posts
Posted: Saturday, February 07, 2009 - 12:07 AM UTC
Intereasting pictures you have mick I would love to see someone try it out

thanks for sharing the photos

WayneB
Visit this Community
Victoria, Australia
Joined: July 22, 2008
KitMaker: 141 posts
Armorama: 130 posts
Posted: Saturday, February 07, 2009 - 03:41 AM UTC
Mick, these are fantastic shots. Thanks for posting them.

W
Heatseeker64
Visit this Community
New South Wales, Australia
Joined: October 05, 2008
KitMaker: 307 posts
Armorama: 305 posts
Posted: Monday, February 09, 2009 - 05:53 PM UTC
Today's my birthday, and I had two packages arrive in the mail today, and neither of them were gifts as such, but I suppose they qualify because they arrived on the day.

The biggest excitement was the arrivel of an envelope from Singapore containing some as-yet unreleased decal sheets for the very Aussie Rwanda carriers I am modelling ... and, as an obscure claim to fame, they are based in the photographs I took of the actual vehicles back in 1994!

What I have been sent is the prototype sheet and there will be some small changes. Rest assured I will review the final product in detail.

Meanwhile, I recently sold some stuff on eBay, and had a slush fund in Paypal to buy some bits. Any Aussie carrier project will need plenty of ammo boxes on the top deck, and I also took a punt on a set of AFV Club T50 track:


I really struck gold with the ammo box set - not only are they in plastic, accurate and finely detailed, they also come in blocks which can be cut and endlessly re-configured for just about any Aussie M113A1 ammo stowage!

I am yet to fit the track, but it is the best detailed and most pliable "rubber band" type I have seen yet, and I will be interested to see if the correct sag can be attaned.The Tamiya tracks are useless because they have no inner surface detail and while the Academy tracks are nicely detailed, they are stiff, and a bit tight.

Anyway, there's a lot to like in these packages, but I have to say I am rapt by the arrival of the Fine Details protoype decal sheets - they will make marking these very esoteric vehicles a no brainer! Great to see such a reputable manufacturer documenting Aussie peacekeeping subjects!
newfish
Visit this Community
England - West Midlands, United Kingdom
Joined: June 23, 2008
KitMaker: 2,329 posts
Armorama: 2,110 posts
Posted: Tuesday, February 10, 2009 - 01:59 AM UTC
Happy birthday Mick .

I like the look of those decals! I am building a Scimitar at the moment and i plan to paint it in UN colours


keep up the good work


Heatseeker64
Visit this Community
New South Wales, Australia
Joined: October 05, 2008
KitMaker: 307 posts
Armorama: 305 posts
Posted: Saturday, February 28, 2009 - 08:33 PM UTC
The Rwanda cars are getting tantalisingly close to a coat of paint:


The fitter just needs some straps on the jerries and the T50 gun car a few aerials and little details like the lock on the cargo hatch etc.

This whole project started a few months' back when I test fitted a few of the excellent Mousehouse fuel cells I bought and reviewed ...... going through my stash I found that I had no less than 15 buckets of different types in varying stages of construction.

Some of the kits dated back more than 20 years, and most had aftermarket bits that often disappointed and gethered dust, along with the donor kit.

I resolved to build up a couple of the Rwanda carriers just as an exercise to learn about some techniques and to check the accuracy of the Tamiya and Academy kits.

One big bonus from the project was meeting Lawrence Goh of Echelon Fine Details through this fine forum, who had produced a sheet of decals for the Rwanda cars and was seeking the photographer who took the photographs so he could use them in an instruction sheet ... well, Lawrence found that photographer, I've sent him some pics to use with my compliments, and he sent me some prototypes of the decals for my project (they have been incoorectly labelled "Somalia" and need a third scorpion, but all will be fixed in the production run).


Comparing the most useable of the available 1/35 M113 kits - Academy and Tamiya - both are acceptable, and to build an Australian carrier, they need to be "cross kitted" to use the best bits from both ... now almost 35-years-old, the Tamiya kit isn't that bad, and represents a "gasser" with a petrol engine. Its big drawbacks are the moulded-on wheel station arms - which need to be thinned down on the inside to fit belly armour - and the fuel cell is nothing like I've ever seen, but the engine deck is correct for an M113A1. The trim vane is too short for an M113A1, but is spot-on for a very early M113.

The Tamiya track has no internal detail and is useless. The Academy rubber bands are far better detailed, but very stiff and impossible to make sag. Academy, Model Kasten and AFV Club offer individual links, but they all suffer from sinks marks in the track pads ... I've just receuved a set of AFV Club rubber band tracks, which wre beautifully detailed and soft rubber, so we'll have to see if we can get that M113A1 sag from them when I fit them.

Although 20 years younger, the Academy kit doesn't offer mucjh more than its older inspiration (most parts are readily interchangeable between the kits). The seperate wheel arms allow belly armour to be fitted without modification, and if you choose to leave the track shroud off, the hull has mounting holes. I don't like the way the driver's hatch is mounted, the fuel cell is way oversized, and the engine deck is correct for an M113A1.

One little "tweek" that both kits need is to the rear guards ... I was befuddled as to why the kit jerries almost touched the tail lights when fitted - I measured the hull dmensions, and they are acceptably close, and the jerries were also in the ball park scale wise. Turns out the guards are mounted too high. Note in these photographs how the guard arch is below the level of the sponson, and the vertical join in the rear and side plates which is also absent from both kits:


The hinges on rear hatches of both kits are toy like, and need to be replaced.

As a precursor to putting some of what I learnt from these Rwanda carriers in to other projects which will utilise more up to date Aussie accesories (Mousehouse has a T50 turret with basket and other bits which is apparently very good), I "prepped" a Tamiya and Academy Hull with corrected rear guards and Aussie sponson armour (note the filled in locator holes marking the original position of the guards):


As an exercise, I also fitted Vietnam era Aussie belly armour to the Tamiya hull, which will be an M113A1 ... but, as previously stated, it is much easier to fit to the Academy hull:


Naturally, once the rear guard mod is done, the track shrouds won't line up ... I haven't figured that one out yet ...

To show how interchangeble the bits are between the, the Academy hull will be built as an M125A1 in Somalia, and the interior and hull top were a "drop fit":


I've heard word that AFV Club will be releasing an Aussie M113A1 with T50 turret but without interior detail ... if they get the turret and other fittings such as the cargo hatch with filter cover right I'll be eternally greatful. But if they use the Academy hull as a basis, some mods will need to be made.

Getting back to the Rwanda carriers, the paint shouldn't be a big challenge, and the vehicles didn't knock up many track miles, so only minimal weathering will be needed. I need a new nozzle and needle for my Paasche air brush, as I don't want to risk getting the kits this far and ruining them with dodgy paint ... I plan to paint both of them green and then a coat of thinned and slightly tinted white.

And I reckon they'll both look great once those lovely Echelon decals are applied!
newfish
Visit this Community
England - West Midlands, United Kingdom
Joined: June 23, 2008
KitMaker: 2,329 posts
Armorama: 2,110 posts
Posted: Saturday, February 28, 2009 - 10:03 PM UTC
Mick some superb work you've got mate!.

They will look really nice when they are completed!.

Is the M106 your not next project?

Heatseeker64
Visit this Community
New South Wales, Australia
Joined: October 05, 2008
KitMaker: 307 posts
Armorama: 305 posts
Posted: Saturday, February 28, 2009 - 10:35 PM UTC

Quoted Text

Mick some superb work you've got mate!.

They will look really nice when they are completed!.

Is the M106 your not next project?


The Australians used the M125A1, which mounted the 81mm mortar ... the mortar car will be next - with all I've learnt over the past months I can mass produce hulls with the Aussie sponson armour and corrected rear guards (I modified four hulls as such on Saturday within an hour).


I now basically have four Aussie M113A1 "hulks" ready to be kitted out (M125A1 Somalia, M577A1 Somalia, M113A1 late Vietnam with belly armour, M113A1 FSV Saladin late Vietnam with belly armour).

In Somalia the Aussie never mounted mortars in the two M125A1s that were there but instead used them an impromptu APCs .... those of you who read Australian Defender magazine may remember the first cover pic was of an M125A1 in Baidoa, which I took from the other M125A1!

Here's another snap I took during that patrol:


I look forward to getting some paint on the Rwanda cars - not only have I done a UN white vehicle before, but I also have an association with them which continues to this day (I visit 134192 every time I go to the Australian War Memorial).

kriegsketten
Vendor
ECHELON
Visit this Community
Singapore / 新加坡
Joined: November 12, 2007
KitMaker: 283 posts
Armorama: 177 posts
Posted: Thursday, March 19, 2009 - 04:19 PM UTC
Hello Mick!

Any updates so far?

I've been looking forward to your builds with enthusiasm, you must be really busy lately.

Anyway, just want to let you and everyone know the decals are ready!

Cheers mate!

Lawrence
Heatseeker64
Visit this Community
New South Wales, Australia
Joined: October 05, 2008
KitMaker: 307 posts
Armorama: 305 posts
Posted: Friday, March 20, 2009 - 12:01 AM UTC

Quoted Text

Hello Mick!

Any updates so far?

I've been looking forward to your builds with enthusiasm, you must be really busy lately.

Anyway, just want to let you and everyone know the decals are ready!

Cheers mate!

Lawrence


Mate, both the carriers are VEEEERRRRRY close to a coat of paint ... th markings will be a no-brainer with your excellent decal sheet!

I reckon you'll be shifitng a few when people see them on my Rwanda cars ... watch this space.
kriegsketten
Vendor
ECHELON
Visit this Community
Singapore / 新加坡
Joined: November 12, 2007
KitMaker: 283 posts
Armorama: 177 posts
Posted: Friday, March 20, 2009 - 03:17 AM UTC
No rush mate! I'll keep my eyes peeled on your updates! :-)

Cheers,

Lawrence
Heatseeker64
Visit this Community
New South Wales, Australia
Joined: October 05, 2008
KitMaker: 307 posts
Armorama: 305 posts
Posted: Sunday, April 26, 2009 - 12:25 AM UTC
People have been asking about my m113 builds ... I had some Olive Drab Lustreless in teh gun the other day and I gave the lower hull and wheels of the Vietnam bucket a squirt - I am not usually a fan of pre-painting, but I just wanted to get the hull sitting on tracks for my morale's sake. The tracks are AFV Club:


The Rwanda car is very close to paint ... just need to add two lifiting fixtures to the front of the hull, bump stops for the cargo hatch and sort out the gun deflecting rail behind the turret. I have painted the ammo boxes green and masked them before gluing in to place:


The Fitter is almost good to go - just need to add the extension to the trim vane.

Hopefully I'll soon have a coat of white on the two Rwanda carriers, and then I can apply those looovely decal from Echelon!
newfish
Visit this Community
England - West Midlands, United Kingdom
Joined: June 23, 2008
KitMaker: 2,329 posts
Armorama: 2,110 posts
Posted: Sunday, April 26, 2009 - 12:44 AM UTC
Hi mick. Great, work im really looking foward to seeing them with some paint on!.


ptruhe
Visit this Community
Texas, United States
Joined: March 05, 2003
KitMaker: 2,092 posts
Armorama: 1,607 posts
Posted: Monday, June 01, 2009 - 03:18 AM UTC
Surprising to see A1 exhausts and other A1 features. Do these vehicles not have the additional shock mount either?

Thanks for the tip on mounting the rear mudguards. Are the antenna bases from Aussie Armour? I've got some from Accurate Armour but they only have two bolt heads.

Paul
Heatseeker64
Visit this Community
New South Wales, Australia
Joined: October 05, 2008
KitMaker: 307 posts
Armorama: 305 posts
Posted: Monday, June 01, 2009 - 03:54 AM UTC

Quoted Text

Surprising to see A1 exhausts and other A1 features. Do these vehicles not have the additional shock mount either?

Thanks for the tip on mounting the rear mudguards. Are the antenna bases from Aussie Armour? I've got some from Accurate Armour but they only have two bolt heads.

Paul


Yep, us Aussies ran them buckets in to the ground in their A1 configuration, although you did see some A2/A3 exhausts as early as Somalia in 1993 and regularly in East Timor and some Diehl track, they basically remained Vietnam era "A1s".

The aerials are AA, and I've drilled an extra two bolt heads.

Should be getting some paint on these suckers soon!
jashby
Visit this Community
Queensland, Australia
Joined: July 01, 2009
KitMaker: 278 posts
Armorama: 248 posts
Posted: Tuesday, June 30, 2009 - 10:40 PM UTC
Excellent job Mick. Your doing a fine job of a subject close to my heart.

I don't want to be a stck in the mud but I just wanted to draw your attention to the oil jerries you have fitted to the rear of the vehicles. If you notice in your excellent photos the spout for all the jerries face in toward the ramp. There is a reason for this. We are taught to keep the spouts inboard so that they don't get damaged by passing branches or bump rubbing against trees. Just a little thing that I thought you might like to know being as you have done an outstanding job of capturing the Aussie feel on these buckets.

Cheers, John
Heatseeker64
Visit this Community
New South Wales, Australia
Joined: October 05, 2008
KitMaker: 307 posts
Armorama: 305 posts
Posted: Tuesday, June 30, 2009 - 10:50 PM UTC

Quoted Text

Excellent job Mick. Your doing a fine job of a subject close to my heart.

I don't want to be a stck in the mud but I just wanted to draw your attention to the oil jerries you have fitted to the rear of the vehicles. If you notice in your excellent photos the spout for all the jerries face in toward the ramp. There is a reason for this. We are taught to keep the spouts inboard so that they don't get damaged by passing branches or bump rubbing against trees. Just a little thing that I thought you might like to know being as you have done an outstanding job of capturing the Aussie feel on these buckets.

Cheers, John


Now you've pointed that out, yes, that is definitely the case! That's a little detail I never would have thought of checking ... you learn something new every day!

I'm just awaiting some new airbrush parts and these projects are now tantalisingly close to a coat of paint.

I assume you were 3/4 Cav ... did you serve O/S?
jashby
Visit this Community
Queensland, Australia
Joined: July 01, 2009
KitMaker: 278 posts
Armorama: 248 posts
Posted: Wednesday, July 01, 2009 - 12:57 AM UTC

Now you've pointed that out, yes, that is definitely the case! That's a little detail I never would have thought of checking ... you learn something new every day!

I'm just awaiting some new airbrush parts and these projects are now tantalisingly close to a coat of paint.

I assume you were 3/4 Cav ... did you serve O/S?

I was and still am. Missed out on Somlia by a few weeks cause I was posted to the School of Armour. My first O/S was Interfet with the SQN. Sadly the old girls are gone now, replaced by the Bushy. I miss the sound of the tracks rattling, the diesel roar and the suspension squeak but at the risk of sounding like an old sod, at least I had 16 good years of memories with them.
Have you figured out how to lower the Idler and eccentric axle to get the right track tension and slack? It's the one thing I always have trouble with. Both kits have the axle stub molded on too high so the track runs straight from the sprocket to the idler and if you try to get it sitting on the second road wheel, like its supposed, to the track ends up looking like a banana. Best of luck.
newfish
Visit this Community
England - West Midlands, United Kingdom
Joined: June 23, 2008
KitMaker: 2,329 posts
Armorama: 2,110 posts
Posted: Wednesday, July 01, 2009 - 04:21 AM UTC
Mick I seriously cannot wait to see some paint on these!