Armor/AFV: Axis - WWII
Armor and ground forces of the Axis forces during World War II.
Hosted by Darren Baker
DML#6383 Tiger 1 Turret Zimmerit Mod
tomapaul
Visit this Community
Bucuresti, Romania
Joined: September 17, 2007
KitMaker: 425 posts
Armorama: 304 posts
Posted: Sunday, July 19, 2009 - 10:24 PM UTC
Absolutely no problem buddy!
Yes I was asking about the decals provided by dragon in the 6406.
As a Tiger noob I am having a lot of difficulties in building an exact Tiger I.

Doesn't the #6383 have a strange small pattern zimmerit on the turret?It's very irregular.
bizzychicken
Visit this Community
Wales, United Kingdom
Joined: September 06, 2008
KitMaker: 967 posts
Armorama: 842 posts
Posted: Monday, July 20, 2009 - 12:09 AM UTC
Hi Phil, no problem with the Voyager instructions, when you find them you find them I'm not in to much of a hurry? Got to have them though, The PE looks awsome but I wouldn't know were to start? it really is a PE minefield!. Looking forward to seeing how the Tamiya paint land on the different modulation styleeeee base cotes. I think its going to be intresting? Had some good news over on ML with my progress on Wikings PzBefWg V's starting to get somewhere with the ID/ tac No's of them . Found out today that Wiking was given three Ausf D of LAH. Fingers crossed and I'll finally be able to ID the Panther that I can Use Dragons D with Zim Kit and what I've learned off this thread will great as the Panther in Question had Zim'ed Schurzen. Can't think off a better starting place to pratice your techqnice ,Flat square Schurzen plates. sorry better stop rambling on about Panthers on this Tiger thread. Geraint
Plasticbattle
#003
Visit this Community
Donegal, Ireland
Joined: May 14, 2002
KitMaker: 9,763 posts
Armorama: 7,444 posts
Posted: Monday, July 20, 2009 - 01:59 AM UTC
Hello Phil. Its my first time in this thread, so its been an amazing read from the start until today. Great work throughout, and something Im sure is appreciated by many. Keep it going.
Crewchief
Visit this Community
Oklahoma, United States
Joined: July 01, 2009
KitMaker: 154 posts
Armorama: 146 posts
Posted: Monday, July 20, 2009 - 09:06 AM UTC
Phil, your detail work here is stunning, magnificent build
chrsf68
Joined: May 26, 2007
KitMaker: 17 posts
Armorama: 16 posts
Posted: Monday, July 20, 2009 - 11:21 AM UTC
Hello again Phil.Glad you are back. Everything looks great .Yeah I lucked out on 1 6253 kit, and got it for $40.00.The other was 70.00 with shipping included.All in all for the 2 kits,didn't come out too bad.I intend to do one of them as a Befhelswagen, Wittmann's #007.I am making some progress on the others too.I had a wonderful e-mail correspondence with Mr. David Byrden, seeking advice on 007.He was quite helpful even though not much reference exists on this one. I also picked up the manual "The Modelers guide to the Tiger Tank" by Stansell that has been great as well.Well, Phil keep it up,looking great. Chris
muchachos
Visit this Community
Ontario, Canada
Joined: May 21, 2008
KitMaker: 537 posts
Armorama: 439 posts
Posted: Monday, July 20, 2009 - 12:56 PM UTC
Phil - you could enter it in the What-if campaign!
barkmann424
Visit this Community
England - North West, United Kingdom
Joined: November 23, 2008
KitMaker: 357 posts
Armorama: 353 posts
Posted: Tuesday, July 21, 2009 - 08:46 PM UTC
Good Morning Tiger fans!

Hello Paul! The zimmerit patterns and muzzle brake size for the decal options for the Tigers depicted by #6406? A little tricky...


Hmmm... Well the option for '334' of the 1.(3.?)/s.Pz.Abt.505, Nowe Koszary 1944... Hypothetically you could use either the broader pattern zimmerit or the finer one on the turret, and also perhaps either muzzle brake. I believe that up to now we only have images of the units Tiger 1's with the unsculpted hull side front ends, rather than the ones without the typical late cut-outs for the towing c-hooks/hawser. From the 13th of April until the 26th April 1944, the s.Pz.Abt.505 is understood to have received 23 new Tiger 1's. This means that the fresh vehicles received could have been a bit of an assortment due to the production crossover in February -May 1944. From the images we have available, it looks as though the finer patter of turret zimmerit was the norm. So sorry on that one Paul, this unit really has caused many a headache with it's camo colours, unit emblem, and production variant nailing.

Now the the 2 Tigers of the s.SS.Pz.Abt. 101, in Normandy are a little simpler, again from the images available the majority of the identified Late production Tiger 1's on the inventory had the broader pattern zimmerit on the turret, and mainly the smaller muzzle brake. I think you would be safe with '122' of the first kompanie and with '304' of the 3rd Kompanie, this would represent a seconded vehicle 'renumbered' from the residual inventory of the 1st kompanie when it 'traded in' its Tiger 1's for King Tigers at the end of July and early August 1944. As the attrition grew and serviceable Tiger 1's began to thin drastically.

I cannot find an image of any of the other Tigers depicted in the kits decal options, but on the whole they should fit into the true late bracket, broad zimmerit and smaller muzzle brake, as a lot of their 'sibling' Tigers had these features.

Hi there Geraint! Good news on the Panther D instructions... They turned up in a #6406 box!!! I'll post them out later. I am still working out the rest of the processes for this experimental paint job.
Which brings me to Scott! Hello there Muchachos! A what if! I followed some of the 'What if ?'Campaigns, some of those threads are excellent concepts, I think I remember rightly about a Tiger on the Axis occupied Moon sector, and all the hypothetical debate over it's colouration and performance on a differing scenario. Great stuff, now theirs a film opportunity eh?

Hi there Frank! Really good to see you on the crew... At first I thought Lemmy had come calling for his Pint back , but that really is another story for another time. I really didn't know when I started this that it would be much interest to anybody, as the kit had a fairly mixed reception, and zimmerit had already been covered so much in the past. Well you always learn eh? I certainly have learned a hell of a lot of stuff along the way, especially about the perception of accepted knowledge and experience across the hobby and related specific interest fields. The amount of kindness, generosity, time and knowledge not to mention friendship that I have received in these last 7 months has been overwhelming . I am just happy that some of my eccentricities and obsessive nature can be of use to people. Thanks again for calling in... It was bitter that you drank in Dingwalls wasn't it?


Hello Charles! Thank you for the kind words of encouragement, it is a great kit that really can be improved to many higher levels, it's just up to you really and time and money eh?

Hey Chris! You certainly cleaned up with those two #6253's eh? $90! That equates to around £60... Better than buying any of the later Tiger 1 releases. I still keep looking at the Cyber Hobby 'Wittmann' but cannot think why I would part with £75 plus for it! When I could get 3 other DML Tigers for the same amount. How are the builds coming along?

Right I'll stop the waffling... And start the waffle plate pasting! Here are some images of the various patterns realised by using different tools.
Grant you asked about the Lion Roar 017 special set... Well here is the waffle pattern, this is very crisp and gives a good depiction... Though because of the nature of the real waffle pattern on Stug's I don't think the roller gives you the right imprint, it is difficult to roll and stop, lift and continue, whereas the doe 'stamp' head gives you a better representation.


Here is the broader option from the previous Lion Roar set that includes the tool handle.


Along with the finer option.


Now onto the slightly heavier impressions given by the AFV club tool.

The Broader turret depiction.


And their finer gear head representation.


Now onto Tamiya and their 'rake' style tools. Looking at the zimmerit pattern on the main body of the Tiger 1, I know believe that they were rolled mainly and not raked or spatula indented... I shall explain later.
The one thing that is positive about using this method, is that the comb/rake removes a lot of waste paste/putty, giving you pretty good scale thickness and depth.


And finally for this pasting session... 'Wunderroller' and son of 'Wunderroller' it just goes to show liberating household items and salvaging parts from hand picked children's toys is not a bad thing... But I must put their plasticine back before they find out!


Okay then cheerio for now, thanks once again for dropping by. Back tonight with some more of the build proper!

Phil.
chrsf68
Joined: May 26, 2007
KitMaker: 17 posts
Armorama: 16 posts
Posted: Wednesday, July 22, 2009 - 04:15 PM UTC
Well Phil,
I have almost completed the Dragon with Zimm Tiger.I have another one, I think #6406 in the beginning stages, AND 6253 I am putting in the interior of the turret,and have zimmed the sides. I am stuck on the interior of the turret as I need to know the location of the extra radio in the Befehls version for #007.Anyhow, a bunch started and none finished, plus the Kurzmaul Tiger, AFV Tiger, and another of 6253 not even started, and worst of all I am off to Myrtle Beach SC, on vacation for 9 days, with no models to work on!I guess this will be the last post by me until my return, unless I get desparate and find someones laptop to post with!I am taking" The modelers guide to the Tiger Tank "with me to help with modelling withdrawals. Take care and I am sure there will be much to catch up on when I return.Chris
barkmann424
Visit this Community
England - North West, United Kingdom
Joined: November 23, 2008
KitMaker: 357 posts
Armorama: 353 posts
Posted: Wednesday, July 22, 2009 - 07:13 PM UTC
Morning/Evening all!

Hi Chris! Vacation eh? Sounds like your off to a cool spot for a while eh? Myrtle Beach, Is that the place with all the sea lions? I have heard that a liberal coating to the body of Mr Surfacer, acts as an excellent shark repellent! I think were off to Halifax (West Yorkshire) and Skegness this year!!! One consolation though... Halifax Modellers World A great LHS a veritable cave of treasures.

Right a little update, whilst the camera sorts itself out. We are a bit further on with this Tiger Tango, than this update, but no photo's till the camera gets fettled today.
The Turret spare track hangers and clamps get a little attention today. The clamp and hanger were drilled out with a pin vise. Then on the clamp plier formed copper wire wasadded for the locking handle of the clamp/clasp.


I am still waiting for some Archer surface decals for these, if they get here sharpish then casting numbers will be applied and Mr Surfacer 1200 coated, to soften the raised detail slightly... If they don't get here soon then by weekend the turret gets it! A paint job that is.

On the bottom hanger part of the spare link attachment assembly, a 0.5 hole was drilled, then stretched sprue passed through until it 'locked', this was then glued with Tamiya extra thin cement, before cutting and filing to size.


If you were doing a more 'battle weary' Tiger that has links missing it would be better to replace the rod stub with some thicker gauge stock styrene rod, with a little chamfered edge on the top lip. But because this Tiger is only just off the forcourt, all links will be in place, so it is not so critical to represent the base plate holding pin as large. This would mean drilling out the links to a near tolerance state, and using resin links for this (sorry magic tracks and time just dont mix !!! How many guide horns? Plus a lot of washes on the tracks could spell disaster for a few of the guide horns.) I don't want to be breaking any due to over drilling.


With some links attached!


And a different view, you may notice that the vision ports have recieved a little more work, using Mr Surfacer 500 to blend them a bit more into the moulded zimmerit pattern.


So until later, Adios Amigos, back real soon... Phil
tomapaul
Visit this Community
Bucuresti, Romania
Joined: September 17, 2007
KitMaker: 425 posts
Armorama: 304 posts
Posted: Thursday, July 23, 2009 - 11:08 AM UTC
Thanks for the reply Phil!
I ended so confused with the late/final variants and mixtures that I had to focus on an entire battalion that had only one type of tiger.So I had to pick the 510 Heavy tank battalion.Don't know what particular tiger...I think 233, but it doesn't matter as they all looked alike to me(final tigers).

So to no longer poluate your topic I'll start mine.
muchachos
Visit this Community
Ontario, Canada
Joined: May 21, 2008
KitMaker: 537 posts
Armorama: 439 posts
Posted: Thursday, July 23, 2009 - 01:50 PM UTC

Quoted Text


Which brings me to Scott! Hello there Muchachos! A what if! I followed some of the 'What if ?'Campaigns, some of those threads are excellent concepts, I think I remember rightly about a Tiger on the Axis occupied Moon sector, and all the hypothetical debate over it's colouration and performance on a differing scenario. Great stuff, now theirs a film opportunity eh?


The moon Tiger was definitely an interesting, intelligent discussion. I was disappointed that noone ever posted the results.

This thread is great! You have made the reference for DIY - and DML - zimmerit.

SCOTT
barkmann424
Visit this Community
England - North West, United Kingdom
Joined: November 23, 2008
KitMaker: 357 posts
Armorama: 353 posts
Posted: Thursday, July 23, 2009 - 08:29 PM UTC
Good morrow to all! We actually have a dry bright start in'th north today If it holds out I should be able to get some more primers and such down.

Hi Scott! That's the thread, I will definately have a re-read of it, especially now Mig Productions are getting into the Sci-Fi AFV +45 stuff. It really does open up the hobby to a wider audience eh? In our local Games Workshop, you can't move during the weekend and scool holidays, and from what I can see, you have the nucleous of a very healthy enthousiastic Armour modelling future ahead. What RAL do you think that 'Darkside Lunar Grau' would be?

Okay, some images... These are the first layersof the zimmerits 'ochre' tone as described in the recipe! Funnily enough it looks a bit like 'Dunkelgelb'! It is a mix of 'Tamiya Flat Flesh XF15, Buff XF57, Desert Yellow XF59, in equal parts, with a hint of Red Brown XF64 to warm it slightly. This was then thinned to a 30 paint/70 thinner, and laid down with an AB. It does look a bit awkward at the minute, but their is a possibility that prior to final finnishing at Kassel, the Mid And Late pasted Tigers would have appeared very similar eh? Except for the white primer on some of the faces and black roadwheels.


Right just have to see if those Archer Surface Detail Decals AR88007 arrive, so the turret spare track clamps can get a little extra detail, before painting... As I getting an itchy trigger finger!

Thanks once again for joining me in this madness... Phil.
barkmann424
Visit this Community
England - North West, United Kingdom
Joined: November 23, 2008
KitMaker: 357 posts
Armorama: 353 posts
Posted: Saturday, July 25, 2009 - 09:55 PM UTC
Hello all!

Well the Archer Surface Detail set AR88007 arrived, and I had a little play with them!


These are 'resin' waterslide decals, intended for replicating casting marks and foundry numbers onto 1/35, 1/48, and 1/72 scale allied armour... I'm sure that the fine folk at Archer are beavering away on an imminent Panzer set of casting marks as we speak!


These were used by Ricardo de Merino on his excellent super detailing of AFV clubs Tiger (latest production) in the recently published Xtreme Modelling : Elements ...in combat! Tiger 1 & variants. A extremely handy publication for the Tiger modeller, and sits well with 'Pat Stansell's marvelous 'The Modellers Guide to the Tiger Tank' .
The kit part I will be using them for are the Turret Spare Track clamps upper portion. The casting numbers and foundry mark can be found on both parts of the hinged clasp. The numbers appear to follow a serial count over the production...

The Early/Mid Tiger in the Kubinka Armour museum has the casting serial of 2760-3 on the forwards portion of the clasp along with the foundry mark, and both again on the rear turret fixed potion of the clamp.


The Vimotiers Late Tiger has the cast serial of 2760-3 along with the factory mark on both parts of the clamp also.


Now the Saumur Late Tiger has a little production variation on it's turret spare track clamps, as it has a re-profile retaining lip to it with a portion removed around half way along.


Thanks to DennisTrowbridge for the image.

And it's foundry casting serial... 2760-1 with the foundry symbol only present on the foward part of the clamp. Not quite Agatha Christie! But very interesting, dont you think?


On a further note of interest, on Ron Volstad's great Artwork for the excellent DML Tiger 1 Late Production, 3-1 kit #6253 these 'profiled' track clamps are depicted on '212' as it terrorises the 'Tommies' along the N175. This guy surely has an eye for detail eh?

Right then progress report! The Archer decals were placed onto the track hanger clamps using part of a 1/72 legend from a HVSS suspension part, the D and 0 being removed. This left four numerals!... Thats all you can fit, so thats all that was represented, along with a ersatz foundry symbol using a very undistinct letter G turned on it's side. Please forgive the blurry images at the start of this part... As my point of focus seems to be way off the mark!


These were then set with Microscale Industries 'Micro Set', when this was thoroughly dry they were given a thinned coating of Mr Surfacer 1200.


Then a coat of 'Rot Oxid' to tie them in with the 'prior to factory top coat' theory and we have a fair representation of the clamps! What do you reckon? I think the detail adds to the look somewhat, and should go well in comparison to Tiger model designs Resin AM replacements.


Okay enough of the yapping, here are the shots!


Right then!I think we will prepare the Airbrush Heer Doktor!

Thanks for dropping by, back in a jiffy! Phil.
bizzychicken
Visit this Community
Wales, United Kingdom
Joined: September 06, 2008
KitMaker: 967 posts
Armorama: 842 posts
Posted: Sunday, July 26, 2009 - 05:49 AM UTC
Well that is attention to detail! top marks Phil
barkmann424
Visit this Community
England - North West, United Kingdom
Joined: November 23, 2008
KitMaker: 357 posts
Armorama: 353 posts
Posted: Wednesday, July 29, 2009 - 10:13 PM UTC
Hello everybody! Hello Geraint!

Well the Ark is finished (Ironic emoticon statement!) back to the modelling.

It's not really attention to detail Geraint... It's just that I can see them, so they have to be put there to appease my paranoia!

Well then, I have been messing with the placement of the pre-colours, prior to the base coat further, and trying out a few things with Jan Peters style white over dark pre-shading. This is the story so far...


It's looking interesting eh?

I also managed to get my hands on a box of Mini-Arts 'Breakdancing' Panzer Crew, the sculpting is rather good, but a little flash is present. All the same an excellent release, with a lot of possibilities for conversion of poses.


I'll try and put 'Da Posse' together for a pre-clamber later.

Sorry it's a brief update, just filling up sandbags for the next deluge!

Right gotta blast! See you real soon! Phil
vanhall
Visit this Community
Groningen, Netherlands
Joined: January 23, 2007
KitMaker: 406 posts
Armorama: 391 posts
Posted: Friday, July 31, 2009 - 09:44 AM UTC
Excellent stuff Phil..
A lot to catch up with Great detail on those spare link holders. One more method for the memory bank.
Thanks for the zim roller/rake examples. I've since received the LionRoar roller and the 'special' set. Seems it includes two types of zim rollers/heads, a waffel set and a set for 1/48th zim.
Just need some plasticine now..
Looking forward to see how all the pre-shade colouring turns out. Did you not fancy starting with an overall coating of 'Deutsch Stahl 1943' ?

I notice the 'break dance crew' includes two right arms for the CO.
Don't fancy all the camo uniform painting..

Great stuff, keep it coming between sandbagging..
sbs1701
Visit this Community
Uruguay
Joined: July 12, 2009
KitMaker: 13 posts
Armorama: 7 posts
Posted: Friday, July 31, 2009 - 03:59 PM UTC
WOW...!

Really good modeling...!

Congratulations Phil, you are good, really good...!

I am doing a Tiger I late also, your tips help me a lot and this modeling campaign of you help me even more.

Hope see more, thank you

Best regards
Sebastián
barkmann424
Visit this Community
England - North West, United Kingdom
Joined: November 23, 2008
KitMaker: 357 posts
Armorama: 353 posts
Posted: Friday, July 31, 2009 - 08:43 PM UTC
Another soggy morning folks! But at least I don't need to go outside to do any spraying today, it's all AB work from now!

Hello Grant , thanks for taking time away, to drop in. it means a lot my friend! 'Deutsch Stahl' eh ? I wonder if any paint producers make 'Krupp' shades of rolled and cast armour plate? Maybe kit manufacturers could mould the styrene in a steel tinted styrene for major armour parts? That could be fun! On to the MiniArt figure of the Officer, and his extra arm... I think I'll use the option without the flare pistol, as I don't think that the Allied Jabo's or roaming armour columns needed much help finding skulking Panzers eh? Villers Bocage could have been different, if Herr Wittmann or other commander had scrambled their crews with a flare! That camo should be fun... Take care Grant, all the best.

Hello Sebastian! Thank you ever so much for looking in, and your kind words of encouragement really help me take this thread further. All through this blog I have tried to learn and develop as many new little tricks and tips as possible. And have also been using a lot of products that I have not used previously. Believe it or not, I have never really used Tamiya Acrylics to any great extent in the past, so that's a new learning curve also. They are not as simple to use as the Gunze Sangyo paints I used for the first time also on '112'. AB pressure and thinning appear to be much more critical with the Tamiya. Next up on painting for the third Tiger, will be LifeColour, once again another paint range I have never had experience of, but maybe Grant can take us all through the stages of that paint system perhaps. He has really got them nailed.
So really Sebastian, it's all about moving forward from one model project to another one acquiring knowledge and gaining experience as you travel through the hobby, then finding what works for you.

Okay then onto the 'Dunkelgelb' base coat, this was finally applied onto all the previously 'sub modulated' primed hull and turret areas. For this used a mix of 2parts Dark Yellow XF60, 1 part Desert Yellow XF 59, I part Flat Flesh XF15 and 1 part Flat White, mixed 40/60 with Tamiya Acrylic Thinner X20A. Here is the result, as you can see the shade of this is a lot paler than the GS base coat of straight 'Dark Yellow' on '112' that gave me some much trouble in lightening it prior to the weathering. Perhaps being lighter this Tiger '121' should have a wider window to weather with. Okay the duct tape is going over the mouth! Here are the images!


And back out of the Tiger cave '112' for a bit of comparitive fun!


Right go to get back to the desk! As the Modelling Mafia have got my proverbials in a vice, if I don't complete the s.SS.Pz.-Abt.101/501 in time for the big push near Liege, then another member of my crew will arrive dismembered through the post... Is that not correct General Geraint?

See you all later people. and thanks again for checking up on the Tigers... Phil.
iwatajim
Visit this Community
United Kingdom
Joined: December 15, 2008
KitMaker: 246 posts
Armorama: 171 posts
Posted: Saturday, August 01, 2009 - 02:50 AM UTC
Hi there Phil,

Excellent work as usual. I really enjoy following your progress on this thread. I look forward to seeing the camo on this one. I know what you mean about starting with a too dark base colour from my own experience.

Keep up the good work mate.

Cheers, Jim.
barkmann424
Visit this Community
England - North West, United Kingdom
Joined: November 23, 2008
KitMaker: 357 posts
Armorama: 353 posts
Posted: Saturday, August 01, 2009 - 11:03 PM UTC
Good morning Tiger people!

Hello there Jim! 
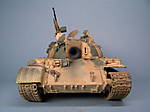
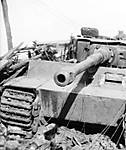
Thanks for stopping by, as you may have deciphered from my ramblings, this Tiger is to be depicted as '121' (though this Tiger is unidentified by the excellent 'Tiger im Focus' site. According to 'Agtes' text in 'Michael Wittmann & The Waffen SS Tiger Commanders of the Liebstandarte in WWII" three 1st Kompanie Tigers took part in the action within the town of VillersBocage, these being 111, 112, 121, and 131, within the confines of the town, images show 3 lateTigers burnt out and no mid of the 3./Zug with the tell tale rubber shod roadwheels and unsculpted flat hull front side end plates... So with '111' and ,112, accounted for this leaves '121'?) on the 1st Kompanies inventory being the mount of Ustuf Fritz Stamm. This particular Tiger of the 1./s.SS.Pz.-Abt.101 was knocked out by 6pdr anti-tank fire at the junction of La Rue Jeanne Bacon and La Rue Emile Samson, in the afternoons actions by the combined units of the Panzer Lehr and the 1st Kompanie of the Schwere SS Panzer Abteilung 101, that ensured containment of the British spearhead towards Caen along the N175. Here is the image, unfortunately Lt Bill Cotton put paid to any chance of mapping out the camouflage effectively as well as scorching of the turret numbering!


So a 'generic' pattern similar to the other 1st Kompanie lates will be configured!

A little more work on the basecoats tones and shades has taken place, along with basecoating the roadwheels. and some 'rusting' work on the exhaust muffler stacks.

The rust effect was applied using a mix of Gunze Sangyo H-344 'rust' and H-343 'soot' from their weathering set, and a light stippling of Mig Productions P230 Old Rust and a light dusting of Light Rust P024. Don't worry about the rear deck not playing ball, as I have not cemented the hull roof yet... In case of any torsion bar failings.


You can see from these shots the layered shade effect on the roadwheels, from the various colours used in primer coats.


A little more work on pale highlights on the turret roof, rear deck and other high points, and it's 'camo time'! Then those gorgeous 'Bison Decals'!

Back later, thanks for supporting this mayhem... Phil.
barkmann424
Visit this Community
England - North West, United Kingdom
Joined: November 23, 2008
KitMaker: 357 posts
Armorama: 353 posts
Posted: Tuesday, August 04, 2009 - 09:44 PM UTC
Good Day my fine fellows! How are we all today?

A little more work with the manipulating of the simulated light areas, and high points has now been achieved! To the eye in daylight, the effect is quite stark in some areas, but under the cameras gaze it is a lot more subtle. The 'Dunkel gelb mix was lightened with a touch more flat white, and adjusted to specific area with a touch of Tamiya's smoke.
Here is a standard lit shot of the Tiger, with it's finished 'subtle' modulation finished.

And here are a series of images with the lighting source moved through various aspects, in order to give some idea of the lightening effect to some of the planes and panels.


Modulation is in the eye of the beholder eh?
And a few of the rear aspect of the beast!


So it sort of works... So it's on with the Rotbraun! For this I used... Tamiya XF-64 Red Brown! Because there are no known images of '121' I have tried to keep it similar to '112's camo scheme, although a little bit more freely applied, with more variation in direction. Really it's a combination of all the 1st Kompanie's lates schemes that can be identified.


And one with a different lighting.

You can still see the 'modulation quite well in some areas, so not a bad little exercise in all.
Right then away to the cupboard for the 'Olivgrun'.

Catch you all up later... Phil.


chrsf68
Joined: May 26, 2007
KitMaker: 17 posts
Armorama: 16 posts
Posted: Wednesday, August 05, 2009 - 01:33 PM UTC
Hi Phil.
Back from vacation now.Enjoyable, but when my search for hobby shops in the Myrtle Beach, South Carolina area, turned up a no-go, I was ready to come home! My saving grace was plenty of armor/modelling material to read.I am finding my quest for info on Wittman's final Tiger, #007, quite interesting, if not a bit frustrating.I have nailed it down to a late model with larger muzzle break,heater port,small idlers,steel wheels and of course all the Befhels goodies.Do you agree with this assessment?I have seen it built as a mid Tiger on occaision, but I believe ,after alot of research,it to be a late Befhels , as stated.Hope all is well, the "Big Cat" is looking excellent.There is a great article in the new Fine Scale Modeler about color modulation techniques, which is quite informative.I think since I never seem to find the time to post pics here on this thread, maybe I will document the epic adventure of building and installing the interior on #007, in a new thread one day.I think that someone would enjoy yet another take on 007, especially with partial interior.All is looking great, talk to ya soon, Chris
barkmann424
Visit this Community
England - North West, United Kingdom
Joined: November 23, 2008
KitMaker: 357 posts
Armorama: 353 posts
Posted: Thursday, August 06, 2009 - 10:30 AM UTC
Good Evening!

Welcome back Chris! I hope you are all rested up an ready for your 'Tigerfest'? The general consensus for '007' is precisely the one you state. Not much to go on other than that famous photograph where the turret is 'popped'! Really looking forwards to seeing this kitty Chris!

Right a little update then! The 'Olivegrun' is on... And it looks a bit psychedelic, to say the least. But with a little tidying up with a bit of 'paled' 'Dunkelgelb' and it won't be as stark. AsI said in the previos post, I have attempted to depict a typicaly generic 1st Kompanies 1./Zug and 2./Zug. These appear to have a particulary heavier 'abstract' type of camoflage pattern, compared to the 2nd Kompanies 'wispier' stripes and 'clouds'. In the flesh the Tiger is not as dark as the images!
Okay then gentlemen! Here is the beastie with it's stripes on!


Right that's it for tonight then, back on the morrow with the tidied version, and those Bison decals! The green fill is definately different!!!


See you all real soon! Phil,
barkmann424
Visit this Community
England - North West, United Kingdom
Joined: November 23, 2008
KitMaker: 357 posts
Armorama: 353 posts
Posted: Friday, August 07, 2009 - 08:27 PM UTC
Good morning Tiger folk!

Well the decals are on... As I said previously, they are certainly striking. If you remember back to the green fill on '112's turret numerals, Bison have gone for a lighter brighter shade, than the controversial DML green.
At first I was not so sure, but a few hours away and a look at them on screen, they do have a certain feel about them, and good for comparison eh?
The Decals softened up really well with a liberal coating of Micro-Sol, even though the whole model received a good coating of satin-coat, I had to remove almost all of the decal carrier film and apply each numeral individually, as one attempt was quite badly silvered... Good job I have a few sets of Bison Decal 'Tigers of the s.SS-Panzer Abteilung 101' eh?
Here are the results of the decal application, let them speak for themselves!


Here they are compared, '121' against '112'.


Well whats your opinion chaps!

Right then I suppose it's time to seal these decals in and, get to filtering, dot or panel? Post shading or mapping? Choices, choices, but at lest we have more choices now to suit all individual tastes eh?

I might even start getting '213' into shape ready for painting as each of '121's stages dry!

See you all real soon... Cheers for stopping by. Phil.
spitfire303
Visit this Community
Vendee, France
Joined: December 22, 2006
KitMaker: 1,437 posts
Armorama: 1,406 posts
Posted: Friday, August 07, 2009 - 08:51 PM UTC
Hi Phil, it's looking really great. Family grow fast I like the lighter green. Yeah the carrier film is pain. I was very agreeably surprised why I applied my Echelon decals on the pz IV. The film was precut on the big tactical number!! User friendly decals Maybe they would have something for you?

keep up the good work

spit