_GOTOBOTTOM
Armor/AFV: Braille Scale
1/72 and 1/76 Scale Armor and AFVs.
Hosted by Darren Baker
M1A1 Abrams
Grillmaster
Visit this Community
Berlin, Germany
Joined: November 20, 2007
KitMaker: 41 posts
Armorama: 40 posts
Posted: Wednesday, March 11, 2009 - 10:02 PM UTC

Good morning, gentlemen!

Some might remember the T-72B with ERA, that I posted here on Armorama some time ago. Since the (near) completion of this kit, I had virtually no time for modelling. Only yesterday was I able to get to the workbench. Difficult choices had to be made. Was I to complete the T-72 - still some weathering and decaling to do - or was I to start something from the ever-growing stash?
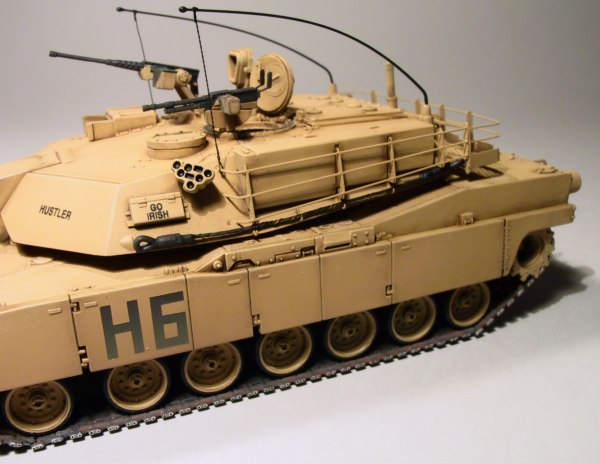
Browsing the net brought the sollution, for I found some cool pics of the M1A1 Abrams and decided to tackle the Revell offering that was gathering dust on the shelf. Since I discovered the fun of scratch-build details and additions, I will go all-out on this one and try to build a special version of this tank. I will however, at this stage, not reveal which version I am building. You will get the idea as I will progress.
I start with the Revell M1A2 offering, which is fairly nice but requires some surgery to make it into a recent tank (some missing details, wrong tracks etc...)
You can see the kit here:


I will also use Eduards set for the M1A2/M1A1 which is originally intended for the Dragon-kit, but will do nice here as well.

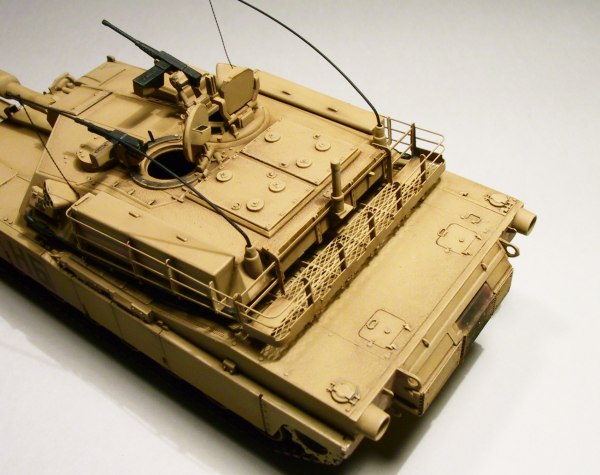
Basic construction of the hull and turret is done.


As you can see, I modified the gun mantlet, since some very obvious nuts and bolts were missing here. I also replaced the coax machinegun with aluminium tubing of the right size. I also drilled the barrel of the main gun open.
Some pics of the corrected mantlet:


Thats it for now. I will keep you updated!
A last one with the T-72 to give you a little size comparison:


Quite a beast!

Tell me what you think! I will be grateful for any tips and suggestions!

Cheers!
sabredog
Visit this Community
Western Australia, Australia
Joined: July 22, 2007
KitMaker: 607 posts
Armorama: 599 posts
Posted: Wednesday, March 11, 2009 - 11:29 PM UTC
Excellent work so far. I do like the way the T-55 turned out.
majjanelson
Visit this Community
South Carolina, United States
Joined: December 14, 2006
KitMaker: 1,355 posts
Armorama: 979 posts
Posted: Thursday, March 12, 2009 - 02:20 AM UTC
Well done so far!

I would reccomend you get the PART PE set #P72014 which provides a replacement bustle rack that the Eduard set doesn't.


http://www.part.pl/

Here is one of mine:


The brass items are from PART PE set, and the steel items are from Eduard's PE set. The silver is aluminum foil.

Hope this helps...
TankSGT
Visit this Community
New Jersey, United States
Joined: July 25, 2006
KitMaker: 1,139 posts
Armorama: 946 posts
Posted: Thursday, March 12, 2009 - 06:24 AM UTC
Jeff, why the aluminum foil on the turret storage boxes?

Tom
majjanelson
Visit this Community
South Carolina, United States
Joined: December 14, 2006
KitMaker: 1,355 posts
Armorama: 979 posts
Posted: Thursday, March 12, 2009 - 07:39 AM UTC
Tom,

I am using a resin cargo storage bin to replace the LH one on the turret, and to replicate the open top, I formed one from aluminum foil. The formed lid is not in the photo, its in my little parts box.

I made one for the RH bin so they would look consistent. I still have to add the piano hinges and rivets line on the lid top, along with the latch handles.

I've actually "junked" the DML kit shown in the photo since I got fed up with the armor skirts being molded to the top hull, modified parts for a motorized toy, etc. I am replacing it with an Italeri M1 that I'm converting to M1A1 standard. I originally bought the Italeri kit for parts, but it's scale matches a Revell M1A2 kit. I'm planning a dio with two M1A1s in OIF, so the two models need to match in size, details, etc.
Grillmaster
Visit this Community
Berlin, Germany
Joined: November 20, 2007
KitMaker: 41 posts
Armorama: 40 posts
Posted: Sunday, March 29, 2009 - 03:36 AM UTC
Hello Gents!

First of all, thanks for the nice comments. That M1 with the Part PE-set looks nice! I wont use the Part set, though, partly because I try to limit the amount of money I invest in these little kits

Progress has been slow, but I managed to get some scratchbuilding done today. I guess the question, which version I am actually building, will be answered today, as I completed some add-on belly armour:


here is the front:


as you can see, I had to fill a nasty trench on the frontal armour plate. God knows why Revell chose to put it there, but I have not seen a single picture with the trench on real life Abrams!

I also did some work on the modified side-skirts that this version needs:


Last but not least, an important ingredient for the final side-skirts. This is a (not quite finished) master. I will have to cast 36 of these little pieces. Hopefully it works out the way I hope it will.


Sooooooo....

Any takers on which version this is going to be???

Come on, I know you know by now

Cheers!
Tankrider
Visit this Community
Oklahoma, United States
Joined: October 07, 2002
KitMaker: 1,280 posts
Armorama: 1,208 posts
Posted: Sunday, March 29, 2009 - 05:18 AM UTC
Jeff,
The "trench" is a poorly placed weld line that should be within inches of the top of the hull. As for what the heck you are up to, I would venture that you have a couple of TUSK equipped M1A1s in your plans. 3ID or 1AD vehicles??? Nice work on the skirts and belly armor. Post some pics of the ARAT soon.

John
majjanelson
Visit this Community
South Carolina, United States
Joined: December 14, 2006
KitMaker: 1,355 posts
Armorama: 979 posts
Posted: Monday, March 30, 2009 - 04:57 AM UTC

Quoted Text

Jeff,
The "trench" is a poorly placed weld line ...

John


John, I think you meant this for "Just Me!, aka Grillmaster". He is the originator of this post and also provided the update that your comment refers to. I don't undertand how Revell can make such an otherwise excellent kit and throw in a bonehead thing like their "weld seam" on the bow.
majjanelson
Visit this Community
South Carolina, United States
Joined: December 14, 2006
KitMaker: 1,355 posts
Armorama: 979 posts
Posted: Monday, March 30, 2009 - 05:53 AM UTC

Quoted Text


I noticed you removed the front lower hull tow points. Don't forget to put them back on, since they remain and are not covered after the belly armor installation (image from PrimePortal)...


Looking good so far!
Grillmaster
Visit this Community
Berlin, Germany
Joined: November 20, 2007
KitMaker: 41 posts
Armorama: 40 posts
Posted: Monday, July 13, 2009 - 10:31 AM UTC
Hello Gentlemen!

This thread has not been updated for a long time. There are some things that have to be taken care of. But I guess, most of the people around here face a similar situation: so many kits, so little time...

Anyway, enough banter - I managed to get some work done over time, although this build is still progressing quite slowly ;(

I have since purchased the Trumpeter M1A1 with the Mineroller. The Trumpeter offering is not bad, in some areas even superior to the Revell kit. I decided to rip off the already fixed commanders cupola from the Revell kit and to replace it with the Trumpeter one. This one looks much better and has a superior M2 mount to boot!

I also scratched the CSAMM and the armour around the loaders hatch using sheet styrene and an M2 taken from the Revell kit. Some details (for example the Xenon-light on the CSAMM) have still to be added. I am quite happy about the way this turned out.

Next came the ARAT tiles. Initially, I thought about making them individually (32 per side !!!), but was unable to get the resin to work properly (Aaaaargl, bubbles, bubbles bubbles...). My guess is that the resin is too old. Anyway, my initial attempt failed miserably and the next ones were not better. Another problem were the little bolts that are on every tile. I finally gave up on those, since they can barely be seen on photos that are taken from a distance (resembling 1/72 scale). I finally solved the problem by building sheet styrene to the appropriate thickness. I then engrfaved the tiles. The result is quite nice, although the tiles are not 100% symmetrical. But I guess I will have to live with that.

Oh, I also fixed Revells tracks by adding the square rubber pads.

Enough talk, here are the pics:


Next on the list is the loaders shield and the M240, as well as small details of the ARAT mounting-system.

Stay tuned!!
Violetrock
Visit this Community
European Union
Joined: March 09, 2003
KitMaker: 831 posts
Armorama: 791 posts
Posted: Tuesday, July 14, 2009 - 05:57 AM UTC
Well done!

One thing to note: The belly armour only covers the crew compartment area, not the engine.

Thomas
warlock109
Visit this Community
Utah, United States
Joined: February 05, 2004
KitMaker: 163 posts
Armorama: 160 posts
Posted: Tuesday, July 14, 2009 - 06:28 AM UTC

Quoted Text

Well done!

One thing to note: The belly armour only covers the crew compartment area, not the engine.

Thomas


Are you sure? I was under the impression the belly armor went the full length of the hull.

Jerry
majjanelson
Visit this Community
South Carolina, United States
Joined: December 14, 2006
KitMaker: 1,355 posts
Armorama: 979 posts
Posted: Tuesday, July 14, 2009 - 07:37 AM UTC

Quoted Text


Quoted Text

Well done!
One thing to note: The belly armour only covers the crew compartment area, not the engine.
Thomas


Are you sure? I was under the impression the belly armor went the full length of the hull.
Jerry


Picture taken from the rear of the hull (from Prime Portal) the add-on belly armor stops just aft of the 4th or 5th road wheels:
warlock109
Visit this Community
Utah, United States
Joined: February 05, 2004
KitMaker: 163 posts
Armorama: 160 posts
Posted: Tuesday, July 14, 2009 - 07:48 AM UTC
I stand corrected.

Thanks, Jerry
Grillmaster
Visit this Community
Berlin, Germany
Joined: November 20, 2007
KitMaker: 41 posts
Armorama: 40 posts
Posted: Wednesday, August 26, 2009 - 08:05 AM UTC
Hello all!

I thought it would be a good idea to post some additional pics, although build progress has been small since the last update.

First of all, let me thank all the peopl that have commented on my build. Thank you guys! Feedback is always appreciated

That issue with the belly armour is nagging me a bit. I used the 1/35 TUSK set as a reference (or rather the pictures of said set...). A good lesson never to trust anything else than first-hand reference. However, I think I wonŽt change that now, since noone will be able to see underneath the Abrams anyway.

But back to the build...

I have since added some detail of the ARAT-mounting system and scratched the infantry-phone box at the rear of the tank. I also added some of the PE.
The biggest issue so far has been the loaders shield, with its bullet-proof windows. That took some time and is not perfect. Perhaps I will redo the whole thing again, but for the moment have lost any motivation to do so. I hope that it will look the part once painted.

I also thought about adding the Trumpeter M1 mineroller. This thingy looks quite good OOB, but is missing some very prominent features (how could Trumpeter miss those?).
If I decide to go with the mine-roller, I will have to scratch thoses as well.

What do you think - add minerollers or go vanilla M1A1 TUSK?

Another question is some kind of antenna next to the optics-box in front of the commanders cupola (I read somewhere that this is the blue force tracker antenna, but who knows...). Is this fitted to mineroller equipped tanks as well?


(picture via primeportal)

Here are mine:


Thanks for watching!
tread_geek
Visit this Community
Ontario, Canada
Joined: March 23, 2008
KitMaker: 2,847 posts
Armorama: 2,667 posts
Posted: Wednesday, August 26, 2009 - 08:25 AM UTC
Coming along. Your build seems to be taking as long as most of mine. At this point my opinion is to leave the tank a vanilla TUSK. Save the mine rollers for your next M1 build.

Cheers,
tread_geek
majjanelson
Visit this Community
South Carolina, United States
Joined: December 14, 2006
KitMaker: 1,355 posts
Armorama: 979 posts
Posted: Thursday, August 27, 2009 - 01:47 PM UTC

Quoted Text

Another question is some kind of antenna next to the optics-box in front of the commanders cupola (I read somewhere that this is the blue force tracker antenna, but who knows...). Is this fitted to mineroller equipped tanks as well?!


From what I've read and researched, this in the Blue Force Tracker Antenna, but I also think it has a GPS antenna, too (possibly the round black plastic shape with a wire).

All of the photos I've seen only seem to show the BFTs on M1A1s. I haven't seen any on M1A2/M1A2 SEPs, which I think already have the BFT as part of their Force XXI Battle Command for Brigade and Below (FBCB2) suite,or is to be added as part of the SEP V2 upgrade.

Behind the Commander's Independent Thermal Viewer (CITV) is square black plastic blob on top of the CITV protective Cover Bracket that is a GPS antenna.

[EDIT} There is also a rectangular plate on rear of the turret roof behind the blast panels that I've seen noted as a GPS antenna, but I think it applies to M1A1s, as shown in the second picture.


Besides Prime Portal for the images, I got some of the info from Global Security's page and The Armor Site's page on the M! Abrams.

But I could have all of this wrong, since I am not a Tanker, just an en-gin-ear! Maybe Gino or Frenchy can clarify this...

By the way, your Braille Abrams is looking GREAT!
Grillmaster
Visit this Community
Berlin, Germany
Joined: November 20, 2007
KitMaker: 41 posts
Armorama: 40 posts
Posted: Sunday, January 31, 2010 - 05:28 AM UTC
It is time to revive this build-log!

This baby has been sitting on the bench for too long. Unfortunately, my builds tend to take forever, since I only have limited time to begin with, and then there are all those other tempting projects. To cut it short, the TUSK had to wait because I started a Trumpeter LAV-25 and updated it to current standards (not finished yet, more on that later, perhaps IŽll start a dedicated thread.)


There has been no mayor breakthrough with the M1A1, just small additions.
Firts of all, I scratchbuild an armourplate at the back that should protrude slightly, but was recessed with the Revell kit (as well as with the Trumpeter one). Also missing were two access panels which I added in the process.


At the front, I added lighting wires over the fenders and the previously shved off towing brackets on the belly. I also did finish the ARAT assemblies at the sides and started on the vision blocks of the driver.


At the turret, I added the cross-wind sensor of the Trumpeter-kit (much better than the Revell one!!) And scratched the termal sight of the .50 cal. I also added a thermal sight to the M240 of the loader. It is rather basic, but it is a really TINY thingy in 1/72!!


The carpetmonster ate one smoke grenade launcher, so I scratched one with a cover made from putty. I also added a cable which is obviously routinely slung around the mount of the smoke grenade lkaunchers on operational Abrams.

I also scratched a kind litter, which is often seen on pictures of recent Abrams. It is simplified (because of scale!), but I am quite happy with it, so it might just stay on the tank.


I am also thinking about putting a tanker in the loaders hatch and for that purpose painted one tanker from a CSMC set. These figs are a bit on the large side, but fantastically detailed!! Unfortunately, the equipment is a bit wrong (no/wrong body armour), but since only the head will be visible, this should do the trick. Tell me what you think about my approch to the ACU pattern!


Thats it for now.

Stay tuned for news as this build progresses (albeit sloooooowly!!)

Cheers,

Stefan.
Panther64
#261
Visit this Community
North Carolina, United States
Joined: September 12, 2005
KitMaker: 395 posts
Armorama: 365 posts
Posted: Sunday, January 31, 2010 - 01:58 PM UTC
Wow Stefan! I'm, really digging your TUSK Abrams! What a great project in braille scale. You give me courage to do two other projects I've been wanting to do: A STRV 122 and a Leopard 2A6 PSO. Maybe someday soon. Keep up the great work,looking forward to seeing it done.
majjanelson
Visit this Community
South Carolina, United States
Joined: December 14, 2006
KitMaker: 1,355 posts
Armorama: 979 posts
Posted: Sunday, January 31, 2010 - 03:53 PM UTC
It's been awhile, but great update! Your TUSK is coming along, and I agree with you about how some of the detail parts you have added are extreamly tiny!

If the tank Crewman will only have his head outside the hatch (I assume the Loader's Hatch) it should look fine. Although your "ACU" doesn't show much of the digital pattern, it does appear to have the overall sage green hue. Or you could paint the uniform an OD color, since it appears to be similiar to the tanker's "jumpsuit" uniform..(image from Prime Portal)

And this...
PanzerEd
Visit this Community
Northern Ireland, United Kingdom
Joined: January 14, 2006
KitMaker: 432 posts
Armorama: 402 posts
Posted: Sunday, January 31, 2010 - 11:28 PM UTC

Quoted Text


Quoted Text


I noticed you removed the front lower hull tow points. Don't forget to put them back on, since they remain and are not covered after the belly armor installation (image from PrimePortal)...


Hi Jeff,

What are those black and grey "things" with the blue and red hoses under the front of the tank? I've seen them a couple of times but don't know what they are.

Nice looking tank so far mate.

Des

Looking good so far!

majjanelson
Visit this Community
South Carolina, United States
Joined: December 14, 2006
KitMaker: 1,355 posts
Armorama: 979 posts
Posted: Monday, February 01, 2010 - 02:14 AM UTC

Quoted Text

What are those black and grey "things" with the blue and red hoses under the front of the tank? I've seen them a couple of times but don't know what they are.


Des,

They appear to be pneumatic lifts or jacks for raising the belly armor up for bolting in place. At least that's my guess. They could be hydraulic, but they would still perform the same function.
Tonyfr
Visit this Community
Ohio, United States
Joined: June 12, 2009
KitMaker: 516 posts
Armorama: 391 posts
Posted: Monday, February 01, 2010 - 04:34 AM UTC
Des,

Excellent job so far. I have enjoyed following the build. I am amazed at the level of detail given it is a 1:72.

Tony
Grillmaster
Visit this Community
Berlin, Germany
Joined: November 20, 2007
KitMaker: 41 posts
Armorama: 40 posts
Posted: Monday, February 01, 2010 - 09:12 PM UTC
Thank you all for the interest and the comments!

My attempt at painting the ACU-pattern is much more visible in real life - my photographing skills just suck. But it is fairly subdued. Looking at pictures of the real thing, I noticed that when seen from a distance ACU blurrs into a blue-gray colour. Hard to replicate this in 1/35, let alone 1/72.
But I have a few sets of CaesarŽs modern US and Elite US soldiers lying around, so I guess I will have plenty of opportunities to practice painting this pattern. By the way, is anyone interested in a review of the CSMC modern US-tanker set I use?

Cheers,

Stefan.
arkhunter
Visit this Community
Illinois, United States
Joined: June 11, 2006
KitMaker: 116 posts
Armorama: 95 posts
Posted: Tuesday, March 02, 2010 - 07:08 AM UTC
Stefan,

Any progress? I think I might be able to help with the ACU if you still need help...

This and this are two examples of how I do the ACU in 1/72... I use Green Grey (101), Stone Grey (104), Deck Tan (110) from vallejo for the darkest, medium, and lightest colors.

Take care,
Austin
 _GOTOTOP