Challenger 2 operation telic.
England - West Midlands, United Kingdom
Joined: June 23, 2008
KitMaker: 2,329 posts
Armorama: 2,110 posts
Posted: Sunday, March 29, 2009 - 03:53 AM UTC
Hi Niel, great work on the antislip panles and the wiring!.
I've just orderd one of these bad boys


Art isn't just pritty pictures. It's an expression of human rage.
New Brunswick, Canada
Joined: October 18, 2002
KitMaker: 2,247 posts
Armorama: 1,138 posts
Posted: Sunday, March 29, 2009 - 04:25 AM UTC
Hey there Rick,
I carry a line of masking tape from Line O Tape, comes in 1/8", 1/16", 1/32", and 1/64". $3 a roll, 240" on a roll. If you need some, I can throw them in an envelope and mail them up to you, so shipping is a pittance.
Shoot me an e-mail and let me know if you need them.
Thanks!
Scott Millican
Elm City Hobbies
1779 Route 640
Hanwell, NB E3C 2B3
Phone: 506-454-8273
Web site: www.elmcityhobbies.com
e-mail:
[email protected]
Hours of operation:
Tue, Wed, Thu, & Sat: 10 to 6
Fri: 10 to 9
United States
Joined: June 23, 2008
KitMaker: 1,024 posts
Armorama: 753 posts
Posted: Sunday, March 29, 2009 - 06:57 AM UTC
the anti slip coating is un believable it looks great

England - South East, United Kingdom
Joined: July 30, 2007
KitMaker: 658 posts
Armorama: 599 posts
Posted: Sunday, March 29, 2009 - 08:29 AM UTC
Hi james
Great to here that you have bought a challenger when you make a start send me a pm and i'll send you some of the anti-slip so you can have a go yourself.........
Hi scott
You'll probably get more orders if you take out an advertisement with kitmaker network.
Thank's for your input calvin.
I personally feel that the anti-slip has come out a bit course but if you like it thats good enough for me
neil.....
-============================================================-
"THE MAN THAT MAKES NO MISTAKES USUALLY MAKES VERY LITTLE ELSE"
-============================================================-
England - West Midlands, United Kingdom
Joined: June 23, 2008
KitMaker: 2,329 posts
Armorama: 2,110 posts
Posted: Sunday, March 29, 2009 - 08:43 AM UTC
Hi niel i was thinking about that and how to tackle it lol.
Thanks thats rather kind of you!.
btw i started to paint my Scimitar today

Art isn't just pritty pictures. It's an expression of human rage.
Noord-Brabant, Netherlands
Joined: March 24, 2008
KitMaker: 1,247 posts
Armorama: 913 posts
Posted: Monday, March 30, 2009 - 06:35 AM UTC
Great work Neil! It sure does look very realistic.
lars
England - South East, United Kingdom
Joined: July 30, 2007
KitMaker: 658 posts
Armorama: 599 posts
Posted: Monday, March 30, 2009 - 09:07 AM UTC
hi lars
i looked at your bradley it looks very nice you should show the pictures here on the english side of armorama.......
heres a picture of some of the stowage that i mentiond at the beggining of the blog.the four pieces were made from tamiya epoxy puty rolled out to a very thin thickness and attached using my 1.00mm masking tape.

neil..........
-============================================================-
"THE MAN THAT MAKES NO MISTAKES USUALLY MAKES VERY LITTLE ELSE"
-============================================================-
England - West Midlands, United Kingdom
Joined: June 23, 2008
KitMaker: 2,329 posts
Armorama: 2,110 posts
Posted: Monday, March 30, 2009 - 09:26 AM UTC
Hi Niel its looking superb where did you get the tape from?.
The stoage looks nice, your scratch building is pritty neat!.
Art isn't just pritty pictures. It's an expression of human rage.
Ontario, Canada
Joined: September 28, 2006
KitMaker: 2,672 posts
Armorama: 2,475 posts
Posted: Monday, March 30, 2009 - 11:39 AM UTC
Really nice job on the details, the wiring and stowage is really well done.
I also ordered some of that tape from the UK, thanks again.
cheers
One of the serious problems in planning against Canadian doctrine is that the Canadians do not read their manuals, nor do they feel any obligations to follow their doctrine.
---From a Russian document
------------------------------------------------
Virginia, United States
Joined: July 17, 2006
KitMaker: 1,558 posts
Armorama: 1,159 posts
Posted: Monday, March 30, 2009 - 12:49 PM UTC
Your Chally is looking very nice. I particularly like the wiring for the headlights. Look forward to seeing more updates.

Noord-Brabant, Netherlands
Joined: March 24, 2008
KitMaker: 1,247 posts
Armorama: 913 posts
Posted: Tuesday, March 31, 2009 - 07:21 AM UTC
Thanks. But that Bradley isn't finished yet.
Your chally definitely looks better with those tarps on the back.
Lars
P.S. I'd already posted at at the English section.
England - South East, United Kingdom
Joined: July 30, 2007
KitMaker: 658 posts
Armorama: 599 posts
Posted: Tuesday, March 31, 2009 - 07:41 AM UTC
OOPS !!!!
Sorry lars i must have missed it......

-============================================================-
"THE MAN THAT MAKES NO MISTAKES USUALLY MAKES VERY LITTLE ELSE"
-============================================================-
England - South East, United Kingdom
Joined: July 30, 2007
KitMaker: 658 posts
Armorama: 599 posts
Posted: Wednesday, April 01, 2009 - 08:13 AM UTC
I have done a little work with the rear stowage boxes and added the voyeger clamps and the tiny padlocks.The thermal exhaust covers are on and i just have a few more peices to add to the hull and the bottom half of the challenger will be complete.I hope to get a coat of primer on the hull over the weekend and try to blitz the turret but i am still waiting on the lionmarc barrel.....


I have also thinned the edge of the exhaust with a 10A scalpel.

neil.....
come on england :-)--
-============================================================-
"THE MAN THAT MAKES NO MISTAKES USUALLY MAKES VERY LITTLE ELSE"
-============================================================-
England - West Midlands, United Kingdom
Joined: June 23, 2008
KitMaker: 2,329 posts
Armorama: 2,110 posts
Posted: Wednesday, April 01, 2009 - 08:31 AM UTC
Niel Nice work on the stowage bins. Where did you order the barrel from?
Its looking really nice
Art isn't just pritty pictures. It's an expression of human rage.
England - South East, United Kingdom
Joined: July 30, 2007
KitMaker: 658 posts
Armorama: 599 posts
Posted: Wednesday, April 01, 2009 - 08:58 AM UTC
Ebay - china, james
I don't mind if the lionmarc barrel doesn't arrive in time as the kit supplied styrene one is good enough.
neil.............
-============================================================-
"THE MAN THAT MAKES NO MISTAKES USUALLY MAKES VERY LITTLE ELSE"
-============================================================-
Quebec, Canada
Joined: November 15, 2002
KitMaker: 3,960 posts
Armorama: 3,579 posts
Posted: Wednesday, April 01, 2009 - 05:17 PM UTC
Hi Neil ...Great job so far ...you're really taking out all the stoppers on this one ...One thing you might want to do is add the bolts the the hinges on the engine deck ..ither than that you haven't missed a thing ..Keep up the good work Sir.
Rick
Auckland, New Zealand
Joined: October 25, 2005
KitMaker: 949 posts
Armorama: 139 posts
Posted: Wednesday, April 01, 2009 - 05:43 PM UTC
Hi Neil
Great job so far.
Do you think the process you used for the nonslip material would work in 1/72nd?
Cheers
Chris
"A Geek is someone who has found something more interesting than sex."
Neil Degrasse Tyson
England - North East, United Kingdom
Joined: July 19, 2008
KitMaker: 317 posts
Armorama: 286 posts
Posted: Wednesday, April 01, 2009 - 08:54 PM UTC
Great progress so far, i've got a challenger two to build yet but it is not the tamiya kit, its the trumpeter kit, cant wait to see yours painted and weathered.
On the workbench:
Dragon: Flammpanzerwagen
Tamiya: Challenger 1
Revell: Shelby Cobra
Academy: TBM-3 "USS Bunker Hill"
England - South East, United Kingdom
Joined: July 30, 2007
KitMaker: 658 posts
Armorama: 599 posts
Posted: Thursday, April 02, 2009 - 08:59 AM UTC
Hi richard
I might just add the bolt heads but then again i might not, it all seems to depend on how hard the days work has been and how much modelling time i can get in the evening

Hi chris
Quoted Text
Do you think the process you used for the nonslip material would work in 1/72nd?
Thats a very good question but i doubt it would work.It seems that any finer than 120 grit then the media starts to turn to a powder and would clump together on the varnish.
I hope that helps you.
Hello phil
You could always upgrade your trump kit with some extras from accurate armour.
neil.............
-============================================================-
"THE MAN THAT MAKES NO MISTAKES USUALLY MAKES VERY LITTLE ELSE"
-============================================================-
England - South East, United Kingdom
Joined: July 30, 2007
KitMaker: 658 posts
Armorama: 599 posts
Posted: Thursday, April 02, 2009 - 10:38 AM UTC
I have just finished adding the anti-slip to the top of the turret.This time i used a lot less varnish and less of the alluminium oxide.Once i have sprinkled on the ant-slip i take the masks of straight away.....

neil..........
-============================================================-
"THE MAN THAT MAKES NO MISTAKES USUALLY MAKES VERY LITTLE ELSE"
-============================================================-
England - West Midlands, United Kingdom
Joined: June 23, 2008
KitMaker: 2,329 posts
Armorama: 2,110 posts
Posted: Thursday, April 02, 2009 - 11:18 AM UTC
Art isn't just pritty pictures. It's an expression of human rage.
England - South East, United Kingdom
Joined: July 30, 2007
KitMaker: 658 posts
Armorama: 599 posts
Posted: Friday, April 03, 2009 - 04:43 AM UTC
-============================================================-
"THE MAN THAT MAKES NO MISTAKES USUALLY MAKES VERY LITTLE ELSE"
-============================================================-
England - South East, United Kingdom
Joined: September 20, 2007
KitMaker: 240 posts
Armorama: 233 posts
Posted: Friday, April 03, 2009 - 04:49 AM UTC
This is looking really good
Looking forward to more!
Cheers,
Ian
Newbury Scale Model Club -- http://www.newburyscalemodelclub.org.uk/
NewMod 2013 -- http://www.newmod.co.uk/
Singapore / 新加坡
Joined: January 19, 2008
KitMaker: 517 posts
Armorama: 382 posts
Posted: Friday, April 03, 2009 - 06:38 AM UTC
Coming to think of it... I didn't realise the Challenger 2s had anti-slip on them...
Still looking great Neil...
Lead, follow, or get out of the way.
United Kingdom
Joined: December 15, 2008
KitMaker: 246 posts
Armorama: 171 posts
Posted: Friday, April 03, 2009 - 08:32 AM UTC
Hi Neil,
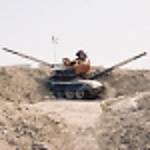
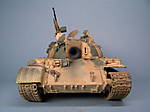
Looking good. Here are a few pictures you might find useful for weathering stages.
Cheers, Jim.


Good luck.