

I am really happy to see how to tackle the hub.
They are really convincing
i hope to see more of your work soon and the painting stage will be really interesting
Cheers
Seb
Constructive Feedback
For in-progress or completed build photos. Give and get contructive feedback!
For in-progress or completed build photos. Give and get contructive feedback!
Hosted by Darren Baker, Dave O'Meara
M1A2 Abrams wreck...my first modern tank

seb43

Joined: August 30, 2005
KitMaker: 2,315 posts
Armorama: 2,158 posts

Posted: Sunday, April 19, 2009 - 07:17 AM UTC

scratchmod

Joined: November 07, 2008
KitMaker: 796 posts
Armorama: 763 posts

Posted: Sunday, April 19, 2009 - 08:28 AM UTC
Hi, it's me again. I've started the painting,Turret only. I wanted to start with the barrel to get a feel of using the salt and HS technique. OK here we go with a sneak peak of how it's progressing.


A primer coat using Wal Mart gray primer.


Next came my usual dark under coat I use on all my wrecks.

I applied a heavy coat of HS followed by some salt.

I then applied some green and brown, just to see what will happen.

The desert sand color was sprayed next.


Here is how it turned out. I still have to work on this new (to me) technique. in the future I'll let the paint dry a bit longer because it came too easy. Also the HS I used isn't the greatest so I'll buy a different one along with a larger grain type of salt. I'll continue with the barrel with some mapping(?), brush and sponge painting.
The turret willl be the fun part to paint. Any tips or suggestions are most welcome.
Rob
A primer coat using Wal Mart gray primer.
Next came my usual dark under coat I use on all my wrecks.
I applied a heavy coat of HS followed by some salt.
I then applied some green and brown, just to see what will happen.
The desert sand color was sprayed next.
Here is how it turned out. I still have to work on this new (to me) technique. in the future I'll let the paint dry a bit longer because it came too easy. Also the HS I used isn't the greatest so I'll buy a different one along with a larger grain type of salt. I'll continue with the barrel with some mapping(?), brush and sponge painting.
The turret willl be the fun part to paint. Any tips or suggestions are most welcome.
Rob

martyncrowther

Joined: September 12, 2007
KitMaker: 1,548 posts
Armorama: 1,407 posts

Posted: Sunday, April 19, 2009 - 08:51 AM UTC
Hi mate nice work, How do you get the salt off?

eugeniusgenx

Joined: March 04, 2009
KitMaker: 81 posts
Armorama: 74 posts

Posted: Sunday, April 19, 2009 - 11:04 AM UTC
Yeah I want to hear how he got the salt off. I have been putting it on top, then using hot water to take it off.
Belt_Fed
Joined: February 02, 2008
KitMaker: 1,388 posts
Armorama: 1,325 posts

Posted: Sunday, April 19, 2009 - 11:26 AM UTC
How common would it be to have an Abrams knocked out due to enemy fire?
martyncrowther
Joined: September 12, 2007
KitMaker: 1,548 posts
Armorama: 1,407 posts
Posted: Sunday, April 19, 2009 - 11:35 AM UTC
I am pretty sure no Abrams have been lost due to enemy fire.
scratchmod
Joined: November 07, 2008
KitMaker: 796 posts
Armorama: 763 posts
Posted: Sunday, April 19, 2009 - 12:41 PM UTC
As far as a tank being lost to enemy fire, most were lost due to on board fires that got out of control.
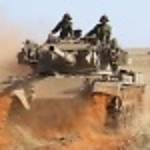
Just a little up date, I started work on the front of the turret and am getting the hang of this slowly. The salt gets washed off with water after the paint has been applied.


Here is a pic that I used as a ref.

That's about as far as I've gotten, new pics to follow soon.
Rob
Just a little up date, I started work on the front of the turret and am getting the hang of this slowly. The salt gets washed off with water after the paint has been applied.
Here is a pic that I used as a ref.
That's about as far as I've gotten, new pics to follow soon.
Rob

newfish
Joined: June 23, 2008
KitMaker: 2,329 posts
Armorama: 2,110 posts

Posted: Sunday, April 19, 2009 - 12:58 PM UTC
superb work Rob great start to the painting !


majjanelson
Joined: December 14, 2006
KitMaker: 1,355 posts
Armorama: 979 posts
Posted: Sunday, April 19, 2009 - 03:07 PM UTC
Quoted Text
Here is a pic that I used as a ref.
Isn't it amazing that the above Abrams was damaged by a catastrophic fire which melted/burned the pads off of the treads and melted the aluminum road wheels, but the cardboard MRE cases on the bustle rack are undamaged!?!?!
Rob - Excellent work so far! Keep going...

cyclones6
Joined: June 30, 2008
KitMaker: 1,199 posts
Armorama: 821 posts

Posted: Sunday, April 19, 2009 - 04:12 PM UTC
Awesome replication of the damage..it looks awesome and the weathering is going good...cant wait to see this thing done
There would be nothing left of that stowage if the fire would have reached it...they got lucky

Evan
There would be nothing left of that stowage if the fire would have reached it...they got lucky
Evan
martyncrowther
Joined: September 12, 2007
KitMaker: 1,548 posts
Armorama: 1,407 posts
Posted: Sunday, April 19, 2009 - 11:55 PM UTC
Great work Mate, thanks for explaining..

FlaminPole
Joined: March 13, 2007
KitMaker: 102 posts
Armorama: 98 posts

Posted: Monday, April 20, 2009 - 10:56 AM UTC
Quoted Text
Awesome replication of the damage..it looks awesome and the weathering is going good...cant wait to see this thing done
There would be nothing left of that stowage if the fire would have reached it...they got lucky
Evan
What we don't see, is the cheese tortellini MRE meals in those boxes, no self-respecting vehicle fire could ever bring itself to destroy such a masterpiece of pre-packaged food!

On to the build, I'm really enjoying seeing your work with the salt on this vehicle, its making me want to retry that method!
scratchmod
Joined: November 07, 2008
KitMaker: 796 posts
Armorama: 763 posts
Posted: Wednesday, April 22, 2009 - 02:20 AM UTC
Hi guys , just a quick update.
I did notice in quite a few pics that the storage in the bustle rack has not burned even though the tanks were burnt out.There are also plenty of pics were the storage is completely burnt or melted, that's the look i'm going to depict.
Cheese Tortellini???? Sounds a lot better then what we had in the 80's.
Ok, here are a few pics of the turret and where I'm at at the moment.


There is a bit of color on the turret but it's not showing up in the pics!! I'll try to finish the turret of this evening and start on the hull. I'm trying to stay on this model, I'm very tempted to start one of the T55's.
Rob
I did notice in quite a few pics that the storage in the bustle rack has not burned even though the tanks were burnt out.There are also plenty of pics were the storage is completely burnt or melted, that's the look i'm going to depict.
Cheese Tortellini???? Sounds a lot better then what we had in the 80's.
Ok, here are a few pics of the turret and where I'm at at the moment.
There is a bit of color on the turret but it's not showing up in the pics!! I'll try to finish the turret of this evening and start on the hull. I'm trying to stay on this model, I'm very tempted to start one of the T55's.
Rob
dropshot

Joined: October 23, 2006
KitMaker: 300 posts
Armorama: 214 posts

Posted: Wednesday, April 22, 2009 - 02:49 AM UTC
 Now that looks so effective I can almost smell burning!!! thanx again.
 newfish
Joined: June 23, 2008
KitMaker: 2,329 posts
Armorama: 2,110 posts
Posted: Wednesday, April 22, 2009 - 03:22 AM UTC
Outstanding work Rob!
the gilmer of pint showing through makes it look something special!
the gilmer of pint showing through makes it look something special!
martyncrowther
Joined: September 12, 2007
KitMaker: 1,548 posts
Armorama: 1,407 posts
Posted: Wednesday, April 22, 2009 - 03:28 AM UTC
Great stuff Rob!

Abydos
Joined: August 11, 2005
KitMaker: 231 posts
Armorama: 225 posts
Posted: Wednesday, April 22, 2009 - 04:00 AM UTC
looks great, keep up the great work, i like the idea your used on the barrel with the salt, clever. i have a question , in those reference pics, i think it was 332 with the tank so badly burned up, how come the tarps and personal equipment never got touched in the back rack? i mean with all the he, ap rounds inside?
oh well but your project looks great like a said above cant wait to see more
oh well but your project looks great like a said above cant wait to see more
stufer

Joined: May 25, 2003
KitMaker: 416 posts
Armorama: 342 posts

Posted: Wednesday, April 22, 2009 - 04:04 AM UTC
though I'm looking for pics of the relatively intact M1 series this build has really caught my eye,fantastic work Rob and looking forward to its completion

scratchmod
Joined: November 07, 2008
KitMaker: 796 posts
Armorama: 763 posts
Posted: Wednesday, April 22, 2009 - 07:58 AM UTC
Thanks guys, glad to hear you like how it looks.
I'm not to happy with the look of the turret so I skipped on to the skirts to practice a little more. The following pics show the steps I took in painting the skirts. I'm trying to get the look of the skirts on "322" but not exactly the same. Since my tank is to be a complete burn out I want it to be more burnt.
Here is 322

The base coat was applied first.

I then applied HS and while still wet I sprinkled some salt onto the skirt.

Ithen sprayed the white areas.

Using tap water I removed the salt.

I then masked the white area with masking fluid.


After the desert tan was sprayed on, the masking fluid was then removed.


I then painted the remaining skirts a dark gray/black with some white in areas. A light over spray with black finished them off. I still have to do the weathering to them, then they should be done. I'll keep practicing and trying new things for different results. I should have the technique down some what by the time I start my T55's.
Rob
I'm not to happy with the look of the turret so I skipped on to the skirts to practice a little more. The following pics show the steps I took in painting the skirts. I'm trying to get the look of the skirts on "322" but not exactly the same. Since my tank is to be a complete burn out I want it to be more burnt.
Here is 322
The base coat was applied first.
I then applied HS and while still wet I sprinkled some salt onto the skirt.
Ithen sprayed the white areas.
Using tap water I removed the salt.
I then masked the white area with masking fluid.
After the desert tan was sprayed on, the masking fluid was then removed.
I then painted the remaining skirts a dark gray/black with some white in areas. A light over spray with black finished them off. I still have to do the weathering to them, then they should be done. I'll keep practicing and trying new things for different results. I should have the technique down some what by the time I start my T55's.
Rob
marsiascout

Joined: March 24, 2008
KitMaker: 1,247 posts
Armorama: 913 posts

Posted: Wednesday, April 22, 2009 - 08:10 AM UTC
WOW!
This may become even more realistic then Per's one!
Lars
This may become even more realistic then Per's one!
Lars
SIRNEIL

Joined: July 30, 2007
KitMaker: 658 posts
Armorama: 599 posts

Posted: Wednesday, April 22, 2009 - 08:36 AM UTC
Hi rob
This looks really good, i'm looking forward to more pictures.
neil..........
This looks really good, i'm looking forward to more pictures.
neil..........
martyncrowther
Joined: September 12, 2007
KitMaker: 1,548 posts
Armorama: 1,407 posts
Posted: Wednesday, April 22, 2009 - 09:01 AM UTC
Amazing work Rob, thanks for sharing the technique!
DAR

Joined: April 27, 2002
KitMaker: 250 posts
Armorama: 188 posts

Posted: Wednesday, April 22, 2009 - 09:22 AM UTC
Great progress Rob, the turret's looking very good.
scratchmod
Joined: November 07, 2008
KitMaker: 796 posts
Armorama: 763 posts
Posted: Wednesday, April 22, 2009 - 09:50 AM UTC
David, Martyn and Neil thanks for the kind words and I'm glad your enjoying this build.
Lars thanks, I chose not to go with the NATO camo under the desert color, instead I wanted a tank that was factory painted after an overhaul. Also I didn't want mine compared to Pers, his is definitely a masterpiece. I enjoy building and painting and trying new things, so for me this is fun and I'm glad you guys are coming along for a wreck ride.
Ok..I had a lot of fun with the skirts so I went ahead and started the hull, I'll get back to the turret later.The pics are pretty much the same as the skirts as far as the painting.


The last two pics show the dirty hull, the dark areas are oil paints, and this is what it looks like right now. I'm letting the oils sit a bit so I figured I would post the progress while I'm waiting.
Time to go wash those oils off and spray some black on the rear area of the tank.
Sorry for all the pics, I thought maybe they could help some one who wants to try this out.
Rob
Lars thanks, I chose not to go with the NATO camo under the desert color, instead I wanted a tank that was factory painted after an overhaul. Also I didn't want mine compared to Pers, his is definitely a masterpiece. I enjoy building and painting and trying new things, so for me this is fun and I'm glad you guys are coming along for a wreck ride.
Ok..I had a lot of fun with the skirts so I went ahead and started the hull, I'll get back to the turret later.The pics are pretty much the same as the skirts as far as the painting.
The last two pics show the dirty hull, the dark areas are oil paints, and this is what it looks like right now. I'm letting the oils sit a bit so I figured I would post the progress while I'm waiting.
Time to go wash those oils off and spray some black on the rear area of the tank.
Sorry for all the pics, I thought maybe they could help some one who wants to try this out.
Rob

SteveReid
Joined: September 07, 2007
KitMaker: 212 posts
Armorama: 159 posts

Posted: Wednesday, April 22, 2009 - 10:14 AM UTC
Rob-
You work fast! It is looking phenomenal ---the only thing more impressive is your modesty.
For those of you following this- I had the good fortune to watch Rob using some of his techniques. What amazed me was that Rob has developed the ability to control the adhesion of his paint.
I think that is a big factor and something I am going to have learn.
Brilliant Rob!!!
Oh- and I wanted to point out one interesting thing about your pic of '222'. Looks as though the fuel for the fire was the flammable parts of the right side suspension. Roadwheel rubber, track pads etc. Anyway- the interesting part is the way the smoke and soot rising from the forward end of the fender produced a soot streak on the underside of the turret overhang. IMHO the stuff in the turret bustle probably would have burned- the fire must have been extinguished. Looks to me like some of the items did begin to burn.
Steve
 |

WEB HOSTING BY


Copyright ©2021 Armorama and Kitmaker Network, a subsidiary of Silver Star Enterprises
All Rights Reserved. Please read our Conditions of Use and Privacy Policy.
All Rights Reserved. Please read our Conditions of Use and Privacy Policy.