_GOTOBOTTOM
Constructive Feedback
For in-progress or completed build photos. Give and get contructive feedback!
DML 6289 Panzer I Ausf. A Spanish Civil War
Damraska
Visit this Community
California, United States
Joined: October 06, 2006
KitMaker: 580 posts
Armorama: 499 posts
Posted: Thursday, April 23, 2009 - 03:35 PM UTC
When DML released their first Panzer I Ausf. A, the second "Smart Kit", in initially received quite a bit of praise. The model builds quickly and easily and includes very nice clear parts for all the view ports and main headlight. The "Magic Tracks" require no cleanup, a huge savings of time, and feature better detail than previous Panzer I vehicle tracks from DML. The kit also includes a nice set of photo-etched guards for the mufflers. Coming in at $20US, it represents a great value for the money.

Those taking a more critical look quickly discovered accuracy problems and the praise turned to scorn. Soon, quite a few people were writing off the kit as a useless waste of plastic or, at best, a source for cheap Panzer I tracks. What went so terribly wrong?

The Panzer I Ausf. A, like many tanks, was produced in a series of production runs with each run incorporating changes and improvements. Since the Panzer I formed the core of the very first Panzer Divisions, during a time when serious armored warfare doctrine evolved at a rapid pace, the changes came quickly and in great number.

The first run of Panzer I Ausf. A tanks (Series 1) rolled off assembly lines at the beginning of 1934 without a superstructure. Training units needed vehicles immediately, even though the armored shell remained under development. The second run (Series 2) included the armored shell but operational use revealed certain critical flaws. The third run (Series 3) addressed many of these issues with some upgrades applied to earlier models. The fourth run (Series 4) incorporated yet more improvements. Finally, the whole design was deemed too small and an enlarged version (Series 5 and 6) produced as Panzer I Ausf. B. These began reaching units in late 1936.

DML advertised their Panzer I Ausf. A as an "early" version. The inclusion of the armored superstructure and lack of an interior precludes construction as a Series 1 vehicle.

Series 2 vehicles included these features (kit depiction):
1) For the first 300 vehicles, an extra vision port on the right rear superstructure (correct) *
2) Lacked reinforcing tabs on the 2nd, 3rd, and 4th roadwheels (incorrect)
3) Used a less robust spring for the first roadwheel (incorrect)
4) MG13s with longer barrels (incorrect)**
5) Did not carry a wire cutter on the right front fender**
6) Used the long cylindrical tail light (not sure; cannot remember if the kit includes this part)***
7) Early style horn (correct) ****
8) No superstructure reinforcing strips (correct) *****
9) Two right superstructure vision ports lack vision slit (incorrect)
10) Vision ports do not show three bolts (incorrect)
11) No tab on brake hatch (correct)
12) Narrow brake hatch (correct)
13) Two fuel ports on engine deck (correct)

Two other errors haunt the kit. First, the idler wheels exceed the proper scale diameter by about 1mm. Second, the second and third return roller mounts sit too high on the hull sides by about 1/2mm and 1mm respectively. A beginning modeler can fix many of these issues, but the idler, spring, return roller, and road wheel problems require some effort to correct.

* The remaining Series 2 vehicles match the description above but lack the right rear vision port--another strike against the model.
** Introduced approximately January of 1936.
*** The later style brake light was retrofitted to some Series 2 vehicles.
**** The late style horn appears in late 1935. Panzer Tracts 1-1 implies this occurred during Series 2 production.
***** Superstructure reinforcing strips were introduced during Series 2 production.

Series 3 vehicles included these features (kit depiction):
1) No vision port on the right rear superstructure (incorrect)
2) Reinforcing tabs on all roadwheels (correct)
3) Used a less robust spring for the first roadwheel (incorrect)
4) MG13s with shorter barrels (correct)
5) Wire cutter on the right front fender (correct)
6) Brake light (correct)
7) Early style horn (correct)
8) Superstructure reinforcing strips (incorrect)
9) Right superstructure vision port lacks vision slit (incorrect)
10) Vision ports do not show three bolts (incorrect)
11) Tab on brake hatch (incorrect)
12) Narrow brake hatch (correct) *
13) Two fuel ports on engine deck (correct)

The kit once again misses the mark for a Series 3 vehicle, with the spring, return roller, and idler wheel issues requiring the most work to correct.

* The wide brake hatch was introduced near the end of Series 3 production.

Series 4 vehicles included these features (kit depiction):
1) No vision port on the right rear superstructure (incorrect)
2) Reinforcing tabs on all roadwheels (correct)
3) Robust spring for the first roadwheel (correct)
4) MG13s with shorter barrels (correct)
5) Wire cutter on the right front fender (correct)
6) Brake light (correct)
7) Late style horn (incorrect)
8) Superstructure reinforcing strips (incorrect)
9) Right superstructure vision port lacks vision slit (incorrect)
10) Vision ports show three bolts (correct; some may have the earlier feature)
11) Tab on brake hatch (incorrect)
12) Wide brake hatch (incorrect)
13) Four fuel ports on engine deck (incorrect)

For a third time the kit misses the mark for a Series 4 vehicle, with the brake hatch, engine deck, return roller, and idler wheel issues requiring the most work to correct.

Now, having clarified things a bit up to 1936, the real confusion sets in. Many changes, such as the armor reinforcing strips, reinforced road wheels, late style horn, wire cutter, brake light, and short MG13s were retrofitted to early production tanks! The vision ports also seem to change post production. Past 1936, even more upgrades appear--4 slit convoy lights *, Notek lights *, armored guards over the engine intake and outflow vents*, a smoke candle rack***, late tracks ****, exhaust hose wraps *****, and desert modifications. The kit does not include parts for such late upgrades.

* Introduced in 1939
** Introduced approximately July, 1937.
*** Introduced in 1937.
**** The tracks for this vehicle apparently went through a number of pre-production changes, though the chronology remains unclear to me. Production tracks included small openings in the guide horns. Post production tracks featured solid guide horns.
***** Panzer Tracts 1-1 makes no mention of this feature, but they appear regularly in photos.

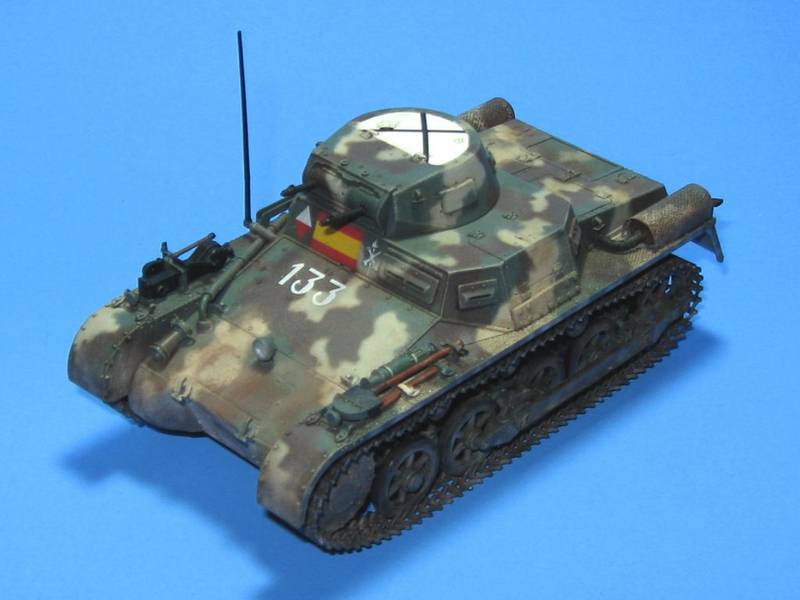
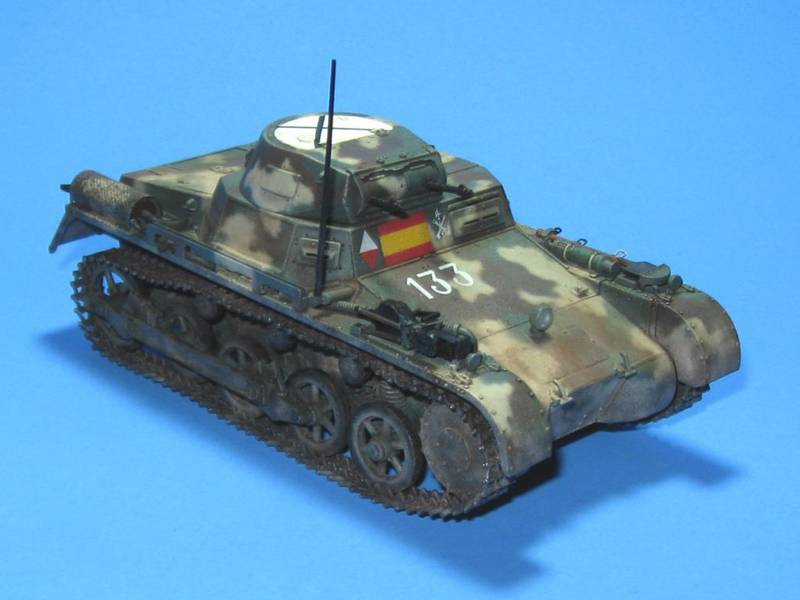
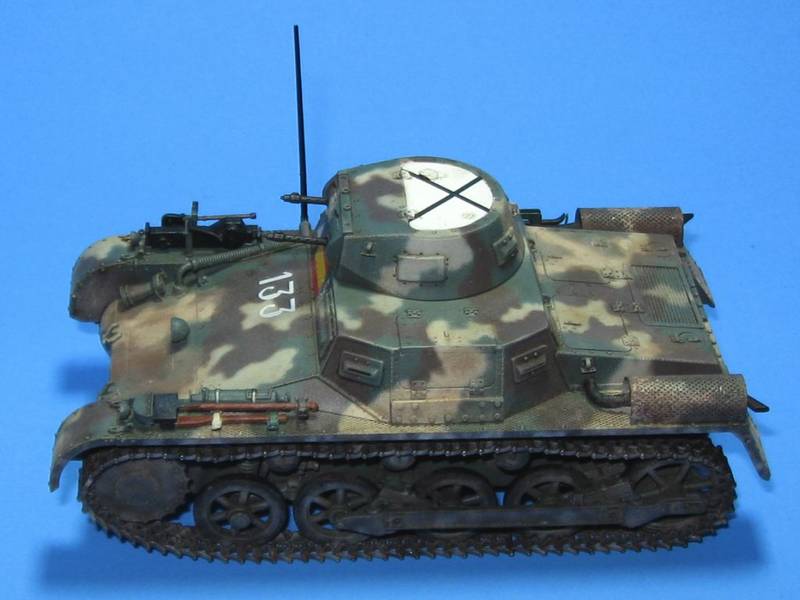
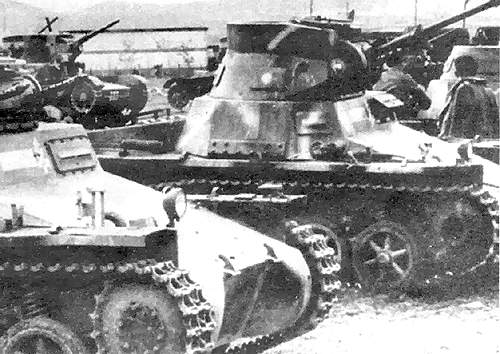
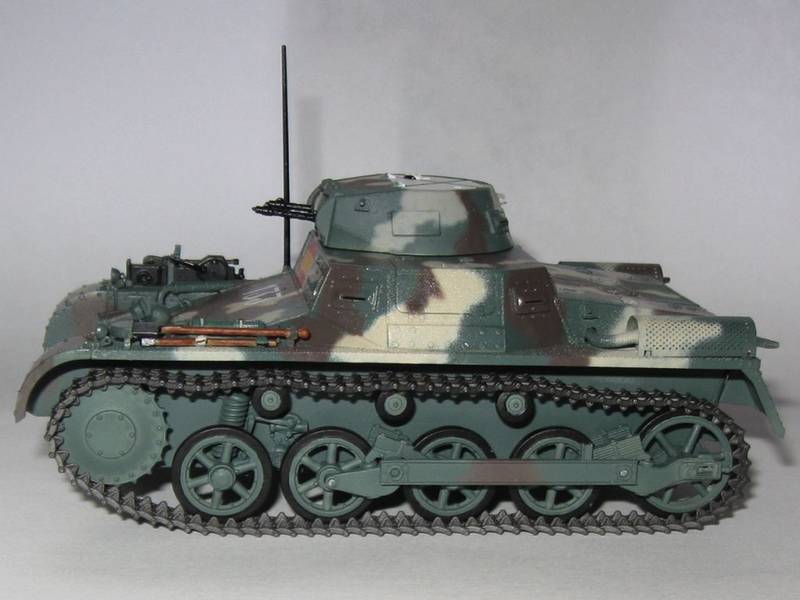
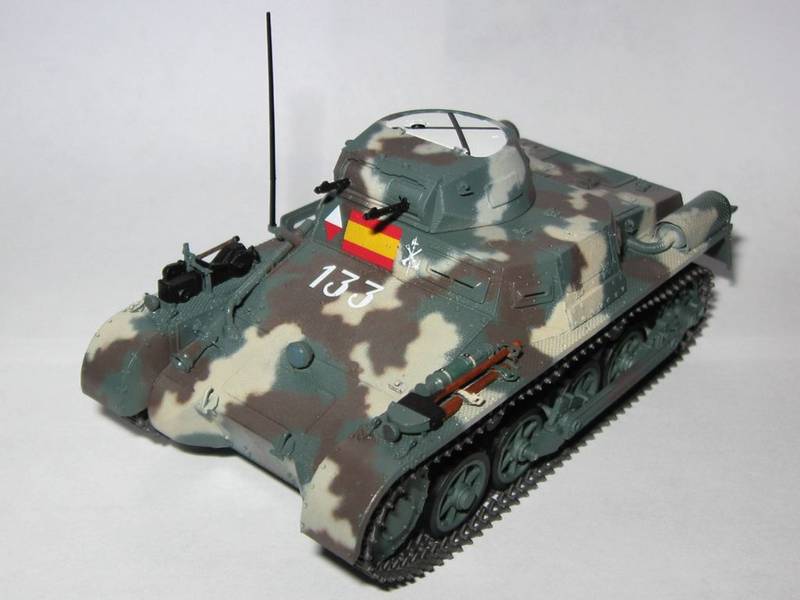
After much consideration I decided to build a 3 Series vehicle as used during the Spanish Civil War. This required correcting the idler wheel, plugging the right rear vision port, adding the reinforcing armor strips to the superstructure sides, and correcting the return roller positions. I forgot to add the tab to the break hatch, decided to leave the front springs along, and learned about the vision port issues too late. No model is perfect.


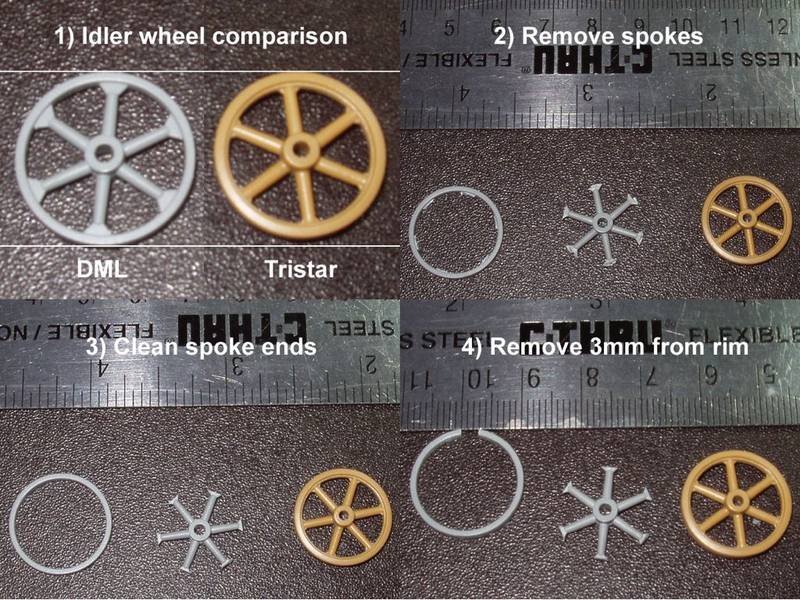
Work began by correcting those pesky idler wheels. Some Tristar and Master Box Panzer IA kits include extras, so check there first. Carefully remove the spoked section of the wheel (Picture 2). Clean up the inner rim of the tire and square off the spoke arms (Picture 3). Remove about 3mm of plastic from the rim of the idler, cutting at a radius (Picture 4).


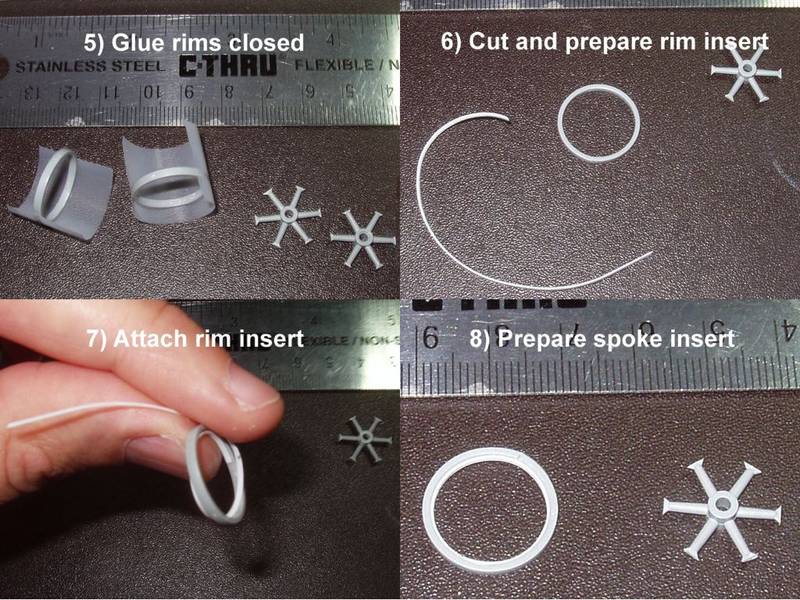
Glue the idler rims together (Picture 5). They should now have the correct diameter. Cut a strip of very thin plastic card about 1mm wide. Use something round and impart a curve to the strip (Picture 6). Glue this to the inner face of the rim, right down the middle, all the way around (Picture 7). Put the starting point of the strip opposite the cut in the rim. Make sure the rim retains a round profile. It may want to deform. Test fit the spoked portion into the smaller idler. Cut away plastic at the end of each spoke EQUALLY until the spoked portion fits snugly inside the rim (Picture 8 ). Glue the spokes in place, along the centerline, with one spoke end at each seam. Optionally, cut off the triangular pieces remaining at the base of each spoke and replace them with larger triangular pieces made from card stock. (I did not perform this step.) Now take the idler wheel inserts and cut away about 1mm. Restore it to a round shape and insert it into the idler. Keep cutting away material from the insert until in fits snugly. Glue it in place with the seam aligned to the seam in the rim. Repeat on the other side. The inserts will butt against the strip inserted down the center of the idler and the spokes. Putty and sand the seam in the idler wheel. During construction, place this seam to the rear of the vehicle under the guide horns of a track link.


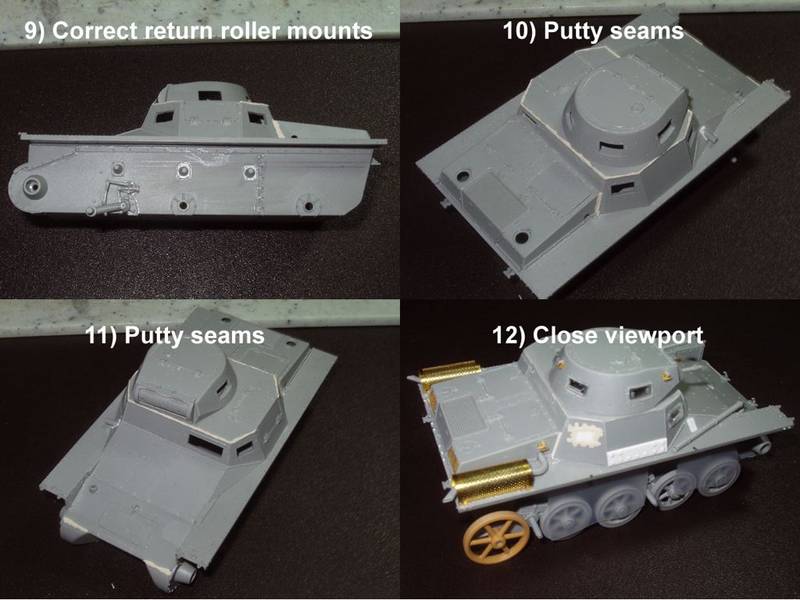
To correct the second and third return roller mounts, draw lines on the hull parallel to the top, bottom, and sides of each mount (Picture 9). Carefully cut off and save the conical portion of each mount. Feel free to cut into the mounting plate but do not cut into the hull. Sand these areas smooth. Cut four 5mm by 7mm pieces of thin plastic card. Round the corners with a file. Square the backs of the conical roller mounts. Draw a straight line on the hull about 1mm below the original top line. Restore the lines previously drawn along the side of each mount. The middle mounting plate goes between the vertical lines, about 1/2mm down from the top line. The last plate goes between the vertical lines, about 1mm below the top line, even with the new line. Place small bolts at the corners of each mounting plate using your method of choice. Glue the conical portion of each mount back in place, at the very center of each plate.

I also added 6 bolts to each side of the hull, where a bulkhead divides the fighting compartment from the engine compartment. Use the corresponding line of bolts on the bottom of the hull as a guide.

Some of the seams around the superstructure require minor putty work (Picture 10). The seam connecting the forward superstructure to the rear superstructure looked a bit too wide so I used some putty there as well. These two assemblies unbolt independently so leave a panel line, not a weld. The spot where the upper hull meets the front plate also requires some putty (Picture 11). The right rear vision port requires a plug (Picture 12).


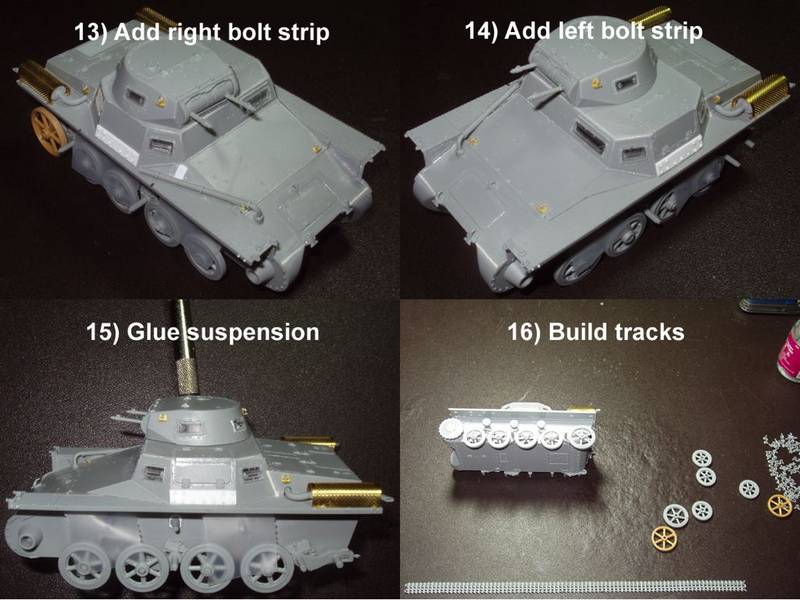
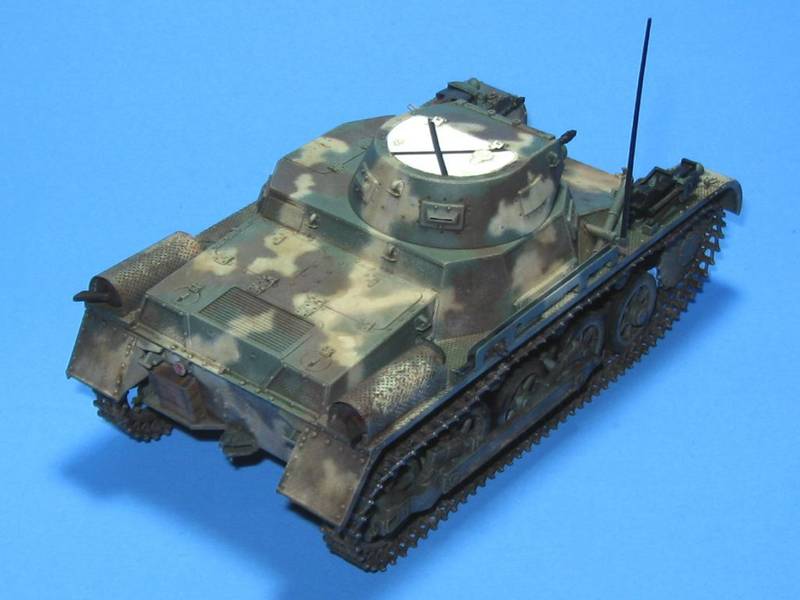
Using plastic card I fashioned the right (Picture 13) and left (Picture 14) armor strips, measuring approximately 4mm by 18mm. Bevel the upper and lower edges at approximately 45 degrees. The DML Panzerbefhelswagen 3 in 1 kit potentially includes extra armor strip parts. Use hex stock of a smaller diameter than shown. (I used what I had.)

I highly recommend gluing the antenna mount in place before installing the brake compartment exhaust vent. If installed in the other order, the vent may interfere with the mount. I was forced to rebuild mine. Place a bolt at each corner of the antenna mounting plate.

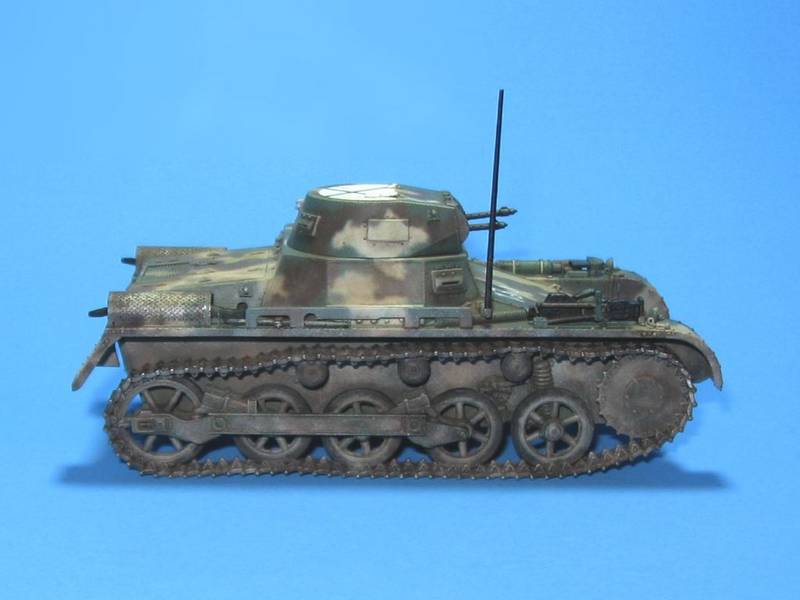
To ensure a vehicle with square and flat suspension, I temporarily attached the roadwheels to the bogie arms, glued the bogie arms in place, then let the tank sit flat until everything dried (Picture 15). When finished with this step I removed the roadwheels.

The kit provided Magic Tracks fit very well and require minimal cleanup (Picture 16). I built each track run into a single piece using Testors Liquid Cement. After about 15 minutes, I mounted the track run with the opening in the track positioned at the front of the drive sprocket. Pieces of paper towel inserted between the track and fenders insure the proper sag. After about 24 hours I removed the tracks and wheels for painting.

If such things bother you, make sure to putty the numerous holes in the undersides of the fenders. I also replaced some of the bolts on the sides of the fenders with rod stock. The rest of the vehicle builds up quickly and easily.


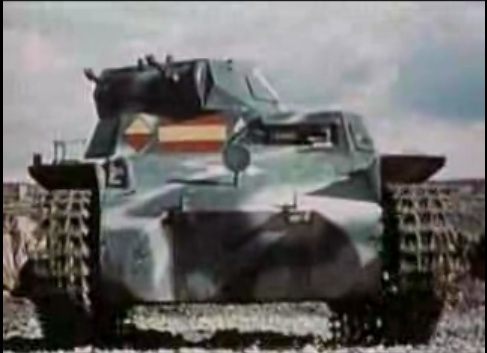
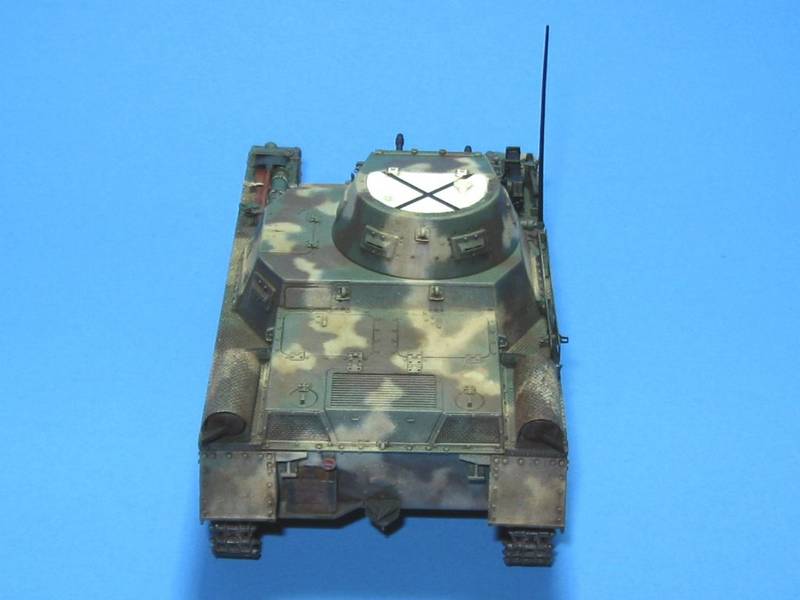
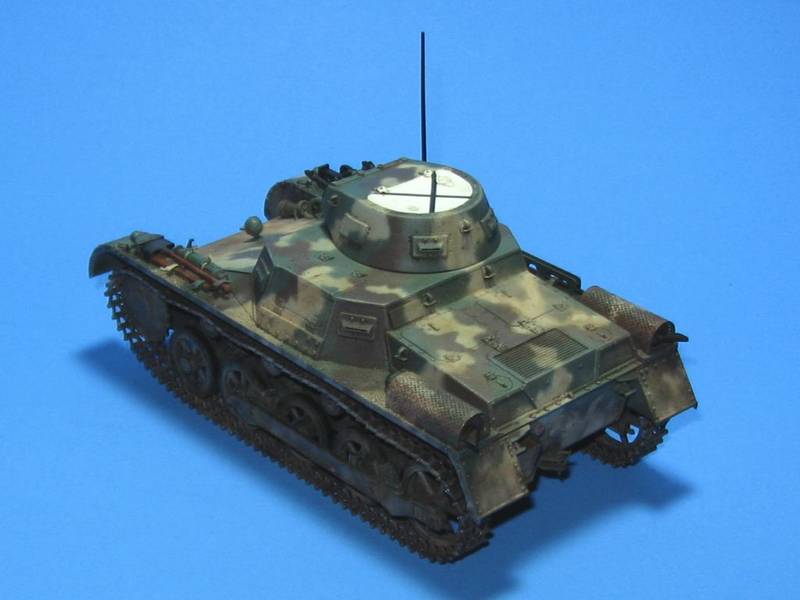
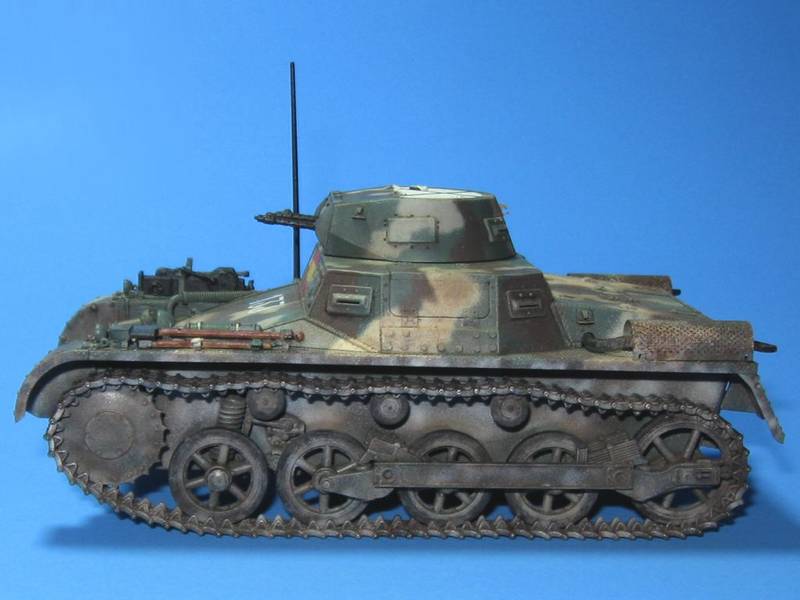
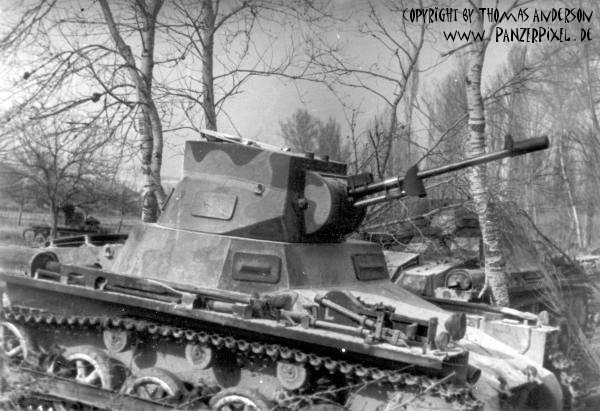
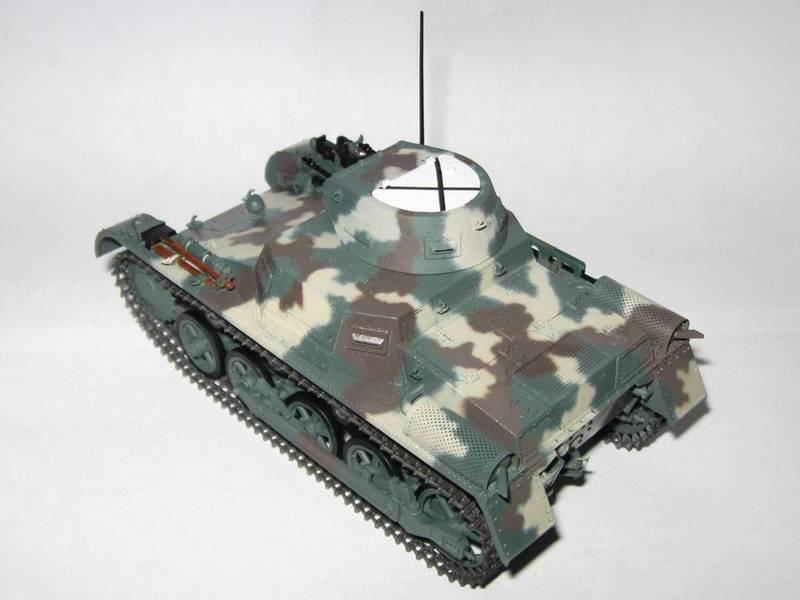
I painted the tank using Model Master enamels based on this photo.


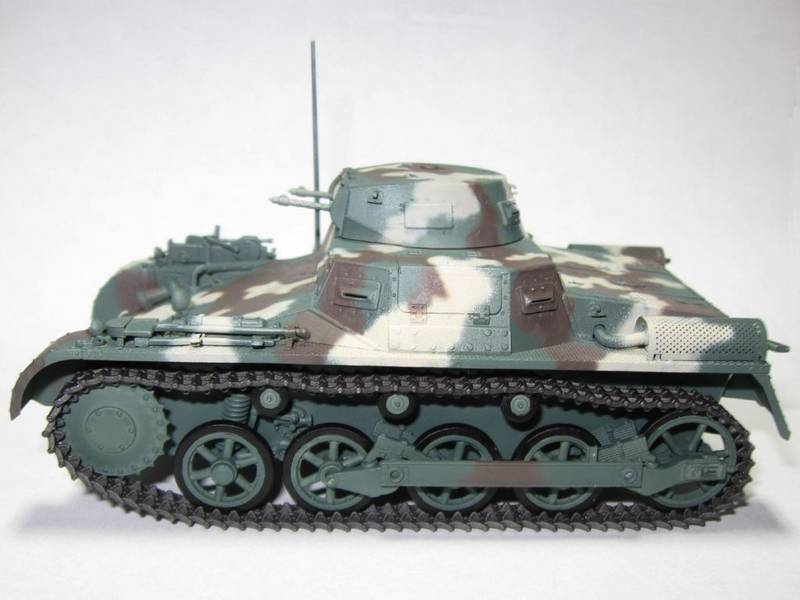
Specifically, I used Panzer Olive Green, Panzer Chocolate Brown, and Armor Sand mixed with a little Panzer Dark Yellow. Tristar's excellent Panzer I Ausf. A Early/Late provided the decals.


Tracks received a coat of Model Master Oiled Steel. MGs, metal tool surfaces, and tires all received Flat Black. Tools received Wood followed by streaks of Raw Sienna or Raw Umber.


My Armor Sand/Panzer Dark Yellow concoction utilized some very old and unreliable paint. The Panzer Olive Green and Panzer Chocolate Brown sprayed much better.


I used Testors Gloss Clear, Semigloss Clear, and Flat Clear acrylics for the clear coats. Photo-etched parts, other than the sheet metal muffler guards, came from a Lion Roar set.

-Doug
Damraska
Visit this Community
California, United States
Joined: October 06, 2006
KitMaker: 580 posts
Armorama: 499 posts
Posted: Thursday, April 23, 2009 - 04:29 PM UTC
Don't you hate when someone posts a build log, and you really want to see the finished model, but the updates come slow as molasses? No wait here!


With decals and a semigloss clear coat in place I started the weathering process. First off, I used my airbrush to mottle the running gear, front, back, and bottom with Burnt Umber, Raw Sienna, and Armor Sand in succession. This gave the lower hull a dirty appearance without covering up any detail.


Next, I used some Oiled Steel to dry brush the track faces, track pins, and guide teeth.


A wash followed, using Raw Umber oil paint in Mona Lisa Odorless Paint Thinner. A well cured base coat and acrylic protective barrier kept this from attacking the enamels.


The wash and airbrushing covered up some details so I dry brushed black back onto the tires and dabbed some other colors here and there to represent clean spots, dirty spots, or party spots. Woo hoo!


The tracks, lower hull, fenders, and bow received a very light dusting of Mig Dry Mud and Wet Mud. The mottling with Umber, Sienna, and Sand takes care of most weathering requirements.

The sheet metal guards over the mufflers were weathered with a sponge using Burnt Umber, Raw Sienna, Burnt Sienna, and Oiled Steel paints. I wanted it to look like heat is slowly causing the paint to chip off, with light rust following. My prototype still looks factory fresh so I avoided excessive rusting and chipping. The machine guns received a slight dusting of ground pencil lead.


Most Spanish Civil War Panzer I Ausf. A tanks wear armored guards over the engine intake and outflow vents. My prototype appears on film for about 3 seconds, coming straight at the camera then turning off to the left. Just before it leaves the frame, the side and engine deck appear in profile. I captured an image at that moment, stared at it many times, and finally decided it had the side armor strips but not the deck armor guard. I could be wrong on both counts.


No model is perfect. After finishing a project I always reflect on what worked, what did not work, and how I could attract a supermodel.

1) The three bolt heads should come off each vision port. Photographic evidence seems to confirm this, but they are hard to see!
2) The right front view port should not have a vision slit. Some putty would correct this easily enough.
3) I forgot to add the little square tab at the bottom middle of the brake hatch. Shoot me.
4) I used "robust" springs for the front road wheels. I was lazy and wanted to finish. See above.
5) I broke the antenna early in construction and I can still see a tiny kink. Leave it off until the very end.
6) My scratch built armor strips look a but clumsy. I now have the right size hex stock for the next go.
7) The line of bolts I added to each hull side does not line up perfectly with the ones along the bottom. Considering I did not look at the ones along the bottom, and realize what they were for, until after I added the ones on the side, I got pretty darn close! So there.
8) Just say no to old, grumpy paint. Also, if the airbrush starts to sputter, clean it and use some Super Lube! Works every time.
9) The flag decal laid down a bit funny, unlike all the others. I should have squeezed out all the air more thoroughly before using decal solvent.
10) The latch on the right, rear crowbar should face into the tank, not hang over the side. Duh.
11) A chain must hold the jack block in place. I'll have to add that feature to the next one.
12) And finally...big breath...do not try to match a custom paint, mixed on the fly, three months later. I always get myself into trouble doing stupid stuff like that.


So what's the verdict? Was the bashing deserved. Honestly, you must decide that for yourself. The kit builds easily and quickly into a nice little model without significant fit problems. It reminds me of a Tamiya kit in that respect. The only gotcha I can think of is the antenna and brake exhaust thing. The return rollers are off by about 1mm. The idler is off by about 1mm. The spring is about 1mm too tall and 1/2mm too thick for an early vehicle, but most probably got the robust spring as a refit. The rest of the detail issues are pretty darn small. On the other hand, the box art was a very poor choice given the complete lack of war era fixtures in the kit.

If you are not into counting rivets, I highly recommend this kit as a quick, fun build UNLESS you have not mastered or just hate individual link plastic tracks. The tiny links in this kit can force an insanity check as surely as seeing Cthulhu himself. I love them, which is a telling insight into my own psychological state. ::drool:: If you are into counting rivets, the kit can be fixed without buying a bunch of resin and I found the process rather fun.


Please feel free to comment, good or bad. I have not gone through this process for my own edification, but rather to help the next person who comes along. To a lesser extent, having the information concentrated in one place will help when I invariably forget most of it.

Here are some great reviews for those wishing to conduct further research:

https://armorama.kitmaker.net/review/1989

http://www.perthmilitarymodelling.com/reviews/vehicles/dragon/dr6289.htm

http://www.network54.com/Forum/477322/message/1157898009/Kit%2C+DML+6289%2C+Pz-Kpfw-I+Ausf-A+Early+Production+%93Smart+Kit%94

Panzer Tracts 1-1 provides the best, single volume coverage of the Panzer I Ausf. A. Most information in the previous post was derived from this source, and I highly recommend it to serious scholars of this vehicle. You can find a review here:

https://armorama.kitmaker.net/review/2896

The tank I chose to model appears in this video:

http://www.youtube.com/watch?v=xizC1uX9eOI

Toadman's Tank Pictures (aka., Chris Hughes) provides an extremely useful walkaround of a Panzer I Ausf. A in the Littlefield Tank Collection here:

http://www.toadmanstankpictures.com/pzi.htm

-Doug
Tarok
Visit this Community
Victoria, Australia
Joined: July 28, 2004
KitMaker: 10,889 posts
Armorama: 3,245 posts
Posted: Thursday, April 23, 2009 - 04:51 PM UTC
Hi Doug,

Thanks for a great article

I've got this kit in my stash as well so I've really enjoyed reading your views and seeing your corrections

Rudi
jimbrae
Visit this Community
Provincia de Lugo, Spain / Espaņa
Joined: April 23, 2003
KitMaker: 12,927 posts
Armorama: 9,486 posts
Posted: Thursday, April 23, 2009 - 10:21 PM UTC
REALLY excellent stuff Doug. Now, for your next one, think about this, the up-gunned (47mm Breda) which is was used by the Nationalists during the Spanish Civil War:

For Discussion purposes only:


You've definitely got the camo scheme cracked with YOUR model!
dropshot
Visit this Community
Provincia de Pontevedra, Spain / Espaņa
Joined: October 23, 2006
KitMaker: 300 posts
Armorama: 214 posts
Posted: Thursday, April 23, 2009 - 10:31 PM UTC
What can I say Doug,I love it .This should be a feature because itīs a lot of work & study that is invaluable to others. Thanks.
Damraska
Visit this Community
California, United States
Joined: October 06, 2006
KitMaker: 580 posts
Armorama: 499 posts
Posted: Thursday, April 23, 2009 - 11:24 PM UTC

Quoted Text

REALLY excellent stuff Doug. Now, for your next one, think about this, the up-gunned (47mm Breda) which is was used by the Nationalists during the Spanish Civil War [...] You've definitely got the camo scheme cracked with YOUR model!


Thank you very much, Jim, both for the nice comments and the pictures. They shall make excellent additions to my tank archive.

I actually was considering a Breda armed tank for my next Panzer I, the other choice being a machine that went to China. I have a Tristar Early/Late kit that works perfectly for a Series 3 vehicle and thus a Breda armed tank. I just need the turret from the appropriate MasterBox kit. I'll start looking around for the best deal.

-Doug
Damraska
Visit this Community
California, United States
Joined: October 06, 2006
KitMaker: 580 posts
Armorama: 499 posts
Posted: Thursday, April 23, 2009 - 11:43 PM UTC

Quoted Text

What can I say Doug,I love it .This should be a feature because itīs a lot of work & study that is invaluable to others. Thanks.


Thank you very much, Mike. After I give Panzer I experts a chance to review my comments and offer corrections I will submit the whole thing as an article. Fame and fortune, here I come!

-Doug
Damraska
Visit this Community
California, United States
Joined: October 06, 2006
KitMaker: 580 posts
Armorama: 499 posts
Posted: Friday, April 24, 2009 - 12:06 PM UTC
I just added more details on Series 2 production features, a list of post series production modifications, one more correction to my post build assessment, and additional links to source material.

I also want to take this opportunity to plug Panzer Tracts 1-1. Most of the production information in my first post derives from this source. I understand that the average modeler does not want to spend $30US on reference material for a model that cost $20. The net offers the same information for free, right? Not by a mile. I have encapsulated a very small portion of that book and used it for this article. The context, great pictures, extensive development and production data, interior information, painting practices, schematics, and many other small details do not appear above. I highly recommend Panzer Tracts 1-1 to every serious (or moderately interested) scholar of this vehicle.

Eat Cheesy Poofs.

-Doug
scratchmod
Visit this Community
Massachusetts, United States
Joined: November 07, 2008
KitMaker: 796 posts
Armorama: 763 posts
Posted: Friday, April 24, 2009 - 12:30 PM UTC
That's one cool little tank, awesome job Doug. That was a very informative build and the fact that you rebuilt the Idler is crazy, but it looks great. I had scratchbuilt a lot on the PzJgr I a few years ago, and that nearly drove me crazy because of the size of the model. I won't touch anything that small again, my hat goes off to you for building and painting that little baby.
I keep looking at the camo scheme,WOW, did you mask the pattern or spray it free hand?

Rob
Damraska
Visit this Community
California, United States
Joined: October 06, 2006
KitMaker: 580 posts
Armorama: 499 posts
Posted: Friday, April 24, 2009 - 02:55 PM UTC

Quoted Text

That's one cool little tank, awesome job Doug. That was a very informative build and the fact that you rebuilt the Idler is crazy, but it looks great.


Thank you very much, Rob.


Quoted Text

I had scratchbuilt a lot on the PzJgr I a few years ago, and that nearly drove me crazy because of the size of the model. I won't touch anything that small again, my hat goes off to you for building and painting that little baby.


I'm sure your Panzerjager I looks awesome. I have not taken on anything so elaborate, but am working my way up to it.


Quoted Text

I keep looking at the camo scheme,WOW, did you mask the pattern or spray it free hand?


I printed a couple screen shots from the film above, taped them to my spray booth, and shot the camo freehand--green base, then tan, then brown. I use a side loading Iwata Eclipse with a .35 needle. Even with grumpy old paint it does a pretty good job. With good paint and some Super Lube on the rear portions of the needle it can lay down a very thin line with almost no over-spray.

-Doug
BigfootV
Visit this Community
Colorado, United States
Joined: December 24, 2005
KitMaker: 1,624 posts
Armorama: 994 posts
Posted: Friday, April 24, 2009 - 03:50 PM UTC
Boy, I sure hope the Quad MM comes out like that.
Great job Doug.

Damraska
Visit this Community
California, United States
Joined: October 06, 2006
KitMaker: 580 posts
Armorama: 499 posts
Posted: Saturday, April 25, 2009 - 03:27 AM UTC

Quoted Text

Boy, I sure hope the Quad MM comes out like that. Great job Doug.


Thanks much, Brian. I am still formulating a plan for the Chevy 15cwt FATs. There was only one, badly warped upper hull between the two kits so a conversion may come into play. I would like to find colorful and elaborate paint schemes for both. I finished a Sherman III last month so that may also factor into the equation. And a camel.

-Doug
Kladivo
Visit this Community
Praha, Czech Republic
Joined: February 03, 2009
KitMaker: 52 posts
Armorama: 47 posts
Posted: Saturday, April 25, 2009 - 02:15 PM UTC
hello there
so i have to say that your building skills are very good especially in the details i would not have the patience to cut up an idler wheel...but..

i have to say i dont like much your weathering....i would defintely add more wash as it looks quite plain, and add some pigments to the tracks and undercarriage as it looks quite clean compared to the rest of the tank.
also the colours u used for the tyres, tracks and barrels dont seem to fit...for the tyres a more lighter shade would suit better, for the tracks something more brownish and for the barrell the classic gun metal...
anyway thats just IMO
take care
Damraska
Visit this Community
California, United States
Joined: October 06, 2006
KitMaker: 580 posts
Armorama: 499 posts
Posted: Saturday, April 25, 2009 - 03:15 PM UTC

Quoted Text

so i have to say that your building skills are very good especially in the details i would not have the patience to cut up an idler wheel


Hi Daniel and thank you.


Quoted Text

...but.. i have to say i dont like much your weathering....i would defintely add more wash as it looks quite plain, and add some pigments to the tracks and undercarriage as it looks quite clean compared to the rest of the tank.
also the colours u used for the tyres, tracks and barrels dont seem to fit...for the tyres a more lighter shade would suit better, for the tracks something more brownish and for the barrell the classic gun metal...
anyway thats just IMO take care


Thank you very much for the feedback. I definitely feel that painting and weathering are my weakest skills and appreciate the critique. I only did the one wash this time because the prototype was so clean. Perhaps it was not sufficient and leaves the model looking too toy-like. I did use pigments on the tracks, but I obviously need more practice there too. I used to use Model Master Gunmetal for the barrels and a shade of gray for the tires, but after weathering they looked wrong. I guess I need to experiment some more. I use a different method to paint the tracks almost every time, looking for that perfect look. Obviously still not there. I will keep experimenting and practicing.

-Doug
 _GOTOTOP