

Hosted by Darren Baker
slat armor for stryker

blaster76

Joined: September 15, 2002
KitMaker: 8,985 posts
Armorama: 3,034 posts
Posted: Monday, October 05, 2009 - 04:32 AM UTC
I am building the AFV M1130 Stryker kit. I bought the Eduard brass slat armor, and after a few steps, it is proving itself to be most dificult and time consumng. (2 hours to bend 3 parts and glue 6 together). I was wondering if someone has recently made a plastic alternative. Or at least the brace pieces done that way.


18Bravo
Joined: January 20, 2005
KitMaker: 7,219 posts
Armorama: 6,097 posts
Posted: Monday, October 05, 2009 - 07:12 AM UTC
Check out Pro Art. I don't know if they do a set for that particular Stryker, but my set for the M1126 came with a huge bag of resin - braces, armor, and much more. These sets are well worth investigating.

skyhawk
Joined: June 03, 2003
KitMaker: 1,095 posts
Armorama: 743 posts

Posted: Monday, October 05, 2009 - 07:20 AM UTC
im working on the Griffion set right now, and its not bad, though a LOT more parts than eduard because they actully made the etch like the real thing. Eduard took some shortcuts on a few areas. I think the metal is much thicker in the Griffion stuff than Eduard. Somewhere on here was a long thread that some folks had commented on how the eduard stuff was super thin and hard to deal with.
Also if im not mistaken, the Pro Art set is eduard, just with resin tubes replacing the PE ones.
I also recomend a Hold-n-fold type tool. The Bug is probally just the right size to do this.
Also if im not mistaken, the Pro Art set is eduard, just with resin tubes replacing the PE ones.
I also recomend a Hold-n-fold type tool. The Bug is probally just the right size to do this.


sopmod6

Joined: March 31, 2005
KitMaker: 761 posts
Armorama: 455 posts

Posted: Monday, October 05, 2009 - 07:35 AM UTC
My review from long ago on another thread...
Having recently acquired the Griffon Stryker set, I can say it is probably the best of all of them; The set costs significantly more, but the parts breakdown and layout on the sheets makes it easier to find per the instruction sheets. The scale thickness is more manageable than that of the other brands ( I bought multiple sets of each brand), but is on par with the PAM set.
The Eduard set is as Mother put it, "bends under your breath. I'm currently working on that set and will have to agree. Soldering the stuff is a meat grinder too. Since Ed decided to release everything in sets to breakdown assembly, I find it harder to keep up with all the multiple etch sheets to find out what goes where. Aaaay!...
The Voyager set is THIN. Nice, but too thin for scale thickness. Nuff said.
The ProArts set is a head scratcher. Ease of assembly? Yes. Less parts? Yes. Nice CD instructions? Yes. Sacrificial Lamb for easier build. Most Definitely. For those who want as realistic as possible, you're better off with any of the other three sets. PAM decided to cast the space armor and hull plates together, so there is no see- through gap in between.
The front part of the space armor is also made in PE, so you have to make sure that when assembling that front half, it lines flush with the rear resin half. I'd preferred if the whole thing was etch. Resin parts are nicely cast, but some are better off in PE due to I SWEAR TO GOD SUPER DUPER FRAGILE PIECES! The square tubing in resin is a very nice touch.
I only had 4 broken pieces between my three sets. The etch frets came in on big sheet, folded multiple times(MULTIPLE) with spacer cards in between.
All the sets parts are broken down in pretty similar fashion for assembly. Copies of each other? Maybe to a degree. The size of parts are different though; Griffons exhaust is larger than that of Ed by a bit. The square tubing in all sets range from 1 to 1.75mm in diameter.
Once I'm done with this Ed set, it'll be my last. I'll be going with the Griffon brand after that, and just putting the others away for, oh, whenever....
Hope this simple quick review helped some...
REPLY
REPLY & QUOTE
EDIT
DELETE
18Bravo
Joined: January 20, 2005
KitMaker: 7,219 posts
Armorama: 6,097 posts
Posted: Monday, October 05, 2009 - 07:37 AM UTC
Quoted Text
Also if im not mistaken, the Pro Art set is eduard, just with resin tubes replacing the PE ones.
Speaking only for the M1126, the fret has "Pro Art Models" and "Made in Belgium" etched into it.
blaster76
Joined: September 15, 2002
KitMaker: 8,985 posts
Armorama: 3,034 posts
Posted: Monday, October 05, 2009 - 07:43 AM UTC
I've got a hold and fold, but that bras is just too thin. I figure if the main braces are plastic or resin, it would be easier to slip in the slats rather than fight wth the whole assembly each time you tuch it. I'll have to check out the pro arts, any body know who sells it.
sopmod6
Joined: March 31, 2005
KitMaker: 761 posts
Armorama: 455 posts
Posted: Monday, October 05, 2009 - 07:50 AM UTC
You're better going off and replacing those brace parts with square plastic rod. I did that on Advice from Mother and it is a better all-around solution.
bulivyf
Vendor

Joined: April 03, 2006
KitMaker: 2,450 posts
Armorama: 2,409 posts
Posted: Monday, October 05, 2009 - 09:32 AM UTC
Hi Steve Joyce,
I Have three Eduard Slat ready and Two Eduard in progress. Also Griffon and Voyager in progress.
If you have problem with Eduard no try next because Eduadr is easy for build. Griffon and Voyager have very
problematic instruction. Pro Art I no build but here is very unrealistic Add-on Armor from resin.
I can advise you if you need with some Eduard slat problem but please you must have many patience because Slat you don't build on two or three day. I build this seven day 10 hour daily.
Miloslav


johnlinford

Joined: October 28, 2006
KitMaker: 203 posts
Armorama: 195 posts
Posted: Monday, October 05, 2009 - 10:02 AM UTC
HI Steve , I also am building the Eduard slat ( look at long time sat down thread on modern US ) and it is most time consuming thing to do.
I have done a bit in between other projects , just wish I could dedicate the time that Miloslav does , cannot wait to see his finished models.
Just keep at it , think of the finished product , they look amazing.
All the best,
John.
I have done a bit in between other projects , just wish I could dedicate the time that Miloslav does , cannot wait to see his finished models.
Just keep at it , think of the finished product , they look amazing.
All the best,
John.

abramstnkr
Joined: July 15, 2007
KitMaker: 75 posts
Armorama: 74 posts

Posted: Monday, October 05, 2009 - 10:37 AM UTC
Quoted Text
HI Steve , I also am building the Eduard slat ( look at long time sat down thread on modern US ) and it is most time consuming thing to do.
I have done a bit in between other projects , just wish I could dedicate the time that Miloslav does , cannot wait to see his finished models.
Just keep at it , think of the finished product , they look amazing.
All the best,
John.
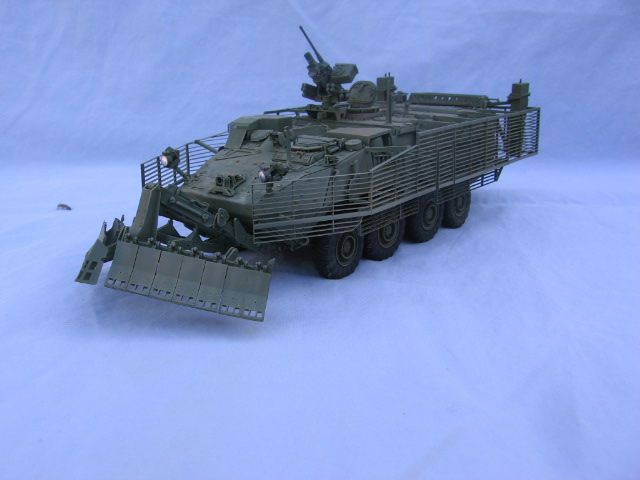
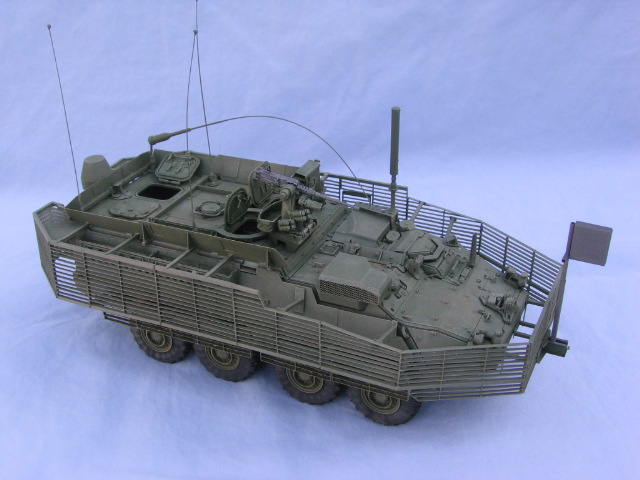
He is right. Here's 2 I've done. Not sure who said it but going with the square plastic strip for the top and bottom parts of the frame and then the photo etch sides is the best way to go. Basically, cut the plastic strips to size, cut the photo etch side frames of that section off, glue all 4 pieces together, start gluing the slats in place and then add the middle photo etch support strip. It takes some time but you eventually get the hang of it.
bulivyf
Vendor
Joined: April 03, 2006
KitMaker: 2,450 posts
Armorama: 2,409 posts
Posted: Monday, October 05, 2009 - 10:57 AM UTC
Quoted Text
Quoted TextHI Steve , I also am building the Eduard slat ( look at long time sat down thread on modern US ) and it is most time consuming thing to do.
I have done a bit in between other projects , just wish I could dedicate the time that Miloslav does , cannot wait to see his finished models.
Just keep at it , think of the finished product , they look amazing.
All the best,
John.
He is right. Here's 2 I've done. Not sure who said it but going with the square plastic strip for the top and bottom parts of the frame and then the photo etch sides is the best way to go. Basically, cut the plastic strips to size, cut the photo etch side frames of that section off, glue all 4 pieces together, start gluing the slats in place and then add the middle photo etch support strip. It takes some time but you eventually get the hang of it.
Wow! I don't know that many modelers build Slat. Maybe you can place here some photos as Jason.
Jason,
Excellent and very clear Slat build.
Miloslav

abramstnkr
Joined: July 15, 2007
KitMaker: 75 posts
Armorama: 74 posts
Posted: Monday, October 05, 2009 - 11:23 AM UTC
By the way, I did use the Eduard sets, along with 2 brand new "Tweezerman" tweezers. Those tweezers are expensive but well worth it. As for the glue I used regular cyanoacrylate, CA Thin glue. After the model was built, I gave it a base coat of the primary color, let that dry and then added a coulpe coats of "Future" to make the slat armor joints a bit stronger. I let that dry and then added another coat of the base color, let that dry and then went on to decaling and then weathering. I just did a Canadian 2A6M with slat as well. I'll post pics of it soon.
Thanks Miloslav!
Thanks Miloslav!

mother
Joined: January 29, 2004
KitMaker: 3,836 posts
Armorama: 1,370 posts
Posted: Monday, October 05, 2009 - 05:01 PM UTC
Ive built several Strykers in the past including 7 with slat armor. I admit I to was pulling out my hair during my first time at it. My second and third time around I learned a few tricks and the rest were a piece of cake.
I replaced the upper, lower and main supports using Evergreen Plastic rod, 1.5mm square rod.


Here is how I go about it which work well for me.


Everything is glued using super glue, the blue bottle super thin type. Ill pour some out on the frosted side of the CD. This side keeps the glue longer while the writing side cures faster, not sure why. Anyhow Ill pick the glue up with a tooth pic and touch the connection. There are times Ill also use an accelerator to speed drying time.
Yes youll find yourself wondering why you started such a project, but keep at it, take breaks at times but keep chugging away at it. In the end youll see the light at the end of the tunnel and youll be glad and excited once its finished and painted.
Good Luck and Happy Modeling,
Joe
I replaced the upper, lower and main supports using Evergreen Plastic rod, 1.5mm square rod.
Here is how I go about it which work well for me.
Everything is glued using super glue, the blue bottle super thin type. Ill pour some out on the frosted side of the CD. This side keeps the glue longer while the writing side cures faster, not sure why. Anyhow Ill pick the glue up with a tooth pic and touch the connection. There are times Ill also use an accelerator to speed drying time.
Yes youll find yourself wondering why you started such a project, but keep at it, take breaks at times but keep chugging away at it. In the end youll see the light at the end of the tunnel and youll be glad and excited once its finished and painted.
Good Luck and Happy Modeling,
Joe

blaster76
Joined: September 15, 2002
KitMaker: 8,985 posts
Armorama: 3,034 posts
Posted: Monday, October 05, 2009 - 07:15 PM UTC
Thanks Joe
I'm copying your instructions. I've done some tough kits some of those new 350 scale Japanese battleships are a bugger at times, but there I always was gluing onto a plastic structure. I'll be getting some of that super glue and work with it, maybe that will at least speed things up as I won't be having the work I've done fall apart and have to restart If you ant to see another toughie, take a look at the underdeck stuff on the 350 scale Akagi. Same sort of deal but once again I'll be gluing to a hard piece of plastic.
I'm copying your instructions. I've done some tough kits some of those new 350 scale Japanese battleships are a bugger at times, but there I always was gluing onto a plastic structure. I'll be getting some of that super glue and work with it, maybe that will at least speed things up as I won't be having the work I've done fall apart and have to restart If you ant to see another toughie, take a look at the underdeck stuff on the 350 scale Akagi. Same sort of deal but once again I'll be gluing to a hard piece of plastic.
shokunin98

Joined: November 08, 2010
KitMaker: 8 posts
Armorama: 7 posts
Posted: Thursday, November 11, 2010 - 02:21 AM UTC
Hello together,
I am new in this community and will try to build a stryker esv with slat armor (griffon L35013). On a few fotos in this article I saw M1132 with mine plow and slat armor which was rectangular at the rear of the vehicle, not sloped.
My griffon set has the slat armor for the M1127 so the rear sections are sloped

But my favorite stryker needs this:

How is the rectangular armor built ? I tried to contact griffon models to sell me one more frame of slat armor to build my own cages, but they didn't react even though I contacted them several times .
So how is it made ?
Best regards from germany
Rafael
I am new in this community and will try to build a stryker esv with slat armor (griffon L35013). On a few fotos in this article I saw M1132 with mine plow and slat armor which was rectangular at the rear of the vehicle, not sloped.
My griffon set has the slat armor for the M1127 so the rear sections are sloped
But my favorite stryker needs this:
How is the rectangular armor built ? I tried to contact griffon models to sell me one more frame of slat armor to build my own cages, but they didn't react even though I contacted them several times .
So how is it made ?
Best regards from germany
Rafael

jwest21
Joined: October 16, 2006
KitMaker: 3,374 posts
Armorama: 3,126 posts
Posted: Thursday, November 11, 2010 - 02:59 AM UTC
Quoted Text
Quoted Text
Also if im not mistaken, the Pro Art set is eduard, just with resin tubes replacing the PE ones.
Speaking only for the M1126, the fret has "Pro Art Models" and "Made in Belgium" etched into it.
It is also thicker and easier to work with than Eduard
prophecy
Joined: November 09, 2010
KitMaker: 158 posts
Armorama: 157 posts

Posted: Friday, November 12, 2010 - 12:30 AM UTC
Hello Rafael,
buy a Eduard Slat set to build the rear section. I think its the cheapest way. Also I can offer you some parts because I needed two sets for my first Stryker with SLAT.
Best Regards
Andreas
buy a Eduard Slat set to build the rear section. I think its the cheapest way. Also I can offer you some parts because I needed two sets for my first Stryker with SLAT.
Best Regards
Andreas
bulivyf
Vendor
Joined: April 03, 2006
KitMaker: 2,450 posts
Armorama: 2,409 posts
Posted: Friday, November 12, 2010 - 01:05 AM UTC
Rafael,
If you still wait, Eduard prepare slat for M 1132.
Miloslav
If you still wait, Eduard prepare slat for M 1132.
Miloslav
shokunin98
Joined: November 08, 2010
KitMaker: 8 posts
Armorama: 7 posts
Posted: Friday, November 12, 2010 - 05:11 AM UTC
Hello Andreas and Miloslav,
thank you for soon request. I will have a little time so I can wait. Did you know something about Griffon and a planned new set for the M1132 ?
And andreas:
I will think about your offer. It can't be wrong to have a few more parts to learn solding this little sections.
Best regards
Rafael
thank you for soon request. I will have a little time so I can wait. Did you know something about Griffon and a planned new set for the M1132 ?
And andreas:
I will think about your offer. It can't be wrong to have a few more parts to learn solding this little sections.
Best regards
Rafael
shokunin98
Joined: November 08, 2010
KitMaker: 8 posts
Armorama: 7 posts
Posted: Monday, April 18, 2011 - 09:43 PM UTC
Hello Miloslav,
did you know something new about the Eduard-slat for the M1132 ?
Best
Rafael
did you know something new about the Eduard-slat for the M1132 ?
Best
Rafael

seel98
Joined: September 25, 2005
KitMaker: 35 posts
Armorama: 32 posts
Posted: Tuesday, April 19, 2011 - 01:10 AM UTC
I have the griffon set and I am not the best so it poses trouble for me..especially threading the straps and glueing them in place. The griffon has lots of small part such as the bolts that need placing on nearly every piece which I guess speaks a lot about its accuracy. I was confused on several parts though, such as the lighting housing, but that could just be my inexperience. I enjoy doing the work, but it is very slow.
skyhawk
Joined: June 03, 2003
KitMaker: 1,095 posts
Armorama: 743 posts
Posted: Tuesday, April 19, 2011 - 07:54 AM UTC
Quoted Text
I have the griffon set ..especially threading the straps and glueing them in place. The griffon has lots of small part such as the bolts that need placing on nearly every piece which I guess speaks a lot about its accuracy. I was confused on several parts though, such as the lighting housing, but that could just be my inexperience. I enjoy doing the work, but it is very slow.
ah yes...those light assemblies are a little confusing, so have a photo near to compare with.
What are you refering to when you talk about threading the straps? I dont remember any straps with the slat set.
Im happy to help if I can.. you can email me [email protected] . I may have some hints or suggestions that will help you.
Andy
seel98
Joined: September 25, 2005
KitMaker: 35 posts
Armorama: 32 posts
Posted: Tuesday, April 19, 2011 - 08:17 AM UTC
The straps for the jerry cans on the back and the straps that hold the ruck sacks and whatnot onto the side carriers. Those are tuff. Thanks for the help though!
 |

WEB HOSTING BY


Copyright ©2021 Armorama and Kitmaker Network, a subsidiary of Silver Star Enterprises
All Rights Reserved. Please read our Conditions of Use and Privacy Policy.
All Rights Reserved. Please read our Conditions of Use and Privacy Policy.