_GOTOBOTTOM
Constructive Feedback
For in-progress or completed build photos. Give and get contructive feedback!
M1A1 Operation Desert Storm, from Dragon AIM
skyhawk
Visit this Community
Florida, United States
Joined: June 03, 2003
KitMaker: 1,095 posts
Armorama: 743 posts
Posted: Friday, July 09, 2010 - 09:23 AM UTC
Hey all,

Well, im back at it. Ryan (the3rdPlacer) and myself are working on the second of the Armordata series, this time covering Operation Desert Storm. you can see the news release mentioning the second and third titles here

so as a special to Armorama goers, here is a build log covering the M1A1.

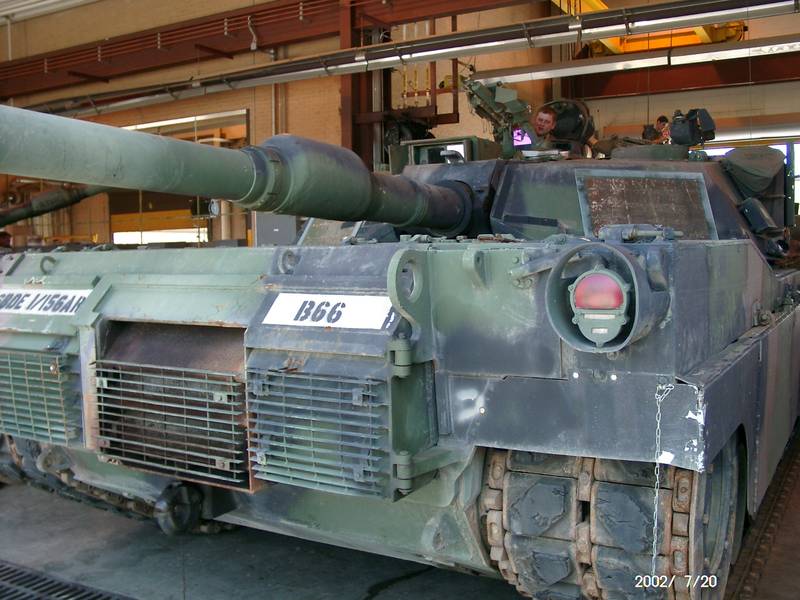
Im backdating the Dragon AIM kit to a standard M1A1. Yes, i could use the taymia kit..but the dragon kit is MUCH better detailed and only needs a few improvements. Im using Eduards PE set for the Dragon kit, Armortrack (Trumpeter) T156 track, and bits from taymias old M1A1 kit. Ending markings will be for the 70th AR, of which I have made contact with many ODS veterans, tank commanders, and all and they have supplied me with lots of great info and pictures!

here is a couple of shots of the work so far:
Photobucket

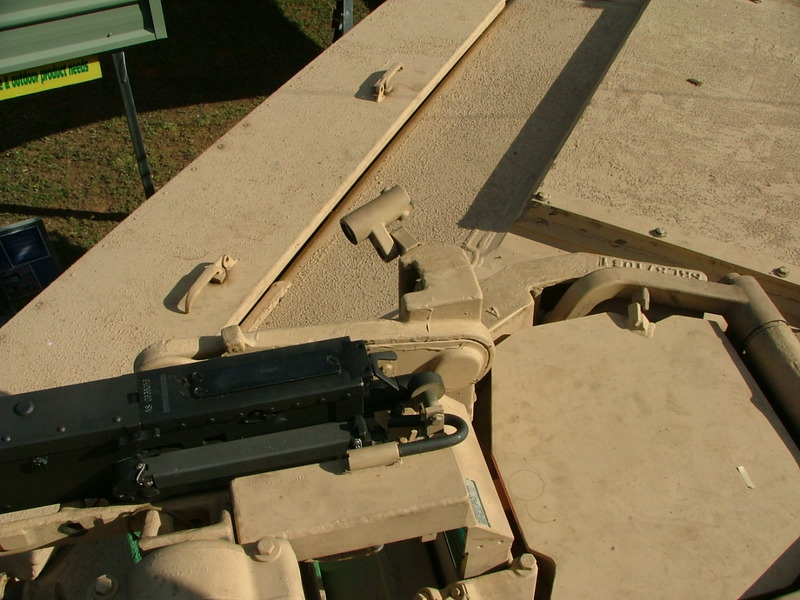
A pic of the TC weapon station. the M2 is from Tasca, barrel from Lion Roar. Scratchbuilt bits for the soliniod and roller that opperates the trigger remotely, along with the cable. Still have to add ammo box, ammo, and the like.
Photobucket

here is the smoke dischargers, with eduard mounts, and some scratchbuilt details. The smoke grenade stowage box is from the taymia kit, located in a slightly different location than the "modern" box.
Photobucket

the turret so far, with the older style sight housing. Also note the smooth blast panels. They are included in the AIM kit as newer upgrades eleminated the lugs on the top of the panels, going back to a smooth panel just like on the M1A1.
Photobucket

Comments welcome folks!!
Andy
metooshelah
#011
Visit this Community
Jerusalem, Israel
Joined: February 06, 2009
KitMaker: 1,507 posts
Armorama: 1,304 posts
Posted: Friday, July 09, 2010 - 09:51 AM UTC
looking good.

i like how the tc MG came out.
keep it up!
vonHengest
Visit this Community
Texas, United States
Joined: June 29, 2010
KitMaker: 5,854 posts
Armorama: 4,817 posts
Posted: Friday, July 09, 2010 - 10:26 AM UTC
This looks great Andy!
I have one of these kits in my stash and haven't really decided what I wanted to do with it. I'll be watching your build with great interest
Citizinsane
Joined: July 27, 2006
KitMaker: 463 posts
Armorama: 450 posts
Posted: Sunday, July 11, 2010 - 12:22 AM UTC
Hey Andy,
great job so far, can't wait to seeing some more pics!
a few pointers though, seems like you're missing the square plate found instead of the 50 cal's rear sight. also you might want to add two screws to the inside horizontal surfaces of that 'round' left-side mg mount and add a piece of tubing to the reloading mechanism thingy.
here's a pic (from pp) you can see one of the screws and that tubing in the left upper corner:

last but not least, the smoke discharger wiring should look a little different, more like one piece of wire that's wrapped around the other and less like two wires wrapped together... anyway I'm not that familiar with ODS vehicles, so maybe i'm wrong on that...
other than that it looks great, I really like the new M2 and the PE ammo can racks on the front the side bins...

Cheers, Max
chnoone
Visit this Community
Armed Forces Europe, United States
Joined: January 01, 2009
KitMaker: 1,036 posts
Armorama: 1,033 posts
Posted: Sunday, July 11, 2010 - 09:44 PM UTC
Hey Andy,

haven‘t really done much yet have you ?
Max is probably right with the wires though, can‘t recall them being twisted, only remember one wire to plug in .... but that is already some time ago.
Choosing the Dragon AIM kit is the right way to go, less hassle with detailing.
So bring this project up to speed ! ..... looking forward on some "real" progress soon.

Cheers
Christopher
skyhawk
Visit this Community
Florida, United States
Joined: June 03, 2003
KitMaker: 1,095 posts
Armorama: 743 posts
Posted: Monday, July 12, 2010 - 01:59 AM UTC
Hey Christopher and Max,

thanks to the both of you for the comments...thats exactly why I posted here! I stare at this too much and a few extra pairs of eyes help find some things I missed..

ill add the other bits to the CWS..finding a bolt that small might be fun! As for the smoke discharger wires, your right...discovered after I had already did the deed. Ill see if there is some way of getting in there and correcting that. Keep in mind the space is less than an 1/8" of an inch, so its really barely seen with the naked eye.

not much has been done past this over the past week...as im also building a M106A2 for the same book and have been doing some scratchbuilding to make the interior components more accurate and detailed. Maybe ill start a post on that as well...

Cheers, and keep the comments comming!
Andy
Citizinsane
Joined: July 27, 2006
KitMaker: 463 posts
Armorama: 450 posts
Posted: Monday, July 12, 2010 - 02:03 AM UTC
well,
there is in fact only one wire, but it's cased with a corded rubber-hose, which looks like this (pic from pp):


I think wrapping a lenth of wire around another is the easiest way to depict that thing...

Cheers, Max
skyhawk
Visit this Community
Florida, United States
Joined: June 03, 2003
KitMaker: 1,095 posts
Armorama: 743 posts
Posted: Monday, July 12, 2010 - 02:54 AM UTC

Quoted Text

well,
there is in fact only one wire, but it's cased with a corded rubber-hose, which looks like this (pic from pp):


I think wrapping a lenth of wire around another is the easiest way to depict that thing...

Cheers, Max


ah, that I might actully be able to do..some insulation or something that I can slit and then place over the wires without having to tear it all apart. I think the photo I was using didnt have the casing..but just the wires "bare".
skyhawk
Visit this Community
Florida, United States
Joined: June 03, 2003
KitMaker: 1,095 posts
Armorama: 743 posts
Posted: Monday, July 12, 2010 - 03:21 AM UTC
here is what the end result will be
M1A1 from 2-70

Photobucket

Splinty2001
Visit this Community
Michigan, United States
Joined: October 01, 2004
KitMaker: 283 posts
Armorama: 181 posts
Posted: Monday, July 12, 2010 - 03:56 AM UTC
I'll be watching this one with great interest. My Bradley company (D Co 4/7 INF) was attached to 2/70 in Desert Storm as an infantry pure company and we fought with them through all 100 hours of the ground war.
chnoone
Visit this Community
Armed Forces Europe, United States
Joined: January 01, 2009
KitMaker: 1,036 posts
Armorama: 1,033 posts
Posted: Monday, July 12, 2010 - 05:39 AM UTC
Well if that‘s the one you wish to complete, then why bother changing the "garage" and the SG stowage box?
Looks like a then "new" HA to me, with the late type "box" protective housing.
Better check with your ref. material to be on the safe side

We‘ll keep watching you
Christopher
skyhawk
Visit this Community
Florida, United States
Joined: June 03, 2003
KitMaker: 1,095 posts
Armorama: 743 posts
Posted: Monday, July 12, 2010 - 05:53 AM UTC

Quoted Text

Well if that‘s the one you wish to complete, then why bother changing the "garage" and the SG stowage box?
Looks like a then "new" HA to me, with the late type "box" protective housing.
Better check with your ref. material to be on the safe side


well, the main reference material is several of the units crew themselves, and others within the unit who have verified only having standard M1A1s. I also have the AAR. Also in other photos you can see the older T156 track, and older style sight housing..
majjanelson
Visit this Community
South Carolina, United States
Joined: December 14, 2006
KitMaker: 1,355 posts
Armorama: 979 posts
Posted: Monday, July 12, 2010 - 08:47 AM UTC
Andy,

You probably have already seen all of this, but just to make sure...

The Smoke Discharger Storage box on the turret seams thicker than the Tamiya one you've installed, but it's hard to tell 9more pictures below):


This image is from the M1 Abrams Main Battle Tank page on the Global Security.org website shows an ODS era M1A1 (incorrectly shown under the M1A2 section):


The above picture also shows the rear hull-mounted APU that was used some during ODS.

For the smooth blast panels, make sure you use the correct Loader's Hatch Catch bracket.

The tubing on top of the .50 cal MG solenoid switch bracket I believe is for the charging pull cable, since the .50 cal M2HB in the M1A1 Commander's Weapon Station normally didn't have a charging handle on the right side (I found this image is from a web search, but I've seen a much better image from a show with the Ausi abrams).


This 30-pageM1A1 picture section on Prime Portal is of an ODS era M1A1 in the KSARNG that Rob McCune posted.
Smoke Discharger Cable:


Wiring for the stowed Wind Sensor:


Unused Spare Road Wheels do have a mold line down the center of the rubber!


Side Turret Bustle Racks on some Abrams had an older style double bracket at the rear:


Older style Smoke Discharger Storage Box:


I hope this helps...
skyhawk
Visit this Community
Florida, United States
Joined: June 03, 2003
KitMaker: 1,095 posts
Armorama: 743 posts
Posted: Monday, July 12, 2010 - 09:21 AM UTC
Hey Jeff,
thanks for the added photos...the one with the TC and CWS is most useful as the other pics I was working from didnt show everything clearly.

As for the rear APU, the 2-70 didnt use them, so no issue there.

I think you may be right about the grenade boxes...but it doesnt need to be much thicker. Im thinking some sheet plastic laminated on the taymia part, cut to look like the hinged lid, would be just right. Ill fix that and the cables..do some more work and post some more pictures.
thanks!
Andy
Ric_Cody
Visit this Community
Georgia, United States
Joined: May 22, 2005
KitMaker: 299 posts
Armorama: 294 posts
Posted: Monday, July 12, 2010 - 12:29 PM UTC
you might have to do some research depending on which unit your M1A1 is going to replicate. Some units got the HA M1A1's which had the squared off dog house, others used the regular M1A1s that had the slanted back.
majjanelson
Visit this Community
South Carolina, United States
Joined: December 14, 2006
KitMaker: 1,355 posts
Armorama: 979 posts
Posted: Monday, July 12, 2010 - 02:07 PM UTC
Andy,

Here is the image I remembered earlier, but had to upload from my files to show you (I cannot remember where on the web I copied it, so I am unable to give proper credit). The tube on the Solenoid switch bracket appears to be for securing the charging handle:


This image from TankMaster webpage shows an earlier(?) version without the solenoid switch and apparently the roller trigger cam is actuated manually be a cable:


This image shows the rear hull with the older hull-mounted APU brackets beside the right Tail Light. The Tail Light Shroud is bolted on so that it could be removed for mounting the APU. You can just see one of the mounting bolts just below the shroud tube.


Someone please correct me if I have this wrong...
Tankrider
Visit this Community
Oklahoma, United States
Joined: October 07, 2002
KitMaker: 1,280 posts
Armorama: 1,208 posts
Posted: Tuesday, July 13, 2010 - 04:19 AM UTC

Quoted Text


As for the rear APU, the 2-70 didnt use them, so no issue there.


Andy,
Who's tank in 2-70 are you building??? Nevermind, I saw the pic of the Bandit 2nd Platoon tank. I took command of D Co, right after they got their tanks back from Saudi Arabia in 1991.

2-70 indeed used standard M1A1s during combat operations and passed them to 1ID after the conflict. They received M1A1HAs at the port and those tanks were shipped back to Erlangen. The tank in the pictures that Rob McClune took was one of the ones that 2-635 Armor (KAARNG) received from 1st ID, so it is highly likely that the subject is a former 1AD/ODS tank.

Drop me a PM as I have digital copies of Rob's pics as well as some detail shots of a standard M1A1 that is in the Patton Museum.

John
skyhawk
Visit this Community
Florida, United States
Joined: June 03, 2003
KitMaker: 1,095 posts
Armorama: 743 posts
Posted: Wednesday, July 14, 2010 - 06:01 AM UTC
Jeff,
Pefect photos...just what I need to finish dressing up the mount. Thanks a bunch! Hopefully I can get some work done tonight on this and post an update.
Andy
Tankrider
Visit this Community
Oklahoma, United States
Joined: October 07, 2002
KitMaker: 1,280 posts
Armorama: 1,208 posts
Posted: Thursday, July 15, 2010 - 10:33 AM UTC
[quote]This image from TankMaster webpage shows an earlier(?) version without the solenoid switch and apparently the roller trigger cam is actuated manually be a cable:


[quote]

Jeff,
This picture shows the CWS from a M1. The M1A1 had a redesigned firing assembly developed after numerous complaints of the M1's CWS firing system. It had a weird grip on the elevation handlethat needed to be manually pulled down and twisted simultaneously to fire the .50, vice the electrical push button on the elevation crank handle/solenoid/roller arrangement found on the M1A1. The power assist handle was also redesigned so the mounting point was not a hazard to the TC (swapped the male & female ends).

John
majjanelson
Visit this Community
South Carolina, United States
Joined: December 14, 2006
KitMaker: 1,355 posts
Armorama: 979 posts
Posted: Thursday, July 15, 2010 - 04:06 PM UTC
John,

Thank you. I went back and reviewed the other pictures on the TankMaster website and noticed that it was a M1 on display. I figured the CWS was improved on the M1A1, but I didn't know the story.

If I remember correctly, the SC Army NG went from M60A3s straight to M1A1s around '89-'91. We did have two AR BNs then, 2-263 AR BN was part of the 218 Heavy Seperate Brigade (Mechanized) and the 1-263 AR BN was the 15th BN of the 24 ID (M), plus a CAV Troop as part of the 218th. The 1-263 spent the duration of ODS at the NTC with the 48 IN BDE (M), GAARNG, both had already transitioned to the M1A1s, but the 197 IN BDE (M) from FT Benning replaced them as the 3 BDE of the 24 ID during ODS.

Now we only have 2 AR Companies.
skyhawk
Visit this Community
Florida, United States
Joined: June 03, 2003
KitMaker: 1,095 posts
Armorama: 743 posts
Posted: Monday, August 02, 2010 - 05:38 AM UTC
Hey all,
Ok, time for an update before we finish off a few small details and head to the paint shop!

First, I fixed the smoke discharger electrical cable...what do you all think? I was actully able to pull my twisted wire out, slip on the coiled wire, and move it back into position. Should look good after paint.
Photobucket

Added the 50cal ammo box and such..there is still some small details to add to this, including some missing bolts, pin chains, and other bits.
Photobucket

and some overall shots so far.
Photobucket
Photobucket
jimz66
Visit this Community
Connecticut, United States
Joined: December 15, 2006
KitMaker: 1,165 posts
Armorama: 1,105 posts
Posted: Monday, August 02, 2010 - 02:33 PM UTC
Looking good Andy, just fix that mold seam in the top photo in your last post.
majjanelson
Visit this Community
South Carolina, United States
Joined: December 14, 2006
KitMaker: 1,355 posts
Armorama: 979 posts
Posted: Monday, August 02, 2010 - 03:10 PM UTC
Andy,

Looking great!

Since you have replaced the Loader's M240 Mount Skate Rail, the rail is bevelled on both sides for the V-Wheels to run on, and the mounting bolts are countersunk into the rail for clearance, except the last two are raised studs to act as bumb stops (pictures from Prime Portal):


The above picture shows the fragmentation lip around the edge of the Loaders Hatch, and also shows the hatch open latch brackets on the hatch and on top of the smooth blast panel. I believe the frag lip was a later mod/upgrade and may not have been inplace for ODS, but I could be remembering incorrectly.

Just trying to help out...
Citizinsane
Joined: July 27, 2006
KitMaker: 463 posts
Armorama: 450 posts
Posted: Monday, August 02, 2010 - 07:03 PM UTC
Hey Andy,
Looking good so far, the smoke discharger wiring looks on point...
anyway, I'll have to second James with that mold seam on the smoke dischargers...
there also are a visible gap and a hole on the left side of the dog-house which, I think, need to be filled. you might want to take off that M2 front sight as well, since these aren't being used on M1's (at least not on current ones, can't say for shure for ODS)
The last thing I noticed is the M2 ammo box cradle. it looks like the dragon part which has got it's upper right most lid mirror inverted, yet, as you appear to have an eduard PE set that should be easy to fix...

Other than that it's really looking good, I wish I had made so much progress on my abrams since your last update


Cheers, Max
Citizinsane
Joined: July 27, 2006
KitMaker: 463 posts
Armorama: 450 posts
Posted: Monday, August 02, 2010 - 07:20 PM UTC
oh yeah, one more question.
since you're using a tasca M2, did you remove the reloading guide-rail thingy from its right side? A1 abrams' machine guns differ from the regular 'infantry' version...

Cheers, Max
 _GOTOTOP