Armor/AFV: British Armor
Discuss all types of British Armor of all eras.
Hosted by Darren Baker
Building the MiniArt Valentine Mk IV
AlanL
Visit this Community
England - East Anglia, United Kingdom
Joined: August 12, 2005
KitMaker: 14,499 posts
Armorama: 11,675 posts
Posted: Tuesday, August 31, 2010 - 11:05 PM UTC
Murphy's Law

Do you ever get to a building stage where you wonder 'should I have done that?'

Well I reached that point yesterday evening after I had adjusted and fitted the RHS rear bin and my mind got to thinking hold on were there different bin arrangements for different Mks? !!

MiniArt provide 5 different styles of side bin, so what you fit will depend more on the period you want to display the tank in than the Mk of tank you are building. As it is extremely hard to identify a Mk II from a Mk IV or a Mk III from a Mk V this can be confusing when you are looking at the build instructions and reference pirctuers that may or may not be correctly identified and may or may not show the RHS.

The following infomration is courtsey of Dick Taylor to whom I asked the question. Bin style depends on time period more than Mk of Tank

So Dick's advice is as follows:

Quote

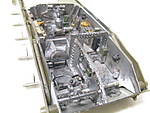
Al, the bins depend on time more than mark. The very earliest Mk IIs (around 1940/41 )only had a short tool bin on the right side, let's call that Bin A. Later (and it may be that this applied to older Mk IIs in retrospect but I don't know this for sure as there is no evidence of any rework programme) versions had three possibilities:

A second smaler bin (B) added immediately behind A to give extra space, this went as far as the wing support rib
A larger tool bin (C) overall size the same as both A and B together, again going as far rearwards as the rib
A ration bin (D), not quite as high as the tool bins, extending rearwards from the rib.

Unquote

So thanks very much for that information Dick as it helps clear up some of the difference I've seen in pictuers of the Mk II and Mk IV.

My advice then would be to fit the bins starting front to rear on the RHS using any reference pictuers you might have but if no RHS shot is available using the time period the picture was taken and the above information as a basic guide.

Needless to say I fitted the rear bin first

The second query I had with the kit was the large 24 inch road wheel size and I sent off for a set of AA Valentine wheels for comparison. Now either I have missed the boat here completely, which has been know to happen, or AAs large road wheels are also short of the 24 inch spec, or my 1/35 scale ruler is complete wrong!

Just to update this a bit:

I was talking with Derek from AA about the wheels. His meassure in at 17.00 trought to 17.03mm across a few sets he checked.. As a 24" (609.6mm) wheel scales out at 17.4mm at 1:35 that means at worst they are 2% smaller and at best 0.5% smaller.

Derek has also just received the MiniArt Kit and their Large wheels measure in at 16.7mm diameter, so around 4% underscale.

If you add that to a slightly longer extension arm then that is where the slightly bigger gap between the small and large wheels appears and what give this other wise cracking kit a sightly odd look.

Here's a comparison the centre wheel is the MiniArt one.


Accurate Armout 24inch wheel


MiniArt 24 inch Wheel


There is a tiny bit of difference but neither as far as I can see measure 24 inches in diameter, but to be fair my 1/35 scale rule probably isn't that accurate.

The AA ones don't have a rear wheel hub insert, but that's another issue, the detail is naturally sharper and the wheels have a slightly more rounded type finish. So there are two options for the kit wheels. Build the kit as is and simply don't worry about it or remove the extension arm on the suspension unit, shorten it and re-attach the arm thereby bring the larger wheel closer to the smaller road wheel. Personally I'm going for the first option, because if I do the second I am sure to end up with one arm shorter than the rest, which would just be Murphy's Law working fine as usual!!

Edit:

but see belwo for developments.

Al
AlanL
Visit this Community
England - East Anglia, United Kingdom
Joined: August 12, 2005
KitMaker: 14,499 posts
Armorama: 11,675 posts
Posted: Wednesday, September 01, 2010 - 01:24 AM UTC
Hi Guys,.

You know this whole wheel thing has been driving me a bit bonkers . I think the MiniArt kit is a cracking kit and by accident I broke off part B11 on one of the bogies. Well the problem solved itself as when I stuck it back on I simply moved the two road wheels fractionally closer to the larger wheel and the 'gap' problem went away This doesn't cure the wheel size problem but it should make the end result more pleasing and closer to the real thing.

Here is the result:


What do you think do these look correct now?

Al
AlanL
Visit this Community
England - East Anglia, United Kingdom
Joined: August 12, 2005
KitMaker: 14,499 posts
Armorama: 11,675 posts
Posted: Wednesday, September 01, 2010 - 02:07 AM UTC
Here they are on the kit?


Al
AlanL
Visit this Community
England - East Anglia, United Kingdom
Joined: August 12, 2005
KitMaker: 14,499 posts
Armorama: 11,675 posts
Posted: Wednesday, September 01, 2010 - 06:07 AM UTC
Hi folks,

this will probably be the last of to-days installment.

Having checked some pics, read lots more and done a bit of head scratching I settled on my bin combination. . This is one of several styles available and appears from Jul 41 onwards so should fit my UK Mk II. Although had I not committed myself to the rear bin I would have chosen an alternative!!


This is where things stand now:


I've attached the firewall to the upper hull


and here we have something a bit tank like


I have a little more work to do on the front underside of the drivers compartment - thank's Chris, but hopefully nearing the point where I can join things up.

Al

SdAufKla
Visit this Community
South Carolina, United States
Joined: May 07, 2010
KitMaker: 2,238 posts
Armorama: 2,158 posts
Posted: Wednesday, September 01, 2010 - 09:25 AM UTC
Al,

You're flying along on this build! I love the interior work - outstanding.

The road wheel issue has me pondering fixes, as well. I like the simplicity of your "serendipitous" fix, though. It's a small change, but one that definitly improves the "look" of the suspension.

Thanks for keeping us up to speed on this one.

Mike
AlanL
Visit this Community
England - East Anglia, United Kingdom
Joined: August 12, 2005
KitMaker: 14,499 posts
Armorama: 11,675 posts
Posted: Wednesday, September 01, 2010 - 10:29 AM UTC
Hi Mike,

As I can't change the size of the wheels this at least looses the gap and is a pretty easy option. Only a tiny bit of shift is required so the 2 small wheels don't look misplaced.

This is a really interesting vehicle, the more I find out about it the more I like it. The kit is really well done for the most part and a little research turns up lots of finish options.

I got the Mk II version when it came out, it is just a pity the Mk IV doesn't come with sand shields lol, lol. Still I could take some measurements and see if I could make a set!!.

Al
AlanL
Visit this Community
England - East Anglia, United Kingdom
Joined: August 12, 2005
KitMaker: 14,499 posts
Armorama: 11,675 posts
Posted: Thursday, September 02, 2010 - 02:06 AM UTC
Hi folks,

A bit more on the interior, added some bolts to the front edge of the underside hull and a small square type box that I believe controlled the drivers vision port plus some stowage in the bins I made and a small electrical box type fittting. Also added a Thompson .45 MG to the top of the turret hull.

More madness


There is great potential for an engine in this one with the large rear doors - lol, lol.

Al
AlanL
Visit this Community
England - East Anglia, United Kingdom
Joined: August 12, 2005
KitMaker: 14,499 posts
Armorama: 11,675 posts
Posted: Thursday, September 02, 2010 - 03:48 AM UTC
Hi Guys,

I joined the upper and lower hulls together and then I added the front idler wheels. The little extensions on these feed up through the upper hull and it was easier to fit the hull first and then add the idlers.

Everything seems to have gone together with no major problems, I have some additional plumbing I want to add to the interior LHS upper hull and at the back of the hull there were two angled haversack bins but I may or may not add these.

The basket and firewall do their job by filling those empty spaces so with the hatches all open it should look pretty busy inside.

next up will be to construct the tracks and paint the lower hull before fitting them. Indies, - great .

some pics!


Al
CMOT
Staff MemberEditor-in-Chief
ARMORAMA
Visit this Community
England - South West, United Kingdom
Joined: May 14, 2006
KitMaker: 10,954 posts
Armorama: 8,571 posts
Posted: Thursday, September 02, 2010 - 04:19 AM UTC
Alan I placed a photo over one of yours at the same angle and then scaled them equally, the wheels are as near as damn it where they need to be.
AlanL
Visit this Community
England - East Anglia, United Kingdom
Joined: August 12, 2005
KitMaker: 14,499 posts
Armorama: 11,675 posts
Posted: Thursday, September 02, 2010 - 05:23 AM UTC
Hi Darren,

Been there, done that, got the tee shirt and Not going there again - no offence

Right on with the track. You get 5 frames of indi track. Each track should consist of 98 links and you get 44 per frame so I've passed the halfway point in the clean up

They fit together really easily and clean up is minimal. Just taking a smoke and tea break before I move onto part II.


Al
AlanL
Visit this Community
England - East Anglia, United Kingdom
Joined: August 12, 2005
KitMaker: 14,499 posts
Armorama: 11,675 posts
Posted: Thursday, September 02, 2010 - 09:06 PM UTC
Hi Guys,

Just a quickl question if anyone knows. Where the two parts of the hull meet there is cleearly a join line inside. There are two options here I think. turn the join into a weld seem or file it and fill it. Any thoughts?

Al
AlanL
Visit this Community
England - East Anglia, United Kingdom
Joined: August 12, 2005
KitMaker: 14,499 posts
Armorama: 11,675 posts
Posted: Friday, September 03, 2010 - 01:45 AM UTC
Hi Guys,

Well I answered my own question as best I can tell the side panel was one sheet of steel so I filled rather than welded. Added in some additional plumbing, this still needs crimped on and the gear shift shaft as I'd made one anyway. Normally all this would be covered with some floor plate but I've opted out fo doing that.


Also added the rear doors. A couple of points here. When you add part C29 at stage 31/32 try to get this as exact as possible. Mine was a fraction off and it meant filing the top end so that it didn't interfer with the fitting of the doors. This part was a bit warped as it is a thin bar with two plates on each end, so patience required there. Also I'd leave the handles off until you fit the rear doors. When I placed the doors mine seemed to curve in too much so I weakened them with some glue and bent them back a little. If you fit them when the doors are in place you won't have this problem as it will be obvious how they should sit.


I've added the side exhaust (the ammo box is just to keep it true until the glue dries) and as you can see built a bit of track which is very easy to work with, just that little pile of links to build yet

Also roughened up the inside surface of the turret top and started to paint the Thompson, just the edge of which will be visible when fitted.


Cheers

Al
AlanL
Visit this Community
England - East Anglia, United Kingdom
Joined: August 12, 2005
KitMaker: 14,499 posts
Armorama: 11,675 posts
Posted: Saturday, September 04, 2010 - 12:07 AM UTC
Bit more progress, down to the small external fittings, with just a fire extinguisher to fit in the lower hull and about ready to close the turret top. I did come across a suitable part of a mortar that might allow me to make a turret traverse mechanism but that can wait for the desert version.

Starting to add a little paint:


Tools and the like to fix:


Still some Tracks to build!!


How things stand at the moment:


The shovels provided have a knob on the end. not very British unless someone can tell me differently?

Al

Plasticbattle
#003
Visit this Community
Donegal, Ireland
Joined: May 14, 2002
KitMaker: 9,763 posts
Armorama: 7,444 posts
Posted: Saturday, September 04, 2010 - 12:28 AM UTC
Great progress Alan. Im really starting to get attracted to this ugly beast .. its so ugly ... its a beauty. Nobody but a WW2 modeller would understand this! Love what you did to the turret interior and basket.
AlanL
Visit this Community
England - East Anglia, United Kingdom
Joined: August 12, 2005
KitMaker: 14,499 posts
Armorama: 11,675 posts
Posted: Saturday, September 04, 2010 - 02:38 AM UTC
Hi Frank,

Yes, ugly it is . The shape always reminds me of a Russian Tank, where of course it served, but it is an odd design. The interior is a bit of fun and building the basket from scratch was a new experience. I do wish all Tanks came with a basic interior lol, lol, something more satifisfying about bits inside.

I really hope either MiniArt of AFV Club do the Archer, more in my time frame, but this is a really good kit and now I've dicovered a simple way to fix the gap issue it makes for a much more pleasing build.

Thanks for dropping in and the comments.

Al
vonHengest
Visit this Community
Texas, United States
Joined: June 29, 2010
KitMaker: 5,854 posts
Armorama: 4,817 posts
Posted: Saturday, September 04, 2010 - 04:48 AM UTC
Frank: Truer words are rarely spoken!

Alan: I just picked up my Mk III today and am really looking forward to digging in after following your build here.

I too would look forward to an Archer from Miniart.
AlanL
Visit this Community
England - East Anglia, United Kingdom
Joined: August 12, 2005
KitMaker: 14,499 posts
Armorama: 11,675 posts
Posted: Saturday, September 04, 2010 - 07:32 AM UTC
Hi Jeremy,

The Mk II is the same kit with the British Figuers and the extra frame D(?) with the sand shields. The instructions are sllightly differend but I hope you enjoy the build it is a cracking little kit.

Al
vonHengest
Visit this Community
Texas, United States
Joined: June 29, 2010
KitMaker: 5,854 posts
Armorama: 4,817 posts
Posted: Saturday, September 04, 2010 - 12:10 PM UTC
Judging from you work, I already know I am. I usually don't get too excited about new kits coming out, but I couldn't wait to get the Mk III Valentine II, and am really looking forward to the future releases of this series.

Looking forward to seeing your next update Alan
AlanL
Visit this Community
England - East Anglia, United Kingdom
Joined: August 12, 2005
KitMaker: 14,499 posts
Armorama: 11,675 posts
Posted: Saturday, September 04, 2010 - 11:30 PM UTC
Hi Jeremy,

The only thing I can see not included in the kit are the Bren boxes that were attached to the rea of the turret. The British version has the early antenna so check you're reference [pics there.

Hi folks,


Right on with the build, always a mile stone when you finish fitting indi tracks. These are very easy to work with. I have also fitted a fire extinguisher and the only other thing I might add is a small bin that sat behind the driver at the top of the inner hull.

Still the hatches and exhaust cover to fit and the small fittings/tools, plus the front and rear fenders. I may remove the parts on the rear RHS top fender as there was a camo net stored there. I will see what I have that might work.

You get some handy spare track which is always a plus.

Lots of finsih options on the British side as I'm doing a Mk II not a Mk IV. I may go for either one belonging t the 17/21st Lancers from 26th Armd Bde, 6th Armd Div or one from 1st Northamponshire Yeomanry, 20th Armd Bde, 6th Armd Div. As the Mk II was used widely as a Training Tank Unit options abound.


Al
AlanL
Visit this Community
England - East Anglia, United Kingdom
Joined: August 12, 2005
KitMaker: 14,499 posts
Armorama: 11,675 posts
Posted: Sunday, September 05, 2010 - 05:53 AM UTC
Hi Guys,

A bit more work, some paint on the tracks, fenders fitted and the lights added. You will need to drill out the MG barrel and I've added the some stuff to the rear LHS. I have an Accurate Armour Camo Net that if I boil it up and flatten it out should do for the rear RHS.

The front light fixings are very delicate so take care removing and fitting these. You could reverse the lights of lay them flat also.

Al


AlanL
Visit this Community
England - East Anglia, United Kingdom
Joined: August 12, 2005
KitMaker: 14,499 posts
Armorama: 11,675 posts
Posted: Tuesday, September 07, 2010 - 04:23 AM UTC
Hi Guys,

A bit more work.

Finish will be a Headquarters Squadron Tank, from 1st Northamptonshire Yeomanry, 20th Armoured Brigade, 6th Armoured Division UK between Oct 1940 to Apr 1942.

An alternative with the same marking could be a Headquarters Squadron Tank, 26th Armoured Brigade, 6th Armoured Division UK between Apr to November 1942, but given the finish I'll opt for a 1NY vehicle.

The Bridge classification would I believe have been 16 but 15 was a close as I had so a little well palced mud should help there. On the WD number again a little well palced mud will help.


I added a bundle of stowage in place of the fittings on the rear RHS.

Al
AlanL
Visit this Community
England - East Anglia, United Kingdom
Joined: August 12, 2005
KitMaker: 14,499 posts
Armorama: 11,675 posts
Posted: Wednesday, September 08, 2010 - 04:32 AM UTC
Hi Guys,

It's at this point in a blog having made 3 updates and encountered silence that one wonders if something might have gone wrong along the way???

Well what do you think so far?

Al
NICK-NAUPLIO
Visit this Community
Argolis, Greece / Ελλάδα
Joined: March 14, 2008
KitMaker: 67 posts
Armorama: 57 posts
Posted: Wednesday, September 08, 2010 - 06:19 AM UTC
I think most people are speechless with the good work you have done on this model.I really like. I have actually just bought the same kit so when i start it I will come back to this thread and follow it.
ChrisDM
Visit this Community
England - South West, United Kingdom
Joined: January 01, 2010
KitMaker: 717 posts
Armorama: 697 posts
Posted: Wednesday, September 08, 2010 - 06:29 AM UTC
Hi Alan,

I've been keepong an eye out for updates but keep missing them, and for some reason I don't get notifications when I subscribe

Anyway, superb (and very quick work) this is a stunner
AlanL
Visit this Community
England - East Anglia, United Kingdom
Joined: August 12, 2005
KitMaker: 14,499 posts
Armorama: 11,675 posts
Posted: Wednesday, September 08, 2010 - 07:03 AM UTC
Hi Nick and Chris,

Thanks for looking in guys, appreciated, gets a bit lonely in the blogs sometimes.

Just added a coat of Klear and staring to work on the exhaust.

Cheers

Al

PS - along with the Archer, one of these would be very cool!