_GOTOBOTTOM
Armor/AFV: Braille Scale
1/72 and 1/76 Scale Armor and AFVs.
Hosted by Darren Baker
ESCI M1A1 Abrams
weathering_one
Visit this Community
Ontario, Canada
Joined: April 04, 2009
KitMaker: 458 posts
Armorama: 456 posts
Posted: Wednesday, November 10, 2010 - 05:15 AM UTC
Hi everyone! As you might guess from my signature banner I am participating in the Braille Battlefield Campaign. I have progress pictures in the campaign thread but though that I would share with others that aren't part of the campaign.

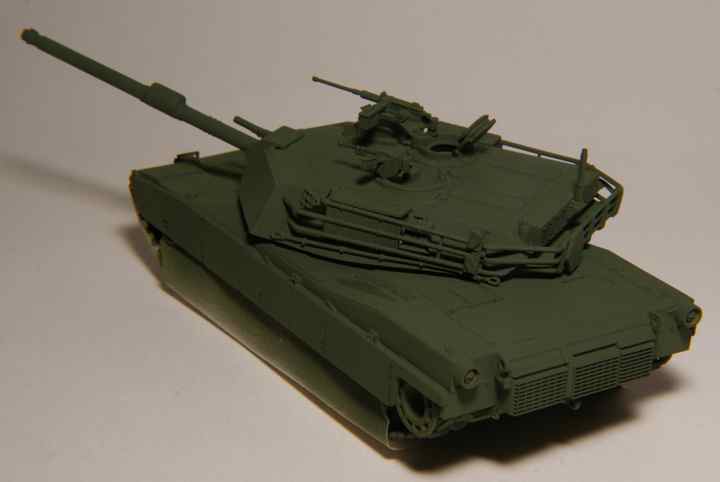
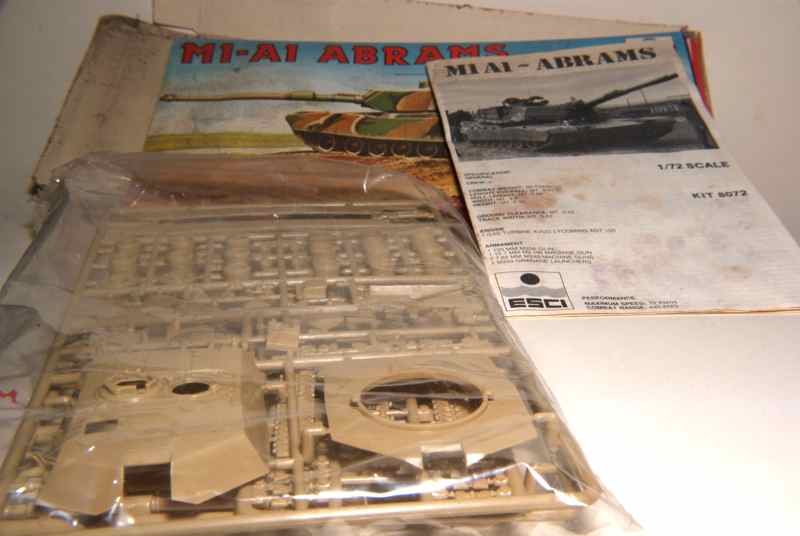
I wasn't sure if I was going to join another campaign but circumstances arose that nudged me in that direction. We had a minor flood in part of the basement and a couple of kits got soaked. An old ESCI M1A1 Abrams was one of the victims. The box was all but disintegrating, the instructions were wet and covered in grime and the decals look the worse for wear. Thankfully the parts trees were protected by a sealed plastic bag. Here's what there was.


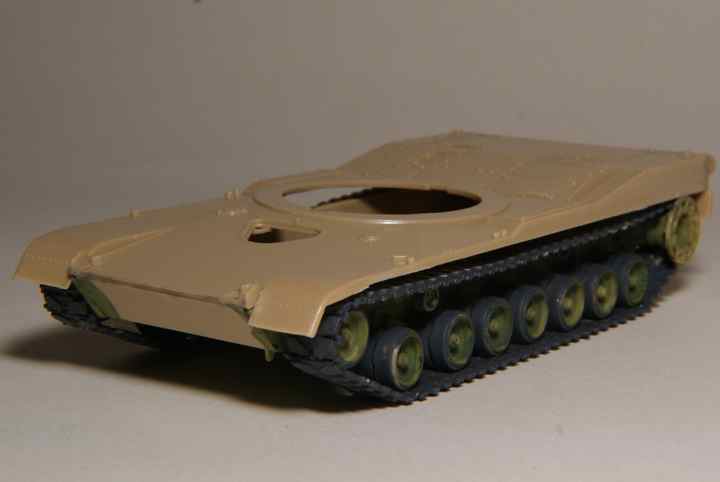
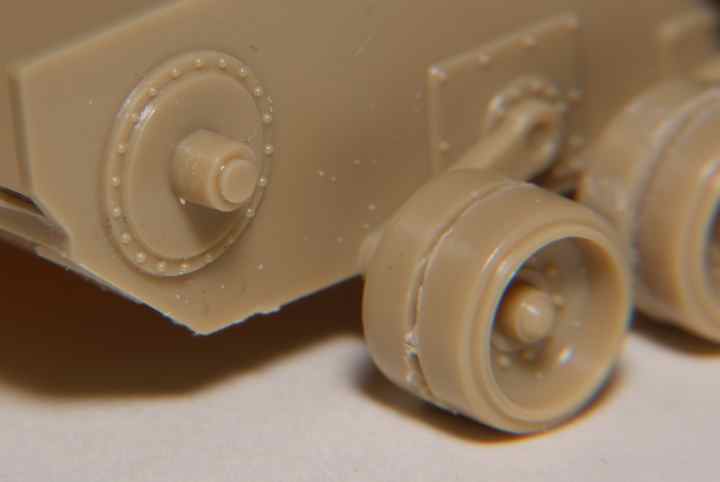
It seemed like a simple enough kit and I hoped that it wouldn't present as many problems as my Matchbox Challenger I did. The first thing that I noticed was that the main road wheels were one wide piece as opposed to being two separate wheels. I thought that the side skirt might disguise the issue but after dry fitting I saw that it wouldn't. Someone suggested that I cut a groove into the first and last exposed wheels and forget about the others. I tried this and it still didn't look right so I decided to cut the first and last two.


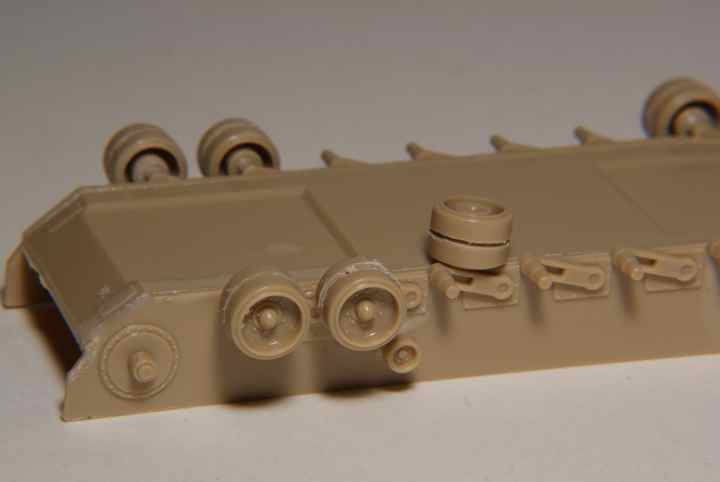
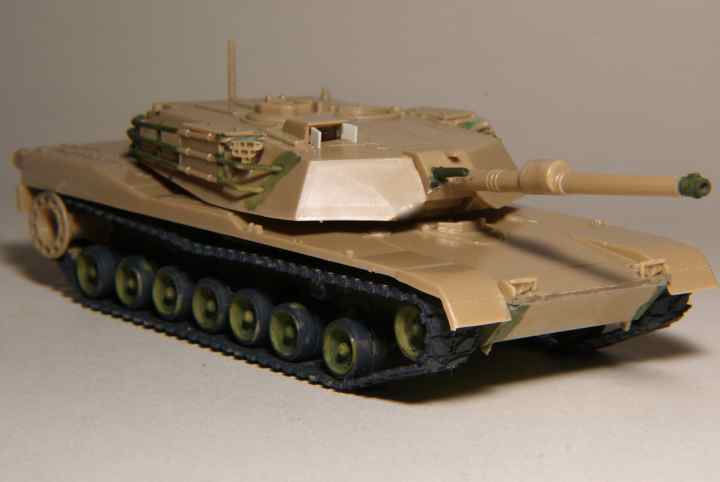
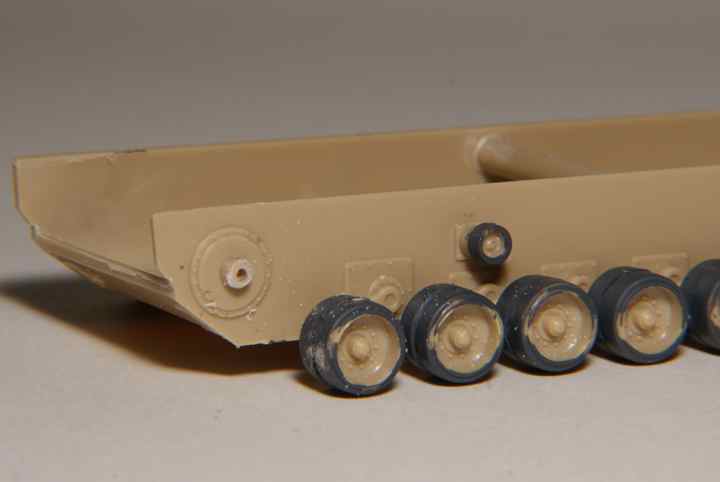
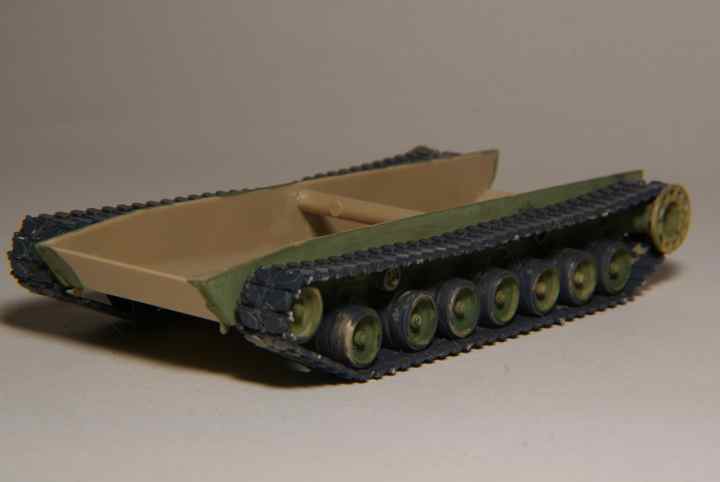
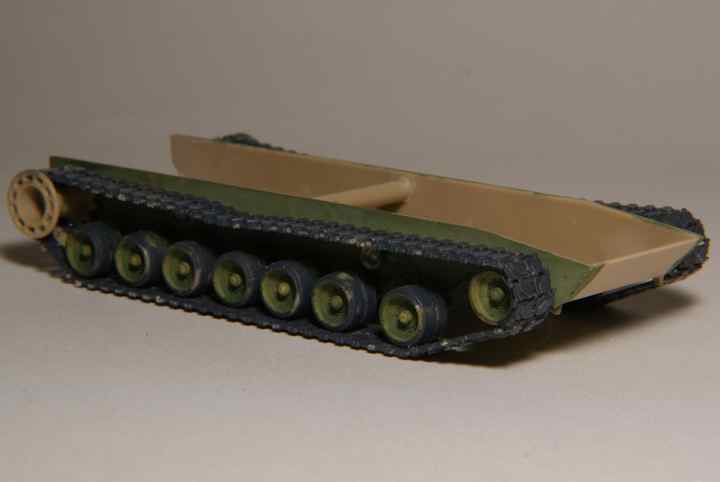
With the skirt held in place it didn't look too bad. However, one thing led to another and before I knew it I had cut a groove into ALL the road wheels.


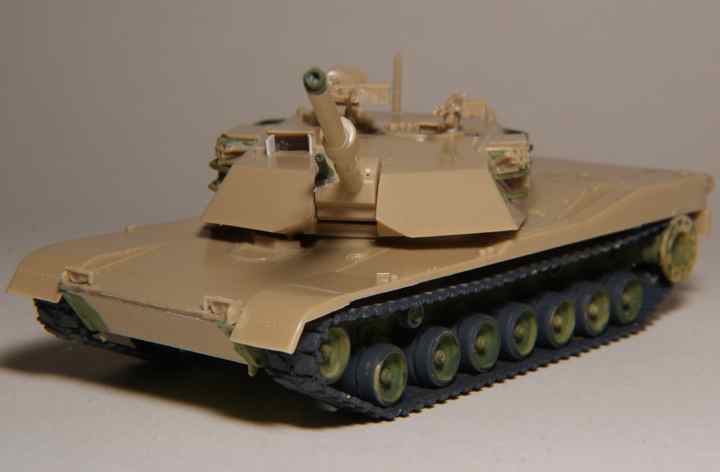
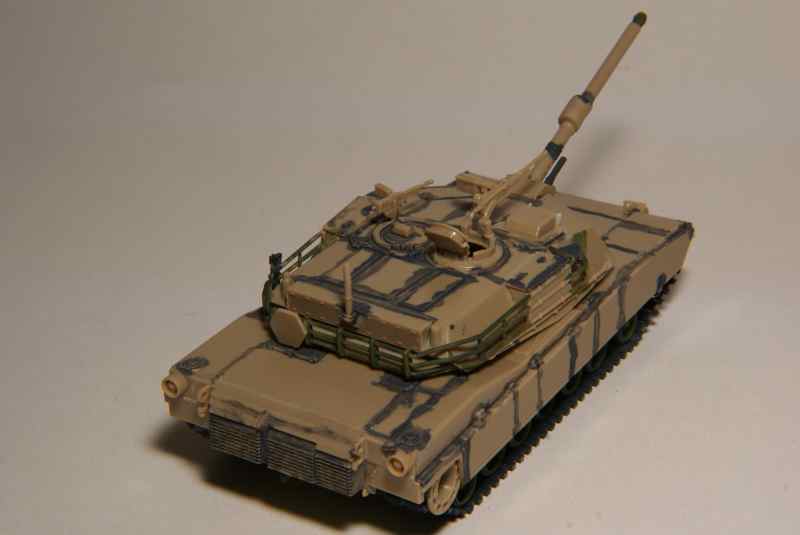
Here's a picture with all the road wheels done beside my previous campaign entry. Notice anything wrong?


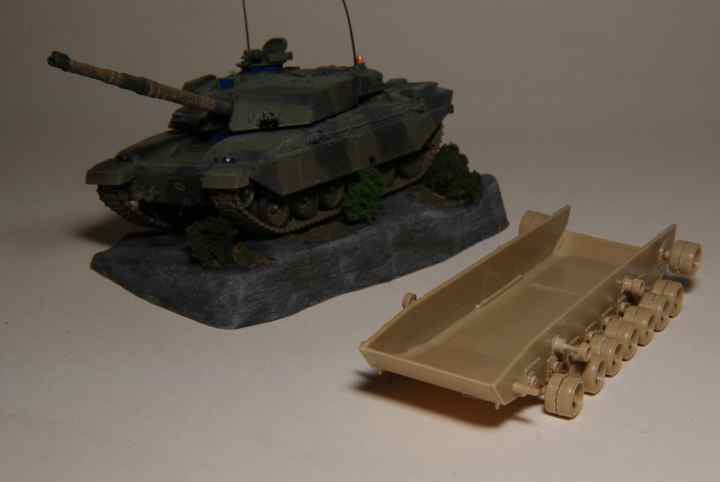
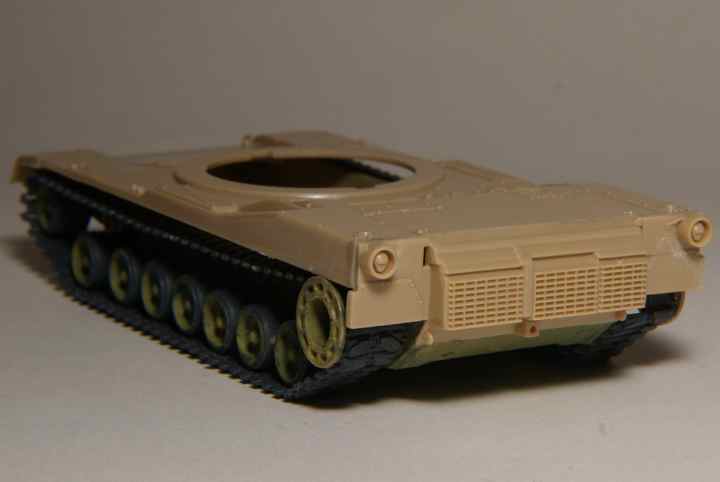
I guess I wasn't paying enough attention and I glued a set of wheels at the back where the sprocket should go. I should have caught this as the knob at the back was not much of anything compared to the other axles.


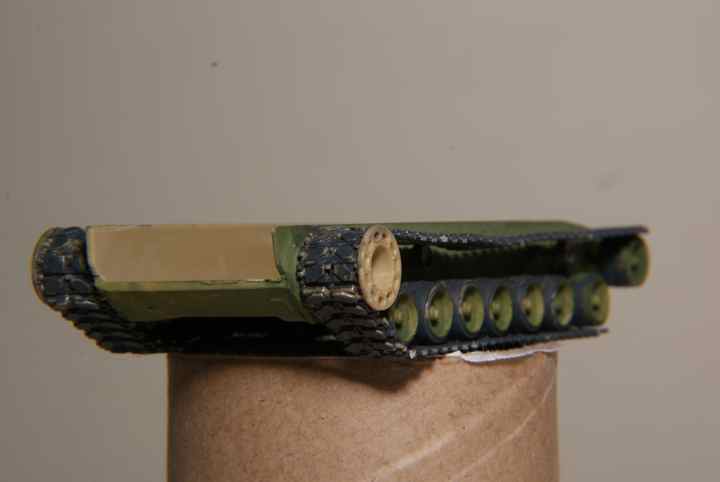
I had to break off those rear wheels, drill them out so they would fit on the front axles. I also had to drill and insert an axle where the sprocket goes.


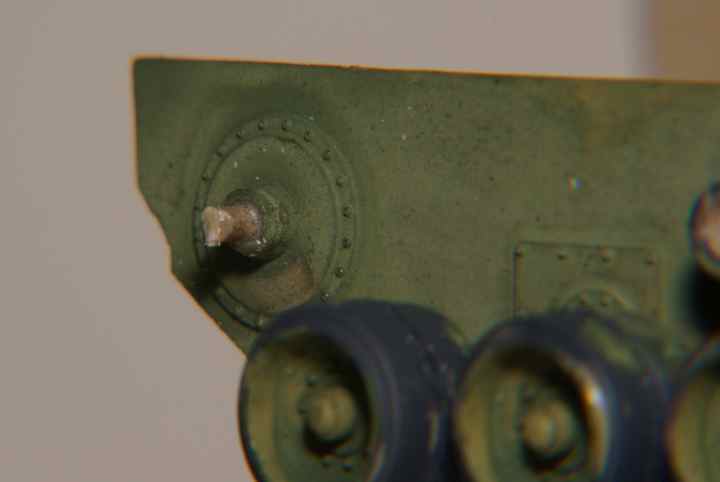
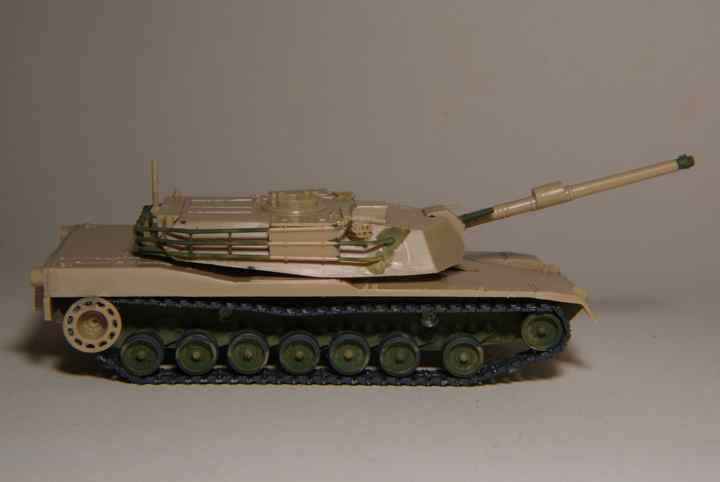
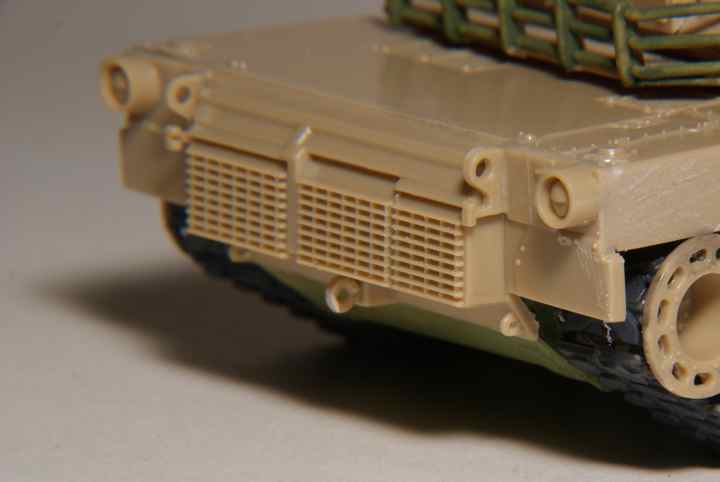
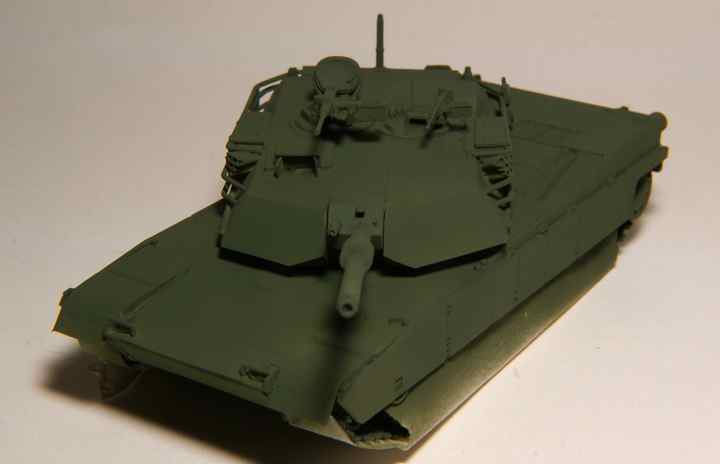
As you can see with the last picture I started some preliminary painting before the side skirts go on.

The link and length track were a royal pain and took forever to do. I did the right side first and found that the instructions were wrong about the number of pieces required. The left track was even worse as they had all the parts numbers except for two pieces wrong.


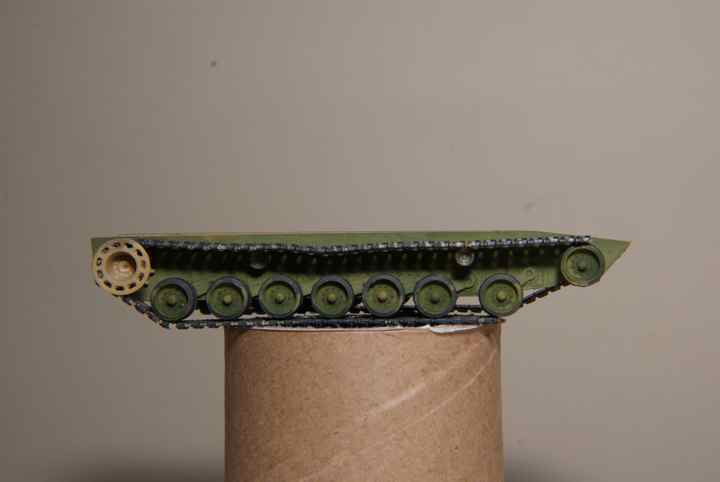
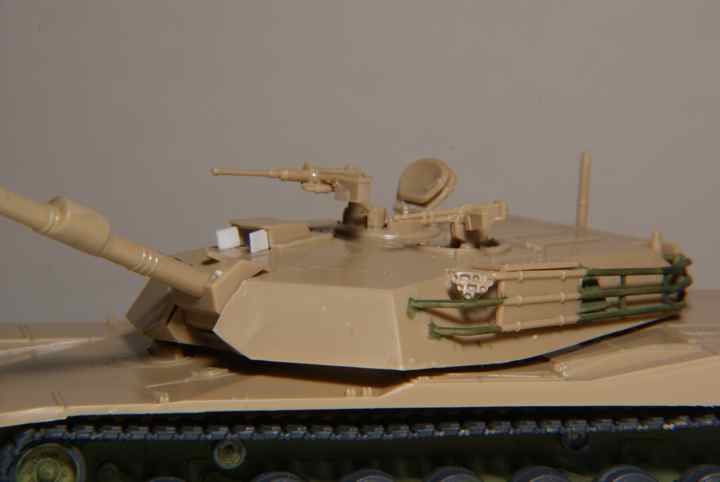
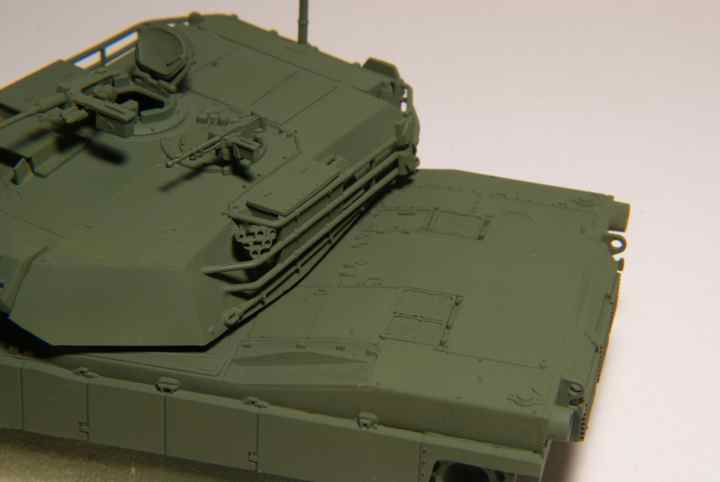
I finally got things together. Note I had to add a reinforcing piece of plastic as the side pieces were warped.


That's it for now and thanks for looking.

Regards,
AJ
PanzerAlexander
Visit this Community
Attica, Greece / Ελλάδα
Joined: February 17, 2010
KitMaker: 625 posts
Armorama: 608 posts
Posted: Wednesday, November 10, 2010 - 06:53 AM UTC
Hey AJ,

Good luck with your build.
it's very difficult to motivate my self to build an old kit when newer and much more accurate are around.
Of course such a kit is always a nice field ti try new painting and weathering techniques.

Looking forward to more pics.

P.A.

Sabot
Joined: December 18, 2001
KitMaker: 12,596 posts
Armorama: 9,071 posts
Posted: Wednesday, November 10, 2010 - 08:13 AM UTC
I did an article on it's little brother, the Italeri M1 Abrams (same basic kit) and had a lot of fun with it. You might find some helpful hints in the article.
https://armorama.kitmaker.net//features/149
weathering_one
Visit this Community
Ontario, Canada
Joined: April 04, 2009
KitMaker: 458 posts
Armorama: 456 posts
Posted: Wednesday, November 10, 2010 - 09:02 AM UTC
Thanks for looking in and commenting, Alexander. Painting the camouflage by airbrush will definitely be a first for me. I'll take your offering of luck and keep my fingers crossed.

@Sabot - How did I miss your article. I did a search on this site but everything it found was 1/35. I've already read your article and see what I can do to incorporate some of the things you mention. My gun was pretty good so I won't need to redo that. I'll see about the side skirts and the gunners sight. Obviously I should be looking at some pictures of the real thing. BTW, the back rack on the turret was totally out to lunch. Not knowing any better I hammered it into submission.

A rather quick update. I started on the turret and bored out the machine gun and them broke it three times while trying to attach the racks. As I state above, the back rack was just plain wrong in shape but I beat it into submission. The smoke discharger mountings were also pathetic and took some trial and error.


I managed a bit more but I will update the campaign thread before I do the same here.

Regards,
AJ
Sabot
Joined: December 18, 2001
KitMaker: 12,596 posts
Armorama: 9,071 posts
Posted: Wednesday, November 10, 2010 - 09:17 AM UTC

Quoted Text


@Sabot - How did I miss your article. I did a search on this site but everything it found was 1/35. I've already read your article and see what I can do to incorporate some of the things you mention. My gun was pretty good so I won't need to redo that. I'll see about the side skirts and the gunners sight. Obviously I should be looking at some pictures of the real thing. BTW, the back rack on the turret was totally out to lunch. Not knowing any better I hammered it into submission.


Easy to do, my contributions to the site have largely been purged or buried. You'd be hard pressed to find anything with my name attached to it.

The last sentence of my article discusses the inaccurate bustle rack. It was the same error they made on their 1/35 scale kit as well. I built so many of their 1/35 scale kits as departing gifts for fellow soldiers, I think I was probably the main purchaser for the vast majority of the Esci M1A1 kits. I think they went under when I was shipped to the desert in 1990 because I wasn't around to buy them any more.
tread_geek
Visit this Community
Ontario, Canada
Joined: March 23, 2008
KitMaker: 2,847 posts
Armorama: 2,667 posts
Posted: Wednesday, November 10, 2010 - 12:10 PM UTC
AJ, nice to see you sharing your build with the masses. It's also great to see help being provided by the community. And I also never ran across Sabots' excellant article on this kit. I'm glad that you are holding back progress shots so that our campaign might get more attension. (another shameless plug) Keep up the good work and can't wait to see the camo and more.

Cheers,
Jan
Sabot
Joined: December 18, 2001
KitMaker: 12,596 posts
Armorama: 9,071 posts
Posted: Wednesday, November 10, 2010 - 01:34 PM UTC
Thanks for the compliments. That article was written ages ago when I was stilll welcomed here. I've got a few others scattered online in various places. I enjoyed building the older kits and trying to bring them up to a more modern standard. Here's what I did with an old Airfix M551 Sheridan:
http://ebasic.easily.co.uk/05800C/03D03B/sheridan.htm
majjanelson
Visit this Community
South Carolina, United States
Joined: December 14, 2006
KitMaker: 1,355 posts
Armorama: 979 posts
Posted: Wednesday, November 10, 2010 - 04:34 PM UTC
Sabot,

Nice little article on the M551 Sheridan. I had previously seen your ESCI M1 article, which I liked and it helped me decide on purchasing an Italeri M1 (which is a re-release of the ESCI). The only drawback of either article is the pictures could be clearer, because I don't think they show off the improvements you made.

AJ,

I am currently converting my Italeri M1 Abrams into a M1A1 standard with some DML parts (roadwheels, 120 mm Main Gun, Improved GPS "doghouse", etc.) and scratch building some other items. I'm also using parts of Eduard and Part PE sets, too.


I guess I should start my own build log...

[EDIT] I forgot to mention that the support rollers are both of equal length - the rollers are both to the hull side of the track guide horns (picture from Prime Portal), but you've likely gone too far to even try to correct this.

Sabot
Joined: December 18, 2001
KitMaker: 12,596 posts
Armorama: 9,071 posts
Posted: Thursday, November 11, 2010 - 01:15 AM UTC

Quoted Text

Sabot,

Nice little article on the M551 Sheridan. I had previously seen your ESCI M1 article, which I liked and it helped me decide on purchasing an Italeri M1 (which is a re-release of the ESCI). The only drawback of either article is the pictures could be clearer, because I don't think they show off the improvements you made.


Built the kit while on TDY at Ft. Lee attending the Army Logistics Management College in 2002. I was living in a hotel room at the guest house with just a travel toolbox for my resources and a disposable camera. Didn't have an airbrush with me and was limited to rattle cans and bottles of Model Master they sold in the PX. I rediscovered 1/72 scale because housekeeping kept disturbing my 1/35 scale kit that I would leave on the little kitchenette table. With a 1/72 scale kit, I could place the entire project in a shoe box and set it on the shelf in the closet.
weathering_one
Visit this Community
Ontario, Canada
Joined: April 04, 2009
KitMaker: 458 posts
Armorama: 456 posts
Posted: Thursday, November 11, 2010 - 03:48 AM UTC
Thanks guys for the interest and information that you are providing. I am actually rather humbled by the attention that this simple build has caused. I've looked at some pictures on Prime Portal and have an idea of what my current skills may allow me to try. I've drilled a hole to the opposite side of the main gun from the machine gun for that extra sight. The little doors for the main sight are doable. I will leave the rack around the turret as it is, including the back part. We'll just call that part an unauthorized field enhancement. After all the hoops I jumped through to force it to fit I can't bring myself to remove it.

With the tracks/suspension done I don't know if I have the skill to add the holes to the sprocket. In Jeff's picture of the upper rollers I can see that the front one is the same as the back. Once the skirt is on all that area will be hidden anyway. I also noticed in that picture that there are what looks like support rods for the skirt. As for the skirt itself, mine looks pretty thin for styrene and could possibly need some support pieces. I could possibly thin down the exposed edges of the skirt and I'll have to study more pictures to determine where Sabot felt more thickness should be added.

So here are pictures of the build as it currently stands.

Upper body on.


Clear plastic added into main sight. I noticed in pictures that it should have a dividing piece in the middle. Have to think of how I'll mask it when painting begins.


Overall shot with turret on.


Regards,
AJ
weathering_one
Visit this Community
Ontario, Canada
Joined: April 04, 2009
KitMaker: 458 posts
Armorama: 456 posts
Posted: Friday, November 12, 2010 - 08:45 AM UTC
I got a few more little things done on the Abrams after checking out more pictures on Prime Portal. I drilled a small hole in the mantlet opposite the machine gun for an auxiliary sight (forgot to take a picture). Attached the headlights, drivers hatch and made the little doors for the main gunners sight. Also had to fill some sink holes with putty. The worst were on top of the smoke dischargers. Thanks to all of you that pointed some of these things out.


I attached all the towing and lifting hardware on the back and drilled out some solid towing eyes.


A few more parts to go and the fun (painting) part can begin.

Regards,
AJ

Edit: Had an opportunity to take the shot of the extra site so here it is.

PanzerAlexander
Visit this Community
Attica, Greece / Ελλάδα
Joined: February 17, 2010
KitMaker: 625 posts
Armorama: 608 posts
Posted: Saturday, November 13, 2010 - 07:11 AM UTC
Hey AJ

I am glad to see that you have made the best out of this old kit.

I totally agree about the ''fun part''

P.A.
weathering_one
Visit this Community
Ontario, Canada
Joined: April 04, 2009
KitMaker: 458 posts
Armorama: 456 posts
Posted: Saturday, November 13, 2010 - 08:39 AM UTC
Thanks Alexander. Now for my humble pictures of the current status. Except for the tow cables and the side skirts it's pretty much done. This has to be a record speed build for me. The commanders machine gun was a real pain with all the tiny parts and had to be assembled with tweezers only. I have poured over tons of pictures on Prime Portal and from what I see the skirts of this kit look quite good (to my uneducated eye) so I think that I will leave them as is. With a bit of luck, painting should start in a day or two. The decals are in pretty bad shape (they got wet in part) so I'll have to see what I can do.


Regards
AJ
weathering_one
Visit this Community
Ontario, Canada
Joined: April 04, 2009
KitMaker: 458 posts
Armorama: 456 posts
Posted: Tuesday, November 16, 2010 - 06:47 AM UTC
My M1A1 is moving along. I attached the final pieces and found that I had one spare track link. After looking at various pictures I found one that had a couple of track links attached to the turret side rack. Well, I attached the one for effect.

In the 'I am trying something new' department, I looked over a few postings where people talk about pre-shading and such. Since I've already tried a few new things during this build, why not one more. I used a dark grey acrylic to accent certain lines and areas of the tank. I mixed it to a consistency of about 60% thinner to 40% paint. The dark really settled into the little recesses and panel lines but I wonder if I should have thinned it even more. Here's the pictures.


Still not totally sure what I am doing but I guess experimenting is all part of learning.

Regards,
AJ
weathering_one
Visit this Community
Ontario, Canada
Joined: April 04, 2009
KitMaker: 458 posts
Armorama: 456 posts
Posted: Thursday, November 18, 2010 - 08:42 AM UTC
I've masked off the tracks on the Abrams with obviously, masking tape! I then applied a lightened shade of Nato green and after that an even lighter shade in certain areas. The preshading seems to have worked but it doesn't quite show as well in the pictures as in person. I think that I'll keep using that in any future build


Now the problem will be finding a suitable masking method and applying the other colours. As the tank doesn't have too many obstructions I might try cutting up pieces of tape but I'll let the green dry overnight before I try that. In looking at the instructions paint guide it seems to be more than a bit strange in the colour choices (light olive, khaki drill, chocolate, oak??). In all the pictures that I've looked at there was nothing like that. I'll stick to the three Nato colours.

Regards,
AJ
majjanelson
Visit this Community
South Carolina, United States
Joined: December 14, 2006
KitMaker: 1,355 posts
Armorama: 979 posts
Posted: Thursday, November 18, 2010 - 05:21 PM UTC
AJ,

Are you referring to the pattern in the instructions, which is shown at the bottom of Henk of Holland's excellent webpage ESCI Page 2 - M1A1 Abrams, and you can then click on the actual instruction sheet.

Like the ESCI M1A1, this pattern didn't really exist AFAIK, or at least was never fielded. You could paint your Abrams:

1. As shown in your instructions.

2. More like the real MERDIC 4-color Camo Pattern (as shown on this AVLB Bridge, not the launcher, which is in 3-color NATO).


3. Leave it in solid OD (as shown by this M1IP on the KCAMPS Website).


4. In the newer 3-color NATO Camo Pattern (picture from Prime Portal).


You wouldn't be historically correct or incorrect for any of the above, mainly due to the inaccuracies of the ESCI M1A1 itself, so I'd do whatever you would enjoy more.
Just trying to help...
majjanelson
Visit this Community
South Carolina, United States
Joined: December 14, 2006
KitMaker: 1,355 posts
Armorama: 979 posts
Posted: Friday, November 19, 2010 - 07:43 AM UTC
An image of an M1 Abrams with MERDC Camo pattern (from the AFV Database):


There is also one shown on The Armor Site!'s M1A1/A2 Abrams website.

This is the image (from a web search):


A good example of the MERDC camo paint scheme on a SP Howitzer...:


...and on a M60 Blade Tank:

weathering_one
Visit this Community
Ontario, Canada
Joined: April 04, 2009
KitMaker: 458 posts
Armorama: 456 posts
Posted: Friday, November 19, 2010 - 09:33 AM UTC
Jeff (majjanelson) my sincerest thanks for all the information that you have provided. I take it that the original painting guide is for a version of what you call the MERDC camo. Obviously their choice of colour names is hardly accurate.

My feeling during around the time of my last post was to try to achieve the Nato colour scheme as in the third picture of your second last posting. My only exposure to doing camo was with my Challenger I build and that was two colour and done freehand with some touch-ups by brush. Three colour might be within my skills but that four colour, especially the smaller squiggles are beyond my current abilities.

Deepest thanks,
AJ
majjanelson
Visit this Community
South Carolina, United States
Joined: December 14, 2006
KitMaker: 1,355 posts
Armorama: 979 posts
Posted: Friday, November 19, 2010 - 04:55 PM UTC
AJ,

I agree, the MERDC camo pattern would be "difficult" to paint in 1/72 scale.

Please note that the line drawing views I linked above are for the standard three-color NATO camo pattern. The color code is: 1 - black, 2 - green, 3 - brown, and you can see it in the side view picture above the drawings.

Another option is the desert sand color...
weathering_one
Visit this Community
Ontario, Canada
Joined: April 04, 2009
KitMaker: 458 posts
Armorama: 456 posts
Posted: Saturday, November 20, 2010 - 05:32 AM UTC
Again I must thank you Jeff. I sort of surmised what colour the numbers stood for but it's better to have confirmation. As for the desert scheme, it probably wouldn't work out. I purposely weathered the lower hull sides prior to assembly for a Nato green scheme and with the skirts on it would be quite difficult to do a proper paint job. Plus the plain sand colour is rather dull.

From the drawing and the Prime portal picture it pretty much appears that this camo scheme was a standard. I'll try my best to match it and at this point I feel that I'll start with the black. As I mentioned earlier,

I am not sure that the kit decals will work after being so old and having been damp at one point. A local individual happened to have an M1 produced or branded under the AMT/ERTL name. Their kit has some major warping of the lower hull and even the body so they relegated it o spare parts. They offered me the decals. Now here's the kicker. The instructions show the tank painted in an overall green scheme and the decals are for a Canadian Abrams!!! According to the box the kit is 1988 vintage and he suggested that it might have been at a time when Canada was looking at buying the M1. The kit is almost identical to the one I am building but has a different canon. Talk about a what if!

Regards,
AJ
weathering_one
Visit this Community
Ontario, Canada
Joined: April 04, 2009
KitMaker: 458 posts
Armorama: 456 posts
Posted: Monday, November 29, 2010 - 08:02 AM UTC
I didn't waste all my time and actually practiced, practiced and practiced with the airbrush. I hope that these first results justified all the effort (and wasted paint). Actually the paint wasn't that bad as I used inexpensive craft store acrylics. The model is sprayed with Nato black from Tamiya and I used printouts of the pictures that Jeff provided above. I tried to get as close to the pattern there as possible. These pictures were taken just after I sprayed so some areas might still be wet. It's the first time I have tried actual camouflage freehand. I had to cut the pressure way back to only 15 or so psi.


Next will be to do the brown colour and then see where touch-ups are needed. The gallery here was down again and as I've used a lot of room there I had to get another picture host. I hope that I did things right and the pictures show.

Regards,
AJ
weathering_one
Visit this Community
Ontario, Canada
Joined: April 04, 2009
KitMaker: 458 posts
Armorama: 456 posts
Posted: Wednesday, December 01, 2010 - 07:38 AM UTC
The next two progress pictures aren't that good but show the attempt with the same process with the brown.


For some reason the brown doesn't show up too well in the pictures except the blotch surrounded by black.

Here is my attempts after about a dozen pictures with different camera settings.


My target picture.


The duplication attempt.


Obviously I still haven't got things quite right but I think that I'm getting closer.


Regards,
AJ
MacTrucks
Visit this Community
Indiana, United States
Joined: November 12, 2006
KitMaker: 285 posts
Armorama: 228 posts
Posted: Wednesday, December 01, 2010 - 02:44 PM UTC
Time for a confession, I have thus far never attempted to airbrush camo in 1/72 scale. I have a number of projects that are pretty much done except for this. The first color is on, but I haven't convinced myself to take the plunge. Your work has inspired me to take a short at it.

Also, this is a nice build of the Esci kit. They were my favorites for years, but I prefer the newer Revell of Germany kits. I always enjoy it when someone takes some outdated "POS" and shows that it can be built and display well if you put the effort into it.
majjanelson
Visit this Community
South Carolina, United States
Joined: December 14, 2006
KitMaker: 1,355 posts
Armorama: 979 posts
Posted: Wednesday, December 01, 2010 - 03:56 PM UTC
AJ,

Looking great! I really like your side comparison images You've made a decent attempt to recreate the camo pattern, and hand Air Brushing it to boot. Your Abrams should look pretty good once you add some weathering, too.
weathering_one
Visit this Community
Ontario, Canada
Joined: April 04, 2009
KitMaker: 458 posts
Armorama: 456 posts
Posted: Saturday, December 04, 2010 - 05:16 AM UTC
@Mactrucks, thanks for the comments and I am happy that my attempts at the painting have inspired you. I've tried a couple of different masking techniques in the past but they never turned out. I've heard about a toothpaste masking but was afraid to try it as I use acrylics.

@majjanelson, thanks again for all your help and suggestions. I am still at a loss as to what to do about markings. I though that I could resurrect the damaged decals but they might not suit after looking at the Prime Portal images. From what I see the only makings on those are serial numbers on the hull back that are done in yellow and black depending on the background colour. All the kit decal markings are straight black that wouldn't show up much. The weathering I am still undecided upon.

I've been a little slow doing anything on the Abrams. I've started the detail painting and have been looking at a lot of pictures to see what else needs to be done. There are a few areas, like the main sight doors, that need to be touched up. I have also taken a lot of pictures trying to find a good setting to show the camouflage better but the Nato brown just doesn't want to show up. I might have lightened it too much so I'll try re-spraying it with a less lightened colour.


Regards,
AJ
 _GOTOTOP