

Hello to all, Dustin here. I'm a relative newcomer to the armor scene (usually a flyboy) but I'm pretty psyched on it after seeing all the fine work on this forum. I finished my first piece of armor, a nice M1a1 w/ TWMP, a few months ago (thanks for the advice/parts to all those that chipped in). I ended up liking the experience so much, I've picked up another DML Abrams and a Legends Tusk 2 kit. I know the Abrams has been done a lot in the past, but it seems that people still like it as much as I do, so this go-around, I think I'll post up pictures of the build as I progress for those that are interested or would like to offer critiques/suggestions. I'm also very new to resin, so this looks like it'll be a bit of a trial-by-fire. I'm referencing the Tankograd Tusk book, as well as a lot of good walkaround sites, but that'll only get me so far. You all know a LOT more than I do about the actual building of this stuff, and I'm excited to learn more as I go.
First pictures to come in the next day or so, once I've started sticking stuff together. Any suggestions or things I oughtta know before I start?
Regards,
-Dustin
Hosted by Darren Baker
Build Log: DML M1A2 w/ Legends Tusk II

charging_rhinos

Joined: June 16, 2010
KitMaker: 89 posts
Armorama: 76 posts
Posted: Wednesday, December 15, 2010 - 08:41 AM UTC

sgtsauer

#065
Joined: March 30, 2002
KitMaker: 2,605 posts
Armorama: 1,814 posts

Posted: Wednesday, December 15, 2010 - 10:01 AM UTC
I look forward to your blog. I intend to do the same project at some time in the future.
Be sure that when you begin your blog, you begin it by going to:
1. Forums
2. Armor/AFV
3. Select a topic association if desired (modern-usa for example)
4. Then click on the 'New Topic' button at the top next to the page numbers
5. The click in this box:
Blog? Click to indicate this is going to be a build log topic.
You may have already been familiar with those steps. Not trying to insult you, just helping out. I find blogs easier to find/follow if they are posted there correctly as opposed to being lumped in with regular postings.
Looking forward to your work.

charging_rhinos
Joined: June 16, 2010
KitMaker: 89 posts
Armorama: 76 posts
Posted: Wednesday, December 15, 2010 - 10:22 AM UTC
Thanks very much for the info! I had no idea there was a build log option at all. Learning already, and I haven't even opened a sprue bag...
I'll start a new post with the correct blog settings when I am ready with my first sets of photos.
I'll start a new post with the correct blog settings when I am ready with my first sets of photos.

CMOT


Joined: May 14, 2006
KitMaker: 10,954 posts
Armorama: 8,571 posts

Posted: Wednesday, December 15, 2010 - 10:41 AM UTC
Continue here and I will make it a blog for you. Good luck with your build.

HeavyArty
Joined: May 16, 2002
KitMaker: 17,694 posts
Armorama: 13,742 posts
Posted: Wednesday, December 15, 2010 - 11:45 AM UTC
Good luck on it and I look forward to following your build. I just finished up the Dragon M1A2 SEP with TUSK I and a full interior. The TUSK set is pretty easy to work with and comes out nicely. The TUSK II set is basically the TUSK I set with a few more pieces added. One thing to look out for is the belly armor. It is too long and should only go back to the 5th road wheel. You need to remove 43mm from the front portion of the rear belly armor piece (it comes in 2 pieces, front and rear). Also, to make the TC's armor plates fit around the CITV, you have to cut a section out of the front (middle) plate. Other than that, I had no isues with it.
You can see mine here.
Hope that helps.
You can see mine here.
Hope that helps.

Wolfe
Joined: January 24, 2004
KitMaker: 173 posts
Armorama: 95 posts
Posted: Wednesday, December 15, 2010 - 11:45 AM UTC
Looking forward to watching your build, Ive been considering the TUSK II set for awhile, but other projects keep popping up. 
Good luck!
Good luck!
charging_rhinos
Joined: June 16, 2010
KitMaker: 89 posts
Armorama: 76 posts
Posted: Friday, December 17, 2010 - 05:05 AM UTC
First update:
It's taken me a bit longer than expected to get things rolling (I've had a nasty electrical/magnetic/optical physics final to study for). But over the past two nights, I've made some considerable progress.
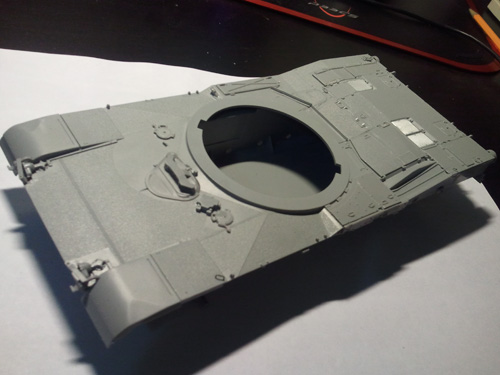
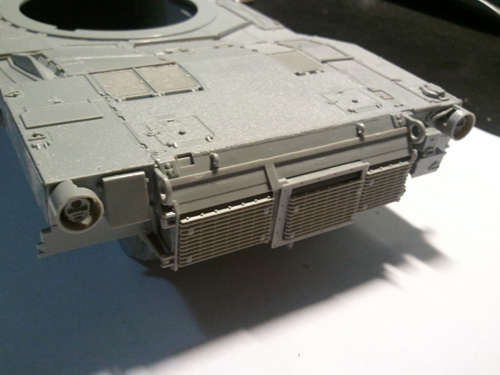
The wheels have been assembled, main hull has been almost completed, the entire engine deck has been installed (minus the photoetch screens), and I'm starting on the suspension tonight. Man, this is a nice kit! It almost just falls together. I've had probably a grand total of 4 hours into it thus far, and I'm pretty pleased with the results. The kit does have some issues that i wasn't expecting after the AIM build over the summer. Like others have mentioned, my hull was pretty badly warped out of the box. The aft portions of the sponsons were "taco-ed" inward a little bit, and the entire hull was slightly twisted from front to back. Not ideal. The AIM's hull was nearly flawless oob. I hair-dryered the SEP's hull ever so gently, and they went into place fairly well.
Had a bit of a scare with the rightmost exhaust grating for the turbine chamber this morning before work. I didn't realize, but I had bent the tip of my hobby knife blade and it formed a microscopic hook. I was lightly scoring the grate with minimal pressure to release it from the sprue, and when the final stroke popped it free, that little hook grabbed and bent almost every little piece of the grate that sticks out on the edges. It ripped the first one completely off. I had a very minor, completely silent freak out fest at the workbench, so as not to disturb the sleeping wife. Some super thin liquid cement softened the bent sections up enough that they went back into place without fatiguing or distorting the styrene at all really. It honestly looks like it never happened.
Anyway, when I get home, I'll snap some pics and post them. As usual, please feel free to critique, laugh, etc. I'm always open to any type of comments. And while I'm at it, I did have a question about some later decisions I'll have to make: On my M1A1 AIM, I built it up so that it was as if it were on a longer excursion, stacked with the usual mountain of stowage. The TUSK tanks seem to be much more limited in their purpose/scope, so I was wondering what they might stow in the bustle rack and on top of the turret, if anything. Does their urban environment make it necessary for them to take less on their missions or fit it all inside? I guess I just don't see the need for tents and cots on a tank that is only patrolling hostile urban streets. I doubt that's an ideal place to go camping. I could be very wrong though, so I thought I'd ask. Thoughts?
It's taken me a bit longer than expected to get things rolling (I've had a nasty electrical/magnetic/optical physics final to study for). But over the past two nights, I've made some considerable progress.
The wheels have been assembled, main hull has been almost completed, the entire engine deck has been installed (minus the photoetch screens), and I'm starting on the suspension tonight. Man, this is a nice kit! It almost just falls together. I've had probably a grand total of 4 hours into it thus far, and I'm pretty pleased with the results. The kit does have some issues that i wasn't expecting after the AIM build over the summer. Like others have mentioned, my hull was pretty badly warped out of the box. The aft portions of the sponsons were "taco-ed" inward a little bit, and the entire hull was slightly twisted from front to back. Not ideal. The AIM's hull was nearly flawless oob. I hair-dryered the SEP's hull ever so gently, and they went into place fairly well.
Had a bit of a scare with the rightmost exhaust grating for the turbine chamber this morning before work. I didn't realize, but I had bent the tip of my hobby knife blade and it formed a microscopic hook. I was lightly scoring the grate with minimal pressure to release it from the sprue, and when the final stroke popped it free, that little hook grabbed and bent almost every little piece of the grate that sticks out on the edges. It ripped the first one completely off. I had a very minor, completely silent freak out fest at the workbench, so as not to disturb the sleeping wife. Some super thin liquid cement softened the bent sections up enough that they went back into place without fatiguing or distorting the styrene at all really. It honestly looks like it never happened.
Anyway, when I get home, I'll snap some pics and post them. As usual, please feel free to critique, laugh, etc. I'm always open to any type of comments. And while I'm at it, I did have a question about some later decisions I'll have to make: On my M1A1 AIM, I built it up so that it was as if it were on a longer excursion, stacked with the usual mountain of stowage. The TUSK tanks seem to be much more limited in their purpose/scope, so I was wondering what they might stow in the bustle rack and on top of the turret, if anything. Does their urban environment make it necessary for them to take less on their missions or fit it all inside? I guess I just don't see the need for tents and cots on a tank that is only patrolling hostile urban streets. I doubt that's an ideal place to go camping. I could be very wrong though, so I thought I'd ask. Thoughts?
HeavyArty
Joined: May 16, 2002
KitMaker: 17,694 posts
Armorama: 13,742 posts
Posted: Friday, December 17, 2010 - 06:02 AM UTC
You are correct that the later tanks with TISK are not piled high with gear. This is more due to our operating out of fixed bases now, as opposed to having to live off your vehicle for extended periods of time as we did during the invasion. Once we settled into FOBs (Forward Operating Bases), the patrols would only last a few hours at a time. Most gear is left back at the FOB. Some things you will see on them still are water and MRE boxes, a couple ammo cans, and maybe a smaller bag or two of personal gear.
Here is how I loaded out my latest M1A2 SEP build.


I'm looking forward to seeing your build. The Dragon M1A2 SEP kit (along with the M1A1 AIM) is great.
Here is how I loaded out my latest M1A2 SEP build.
I'm looking forward to seeing your build. The Dragon M1A2 SEP kit (along with the M1A1 AIM) is great.
charging_rhinos
Joined: June 16, 2010
KitMaker: 89 posts
Armorama: 76 posts
Posted: Friday, December 17, 2010 - 07:25 AM UTC
Thanks very much, Gino. That is a great looking tank you made. I did notice one thing on yours that is different than mine, and I'm now wondering if my choice was inaccurate. I see that your hull's APU cover is the one that encloses a (from what I understand) fairly uncommon Hawker battery, rather than the more common UAAPU cover. I hope my understanding is right on that. Any reason you chose that one over the standard UAAPU cover?
charging_rhinos
Joined: June 16, 2010
KitMaker: 89 posts
Armorama: 76 posts
Posted: Friday, December 17, 2010 - 05:43 PM UTC
As promised, here are a few quick pics of the progress. I'm sure most have seen this model being built in other posts, so I won't bore you too much with an excess of photos during these early stages. I'll save most of that for the Tusk 2 mods and the painting.
HeavyArty
Joined: May 16, 2002
KitMaker: 17,694 posts
Armorama: 13,742 posts
Posted: Saturday, December 18, 2010 - 03:29 AM UTC
Yours is looking good so far. Good job. On the Hawker Battery, mine is a commission build and that is what the customer requested. The Hawker Battery system is becoming more common as the UUAPU is not as reliable as originally thought.
charging_rhinos
Joined: June 16, 2010
KitMaker: 89 posts
Armorama: 76 posts
Posted: Saturday, December 18, 2010 - 04:16 PM UTC
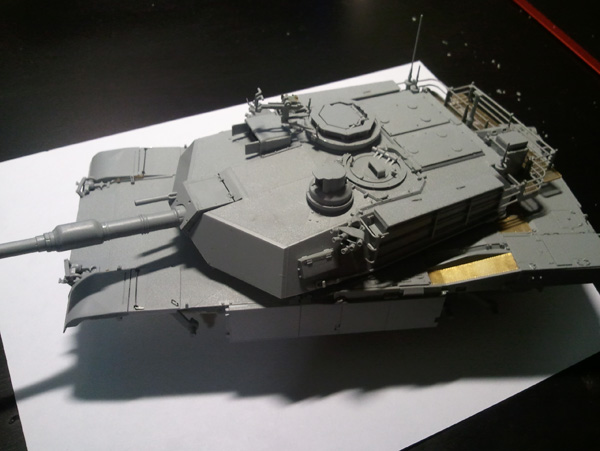
so, the turret is coming along nicely now. Those nasty gaps along the seams of those angled faces next to the main gun have yet to be filled and dressed. I've assembled and installed the main gun, loader & TCs' hatches, and the CITV. The main hull is about 90% done, but I'm still not decided on if it'll go on a diorama or just on a piece of 1" thick display acrylic (I got a bunch for free from work), so I haven't mounted the suspension arms quite yet.
My next question for you experts has come up as a result of poking around at PrimePortal. I saw some great pics of a TUSK1 that had a preliminary version of a remote weapons system installed. I'm now wondering if I ought to order a CROWS kit, scratch build the portions needed to update it, and stick it on there. My goal at the time of ordering this kit was to build a very modern and cutting-edge Abrams, and a CROWS seems like it would fit that purpose very well. But if I did so, I'd have to ditch the cool looking TC's shields and a few other things that seem pretty neat too. And even if I did put on the CROWS, there are no guarantees that what I do would be accurate in any way. Opinions?
My next question for you experts has come up as a result of poking around at PrimePortal. I saw some great pics of a TUSK1 that had a preliminary version of a remote weapons system installed. I'm now wondering if I ought to order a CROWS kit, scratch build the portions needed to update it, and stick it on there. My goal at the time of ordering this kit was to build a very modern and cutting-edge Abrams, and a CROWS seems like it would fit that purpose very well. But if I did so, I'd have to ditch the cool looking TC's shields and a few other things that seem pretty neat too. And even if I did put on the CROWS, there are no guarantees that what I do would be accurate in any way. Opinions?
DamianR

Joined: May 29, 2010
KitMaker: 33 posts
Armorama: 32 posts
Posted: Monday, December 20, 2010 - 12:30 AM UTC
CROWS 2 was only tested on some M1A2SEP tanks in Iraq, it is still not part of a TUSK kit, and most M1A2SEP's with TUSK were still equipped with M2HB's on simle pintle mount.
charging_rhinos
Joined: June 16, 2010
KitMaker: 89 posts
Armorama: 76 posts
Posted: Monday, December 20, 2010 - 04:29 AM UTC
Thanks for the input Damian. I think you're right. I ought to stick with the current TUSK 2 mods, rather than go off on to many tangents. I can always get another kit and do it again when the CROWS is implemented.
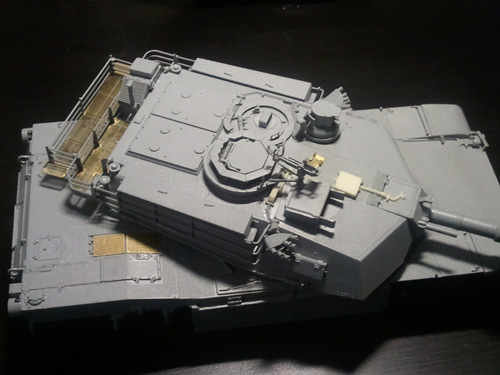
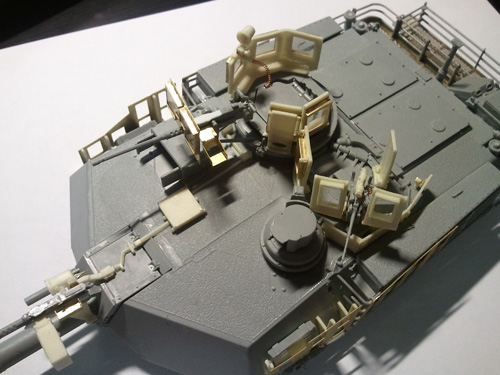
Anyway, I'm basically done with the basic tank itself, and starting to add the Tusk mods. So far, no large hiccups, other than the fact that I ran out of knife blades last night. The belly armor is as far as I dared go with a dull knife. Here are some pics of the beastie:


Still a fair bit of touching up on the belly armor to go. I have yet to sand the joint down (epoxy is still drying), blend the slight step on the edges where the two halves meet, fill any gaps and create the sloped back edge to the armor as shown here:
Overall, the fit is decent and the trimming down of the length of the second segment of belly armor turned out to be a blessing in disguise. It left me with only about 2 cm of the resin rail to remove, rather than 6.
Anyway, I'm basically done with the basic tank itself, and starting to add the Tusk mods. So far, no large hiccups, other than the fact that I ran out of knife blades last night. The belly armor is as far as I dared go with a dull knife. Here are some pics of the beastie:
Still a fair bit of touching up on the belly armor to go. I have yet to sand the joint down (epoxy is still drying), blend the slight step on the edges where the two halves meet, fill any gaps and create the sloped back edge to the armor as shown here:
Overall, the fit is decent and the trimming down of the length of the second segment of belly armor turned out to be a blessing in disguise. It left me with only about 2 cm of the resin rail to remove, rather than 6.
DamianR
Joined: May 29, 2010
KitMaker: 33 posts
Armorama: 32 posts
Posted: Monday, December 20, 2010 - 10:40 AM UTC
Short question, and observation. The belly armor covers only driver and turret basket area, or it is placed full lenght over hull belly? Because on that picture it seems that belly armor is not completely mounted, look at it, it is not symmethric, and maybe there are places to joint both parts (driver/turret basket plate and engine plate)?

2IDsecondtonone

Joined: May 22, 2010
KitMaker: 47 posts
Armorama: 43 posts

Posted: Monday, December 20, 2010 - 02:30 PM UTC
Just a quick note, it looks like you've mounted the cradle for the .50 Cal the other way round. Should be able to swap the ends around. Looking great so far
charging_rhinos
Joined: June 16, 2010
KitMaker: 89 posts
Armorama: 76 posts
Posted: Monday, December 20, 2010 - 02:48 PM UTC
@ DamianR
I did some more research on it, and is seems that the armor is designed not to go the full length of the hull. Apparently it's for the crew only. I scoured the net and the Tankograd TUSK book, and I didn't see a single pic where the armor extended the full length of the hull. Just speculating, but maybe it's supposed to be able to mangle the rear of the tank if needs be, so that it can dissipate some of the energy of, say, an IED blast. But that's just a guess.
@ 2IDsecondtonone
Yeah, it was backwards, but it wasn't glued down. It can still be removed. I didn't glue it on purpose so while I'm putting on the turret add-ons, I won't break the mount and cause more headaches. I'm extremely clumsy. Thanks for the heads up.
charging_rhinos
Joined: June 16, 2010
KitMaker: 89 posts
Armorama: 76 posts
Posted: Tuesday, December 21, 2010 - 05:26 PM UTC
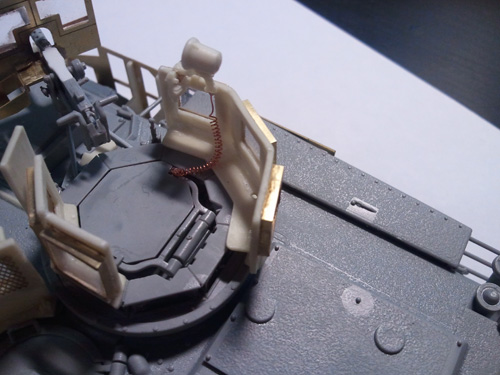
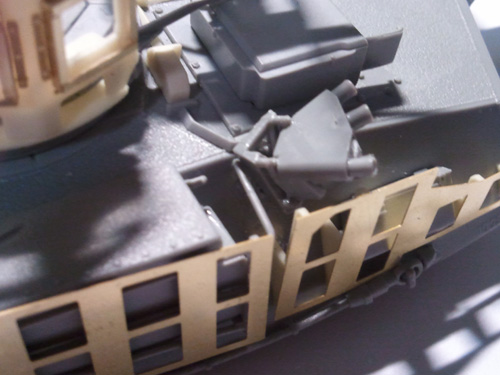
more pics. I've finished with the belly armor and am now working on the conduit along the top. The small angled piece on the mantlet was an incredible pain to remove from the block. It seemed rather straight forward, and I was very careful as i scored it free. But even with all the care, it broke in two places. After another minor freakout session and a tiny-part-on-floor hunt, it went back together without much trouble. Hopefully the rest of it will go more easily.


Next step is the coaxial anti-sniper "Ma Deuce" up front. The resin gun from Legends is very detailed, but it is VERY warped. Both the separate barrel piece and the barrel root that connects to the body of the gun droop significantly. Pics to come. I think I'll be using one of the .50s that came with the Dragon kit, but we'll see what happens tomorrow.
Next step is the coaxial anti-sniper "Ma Deuce" up front. The resin gun from Legends is very detailed, but it is VERY warped. Both the separate barrel piece and the barrel root that connects to the body of the gun droop significantly. Pics to come. I think I'll be using one of the .50s that came with the Dragon kit, but we'll see what happens tomorrow.

sauceman

Joined: September 28, 2006
KitMaker: 2,672 posts
Armorama: 2,475 posts

Posted: Wednesday, December 22, 2010 - 03:12 AM UTC
Nice clean build, good work!
cheers
cheers

charging_rhinos
Joined: June 16, 2010
KitMaker: 89 posts
Armorama: 76 posts
Posted: Saturday, December 25, 2010 - 03:19 AM UTC
Hi all, and thanks for the encouragement and tips. It's been a very fun build thus far.
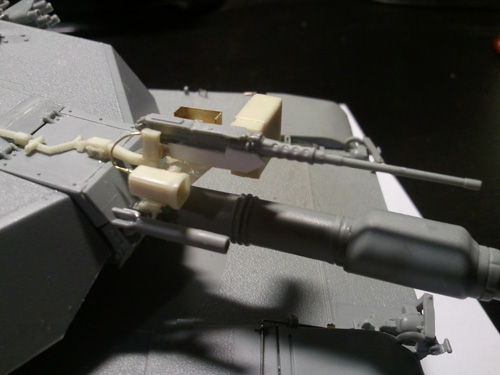
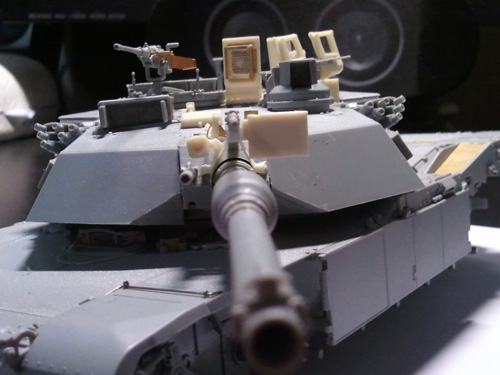
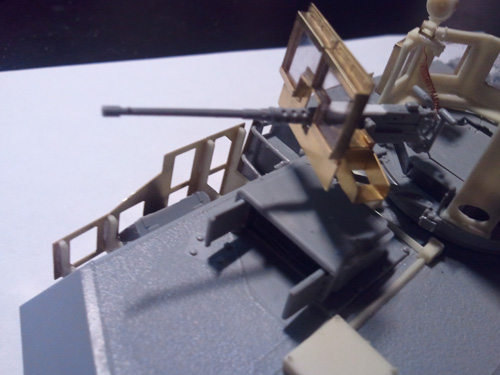
As promised, here is a pic of the sad Legends M2 50 caliber coaxial gun:

As you can see, it is definitely an ugly piece of resin. I did glue it in place temporarily, just to see how it would look, hence the sloppy ca glue on the base, and it looked atrocious. I'm confident that I could have straightened it out with some heat and a bit of time, but there was another issue that I would not be able to fix: it was VERY noticeably smaller than the styrene .50 that came with the Abrams kit. The firing mechanism housing was almost true to scale, but the barrel was too thin, and it was over 1/8" too short. I removed the resin, used the extra DML .50, scratch built the new mount from some Everest HO scale 1x8 plank strips, and it finally looks right. Here is the finished product:
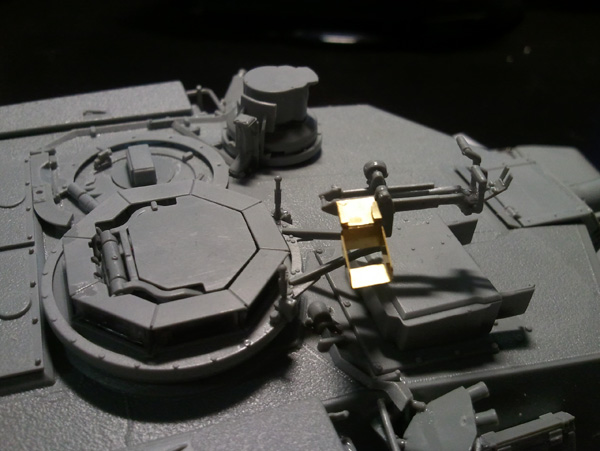
I also started on the loader's cupola mods, and they're coming right along so far. The plastic sheeting for the window panes is pretty brittle, and I got a few cracked pieces while trying to remove them. Those that will build this kit, be sure to take that step nice and slow, cut a little larger than the needed size, and sand the edges down until they fit correctly.
Here are some more pics of the progress:


Oh, and I almost forgot. Merry Christmas to all of you! I hope it's a good one, and that you find lots of spruey goodness under the tree.
As promised, here is a pic of the sad Legends M2 50 caliber coaxial gun:
As you can see, it is definitely an ugly piece of resin. I did glue it in place temporarily, just to see how it would look, hence the sloppy ca glue on the base, and it looked atrocious. I'm confident that I could have straightened it out with some heat and a bit of time, but there was another issue that I would not be able to fix: it was VERY noticeably smaller than the styrene .50 that came with the Abrams kit. The firing mechanism housing was almost true to scale, but the barrel was too thin, and it was over 1/8" too short. I removed the resin, used the extra DML .50, scratch built the new mount from some Everest HO scale 1x8 plank strips, and it finally looks right. Here is the finished product:
I also started on the loader's cupola mods, and they're coming right along so far. The plastic sheeting for the window panes is pretty brittle, and I got a few cracked pieces while trying to remove them. Those that will build this kit, be sure to take that step nice and slow, cut a little larger than the needed size, and sand the edges down until they fit correctly.
Here are some more pics of the progress:
Oh, and I almost forgot. Merry Christmas to all of you! I hope it's a good one, and that you find lots of spruey goodness under the tree.
sauceman
Joined: September 28, 2006
KitMaker: 2,672 posts
Armorama: 2,475 posts
Posted: Saturday, December 25, 2010 - 03:57 AM UTC
Good job on the .50
I agree the resin one looks like crap.
cheers
I agree the resin one looks like crap.
cheers

junglejim
Joined: February 18, 2003
KitMaker: 1,728 posts
Armorama: 1,629 posts

Posted: Saturday, December 25, 2010 - 06:01 AM UTC
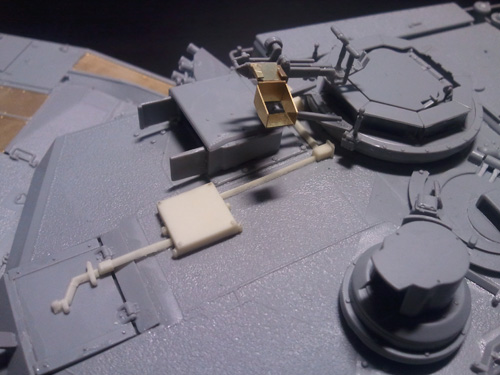
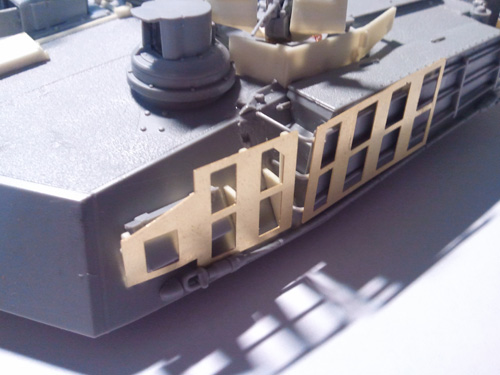
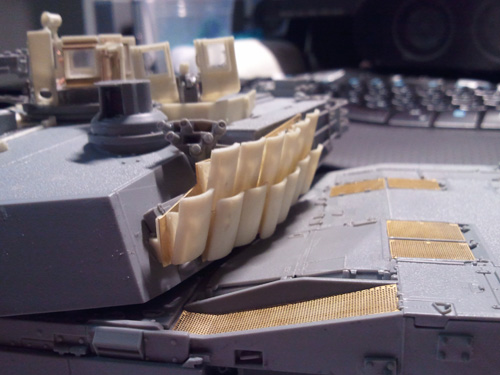
Coming along nicely. Just a quick observation, the p.e. part here should be under the plastic lip, it's a tray for the jerry can (you can see it on Gino's build above.) Should be simple enough to pop off and move to the bottom.

Jim
Jim
charging_rhinos
Joined: June 16, 2010
KitMaker: 89 posts
Armorama: 76 posts
Posted: Saturday, December 25, 2010 - 03:18 PM UTC
Quoted Text
Coming along nicely. Just a quick observation, the p.e. part here should be under the plastic lip, it's a tray for the jerry can (you can see it on Gino's build above.) Should be simple enough to pop off and move to the bottom.
Thanks very much, Jim. It was an easy fix, thank goodness. I guess I was in too big a hurry with that and didn't read the instructions. Typical male, my wife would say right about now

sgtsauer
#065
Joined: March 30, 2002
KitMaker: 2,605 posts
Armorama: 1,814 posts
Posted: Saturday, December 25, 2010 - 03:32 PM UTC
Great job on your build so far.
You did an excellent job adjusting to the .50 cal debacle. Looks great so far. Keep the updates coming.
You did an excellent job adjusting to the .50 cal debacle. Looks great so far. Keep the updates coming.
charging_rhinos
Joined: June 16, 2010
KitMaker: 89 posts
Armorama: 76 posts
Posted: Monday, December 27, 2010 - 04:16 AM UTC
Thanks very much for the kind words, Brent.
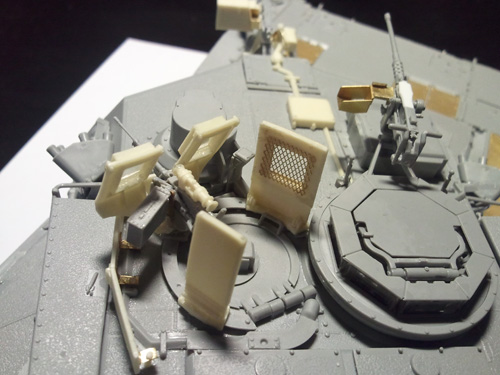
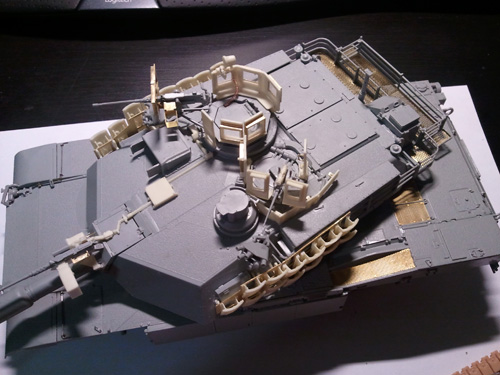
Ok, another update. I've made a lot of progress during the holiday, and learned a few things that might be of use to others that do the Tusk II upgrade. Here are some more pics:
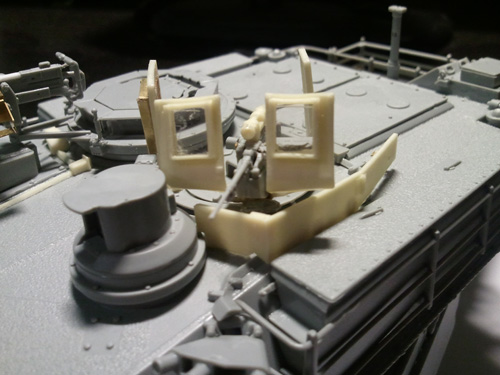
Shields are finally done.
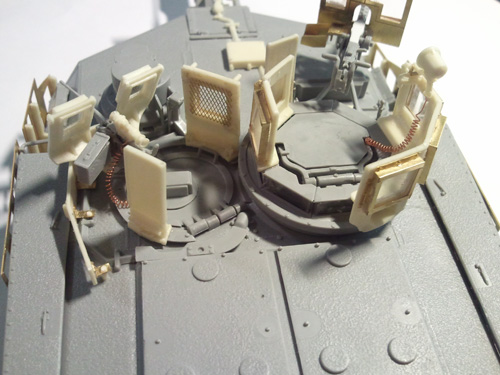
The TC's 50 cal shield was a bit of a pain, but not overly so. It was pretty difficult to cut the glass panes in the 'Utah' shape needed with my hobby knife, so out came the dremel. It was very very touchy work, and I had to take a long time to get it right. But it definitely adds a lot to the model in terms of looks. The Legends instructions do show a series of bolt heads on the backside of the shield, but I saw none of them in the kit to use. I also imagine they'll be a complete nightmare to glue in place without a lot of glue slopped around them, so I'll just leave those off for now.
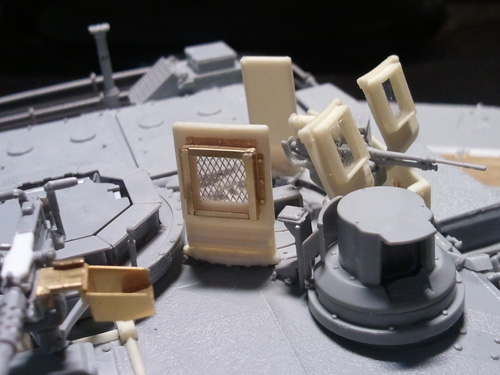
Started on the XM32 ERA tiles on the turret sides next. One thing you might notice is the fact that a few pics show the base plates too high on the model with the tow cables in place. After looking through every photo I could find, it seems that most or all of the new, non-prototype Tusk 2s have removed the tow cables from the turret sides, so that's what I did. I took them off and dropped the photoetch base plates down until they were very close to the bottom edge of the turret, and it looked and fit much better.
On a bit more severe surgical note, I also had to remove the smoke grenade launchers from the turret and raise them up a few millimeters. The Tankograd book has one photo near the back of the book that shows that there is some sort of semi-custom riser plate that allows each SGL to perch slightly above the reactive armor tiles, just enough to have the grenades clear the tiles. This meant that the normal position according to the DML instructions was just too low. You'll see that in some of the following pics:
And with the tiles in place:

That last photo makes the SGLs appear to be much higher than they really are. Only about half of the unit actually sticks above the tops of the tiles.
Overall, things are coming along pretty well. The XM32 tiles release very easily from their blocks with a few small knife scores on the front and one across the injector bridge on the back, and cleanup is just a few strokes with sandpaper. The only major hiccup was the location of the smoke grenade launchers. I was so glad that Dragon offers an extra set with their SEP kit, as it came in mighty handy.
Skirts, DS tracks, priming and painting are coming up next.
Ok, another update. I've made a lot of progress during the holiday, and learned a few things that might be of use to others that do the Tusk II upgrade. Here are some more pics:
Shields are finally done.
The TC's 50 cal shield was a bit of a pain, but not overly so. It was pretty difficult to cut the glass panes in the 'Utah' shape needed with my hobby knife, so out came the dremel. It was very very touchy work, and I had to take a long time to get it right. But it definitely adds a lot to the model in terms of looks. The Legends instructions do show a series of bolt heads on the backside of the shield, but I saw none of them in the kit to use. I also imagine they'll be a complete nightmare to glue in place without a lot of glue slopped around them, so I'll just leave those off for now.
Started on the XM32 ERA tiles on the turret sides next. One thing you might notice is the fact that a few pics show the base plates too high on the model with the tow cables in place. After looking through every photo I could find, it seems that most or all of the new, non-prototype Tusk 2s have removed the tow cables from the turret sides, so that's what I did. I took them off and dropped the photoetch base plates down until they were very close to the bottom edge of the turret, and it looked and fit much better.
On a bit more severe surgical note, I also had to remove the smoke grenade launchers from the turret and raise them up a few millimeters. The Tankograd book has one photo near the back of the book that shows that there is some sort of semi-custom riser plate that allows each SGL to perch slightly above the reactive armor tiles, just enough to have the grenades clear the tiles. This meant that the normal position according to the DML instructions was just too low. You'll see that in some of the following pics:
And with the tiles in place:
That last photo makes the SGLs appear to be much higher than they really are. Only about half of the unit actually sticks above the tops of the tiles.
Overall, things are coming along pretty well. The XM32 tiles release very easily from their blocks with a few small knife scores on the front and one across the injector bridge on the back, and cleanup is just a few strokes with sandpaper. The only major hiccup was the location of the smoke grenade launchers. I was so glad that Dragon offers an extra set with their SEP kit, as it came in mighty handy.
Skirts, DS tracks, priming and painting are coming up next.
 |

WEB HOSTING BY


Copyright ©2021 Armorama and Kitmaker Network, a subsidiary of Silver Star Enterprises
All Rights Reserved. Please read our Conditions of Use and Privacy Policy.
All Rights Reserved. Please read our Conditions of Use and Privacy Policy.