

Excellent work! I can't get over the size of the dio, most dio's are in the ground plane but the vertical element of the block of flats adds an interesting dimension.
Can't wait to see the final product.
....... sigh ........ I need a bigger house !
Hosted by Darren Baker
An ambitious project

Magpie

Joined: July 10, 2011
KitMaker: 653 posts
Armorama: 273 posts

Posted: Sunday, August 28, 2011 - 04:11 PM UTC

BLACKWATER

Joined: August 05, 2010
KitMaker: 449 posts
Armorama: 441 posts

Posted: Monday, August 29, 2011 - 02:35 PM UTC
Hi Victor
Thank you for a wonderful show for our manufacturing process and look forward to the next surprise.
blackwater
Thank you for a wonderful show for our manufacturing process and look forward to the next surprise.
blackwater

olivato

Joined: August 16, 2005
KitMaker: 127 posts
Armorama: 107 posts
Posted: Friday, September 02, 2011 - 12:50 PM UTC
Hi everyone!
A sunny week in Buenos Aires and everything starts to take shape! The DAS is drying and letting me continue with the buildings.
The process goes on as you can see in the picture:
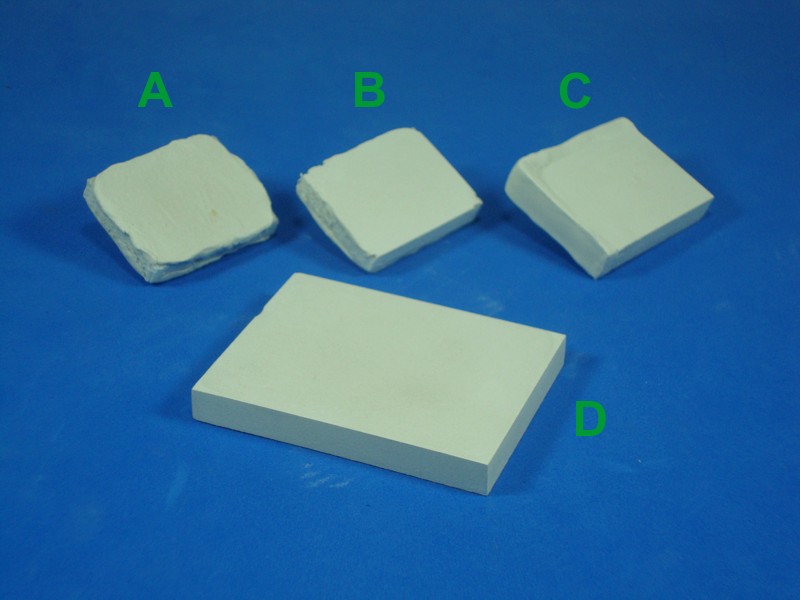
A) This is how the parts look like after drying between the layers of wood.
B) I´ve sanded the faces to reach the thickness as designed.
C) I´ve put more DAS on the sides.
D) Sand again, and the part is finished.
I finished the parts of the terrace and presented all together to see if there were any problems. Luckly for me, everything is going on as I planned. Now I have to glue, refill, add textures, details, and then, start with the effects of the war, a busy weekend.
VonHengest, Blackwater: Thank you for your words.
Magpie: The diorama is about 60cm (23.6 inches) x 30cm (11. and about 45cm (17.7) tall. Yes, the height adds a more interesting dimension to the diorama.
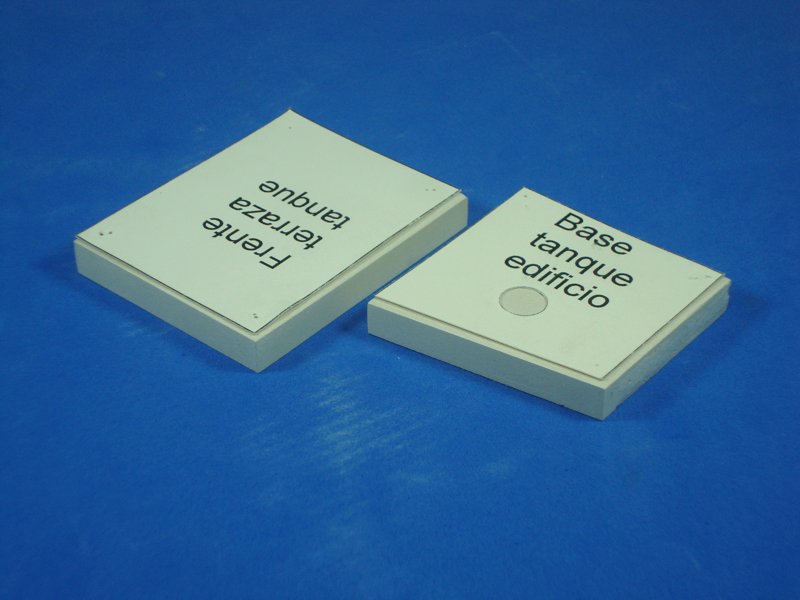
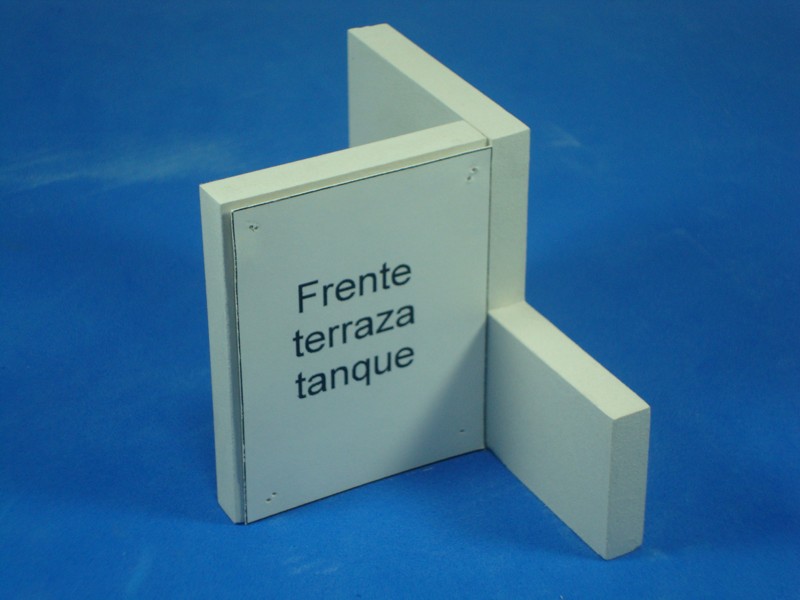
Hisham: If you are still following this topic, I promised a better explanation, so here it is. When I design the buildings, the parts are as you can see in the finished one. Then when I do the template to cut the polystyrene (the "soul" of each part), I have to calculate what sides you can see, and, on these sides I leave a little space for the gauze and DAS. In one of the pictures you can see this difference between the template and the final piece, and in the other picture you can see that the sides attached to another wall don' t need that space.
A sunny week in Buenos Aires and everything starts to take shape! The DAS is drying and letting me continue with the buildings.
The process goes on as you can see in the picture:
A) This is how the parts look like after drying between the layers of wood.
B) I´ve sanded the faces to reach the thickness as designed.
C) I´ve put more DAS on the sides.
D) Sand again, and the part is finished.
I finished the parts of the terrace and presented all together to see if there were any problems. Luckly for me, everything is going on as I planned. Now I have to glue, refill, add textures, details, and then, start with the effects of the war, a busy weekend.
VonHengest, Blackwater: Thank you for your words.
Magpie: The diorama is about 60cm (23.6 inches) x 30cm (11.
and about 45cm (17.7) tall. Yes, the height adds a more interesting dimension to the diorama.Hisham: If you are still following this topic, I promised a better explanation, so here it is. When I design the buildings, the parts are as you can see in the finished one. Then when I do the template to cut the polystyrene (the "soul" of each part), I have to calculate what sides you can see, and, on these sides I leave a little space for the gauze and DAS. In one of the pictures you can see this difference between the template and the final piece, and in the other picture you can see that the sides attached to another wall don' t need that space.

olivato
Joined: August 16, 2005
KitMaker: 127 posts
Armorama: 107 posts
Posted: Sunday, September 18, 2011 - 02:14 PM UTC
Hi!
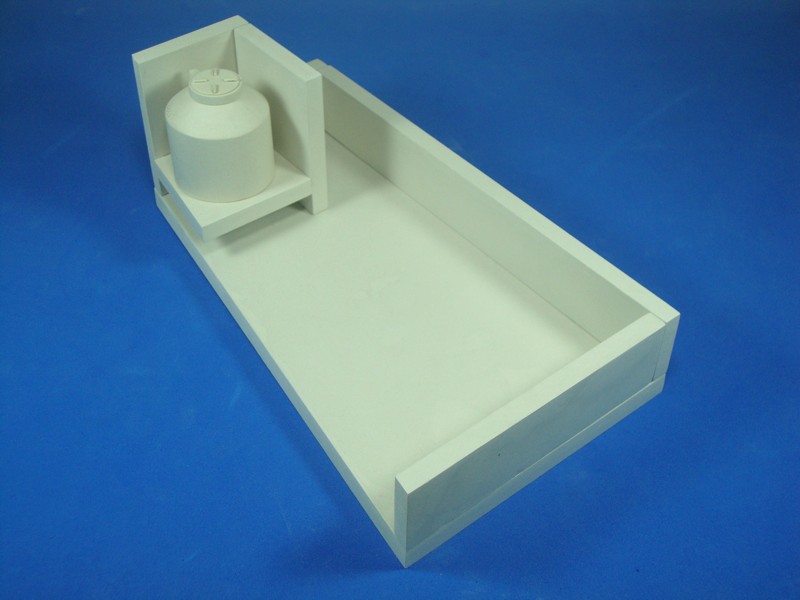
With the spring coming, the days in Buenos Aires are lovely sunny. I have been working with the DAS on the parts of the buildings, but at the same time I have been trying to finish the terrace, and they look like that:
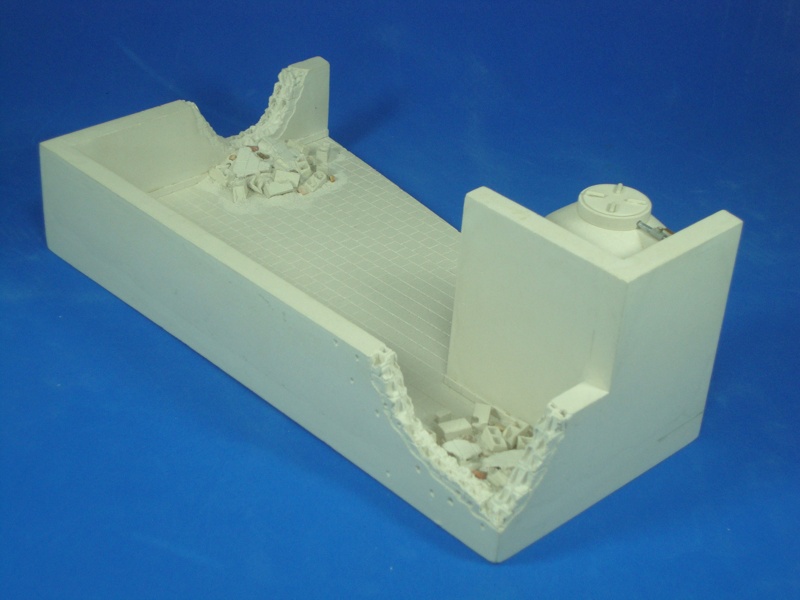
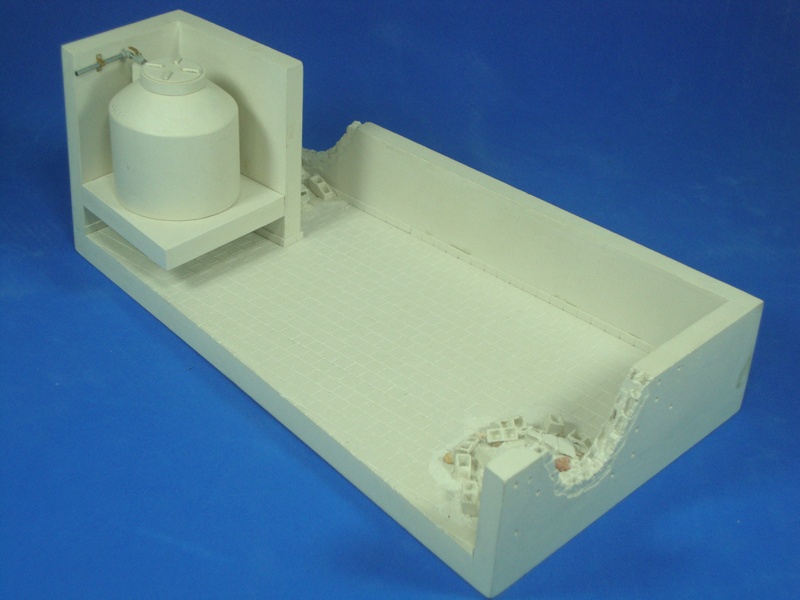
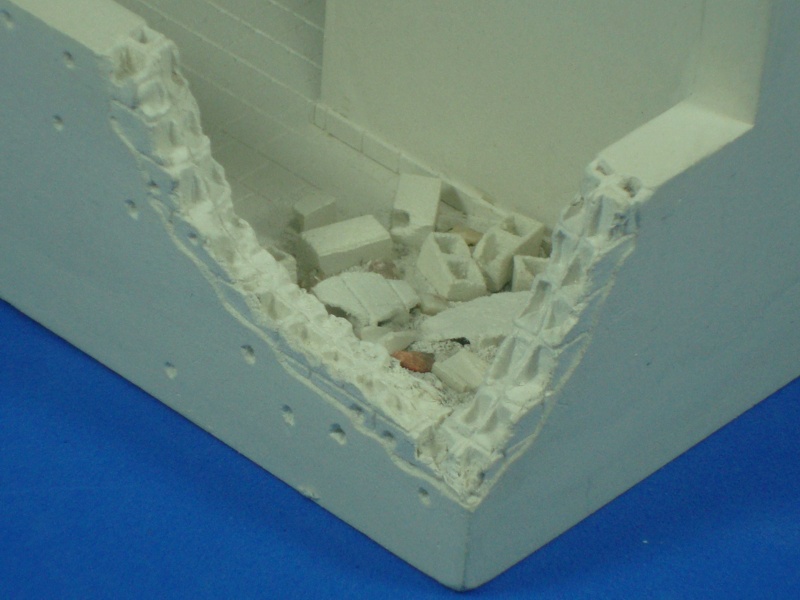
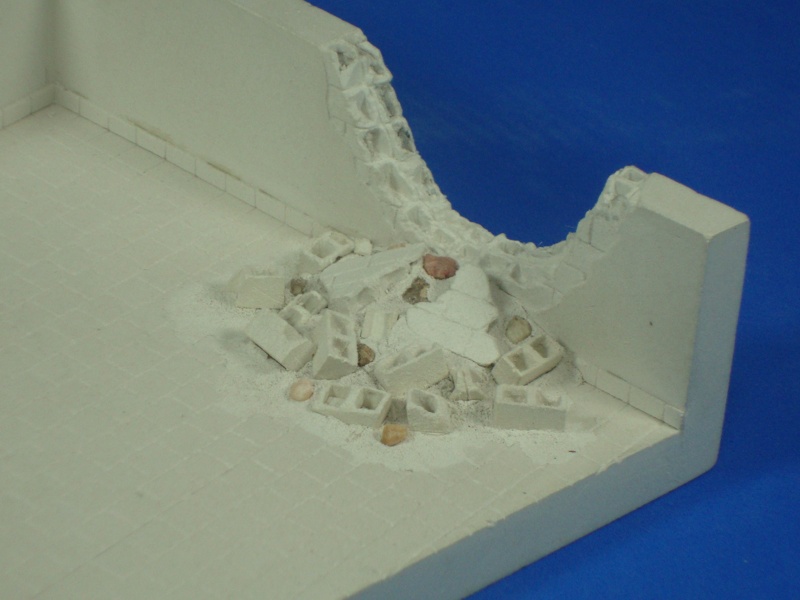
The details have always required lot of time, but the hollow bricks took more time that I imagined.
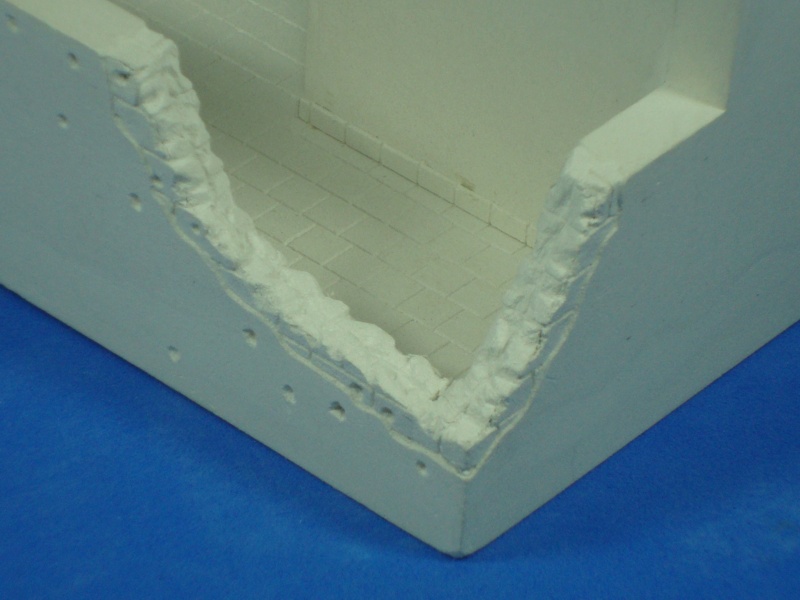
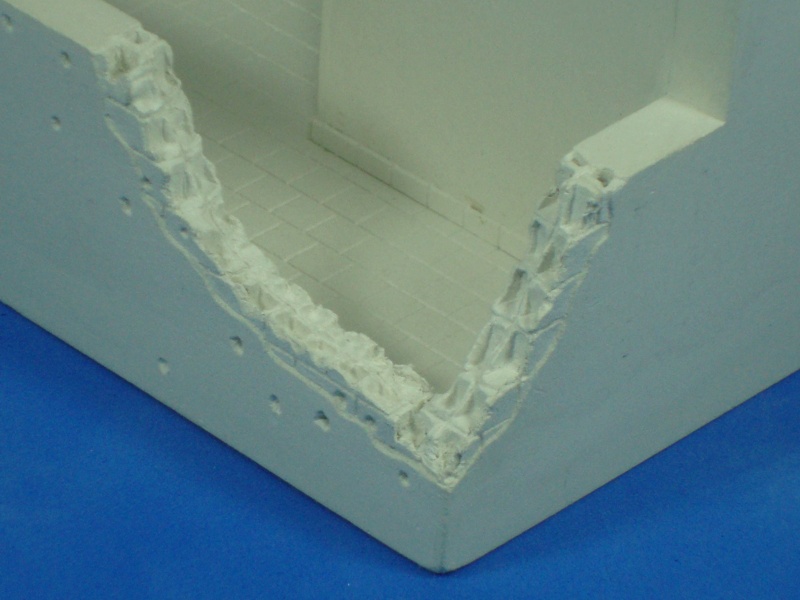
Some of the details that I added are, texture to the floor, tiles at the bottom of the walls, water pipes and pipe holders, and as you can see, the destroyed walls.
Here are some pictures of the process for the destroyed wall and the loose debris.
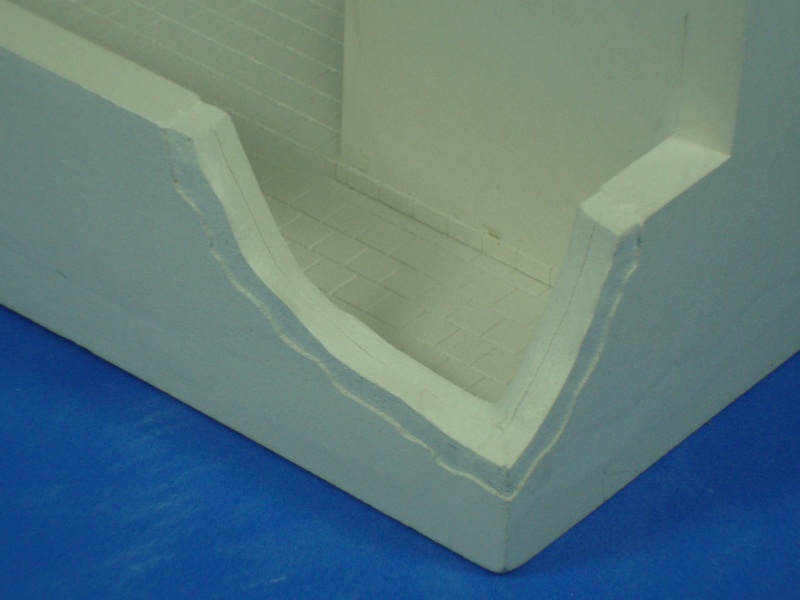
I´m happy with the final result, and expect will be better when there are painted.
The scene will be complete with 2 snipers and a dead revel. At first I imagined a parabolic antenna, but now I think there is not enough space for that and the scene is going to be stuffy.
Now, the 3th floor! I think I´m going to finish floor by floor from the top, because too many things at the same time is a little bit crazy for me, I can´t focus well enough.
With the spring coming, the days in Buenos Aires are lovely sunny. I have been working with the DAS on the parts of the buildings, but at the same time I have been trying to finish the terrace, and they look like that:
The details have always required lot of time, but the hollow bricks took more time that I imagined.
Some of the details that I added are, texture to the floor, tiles at the bottom of the walls, water pipes and pipe holders, and as you can see, the destroyed walls.
Here are some pictures of the process for the destroyed wall and the loose debris.
I´m happy with the final result, and expect will be better when there are painted.
The scene will be complete with 2 snipers and a dead revel. At first I imagined a parabolic antenna, but now I think there is not enough space for that and the scene is going to be stuffy.
Now, the 3th floor! I think I´m going to finish floor by floor from the top, because too many things at the same time is a little bit crazy for me, I can´t focus well enough.
Removed by original poster on 09/19/11 - 23:35:41 (GMT).

Macarla
Joined: September 03, 2011
KitMaker: 2 posts
Armorama: 1 posts
Posted: Monday, September 19, 2011 - 12:40 PM UTC
Great work!!!
Looking forward to seeing more of it!
Keep going!
Looking forward to seeing more of it!
Keep going!

Cookie

Joined: September 21, 2003
KitMaker: 588 posts
Armorama: 490 posts
Posted: Monday, September 19, 2011 - 09:37 PM UTC
Victor
Amazing amout of very detailed work. Looking forward to seeing more of it.
Cookie
Amazing amout of very detailed work. Looking forward to seeing more of it.
Cookie
olivato
Joined: August 16, 2005
KitMaker: 127 posts
Armorama: 107 posts
Posted: Sunday, September 25, 2011 - 12:51 PM UTC
Hi everyone!!!
Macarla and Cookie, thank you for taking the time to see my project.
My buildings are starting to grow!!!
The pieces for the 3th floor are dry and I have been able to glue them to the terrace. At this time I have to be careful with the verticality because in the end this may turn into the Pisa tower.
Now the problem is the floor, because it suffered the "banana effect" with the DAS. The first time I put DAS to the floor, it didn´t reach the level required, so I added more DAS on one of the faces and this caused the "banana efect" when drying. I suppose that I have to resign some millimeters to reach a decent horizontal level.
I presented the pieces for the terrace of the house, and everything was well.
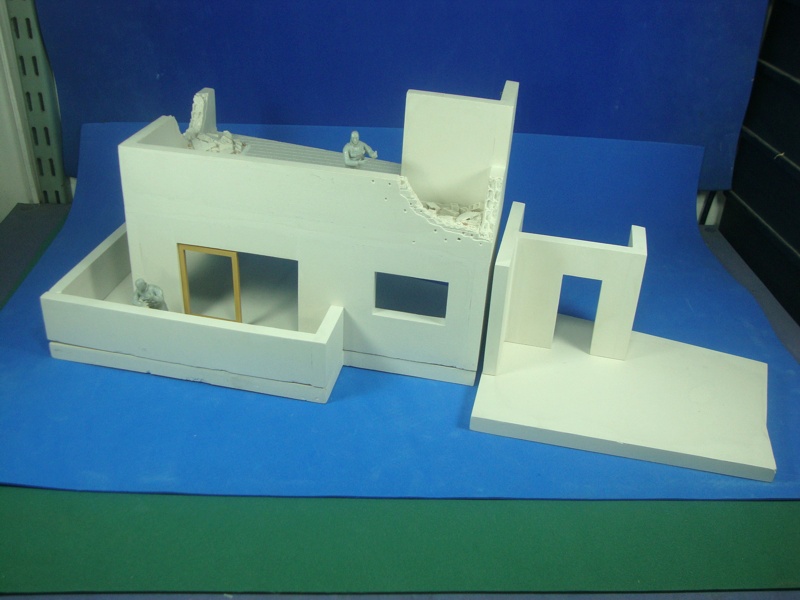
Now I have to do some furniture for the 3th floor. On this floor there live normal people that have suffered collateral damages on their house.
On the 2nd floor is where the action occurred.
Macarla and Cookie, thank you for taking the time to see my project.
My buildings are starting to grow!!!
The pieces for the 3th floor are dry and I have been able to glue them to the terrace. At this time I have to be careful with the verticality because in the end this may turn into the Pisa tower.
Now the problem is the floor, because it suffered the "banana effect" with the DAS. The first time I put DAS to the floor, it didn´t reach the level required, so I added more DAS on one of the faces and this caused the "banana efect" when drying. I suppose that I have to resign some millimeters to reach a decent horizontal level.
I presented the pieces for the terrace of the house, and everything was well.
Now I have to do some furniture for the 3th floor. On this floor there live normal people that have suffered collateral damages on their house.
On the 2nd floor is where the action occurred.

rodrigo_sartori

Joined: January 16, 2007
KitMaker: 160 posts
Armorama: 159 posts
Posted: Monday, September 26, 2011 - 04:56 PM UTC
Olivato, great work. I will definitely follow this diorama.
How did you make water pipes and pipe holders? They were fabulous. Congratulations!
How did you make water pipes and pipe holders? They were fabulous. Congratulations!
callmehobbes

Joined: April 17, 2005
KitMaker: 751 posts
Armorama: 740 posts
Posted: Monday, September 26, 2011 - 08:33 PM UTC
This is stunning - absolutely amazing. I can't wait to see more.
olivato
Joined: August 16, 2005
KitMaker: 127 posts
Armorama: 107 posts
Posted: Tuesday, September 27, 2011 - 02:18 PM UTC
Hi everyone!
Callmehobbies: I know you follow this from the beginning and I really appreciate your support.
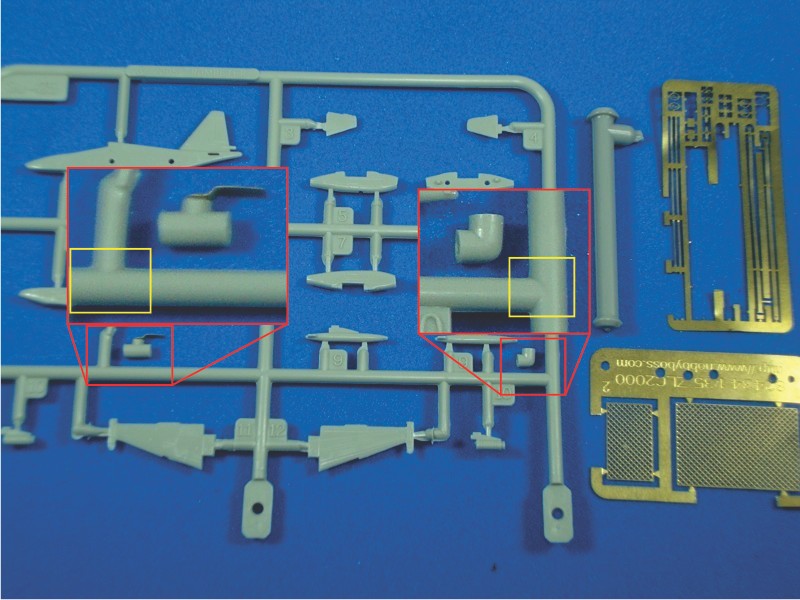
Rodrigo_sartori: Thanks for your words. For the pipes, I used the tree from other models, in this case from a Trumpeter SU-25 1/350 because it matched with the diameter I need. The rest is sand, drill some holes and you have a water pipes accessories.
I make the holes in the pipe accessories to give me some space so that when I cut the wire it doesn't have to be so exact.
The water pipe is made of wire.
I make the screws heating a plastic tree and then push it onto a metal sheet (some photoetched tree) where I had drilled a hole with the diameter a need. I cut the excess and I have a screw.
The metal parts are from a Dragon Gen 2 photoetched tree. I cut and then curve is as I need.
I use what I have, normally trees from models, plastic sheet, metal left-overs from photoetched, wood, poliestirene, wire, resin and DAS... not much more than this.
Callmehobbies: I know you follow this from the beginning and I really appreciate your support.
Rodrigo_sartori: Thanks for your words. For the pipes, I used the tree from other models, in this case from a Trumpeter SU-25 1/350 because it matched with the diameter I need. The rest is sand, drill some holes and you have a water pipes accessories.
I make the holes in the pipe accessories to give me some space so that when I cut the wire it doesn't have to be so exact.
The water pipe is made of wire.
I make the screws heating a plastic tree and then push it onto a metal sheet (some photoetched tree) where I had drilled a hole with the diameter a need. I cut the excess and I have a screw.
The metal parts are from a Dragon Gen 2 photoetched tree. I cut and then curve is as I need.
I use what I have, normally trees from models, plastic sheet, metal left-overs from photoetched, wood, poliestirene, wire, resin and DAS... not much more than this.

ophelia53

Joined: March 10, 2010
KitMaker: 254 posts
Armorama: 226 posts
Posted: Tuesday, September 27, 2011 - 03:12 PM UTC
Victor, your building is amazing!!!! I have never seen your method used before, but it's great! Wish I could cut as straight as you 
Can't wait to see how this turns out! Keep up the great work!
Can't wait to see how this turns out! Keep up the great work!

olivato
Joined: August 16, 2005
KitMaker: 127 posts
Armorama: 107 posts
Posted: Wednesday, October 05, 2011 - 03:15 PM UTC
Hi everyone!
Ophelia53: Thank you for your words.
I have been working on too many things at the same time, and in the end, I don't have anything finished yet.
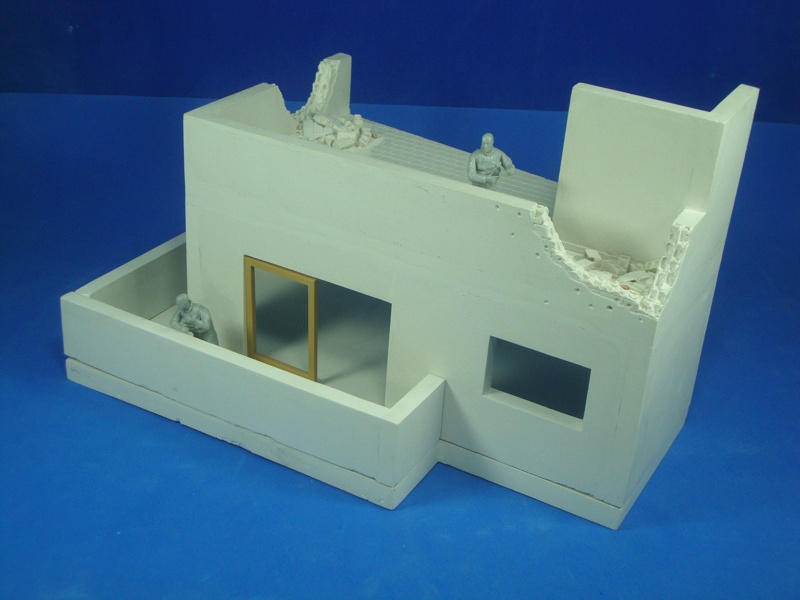
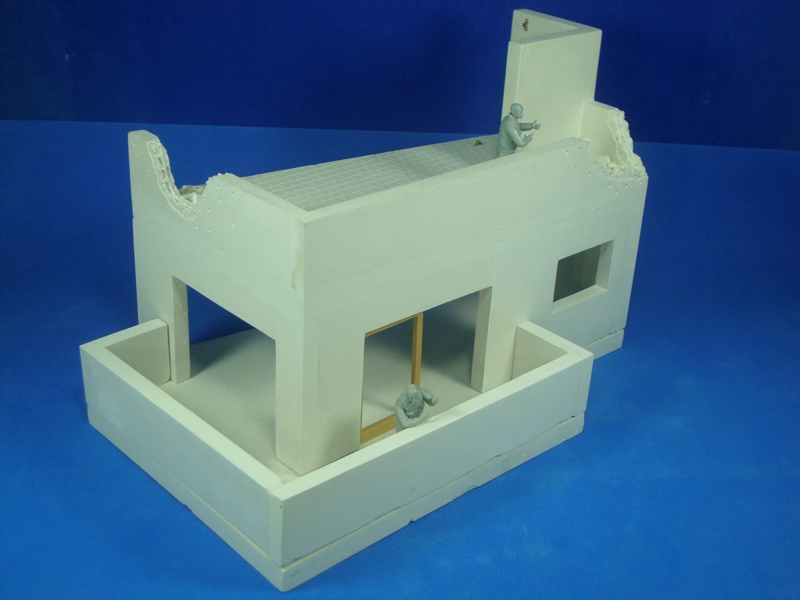
As you can see, in the buildings of this diorama, I have two French windows plus a little one on each floor, and this multiplied by three floors, so I have lot of windows.
I wanted to put everyone in a different position.
I finished the little one (for the kitchen), and I made it in a way close to the real one. I used the sliding window system to be able to put the windows in any position, close, open, even out of the frame (maybe for an explosion).
I used the same method for the French windows, but I added a rolling shutter, I expect it to be finished tomorrow.

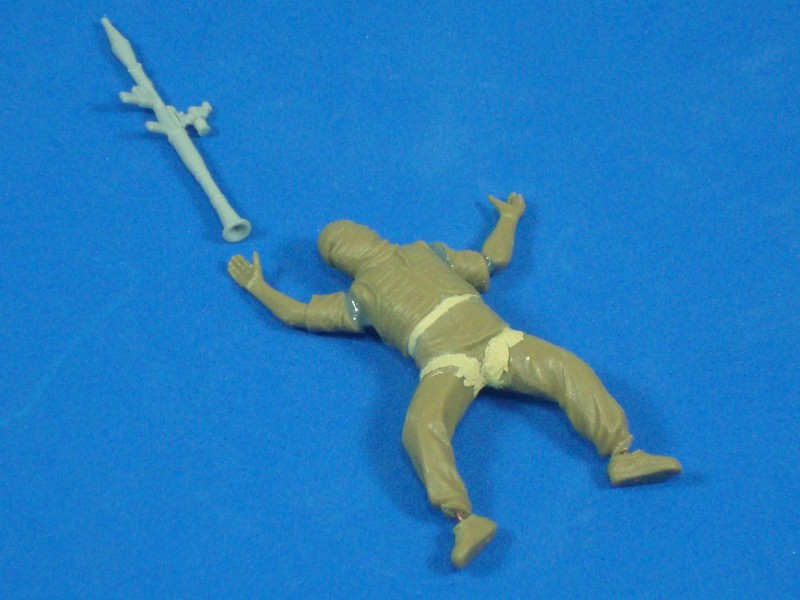
I started the transformation of the rebels to adapt them into a "dead" position. The original kit is the Master Box Iraq Kit 2. The quality of the kit is very good.
I hope to have more things done by the weekend.
Ophelia53: Thank you for your words.
I have been working on too many things at the same time, and in the end, I don't have anything finished yet.
As you can see, in the buildings of this diorama, I have two French windows plus a little one on each floor, and this multiplied by three floors, so I have lot of windows.
I wanted to put everyone in a different position.
I finished the little one (for the kitchen), and I made it in a way close to the real one. I used the sliding window system to be able to put the windows in any position, close, open, even out of the frame (maybe for an explosion).
I used the same method for the French windows, but I added a rolling shutter, I expect it to be finished tomorrow.
I started the transformation of the rebels to adapt them into a "dead" position. The original kit is the Master Box Iraq Kit 2. The quality of the kit is very good.
I hope to have more things done by the weekend.

Spiderfrommars

Joined: July 13, 2010
KitMaker: 3,845 posts
Armorama: 3,543 posts
Posted: Wednesday, October 05, 2011 - 09:33 PM UTC
Victor, I like a lot the building details , you're doing a great job indeed
hogarth
Joined: June 02, 2006
KitMaker: 672 posts
Armorama: 592 posts
Posted: Thursday, October 06, 2011 - 02:59 AM UTC
Great work so far. The only recommendation I have is to get rid of the DML Navy Seal figures and replace them with something more modern....those figures are from the mid-1990s and, needless to say, their gear and weapons have been updated many times over since then. I would imagine you can find some resin figs that fit the bill better, or make some conversions of some existing figures to "update" them to more modern standards. Your building work is awesome to this point.
olivato
Joined: August 16, 2005
KitMaker: 127 posts
Armorama: 107 posts
Posted: Thursday, October 06, 2011 - 02:29 PM UTC
Hi!
Spiderfrommars: Thanks for your support from the beginning, since I started this diorama.
Hogarth: You´re right. This figures are not the ones I´m going to use in this diorama, they don´t match. These figures are only a reference; besides these are complete, while the other ones still have some parts to glue. When I see a picture without a reference, I lose the dimension of things, that's why I always put a ruler or a figure in the pictures. Anyway, I´m very pleased to hear suggestions, so thanks for taking your time to help me improve my work.
By the way, here is the second rebel that I´ve transformed. It´s only the first stage of the transformation.

xsoft_ej

Joined: March 21, 2009
KitMaker: 18 posts
Armorama: 17 posts
Posted: Thursday, October 06, 2011 - 03:46 PM UTC
Olivato, that's amazing job, i can't cut 1cm of plastic strip straight!!! and you do all that cut and trimming so neat, congratulations on a great job....felicitaciones por tu exelente trabajo....
ophelia53
Joined: March 10, 2010
KitMaker: 254 posts
Armorama: 226 posts
Posted: Thursday, October 06, 2011 - 04:08 PM UTC
Hi Victor, this sure is coming along quite nicely!
Question for you...what type of wire do you use for the figs when you transform them? And what gauge or MM is it? And do you use a pin vise to insert it, or what? I never have done any major mods to figs, but will need a few for my dio so I just would like some good information from someone like yourself to help me out, they look awesome!!!!
:)
Can't wait to see more!

WARDUKWNZ

Joined: June 01, 2011
KitMaker: 1,716 posts
Armorama: 1,638 posts

Posted: Thursday, October 06, 2011 - 05:19 PM UTC
Victor this is looking brilliant ..so impressed with your buildings ..mate its gonna be amazing when your done ..will be keeping an even closer eye on this one
The way you do your brick work is something i am going to copy the hell out of
Great work dude ,,keep it up
Yo Brandi .. the wire Victor is useing could be heavy gauge fuse wire or as i do striped out of heavy gauge cable ..like the stuff used for large electric motors and industrial machine wiring , least thats the stuff i use
Phill

grimmo
Joined: January 17, 2006
KitMaker: 752 posts
Armorama: 569 posts
Posted: Thursday, October 06, 2011 - 11:38 PM UTC
victor: brilliant work! it is looking fantastic! cant wait to see it finished.
I have used DAS clay to make kebing, but not walls and roofs/floors like you have. might have to try now!
I have used DAS clay to make kebing, but not walls and roofs/floors like you have. might have to try now!
VLADPANZER

Joined: December 20, 2010
KitMaker: 568 posts
Armorama: 549 posts
Posted: Friday, October 07, 2011 - 07:17 AM UTC
Amazing, incredible, astounding  such great scratch work!!! How did u make the windows!?
You know I am looking forward to the final piece!!
Regards,

such great scratch work!!! How did u make the windows!?You know I am looking forward to the final piece!!
Regards,
olivato
Joined: August 16, 2005
KitMaker: 127 posts
Armorama: 107 posts
Posted: Monday, October 10, 2011 - 06:35 PM UTC
Hi!
Xsoft_ej: Thanks to take your time to follow my project. I don´t cut so straight, it´s Photoshop I give myself a little bit more space to adjust sanding in the end of the process. Un abrazo.
Wardukwnz: I´m really glad you found the brick work useful. Thanks for your support from the beginning.
Vladpanzer: I know you follow this from the start and really appreciate this. Thanks. The windows are made of resin, and sculpted with a minidrill (Dremel). I used the cut disc to made the guide.
Grimmo: Thanks for your words. I like the DAS to make textures. Sorry, my English is not so good. What do you mean by "make kebing"?
Ophelia53: I use a copper wire about 0.7 mm from the interior of an electrical cable. I make a hole on each part of the repositioned arm or leg with a drill bit. In the extreme of the hole, a make it bigger (about 1mm) because it is difficult to align the two holes and this bigger hole allows me a little adjust.
Glue the wire with cyanocrylate and adjust the position of the figure. Then I refill the hole between the parts with epoxy 10 min (this is the gray thing in the arm of the first rebel).
I hope this helps you with your figures and if you need anything else, ask, no problem.
Sorry if I don´t answer quickly, but when I post I want to put something new about the work on the diorama.
The French window is over. I´ve added the rolling shutter and cleaned the frame.

I have made some furniture for the kitchen. The furniture has only one door because the rest is duplicated in resin. I am still working on the drawers front; I hope to have it ready for tomorrow. All the furniture is made entirely with plasticard.
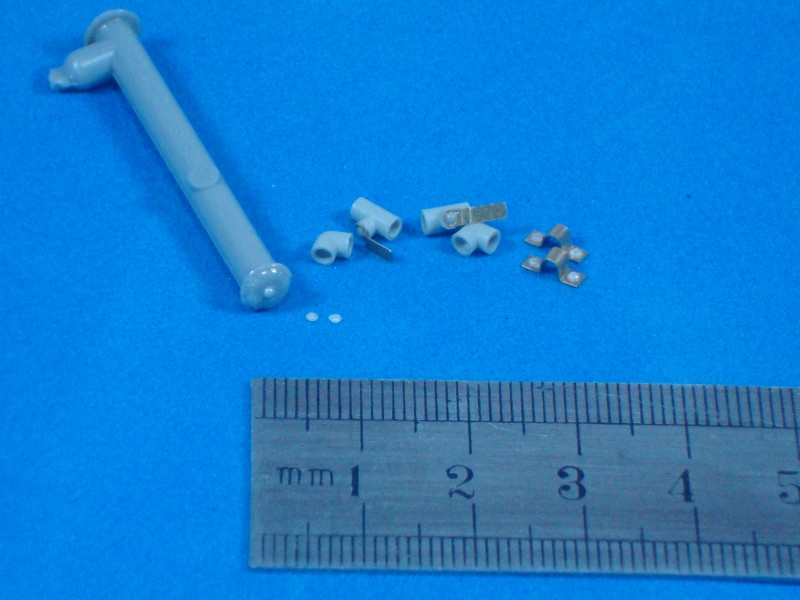
I made a sink for the kitchen with its tap. I make the tap with plastic stretched from the trees, and the pipe is made bending a paper clip.
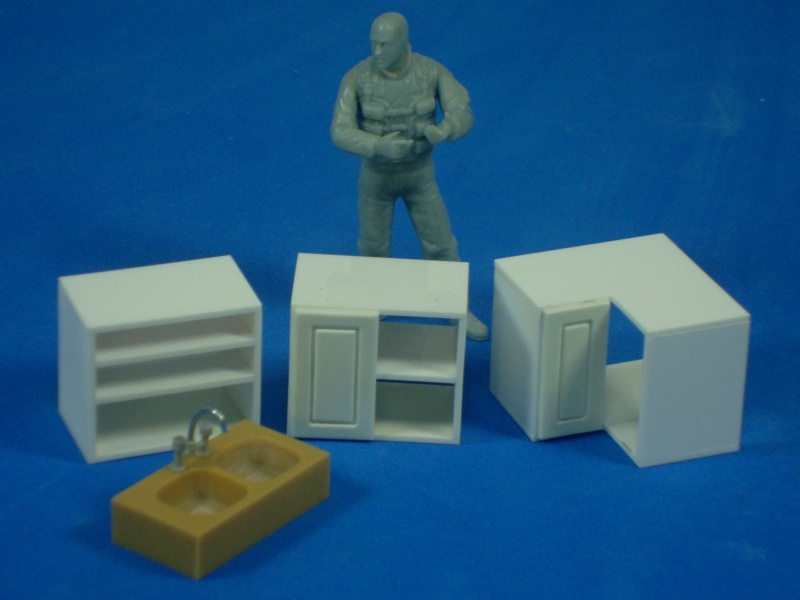
Xsoft_ej: Thanks to take your time to follow my project. I don´t cut so straight, it´s Photoshop
I give myself a little bit more space to adjust sanding in the end of the process. Un abrazo. Wardukwnz: I´m really glad you found the brick work useful. Thanks for your support from the beginning.
Vladpanzer: I know you follow this from the start and really appreciate this. Thanks. The windows are made of resin, and sculpted with a minidrill (Dremel). I used the cut disc to made the guide.
Grimmo: Thanks for your words. I like the DAS to make textures. Sorry, my English is not so good. What do you mean by "make kebing"?
Ophelia53: I use a copper wire about 0.7 mm from the interior of an electrical cable. I make a hole on each part of the repositioned arm or leg with a drill bit. In the extreme of the hole, a make it bigger (about 1mm) because it is difficult to align the two holes and this bigger hole allows me a little adjust.
Glue the wire with cyanocrylate and adjust the position of the figure. Then I refill the hole between the parts with epoxy 10 min (this is the gray thing in the arm of the first rebel).
I hope this helps you with your figures and if you need anything else, ask, no problem.
Sorry if I don´t answer quickly, but when I post I want to put something new about the work on the diorama.
The French window is over. I´ve added the rolling shutter and cleaned the frame.
I have made some furniture for the kitchen. The furniture has only one door because the rest is duplicated in resin. I am still working on the drawers front; I hope to have it ready for tomorrow. All the furniture is made entirely with plasticard.
I made a sink for the kitchen with its tap. I make the tap with plastic stretched from the trees, and the pipe is made bending a paper clip.
olivato
Joined: August 16, 2005
KitMaker: 127 posts
Armorama: 107 posts
Posted: Sunday, November 06, 2011 - 12:05 PM UTC
Hi everyone!!!
If you are thinking that this project is gone... nothing further from the truth. Thanks to all the support that I have received, I am determined to finish this project (hopefully in this life )
Some minor problems have kept me a little far from my workbench but now I'm focused again and in these days I am going to upload some updates.
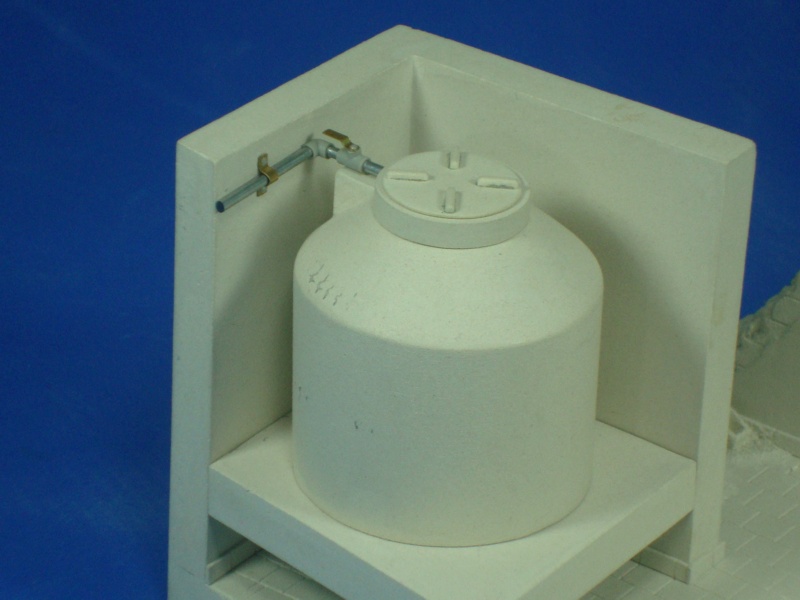
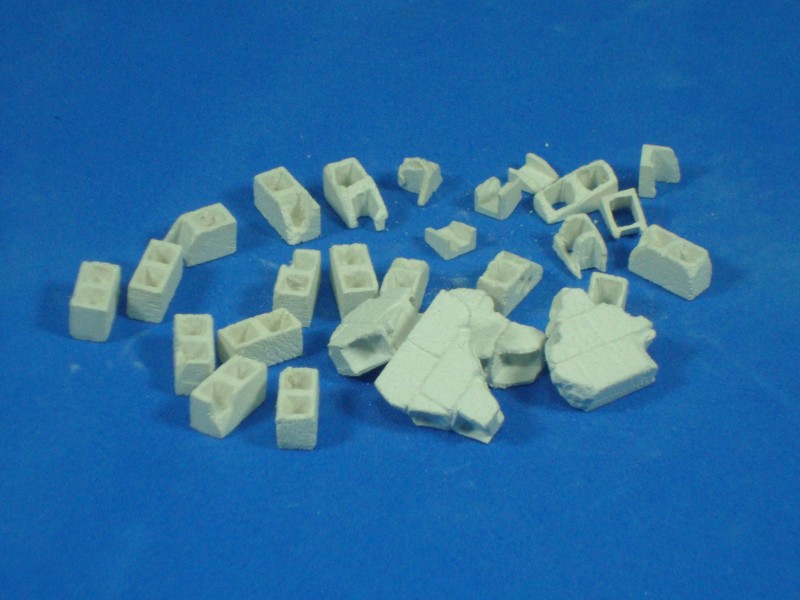
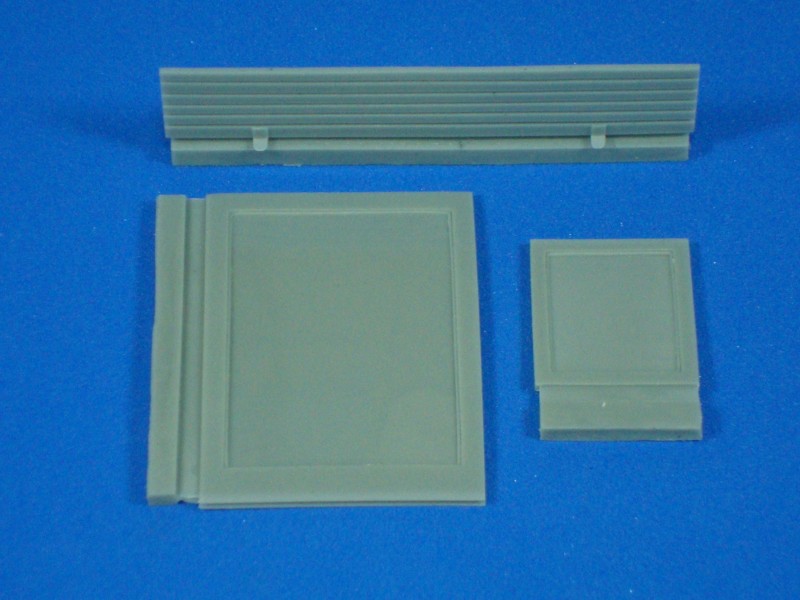
As I had enough things to put in the pressure tank, I prepared the molds to be ready to reproduce in resin. This takes a lot of time, but the results, as you can see, are very good.
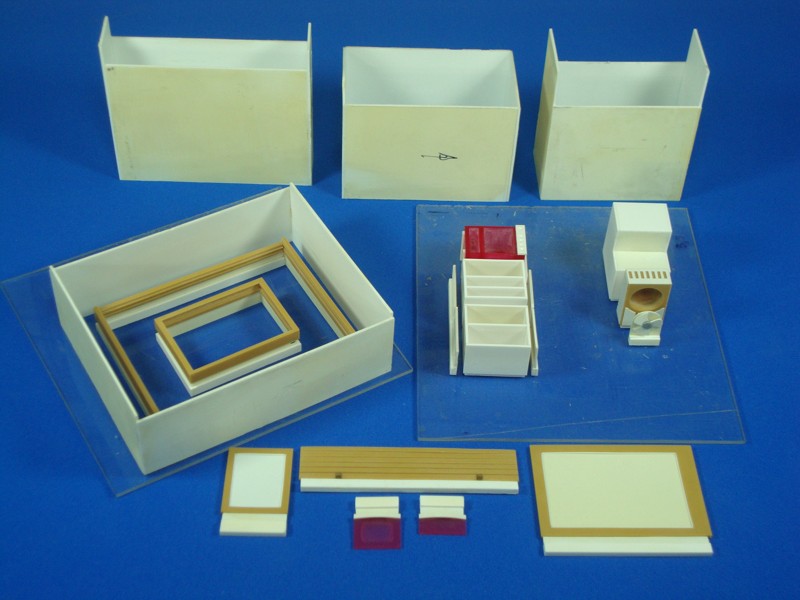
With a pressure tank (or vacuum chamber) the quality of the copies are incredible. Every little detail you put in the original (even a 0.2mm wire) are reproduced, so you can spend some time doing the originals with the certainty that the copy is going to be very accurate.
I don´t use the first copy (the green ones) because I use it as a backup. Some times when the original is extracted from the silicone rubber mold, they break (the originals are made up with a lot of pieces stuck together), so with this first copy I can do the mold again.
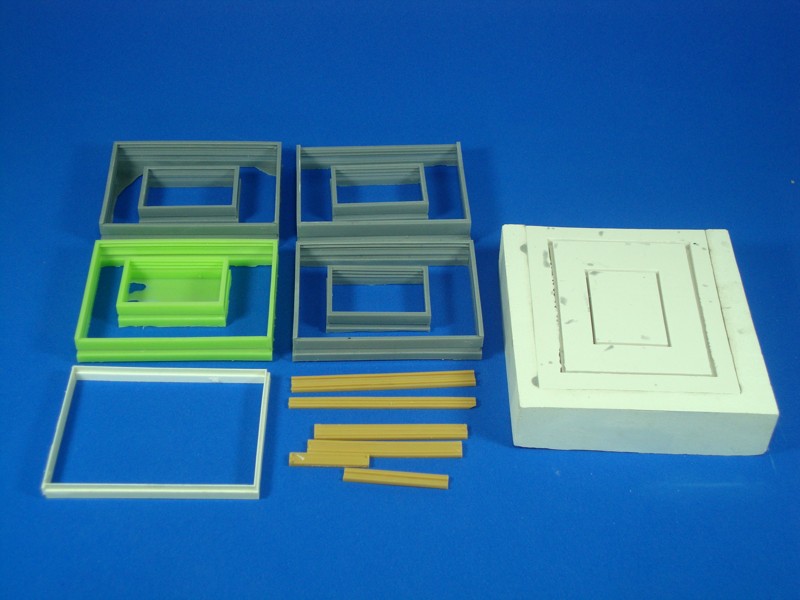
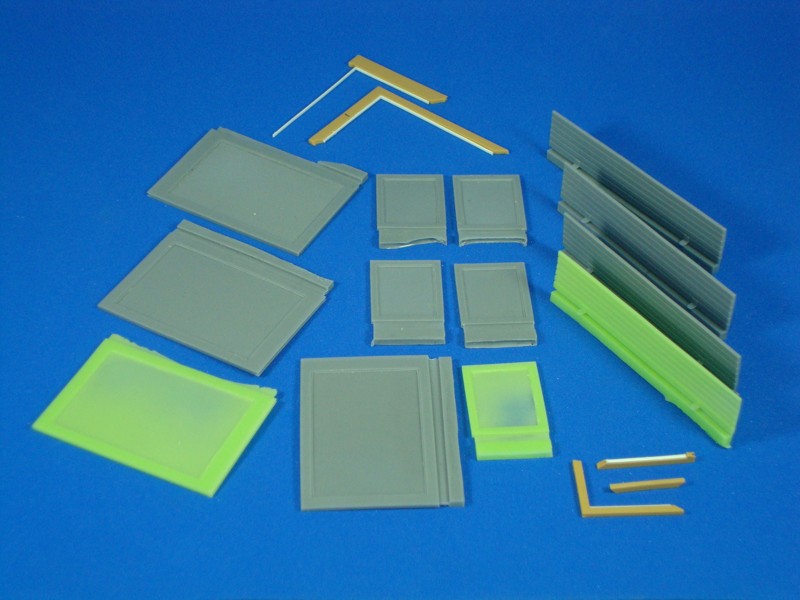
I've upgraded the windows with some details like the interior frame and the glass. Now I'm going to add a handle and make copies from this ones.
This is a little update, but I´m back and soon you are going to have more news from this project.
If you are thinking that this project is gone... nothing further from the truth. Thanks to all the support that I have received, I am determined to finish this project (hopefully in this life
)Some minor problems have kept me a little far from my workbench but now I'm focused again and in these days I am going to upload some updates.
As I had enough things to put in the pressure tank, I prepared the molds to be ready to reproduce in resin. This takes a lot of time, but the results, as you can see, are very good.
With a pressure tank (or vacuum chamber) the quality of the copies are incredible. Every little detail you put in the original (even a 0.2mm wire) are reproduced, so you can spend some time doing the originals with the certainty that the copy is going to be very accurate.
I don´t use the first copy (the green ones) because I use it as a backup. Some times when the original is extracted from the silicone rubber mold, they break (the originals are made up with a lot of pieces stuck together), so with this first copy I can do the mold again.
I've upgraded the windows with some details like the interior frame and the glass. Now I'm going to add a handle and make copies from this ones.
This is a little update, but I´m back and soon you are going to have more news from this project.
VLADPANZER
Joined: December 20, 2010
KitMaker: 568 posts
Armorama: 549 posts
Posted: Friday, November 11, 2011 - 05:54 AM UTC
Are you selling those by chance?  Really cool!!
Really cool!! |

WEB HOSTING BY


Copyright ©2021 Armorama and Kitmaker Network, a subsidiary of Silver Star Enterprises
All Rights Reserved. Please read our Conditions of Use and Privacy Policy.
All Rights Reserved. Please read our Conditions of Use and Privacy Policy.