

Hosted by Darren Baker
An ambitious project

maartenboersma

Joined: October 10, 2010
KitMaker: 764 posts
Armorama: 742 posts
Posted: Sunday, May 20, 2012 - 01:14 AM UTC
Scratch modeling at its best!

olivato

Joined: August 16, 2005
KitMaker: 127 posts
Armorama: 107 posts
Posted: Monday, May 21, 2012 - 02:43 PM UTC
Hi everyone!!!
Today I opened my Outlook and received lots of mails from my post... what a support, what wonderful people are here in this forum, thank you very much!!!.
Jointhepit: Thanks for your words, and the support. Yes, having a teacher in the house is great. I write the entries, but she corrects the tenses, and many times makes the post more readable. I like the styrofoam because it is light, easy to cut, and if you use the high density one, it's hard. Saludos!!!
Edson: You are always there, and I really appreciate your support. Thank you very much. Un fuerte abrazo!
Dave: I agree with you, there are lot of incredible works here, like yours, but sometimes the time is not enough to follow all of them in a close way.
It´s funny you remember my the armchair because it was completely destroyed... you've made me cry again (further on I will explain exactly what happened)
Sometimes I imagine a way to do the things I want. It may turn out great, like the armchair or it may need to re evaluate my original idea, like the manhole or the RPG head. To be honest I learn much more from my failures (do, wrong, do again, wrong, do again... close, but wrong, do again... Ok, it´s good) that from my easy achievements (do... Ok). When I get it right in my first attempt, I never know if was just lucky or I really did it the right way... Thanks Dave for the support.
David: Thanks for your words, and the time to see my project. I want to share this project to help in others modelers in any way I can, because I learn a lot from other modelers that share their tips or simply show how they make their models or dioramas. It doesn't matter the level of the modeler, there is always something to learn from the works of others.
Nico: I know you are following my project from the start, and I really appreciate this incredible support, thank you very much. If something in this post was useful for you, this makes me happy. Thanks.
Maarten: Thanks for taking the time to see my project and for your words. I really enjoy making my own pieces, besides I don´t see many modern accessories, but to be honest, I like to make them. Thanks again.
Unfortunately I don´t have as much time as I would like, so there is not much progress.
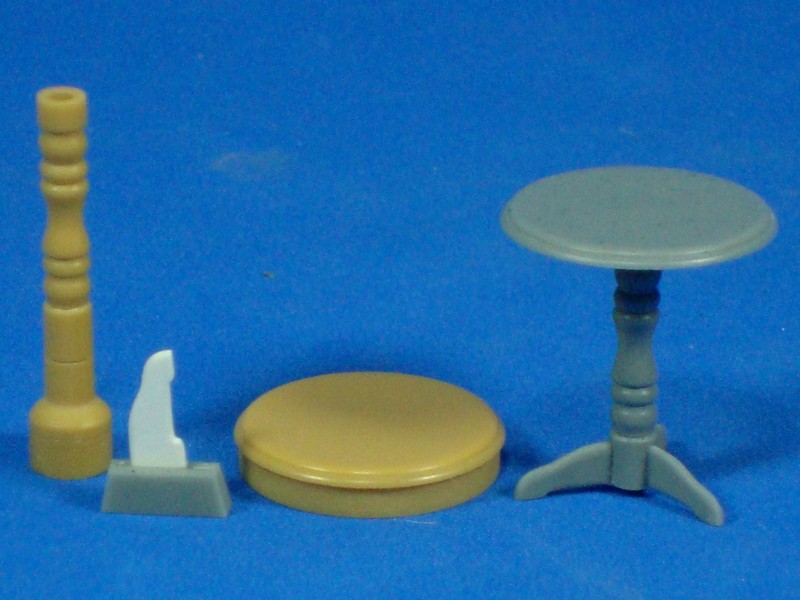
This is a little table I made with the mini bench lathe. The legs was made of plasticard (1 mm) and repeated in resin three times. When you put all together and the little table looks like this.
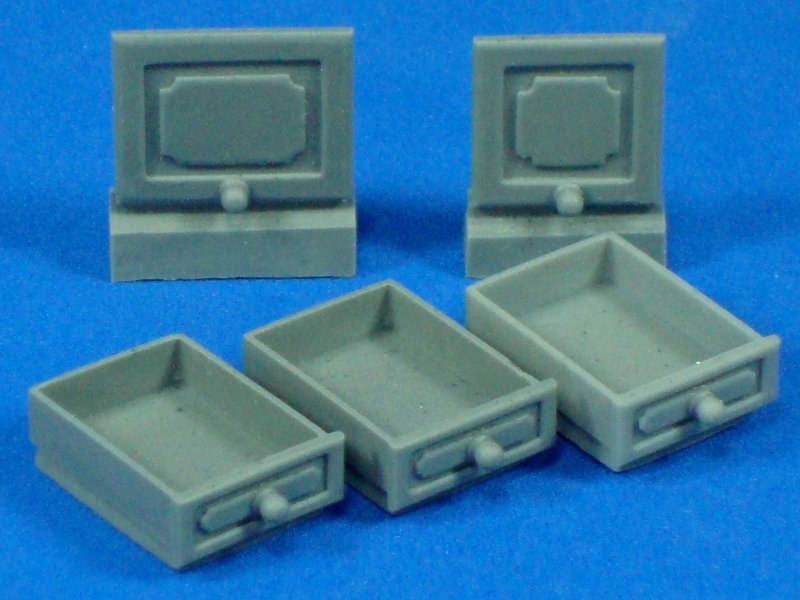
I started a piece of furniture for the living on the 3er floor.
I've made a drawing in Corel, like all the other projects. Without references of sizes, it´s very difficult to maintain good proportions.
I started with the doors.
I made the center and the door frame with a plasticard of 0.5 mm
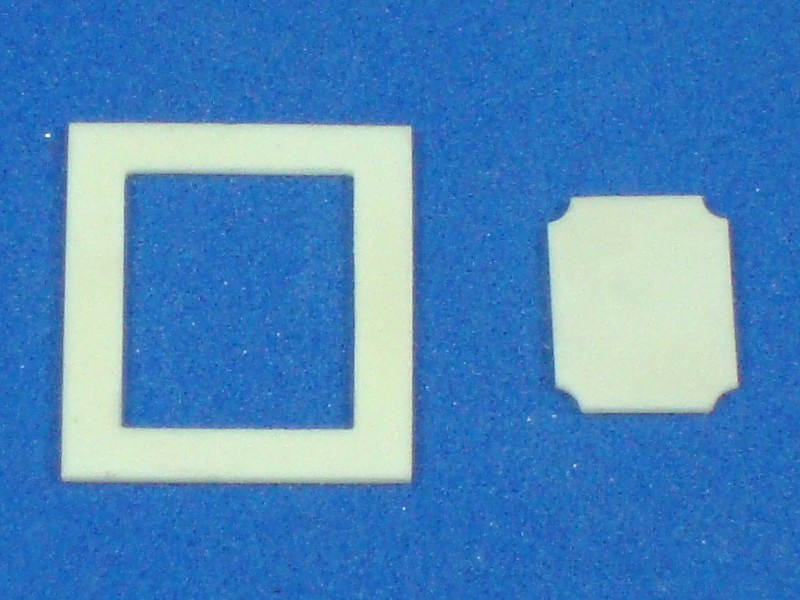
Round the borders.

Glue the center in any place of a piece of plasticard of 0.5 mm

Then glue the frame careful to maintained centered with the center of the door.
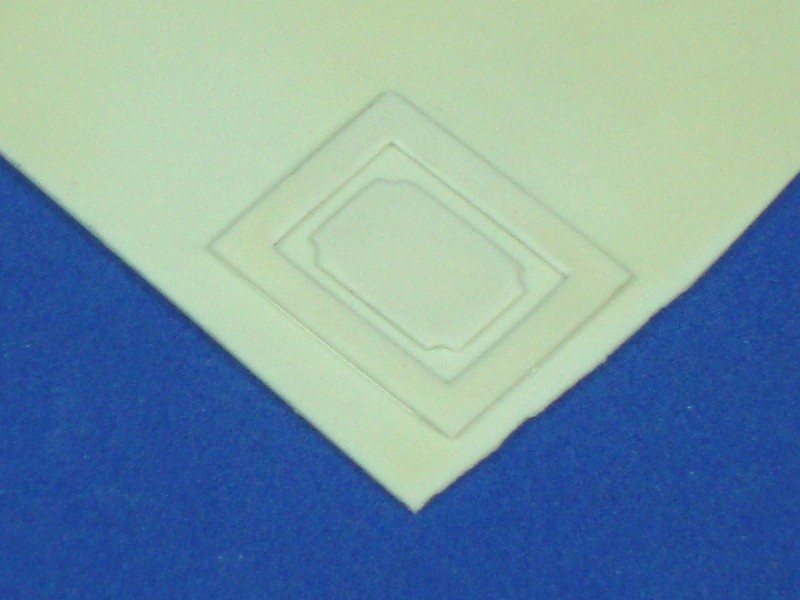
Cut the rest, round the borders and have a nice door.

This guy is already famous...
The rest of the furniture was made in plasticard, and here is when having a drawing helps a lot. You cut the pieces of plasticard that you have already designed.
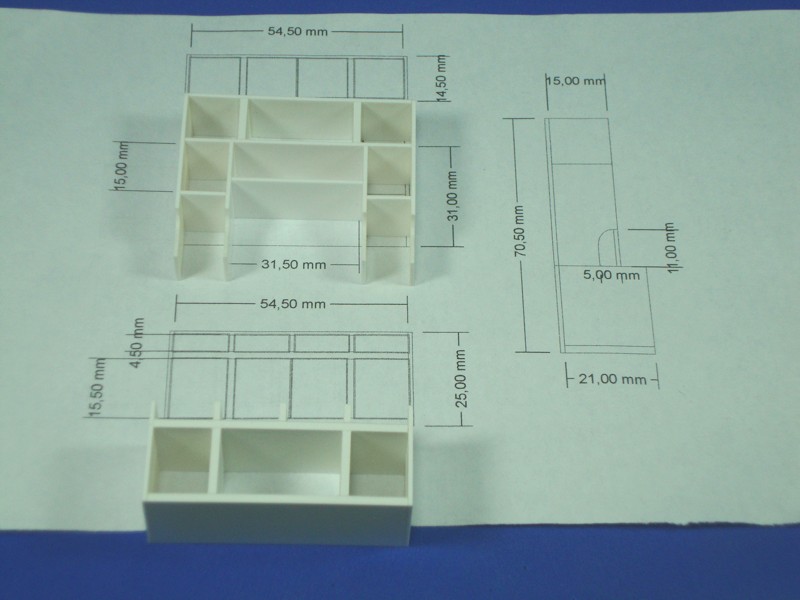
If the columns look familiar, it´s because they are the same as the ones I made for the coffee table.
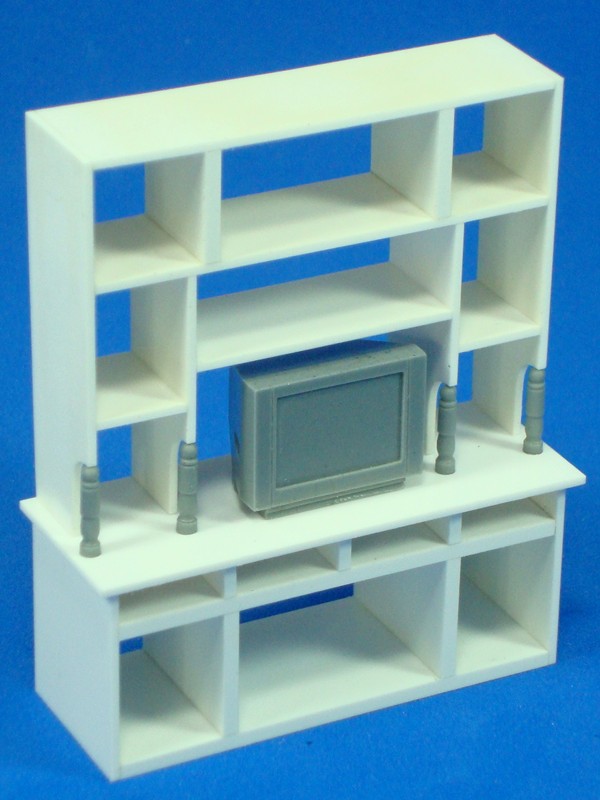
All together it looks like this.
Still need to make the handle for the doors, the drawers, the back and some little adjust, but I liked.
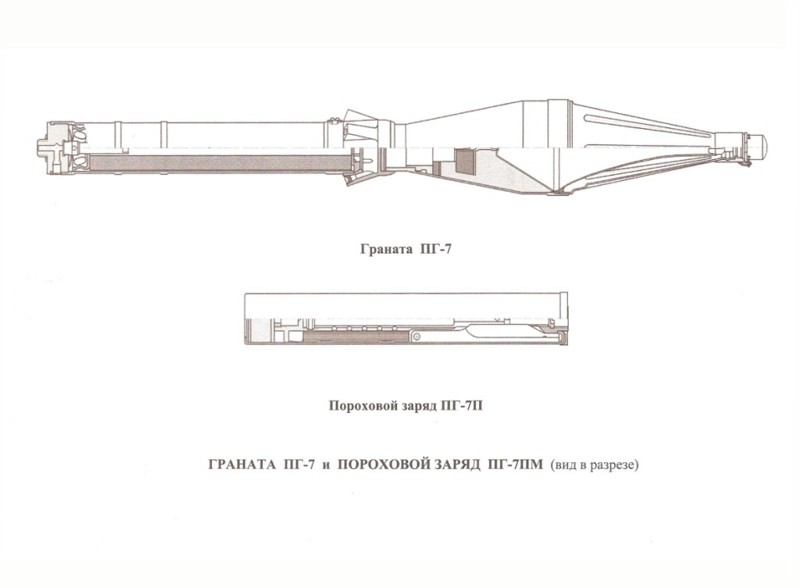
This mini project started as an idea to give my revel on the terrace some RPG explosive heads ready to recharge.
My first idea was to copy the one I have from Dragon. Some problem with the original Dragon mold doesn't let it copy the shape well. I have to sand too much and in the end I lost its circular shape. (I said a problem with the mold because I have two and they both have the same problem).
So, I started to search in the internet. A tip I discovered about searching for Russian things is that first you should find how the name in Russian is, in this case RPG-7 is РПГ-7, and search it in Google.ru. You are going to find lots of good pictures from Russian sites.
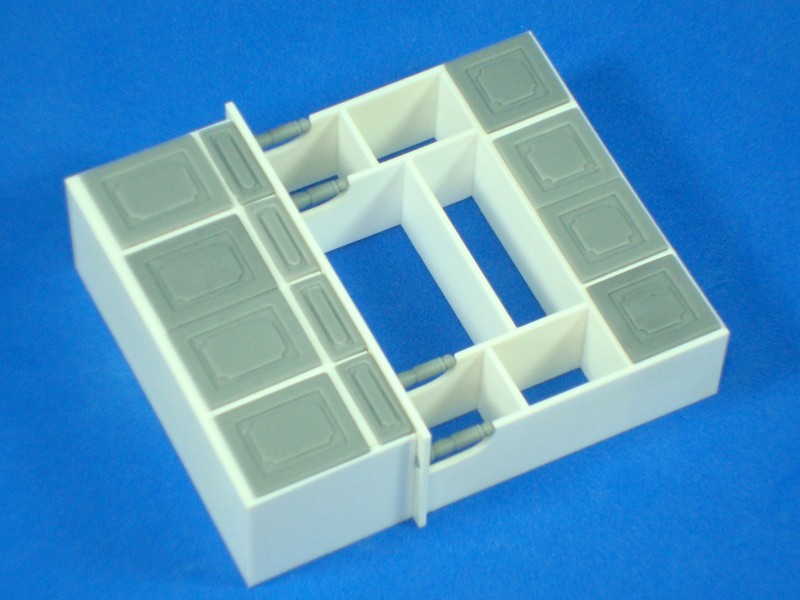
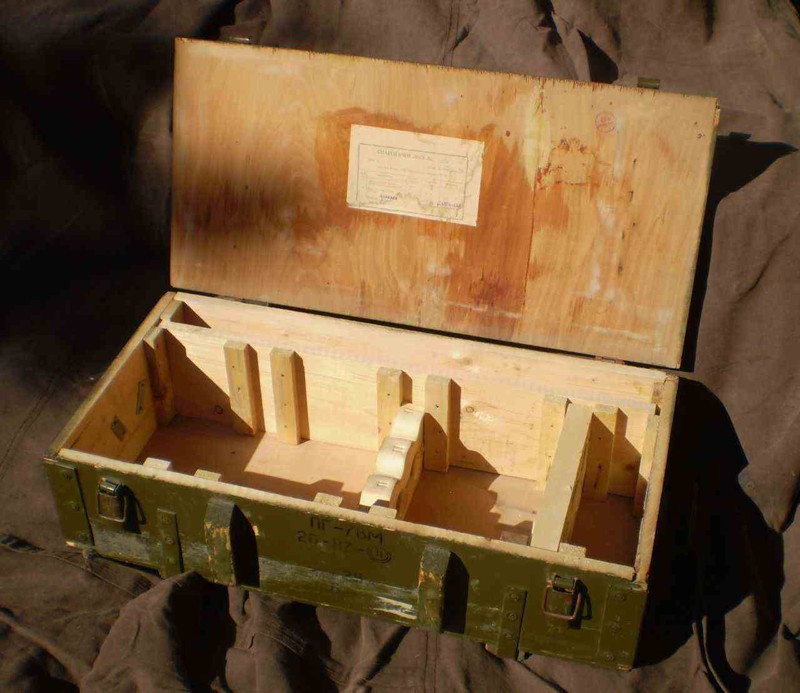
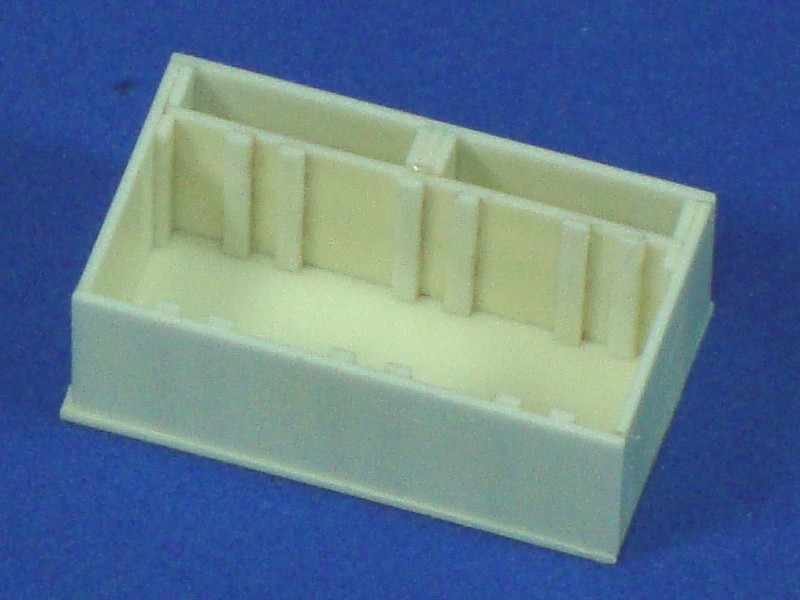
With this method I found pictures not only of the head, but also of the box to transport them too. I think that this box is going to go perfectly with my revels, so I've started to make it.
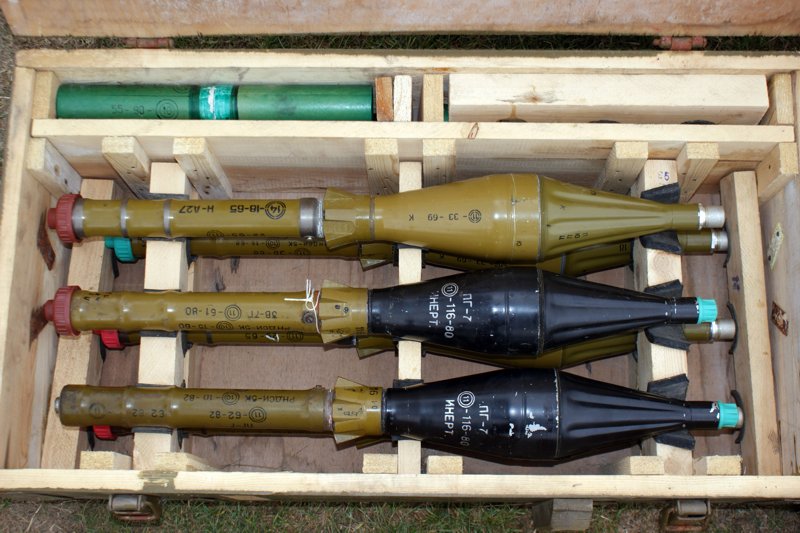
I know the size is wrong, but the only information I have is the diameter of the RPG head... so with this, and the picture I'm trying to make a drawing to start to cut the plasticard.
So, now I'm making not only the RPG explosive head, but also the box. (I was going to make a copy of a head, and ended making the head and the box too... yeah, sometimes I have really bad ideas!)
With the RPG explosive head the 3rd try was the good one, the first two didn´t look good.
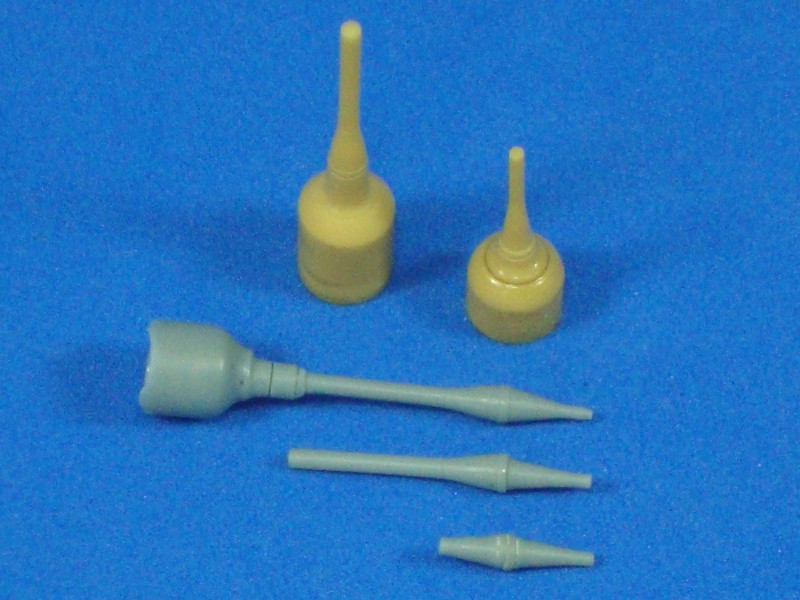
I have to make some details in the first section and these little fin.
The box needs more work, but I think it's going well.
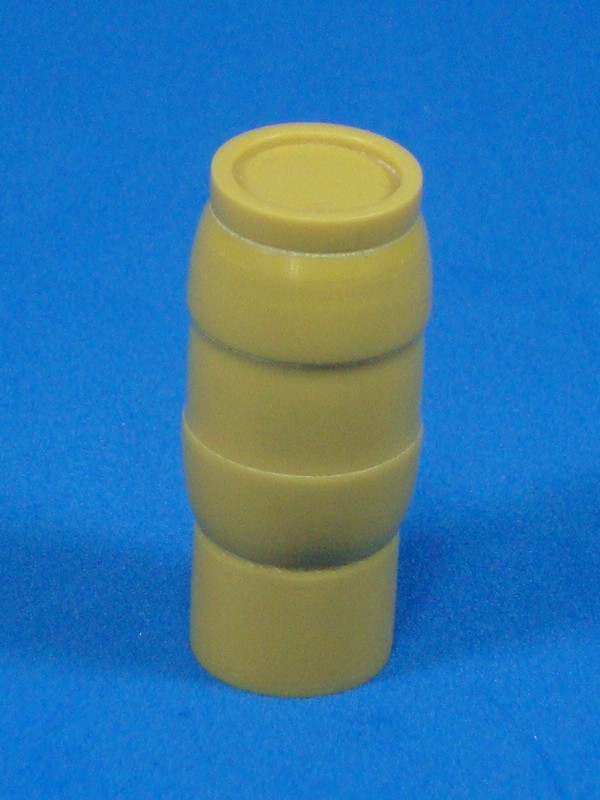
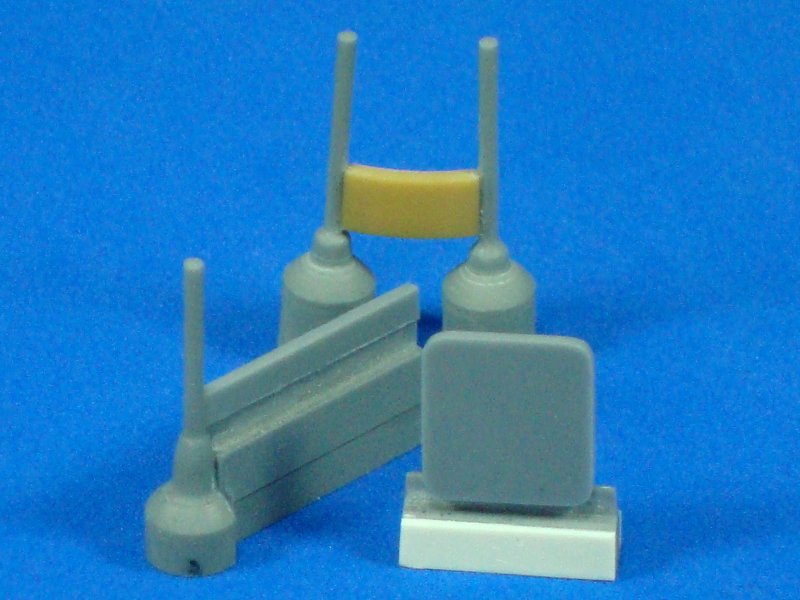
Another thing for my rebels was this chemical drum, maybe to make an explosive artifact.
I have to make the ring to secure the top.
Now I have enough copies to make the mold to repeat, and make the banister. They look like this.
Finally...
Do you know what happens if you put something with air inside (like Styrofoam) into a pressure tank with a pressure of 70 pounds... exactly what it is supposed to, the air bubbles are compressed, and my armchair gets destroyed.
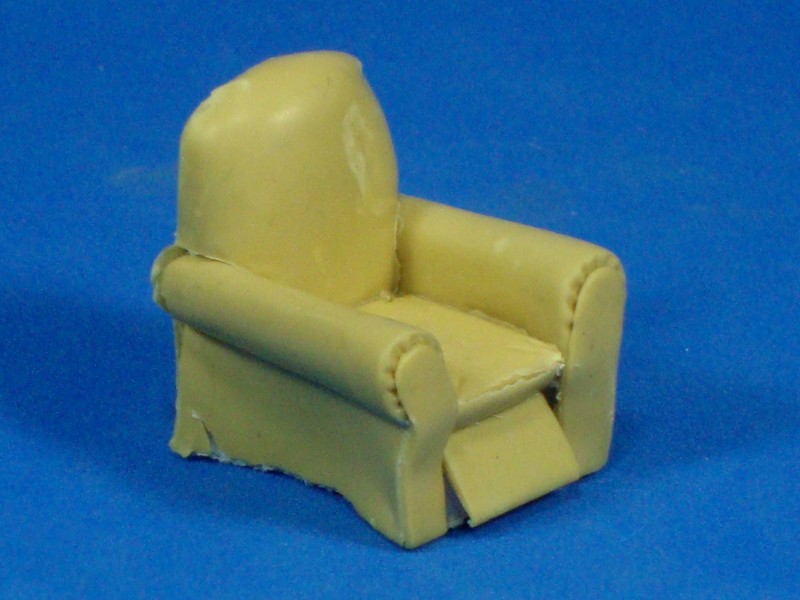

When I stopped crying I started to think what I could do... put this armchair under the Abrams, I don´t know how to explain that, but possible... or start a diorama of a nuclear explosion (I may have to destroy it a little bit more, but now I know how to)... but my best idea was to make a diorama of a cleaning lady with a huge vacuum cleaner sucking in the armchair.
Ok lets be serious. I don´t think the process to create the armchair was wrong. I have to do everything again, but the next time, I think I´m going to burn the styrofoam (eating or with acetone) and refill it with resin to make a solid soul. This solution can work when making the mold again or I could simply make the mold outside the tank and see what happens with the bubbles.
See you soon!!!
Today I opened my Outlook and received lots of mails from my post... what a support, what wonderful people are here in this forum, thank you very much!!!.
Jointhepit: Thanks for your words, and the support. Yes, having a teacher in the house is great. I write the entries, but she corrects the tenses, and many times makes the post more readable. I like the styrofoam because it is light, easy to cut, and if you use the high density one, it's hard. Saludos!!!
Edson: You are always there, and I really appreciate your support. Thank you very much. Un fuerte abrazo!
Dave: I agree with you, there are lot of incredible works here, like yours, but sometimes the time is not enough to follow all of them in a close way.
It´s funny you remember my the armchair because it was completely destroyed... you've made me cry again
(further on I will explain exactly what happened)Sometimes I imagine a way to do the things I want. It may turn out great, like the armchair or it may need to re evaluate my original idea, like the manhole or the RPG head. To be honest I learn much more from my failures (do, wrong, do again, wrong, do again... close, but wrong, do again... Ok, it´s good) that from my easy achievements (do... Ok). When I get it right in my first attempt, I never know if was just lucky or I really did it the right way...
Thanks Dave for the support.David: Thanks for your words, and the time to see my project. I want to share this project to help in others modelers in any way I can, because I learn a lot from other modelers that share their tips or simply show how they make their models or dioramas. It doesn't matter the level of the modeler, there is always something to learn from the works of others.
Nico: I know you are following my project from the start, and I really appreciate this incredible support, thank you very much. If something in this post was useful for you, this makes me happy. Thanks.
Maarten: Thanks for taking the time to see my project and for your words. I really enjoy making my own pieces, besides I don´t see many modern accessories, but to be honest, I like to make them. Thanks again.
Unfortunately I don´t have as much time as I would like, so there is not much progress.
This is a little table I made with the mini bench lathe. The legs was made of plasticard (1 mm) and repeated in resin three times. When you put all together and the little table looks like this.
I started a piece of furniture for the living on the 3er floor.
I've made a drawing in Corel, like all the other projects. Without references of sizes, it´s very difficult to maintain good proportions.
I started with the doors.
I made the center and the door frame with a plasticard of 0.5 mm
Round the borders.
Glue the center in any place of a piece of plasticard of 0.5 mm
Then glue the frame careful to maintained centered with the center of the door.
Cut the rest, round the borders and have a nice door.
This guy is already famous...
The rest of the furniture was made in plasticard, and here is when having a drawing helps a lot. You cut the pieces of plasticard that you have already designed.
If the columns look familiar, it´s because they are the same as the ones I made for the coffee table.
All together it looks like this.
Still need to make the handle for the doors, the drawers, the back and some little adjust, but I liked.
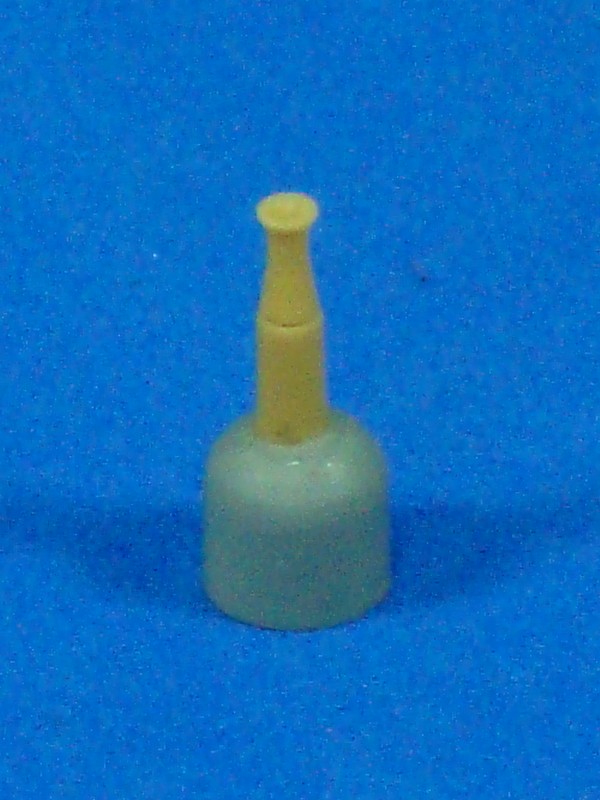
This mini project started as an idea to give my revel on the terrace some RPG explosive heads ready to recharge.
My first idea was to copy the one I have from Dragon. Some problem with the original Dragon mold doesn't let it copy the shape well. I have to sand too much and in the end I lost its circular shape. (I said a problem with the mold because I have two and they both have the same problem).
So, I started to search in the internet. A tip I discovered about searching for Russian things is that first you should find how the name in Russian is, in this case RPG-7 is РПГ-7, and search it in Google.ru. You are going to find lots of good pictures from Russian sites.
With this method I found pictures not only of the head, but also of the box to transport them too. I think that this box is going to go perfectly with my revels, so I've started to make it.
I know the size is wrong, but the only information I have is the diameter of the RPG head... so with this, and the picture I'm trying to make a drawing to start to cut the plasticard.
So, now I'm making not only the RPG explosive head, but also the box. (I was going to make a copy of a head, and ended making the head and the box too... yeah, sometimes I have really bad ideas!)
With the RPG explosive head the 3rd try was the good one, the first two didn´t look good.
I have to make some details in the first section and these little fin.
The box needs more work, but I think it's going well.
Another thing for my rebels was this chemical drum, maybe to make an explosive artifact.
I have to make the ring to secure the top.
Now I have enough copies to make the mold to repeat, and make the banister. They look like this.
Finally...
Do you know what happens if you put something with air inside (like Styrofoam) into a pressure tank with a pressure of 70 pounds... exactly what it is supposed to, the air bubbles are compressed, and my armchair gets destroyed.
When I stopped crying I started to think what I could do... put this armchair under the Abrams, I don´t know how to explain that, but possible... or start a diorama of a nuclear explosion (I may have to destroy it a little bit more, but now I know how to)... but my best idea was to make a diorama of a cleaning lady with a huge vacuum cleaner sucking in the armchair.
Ok lets be serious. I don´t think the process to create the armchair was wrong. I have to do everything again, but the next time, I think I´m going to burn the styrofoam (eating or with acetone) and refill it with resin to make a solid soul. This solution can work when making the mold again or I could simply make the mold outside the tank and see what happens with the bubbles.
See you soon!!!


zontar

Joined: August 27, 2006
KitMaker: 1,646 posts
Armorama: 1,557 posts
Posted: Monday, May 21, 2012 - 03:35 PM UTC
To me, the armchair looks like it has been sitting outside for too long. I'd put in an alley way or on an outside deck. It's just old and beat up.
Love the furniture.
Happy Modeling, -zon
Love the furniture.
Happy Modeling, -zon

xsoft_ej

Joined: March 21, 2009
KitMaker: 18 posts
Armorama: 17 posts
Posted: Monday, May 21, 2012 - 03:40 PM UTC
Victor i think you can use the armchair. well i think almost everybody has a piece of furniture that is old and semidestoyed or just old, well why not try to paint and wheater the armchair and put some old but loved piece of furniture in some room? (i hope make me be undestood because i have this bad english)

Paulinsibculo
Joined: July 01, 2010
KitMaker: 1,322 posts
Armorama: 1,239 posts

Posted: Monday, May 21, 2012 - 08:53 PM UTC
Dear Victor,
Just some bullet holes in the back of that chair and your problem is solved!
What an amazing technology you have. Please, keep us informed.
Just some bullet holes in the back of that chair and your problem is solved!
What an amazing technology you have. Please, keep us informed.

SOYDIOS

Joined: August 24, 2007
KitMaker: 98 posts
Armorama: 56 posts

Posted: Monday, May 21, 2012 - 09:36 PM UTC
... Enhorabuena Victor.
Congratulations on your work so masterful. Excellent details you put in all the diorama. I was impressed and still not finished. Congratulations teacher.
Sincerely ... Jorge.
Enhorabuena Victor. Congratulations on your work so masterful. Excellent details you put in all the diorama. I was impressed and still not finished. Congratulations teacher.
Sincerely ... Jorge.

Spiderfrommars

Joined: July 13, 2010
KitMaker: 3,845 posts
Armorama: 3,543 posts
Posted: Monday, May 21, 2012 - 10:02 PM UTC
Amazing job!
There are many things that you've made here, that could be incredibly useful extra sets...kitchens,shelves, TV, lamps, bricks....furniture (destroyed or not... )
Have you thought to produce and sell them?
There are many things that you've made here, that could be incredibly useful extra sets...kitchens,shelves, TV, lamps, bricks....furniture (destroyed or not...
)Have you thought to produce and sell them?
callmehobbes

Joined: April 17, 2005
KitMaker: 751 posts
Armorama: 740 posts
Posted: Wednesday, May 23, 2012 - 06:54 AM UTC
I really like the armchair - I thought it was intentionally damaged until I read the text.
I am totally in awe of your scratchbuilding. I love this tread and can't wait for updates.
I am totally in awe of your scratchbuilding. I love this tread and can't wait for updates.
olivato
Joined: August 16, 2005
KitMaker: 127 posts
Armorama: 107 posts
Posted: Thursday, July 12, 2012 - 03:10 PM UTC
Hi everyone!
I´m really sorry about this long delay, but some problems with the resin got me stuck (further on I will explain exactly what happened).
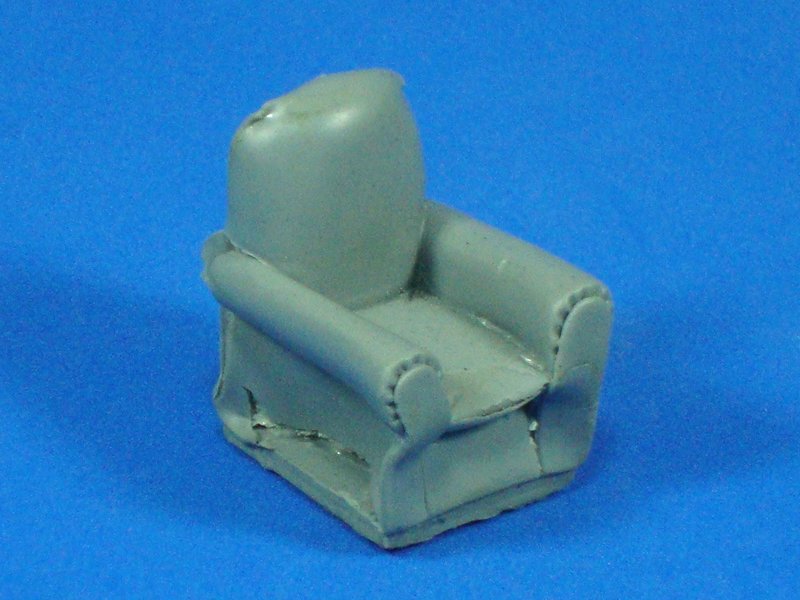
Zon and Edson: You put the armchair in a different context and like the idea very much. May be I'll put the armchair in the terrace of the house with other abandoned things as garbage. Thanks for the idea and continuing supporting me.
Paul: That's another good idea.
It´s not a great technology, just a compressor and a pressure tank. I bought the pressure tank from a company that produces it for painting. The pressure tank supports a pressure of 160 Lb, but at 80 a security valve opens to release the air inside, for safety. Thanks for taking the time to see my project.
Jorge: Thank you very much for your words. I really appreciate your support.
Mauro: Your support is awesome. Thank you very much. As you, other people have suggested that I could sell the things I make. I have been thinking about that and I will probably offer a couple of sets. Thanks again.
Callmehobbes: You are always there, supporting me, and supporting me, and this means a lot to me. Sincerely thank you.
With the nice feedback you gave me about the armchair, I looked again at the photos of the armchair, and I completely agree with you, it doesn't look so bad, but I have a completely different vision on my mind, much more destroyed, as if it had been "sucked" from the inside.
So, I looked for the mold (they are already in the garbage) and made a copy... and that´s the vision in my head.
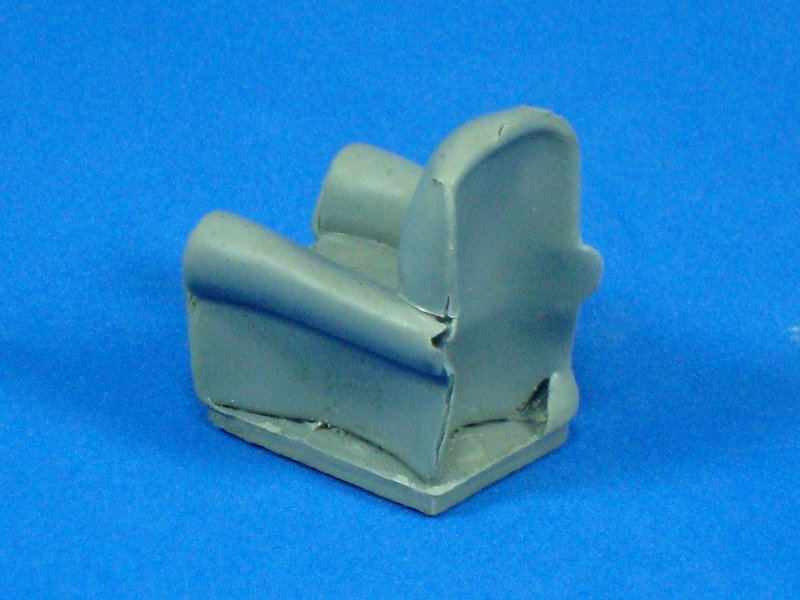
When I removed the master from the tank, the styrofoam was still compressed by the pressure, but as days went by, it recovered part of its original shape (probably the Tamiya epoxy helped too). When I took the pictures, the master didn't look so bad, but the shape in the mold is more compressed.
Anyway, I like the idea of an old abandoned piece of furniture.
I've made another TV. I've used the same method as described in the previous one. This TV is older, it even has a flat screen, and it´s smaller about 20" while the other one is about 28".


For the 2nd floor I made another sink and a little leg for the kitchen furniture. I'm going to make other doors too. I think these changes will make it look different from the one on the first floor.

I've also made another handle for future doors.
For the furniture I showed in the previous post, I made the drawer with plasticard. Unfortunally the master got apart when I extracted it from the mold.
I added the handler on the doors.
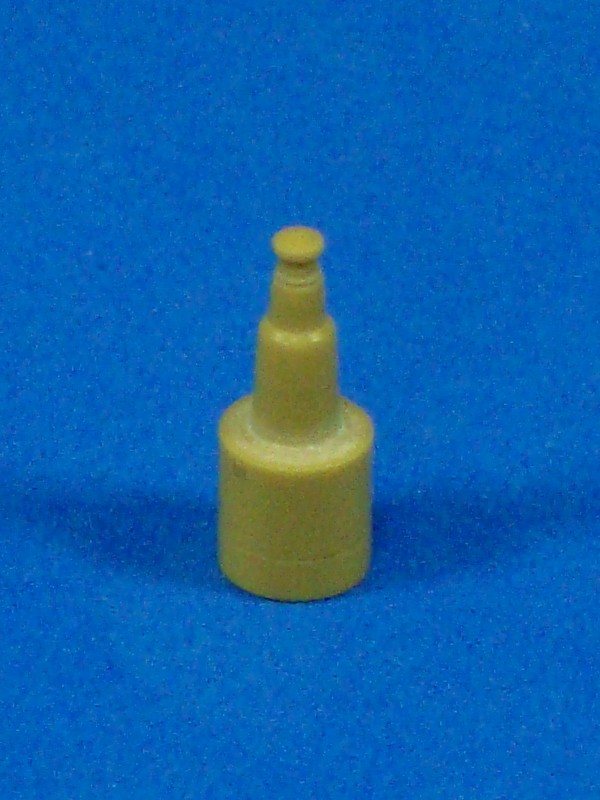
For the RPG-box I made some details that the box has on the exterior, and the separators for the RPG explosive head.

I've made the parts for a chair. In the picture you can see the back, the seat and only one leg, as I'm going to copy that on to make the others. The leg is quite long(longer than necessary for this chair) because it may be useful when making a stool or any other type of chair.
The problem with the resin was the drying time. In summer we have about 32-38 degree and in winter about 1-7 degree. In summer this is a perfect temperature for drying the resin (you can make one every 6hs.). But in winter, the temperature is so low that not even 24hs are enough for the tiny pieces.
The solution was simple, I had to "cook" the pieces.
My first try was to put the molds into the oven, but the problem is that at the minimum level and even with the door open the temperature is too high, so the resin softens, and the bubbles appear again.
In this pictures you can see how the air inside the mold has deformed the door, or the drawers, and on the RPG head a bubble inside the resin appeared and cut the head. (I show a complete one to note were the bubble appear)

So, I thought about using a lamp (the older one, the incandescent), but the problem was the temperatures are too variable. Under the lamp it is too high but on the edges too irregular.
I had to improvise a "oven", so with an acrylics box I have and a lamp I made this "oven". I adjust the temperature by putting the lamp inside or outside the box.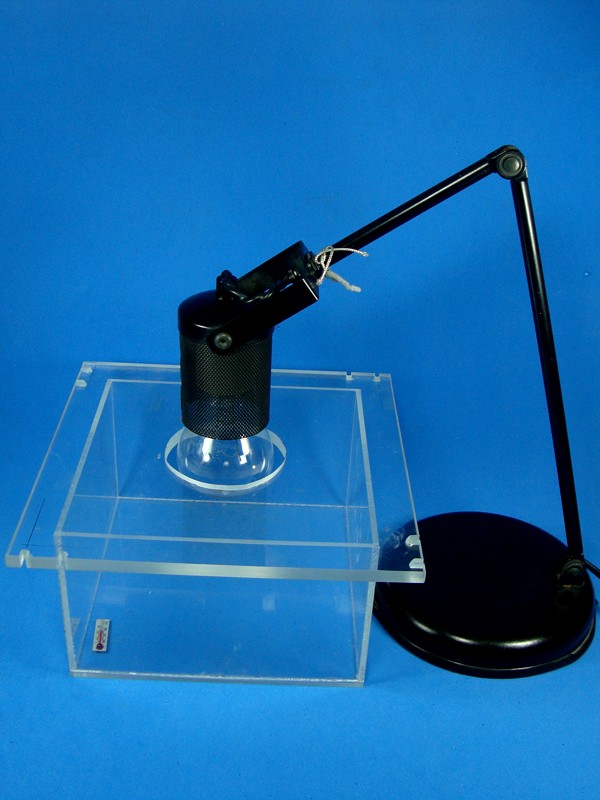
After lots of trying, I can say that at more than 35 degree, the resin starts to soften.
I'm going to try to make a better "oven" with the lamp under the box and a power regulator to adjust the temperature.
May be all these things about temperatures, curing time, etc are boring but I wanted to share them with you in case you have this problem too, or you have already found a better solution, and you want to share it with me...
See you soon!!!
I´m really sorry about this long delay, but some problems with the resin got me stuck (further on I will explain exactly what happened).
Zon and Edson: You put the armchair in a different context and like the idea very much. May be I'll put the armchair in the terrace of the house with other abandoned things as garbage. Thanks for the idea and continuing supporting me.
Paul: That's another good idea.
It´s not a great technology, just a compressor and a pressure tank. I bought the pressure tank from a company that produces it for painting. The pressure tank supports a pressure of 160 Lb, but at 80 a security valve opens to release the air inside, for safety. Thanks for taking the time to see my project.
Jorge: Thank you very much for your words. I really appreciate your support.
Mauro: Your support is awesome. Thank you very much. As you, other people have suggested that I could sell the things I make. I have been thinking about that and I will probably offer a couple of sets. Thanks again.
Callmehobbes: You are always there, supporting me, and supporting me, and this means a lot to me. Sincerely thank you.
With the nice feedback you gave me about the armchair, I looked again at the photos of the armchair, and I completely agree with you, it doesn't look so bad, but I have a completely different vision on my mind, much more destroyed, as if it had been "sucked" from the inside.
So, I looked for the mold (they are already in the garbage) and made a copy... and that´s the vision in my head.
When I removed the master from the tank, the styrofoam was still compressed by the pressure, but as days went by, it recovered part of its original shape (probably the Tamiya epoxy helped too). When I took the pictures, the master didn't look so bad, but the shape in the mold is more compressed.
Anyway, I like the idea of an old abandoned piece of furniture.
I've made another TV. I've used the same method as described in the previous one. This TV is older, it even has a flat screen, and it´s smaller about 20" while the other one is about 28".
For the 2nd floor I made another sink and a little leg for the kitchen furniture. I'm going to make other doors too. I think these changes will make it look different from the one on the first floor.
I've also made another handle for future doors.
For the furniture I showed in the previous post, I made the drawer with plasticard. Unfortunally the master got apart when I extracted it from the mold.
I added the handler on the doors.
For the RPG-box I made some details that the box has on the exterior, and the separators for the RPG explosive head.
I've made the parts for a chair. In the picture you can see the back, the seat and only one leg, as I'm going to copy that on to make the others. The leg is quite long(longer than necessary for this chair) because it may be useful when making a stool or any other type of chair.
The problem with the resin was the drying time. In summer we have about 32-38 degree and in winter about 1-7 degree. In summer this is a perfect temperature for drying the resin (you can make one every 6hs.). But in winter, the temperature is so low that not even 24hs are enough for the tiny pieces.
The solution was simple, I had to "cook" the pieces.
My first try was to put the molds into the oven, but the problem is that at the minimum level and even with the door open the temperature is too high, so the resin softens, and the bubbles appear again.
In this pictures you can see how the air inside the mold has deformed the door, or the drawers, and on the RPG head a bubble inside the resin appeared and cut the head. (I show a complete one to note were the bubble appear)
So, I thought about using a lamp (the older one, the incandescent), but the problem was the temperatures are too variable. Under the lamp it is too high but on the edges too irregular.
I had to improvise a "oven", so with an acrylics box I have and a lamp I made this "oven". I adjust the temperature by putting the lamp inside or outside the box.
After lots of trying, I can say that at more than 35 degree, the resin starts to soften.
I'm going to try to make a better "oven" with the lamp under the box and a power regulator to adjust the temperature.
May be all these things about temperatures, curing time, etc are boring but I wanted to share them with you in case you have this problem too, or you have already found a better solution, and you want to share it with me...
See you soon!!!
roudeleiw

Joined: January 19, 2004
KitMaker: 2,406 posts
Armorama: 2,224 posts

Posted: Thursday, July 12, 2012 - 05:33 PM UTC
Man, your scratchbuilding is good!
Please tell me more about the Mini Lathe. Witch one you have?
I did read that you used 1 mm Plasticcard to make the chairs legs? Correct? 1 mm Rod i suppose.
Does the plastic not melt?
Can you give me some other tips regarding the Lathe and the needs for our scale. The price tag is a bit hefty on a Lathe and as i have one specific need for it soon, i have no idea about the need later.
Claude

olivato
Joined: August 16, 2005
KitMaker: 127 posts
Armorama: 107 posts
Posted: Friday, July 13, 2012 - 11:24 AM UTC
Hi!
Claude: Thank you very much for the support.
About the mini bench lathe, here you have a picture.

An importer brought it to Argentina about seven years ago from China, and took my chance and bought it. I was very lucky to buy it because I didn´t see another one until a year ago when I saw another, a little bit bigger.
Yes, it´s a little bit expensive, about u$s 1000-1500, but it´s very useful for large projects, or if you want to make your own pieces with a good quality (I think these two characteristics fit with your profile )
It was probably a misunderstanding or I didn't explain myself well, but I don´t use plasticard with this tool, not because melts it, you can regulate the speed (RPM) and at minimum it is very slow, but the plasticard is too soft and it gets curved when you work with it (it´s difficult to maintain the same diameter on the length of the cylinder).
I made a mold with cylinders with different diameters, so I have cylinders of resin and use them according to the diameters of the project I want to make. The resin is hard enough to stay straight but at the same time it is easy to sculpt with tools like sandpaper, metal files, even a hobby blade.
The precision of the tool is 0.05 mm, so you can make steps of this distance (if you start with a 20mm cylinder, on the first step you will obtain a 19.9 mm, much more than what we need.)
Here are some photos of other projects I made with this tool, which has been really useful for me so far.
I hope this answers your question, and if there is anything else you would like to know, tell me what it is and I will try a better explanation.
Claude: Thank you very much for the support.
About the mini bench lathe, here you have a picture.
An importer brought it to Argentina about seven years ago from China, and took my chance and bought it. I was very lucky to buy it because I didn´t see another one until a year ago when I saw another, a little bit bigger.
Yes, it´s a little bit expensive, about u$s 1000-1500, but it´s very useful for large projects, or if you want to make your own pieces with a good quality (I think these two characteristics fit with your profile
) It was probably a misunderstanding or I didn't explain myself well, but I don´t use plasticard with this tool, not because melts it, you can regulate the speed (RPM) and at minimum it is very slow, but the plasticard is too soft and it gets curved when you work with it (it´s difficult to maintain the same diameter on the length of the cylinder).
I made a mold with cylinders with different diameters, so I have cylinders of resin and use them according to the diameters of the project I want to make. The resin is hard enough to stay straight but at the same time it is easy to sculpt with tools like sandpaper, metal files, even a hobby blade.
The precision of the tool is 0.05 mm, so you can make steps of this distance (if you start with a 20mm cylinder, on the first step you will obtain a 19.9 mm, much more than what we need.)
Here are some photos of other projects I made with this tool, which has been really useful for me so far.
I hope this answers your question, and if there is anything else you would like to know, tell me what it is and I will try a better explanation.
zontar
Joined: August 27, 2006
KitMaker: 1,646 posts
Armorama: 1,557 posts
Posted: Friday, July 13, 2012 - 01:38 PM UTC
Victor: I really like where you've gone with the armchair, as well as all your other work.
Happy Modeling, -zon
Happy Modeling, -zon
roudeleiw
Joined: January 19, 2004
KitMaker: 2,406 posts
Armorama: 2,224 posts
Posted: Friday, July 13, 2012 - 09:14 PM UTC
Thanks for the explanation Victor
Using a piece of resin is indeed the way to go, idid it myself a few weeks ago to make the legs of a table. I turned it "the old way", stuck in the Dremel and manually carving it. This is not exactly an exact science, but was good enough.
Good enough is not allways good, but spending a 1000 $ to use it twice a year max is usually not a thing i am doing
The 200 $ Proxxon lathe or other China imports in this price category are perhaps betterr candidates but all have disadvantages.(quality and so on)
Anyway, this does not belong in your thread any more.
(if anyone has a good tip , PM me)
Thanks for showing the other pieces you made
Claude
Spiderfrommars
Joined: July 13, 2010
KitMaker: 3,845 posts
Armorama: 3,543 posts
Posted: Friday, July 13, 2012 - 10:10 PM UTC
You really are an ingenious modeller, you're not just a "kit assembler". I really like this way to live our hobby, that's the most creative way to do it...
And as I told before, in my opinion you MUST sell your stuff!!
There are lots of "lazy modellers" who could buy them
Thanks a million for sharing these incredibly inspirational jobs!
And as I told before, in my opinion you MUST sell your stuff!!
There are lots of "lazy modellers" who could buy them
Thanks a million for sharing these incredibly inspirational jobs!
olivato
Joined: August 16, 2005
KitMaker: 127 posts
Armorama: 107 posts
Posted: Saturday, July 14, 2012 - 02:50 PM UTC
Hi everyone!!!
Zon: Thank you very much for taking your time to follow my project, I really appreciate your support and your opinions about the armchair. Thanks.
Mauro: Thank you very much for your kind and encouraging words. I sincerely appreciate that very much, thank you.
Claude: The Dremel is good, but at the minimum speed, the RPM is too high so the resin started to heat and curved, and that´s a problem. You have to work for short periods of time and let it go cold in between.
When I was about to buy the mini bench lathe, I had the same question (whether I was going to use it often enough to justify spending so much money), because the tool is very expensive, but when you have it, you find many more thinks to do with it, and I use it much more often than you may imagine.
Anyway, now the decision is yours, and if you want to know anything else, please ask, no problem.
As you can see, I have all the parts to make the RPG-box, so now I have solved the problem with the resin, I've made the copy and finally finished this project.
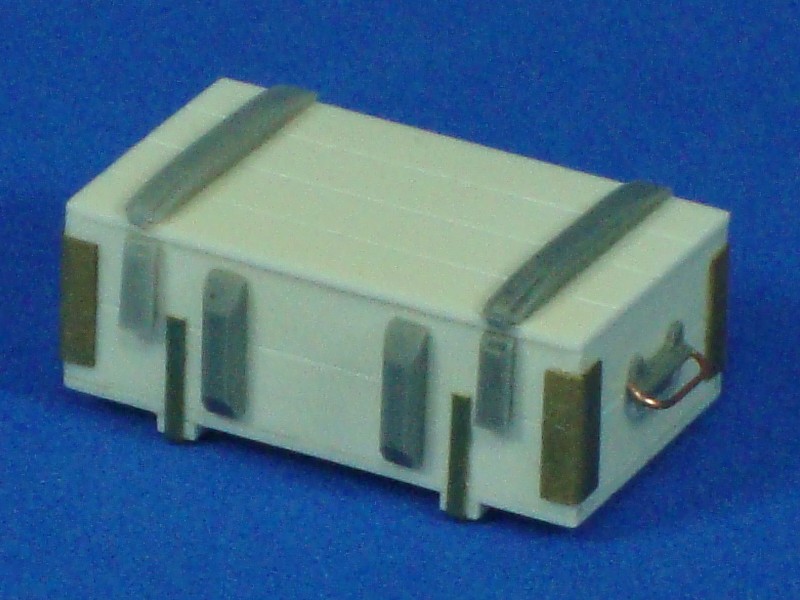
One of the most difficult parts was the separators for the RPG heads, because they have to maintain the head parallel between them and parallel to the box.

This was a fun project, I really enjoyed it. To start with a picture, make a drawing, and see it become a real box but in scale was great fun. I had to investigate, search for pictures, scale it... I really liked it.
Now I going to focus on the RPG-head, and add this little details I mentioned before.
See you soon!
Zon: Thank you very much for taking your time to follow my project, I really appreciate your support and your opinions about the armchair. Thanks.
Mauro: Thank you very much for your kind and encouraging words. I sincerely appreciate that very much, thank you.
Claude: The Dremel is good, but at the minimum speed, the RPM is too high so the resin started to heat and curved, and that´s a problem. You have to work for short periods of time and let it go cold in between.
When I was about to buy the mini bench lathe, I had the same question (whether I was going to use it often enough to justify spending so much money), because the tool is very expensive, but when you have it, you find many more thinks to do with it, and I use it much more often than you may imagine.
Anyway, now the decision is yours, and if you want to know anything else, please ask, no problem.
As you can see, I have all the parts to make the RPG-box, so now I have solved the problem with the resin, I've made the copy and finally finished this project.
One of the most difficult parts was the separators for the RPG heads, because they have to maintain the head parallel between them and parallel to the box.
This was a fun project, I really enjoyed it. To start with a picture, make a drawing, and see it become a real box but in scale was great fun. I had to investigate, search for pictures, scale it... I really liked it.
Now I going to focus on the RPG-head, and add this little details I mentioned before.
See you soon!
Pops53
Joined: November 05, 2011
KitMaker: 100 posts
Armorama: 98 posts
Posted: Sunday, July 15, 2012 - 03:06 AM UTC
Marvelous work! As a previous commenter accurately observed, this is scratch modeling at its very best ... and most creative. Bravo!

Hisham

Joined: July 23, 2004
KitMaker: 6,856 posts
Armorama: 6,363 posts
Posted: Sunday, July 15, 2012 - 03:28 AM UTC
Excellent and ingenious work, Victor!! I remember when you first posted the start of the building.. and I'm glad you're still at it.
If I had your skills, I would definitely start a small AM company and start selling copies to people like ME.. who would definitely buy everything you make
Hint intended
Hisham
If I had your skills, I would definitely start a small AM company and start selling copies to people like ME.. who would definitely buy everything you make
Hint intended
Hisham
SGTJKJ

#041

Joined: July 20, 2006
KitMaker: 10,069 posts
Armorama: 4,677 posts

Posted: Sunday, July 15, 2012 - 06:10 AM UTC
Fantastic work, Victor! Seems like you have the modelling and casting skills to set up your own company.
Looking forward to see more
Looking forward to see more


rodrigo_sartori

Joined: January 16, 2007
KitMaker: 160 posts
Armorama: 159 posts
Posted: Monday, July 16, 2012 - 05:11 AM UTC
Olivato,
His work is perfect. Neatness in detail is amazing.
I keep following your work and also learning. Very.
Hugs,
Rodrigo
His work is perfect. Neatness in detail is amazing.
I keep following your work and also learning. Very.
Hugs,
Rodrigo

blockhaus
Joined: July 04, 2003
KitMaker: 693 posts
Armorama: 682 posts
Posted: Monday, July 16, 2012 - 06:52 AM UTC
only want say you that I enjoy every of your messages here
Carlos

1967er

Joined: March 12, 2012
KitMaker: 224 posts
Armorama: 201 posts
Posted: Monday, July 16, 2012 - 07:46 AM UTC
Man, your scratchbuilding skills are marvellous.
I've never seen something similar.
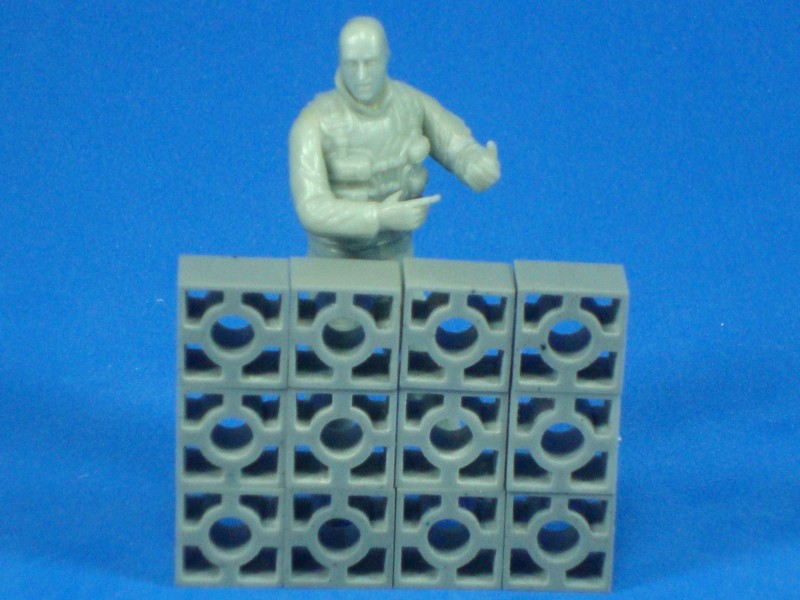
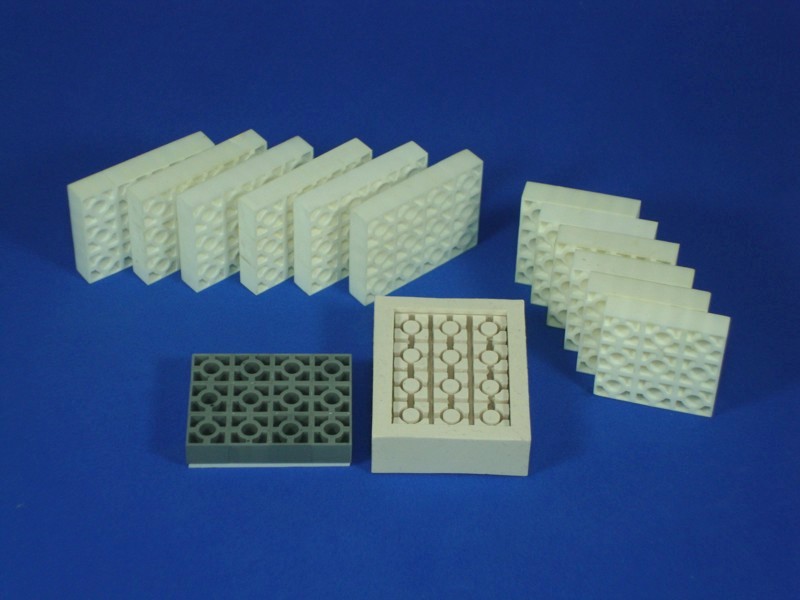
What you are doing with the hollow bricks is insane - but wonderful.
I cannot wait to see it all painted.
I will definitely follow your article....
cheers
Thomas
I've never seen something similar.
What you are doing with the hollow bricks is insane - but wonderful.
I cannot wait to see it all painted.
I will definitely follow your article....
cheers
Thomas
olivato
Joined: August 16, 2005
KitMaker: 127 posts
Armorama: 107 posts
Posted: Monday, July 16, 2012 - 11:19 AM UTC
Hi everyone!!!
Fred: Thanks for your kind words and for taking your time to follow my work, thank you very much.
Hisham: You were one of the first to give me your support since I started this project, I really appreciate that you are still following my work today. As you, other people have encouraged me to sell my resin pieces, and I´m working on it. Thanks.
Jesper: Thank you for taking your time to see my work. I´m working on offering my work in a serious way, and not something in a rush.
Rodrigo: I know you follow this project and I sincerely appreciate your support. If I am still focused on this project is for all the support I receive from people like you. Thank you very much.
Carlos: You only have kind and encouraging words for me and my work, thank you very much.
Thomas: Thanks for your words, and the time to see my project. Yes, the hollow bricks were something difficult, but the effort was worth it.
I expect to have the skill to paint and not ruin all this work.
Another mini project finished!!!
As in the case of RPG-box, now I have enough copies to present the banister of the house.
In this picture you can see the master, the mold and the copies. I tainted the resin with white not to have problem of tonalities with the color of the rest of the house.
Here you can see how they look on their place in the house.
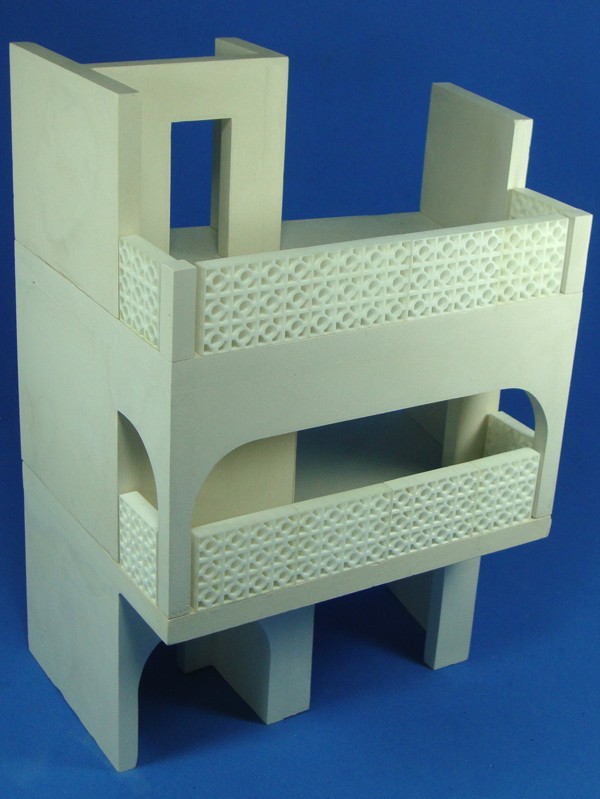
I think this banister gives a lot of character to the house, and it's going to be a distinctive point in this diorama.
See you soon!!!
Fred: Thanks for your kind words and for taking your time to follow my work, thank you very much.
Hisham: You were one of the first to give me your support since I started this project, I really appreciate that you are still following my work today. As you, other people have encouraged me to sell my resin pieces, and I´m working on it. Thanks.
Jesper: Thank you for taking your time to see my work. I´m working on offering my work in a serious way, and not something in a rush.
Rodrigo: I know you follow this project and I sincerely appreciate your support. If I am still focused on this project is for all the support I receive from people like you. Thank you very much.
Carlos: You only have kind and encouraging words for me and my work, thank you very much.
Thomas: Thanks for your words, and the time to see my project. Yes, the hollow bricks were something difficult, but the effort was worth it.
I expect to have the skill to paint and not ruin all this work.
Another mini project finished!!!
As in the case of RPG-box, now I have enough copies to present the banister of the house.
In this picture you can see the master, the mold and the copies. I tainted the resin with white not to have problem of tonalities with the color of the rest of the house.
Here you can see how they look on their place in the house.
I think this banister gives a lot of character to the house, and it's going to be a distinctive point in this diorama.
See you soon!!!

vonHengest
Joined: June 29, 2010
KitMaker: 5,854 posts
Armorama: 4,817 posts

Posted: Monday, July 16, 2012 - 11:37 AM UTC
It's really great to see so much more work being done on your project here Victor, things look like they have been really interesting in a good way for you lately
xsoft_ej
Joined: March 21, 2009
KitMaker: 18 posts
Armorama: 17 posts
Posted: Monday, July 16, 2012 - 01:17 PM UTC
Victor what amazing job are you doing here, you have so much patience, i dont have the english words to explain how much i'm enjoying your work it's a wonderful way to inspire others... i can't wait to see the destroyed armchair painted and weathered. and yes the house has a lot of character added by the bricks, this alone put you in the middle east.
Me encanta tu trabajo y tu actitud de mostrar como lo estas haciendo me parece exelente, saludos y un fuerte abrazo desde Guatemala.
Me encanta tu trabajo y tu actitud de mostrar como lo estas haciendo me parece exelente, saludos y un fuerte abrazo desde Guatemala.

Nito74

Joined: March 04, 2008
KitMaker: 5,386 posts
Armorama: 4,727 posts
Posted: Monday, August 06, 2012 - 07:06 AM UTC
Victor, I found a similar project but on a bigger scale with as Iraq street dio.
Lots of buildings, figures and a huge convoy.
I just want to give you the link, you find some other options, ideas, or solving some issues.
I might be helpful.
http://www.ammontijo.com/forum/viewtopic.php?f=1&t=3726
17 pages thread.
Good luck on your project !!
Lots of buildings, figures and a huge convoy.
I just want to give you the link, you find some other options, ideas, or solving some issues.
I might be helpful.
http://www.ammontijo.com/forum/viewtopic.php?f=1&t=3726
17 pages thread.
Good luck on your project !!
 |

WEB HOSTING BY


Copyright ©2021 Armorama and Kitmaker Network, a subsidiary of Silver Star Enterprises
All Rights Reserved. Please read our Conditions of Use and Privacy Policy.
All Rights Reserved. Please read our Conditions of Use and Privacy Policy.