

Very impressive work, thanks for sharing!
I look forward to following your updates :-)
Hosted by Darren Baker
1/35 German Railway Station Diorama

Occam

Joined: October 10, 2004
KitMaker: 190 posts
Armorama: 129 posts

Posted: Monday, March 05, 2012 - 12:33 AM UTC
mic113

Joined: February 04, 2012
KitMaker: 88 posts
Armorama: 59 posts
Posted: Thursday, March 08, 2012 - 03:45 AM UTC
As usual you are doing atop work and following your thread is a
real enjoyement
Am also starting my hudge 2m x 1.2 large diorama and can wait to be at your point
Keep your good work !!!
real enjoyement
Am also starting my hudge 2m x 1.2 large diorama and can wait to be at your point
Keep your good work !!!

rodrigo_sartori

Joined: January 16, 2007
KitMaker: 160 posts
Armorama: 159 posts
Posted: Thursday, March 08, 2012 - 04:23 AM UTC
very, very good work. Surely, this will be a reference for me.
Congratulations!
Congratulations!

bill1

Joined: August 14, 2005
KitMaker: 3,938 posts
Armorama: 520 posts

Posted: Friday, March 09, 2012 - 09:57 AM UTC
Yo Cem,
Whow, what a build update you showing here! Nice models.
The platform wagon is stunning work, the wooden frame is superb!
You guys build so mutch models in such a short time...do you guys ever sleep?
Keep up the good work!
greetz Nico
Whow, what a build update you showing here! Nice models.
The platform wagon is stunning work, the wooden frame is superb!
You guys build so mutch models in such a short time...do you guys ever sleep?
Keep up the good work!
greetz Nico

Removed by original poster on 03/29/12 - 14:15:37 (GMT).
mozart

Joined: May 17, 2004
KitMaker: 70 posts
Armorama: 66 posts
Posted: Thursday, March 29, 2012 - 02:16 AM UTC
Quoted Text
Am also starting my hudge 2m x 1.2 large diorama and can wait to be at your point
Keep your good work !!!
Hey Michel,
Good luck with yours...Especially with the rail road tracks.
At the moment I'm assembling and painting rail road tracks
 before It was drive line and vehicle tracks now these are my worst nightmare
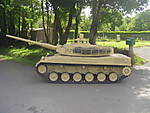
Panzerjagerwagen V is also one of the wagons on this dio


I used 3mm red LED on head lights


Metal barrels *main gun & coax

Painted interior


Fully assembled


Final....


Flashing head lights...


bill1
Joined: August 14, 2005
KitMaker: 3,938 posts
Armorama: 520 posts
Posted: Thursday, March 29, 2012 - 03:09 AM UTC
Yo Cem,
Again a model finished....whow, you going hard.
The result is very nice...nice touch on the working light.
Keep up!
Greetz Nico
Again a model finished....whow, you going hard.
The result is very nice...nice touch on the working light.
Keep up!
Greetz Nico

ophelia53

Joined: March 10, 2010
KitMaker: 254 posts
Armorama: 226 posts
Posted: Thursday, March 29, 2012 - 03:18 AM UTC
WOW! This is an awesome build! Love all of it! Can't wait to see more. Keep up the exceptional work!

mic113
Joined: February 04, 2012
KitMaker: 88 posts
Armorama: 59 posts
Posted: Thursday, March 29, 2012 - 06:55 AM UTC
Very nice built again !! Only one word ; SUPERBE !!!!
Keep on your progress and post I follow you attentivly
One question i do like the main color you used what is it ?Tamiya TS 46 ??? or more BUFF ?
Keep on your progress and post I follow you attentivly
One question i do like the main color you used what is it ?Tamiya TS 46 ??? or more BUFF ?

Snert24

Joined: February 14, 2011
KitMaker: 19 posts
Armorama: 18 posts
Posted: Thursday, March 29, 2012 - 08:11 AM UTC
Hi
Fantastic work!!!!
Swen
Fantastic work!!!!
Swen
VLADPANZER

Joined: December 20, 2010
KitMaker: 568 posts
Armorama: 549 posts
Posted: Saturday, March 31, 2012 - 07:09 AM UTC
Incredible work!!!


tommy1drop

Joined: February 07, 2011
KitMaker: 131 posts
Armorama: 116 posts
Posted: Saturday, May 19, 2012 - 08:05 AM UTC
Just trolling through some of the dios on here and i have to say this is a fantastic blog, your work is simply superb, the attention to detail is fantastic, looking forward to seeing more of this build.
Tom
Tom
mozart
Joined: May 17, 2004
KitMaker: 70 posts
Armorama: 66 posts
Posted: Sunday, May 20, 2012 - 11:33 PM UTC
Many thanks to all.
Here is another wagon I have completed a year ago and I already shared the completed wagon from Armorama forum. But not the building process.
2cm Vierlingsflak auf Eisenbahn
This as a scratch built 1/35 rail wagon model, converted from a 1/35 Trumpeter Railway Gondola.
The weapon is Tamiya 20mm Flakvierling 38 with 1x Aber 35A89 - Ammo boxes for 20mm Flak 30 & 38 , 1x Eduard Flakvierling 38 Detail, 1x CMK 20mm Flakvierling 38 Barrels detail sets.
I have started working on this experiment with limited reference photos and descriptions. There by some parts came out as improvisation
There where few verities of these wagons but these two photographs from "Bundesarchiv" gave me to Idea to build a 20mm Flak Wagon project


There were also useful information and references about flak rail wagons on this book.

I started building the chassis out of Trumpeter Railway Gondola kit


Due to the ref drawings I had to expend the length up to 26cm


Adding side railings:


Here is another wagon I have completed a year ago and I already shared the completed wagon from Armorama forum. But not the building process.
2cm Vierlingsflak auf Eisenbahn
This as a scratch built 1/35 rail wagon model, converted from a 1/35 Trumpeter Railway Gondola.
The weapon is Tamiya 20mm Flakvierling 38 with 1x Aber 35A89 - Ammo boxes for 20mm Flak 30 & 38 , 1x Eduard Flakvierling 38 Detail, 1x CMK 20mm Flakvierling 38 Barrels detail sets.
I have started working on this experiment with limited reference photos and descriptions. There by some parts came out as improvisation
There where few verities of these wagons but these two photographs from "Bundesarchiv" gave me to Idea to build a 20mm Flak Wagon project
There were also useful information and references about flak rail wagons on this book.
I started building the chassis out of Trumpeter Railway Gondola kit
Due to the ref drawings I had to expend the length up to 26cm
Adding side railings:
Catalind

Joined: March 10, 2012
KitMaker: 9 posts
Armorama: 8 posts
Posted: Monday, May 21, 2012 - 10:46 PM UTC
It is soooo great, fantastic work, is there a chance of having the biographical pictures of the wagons that you are constructing? Thanks
Can t wait to see the rest of it
Can t wait to see the rest of it
mozart
Joined: May 17, 2004
KitMaker: 70 posts
Armorama: 66 posts
Posted: Monday, May 21, 2012 - 11:16 PM UTC
Quoted Text
It is soooo great, fantastic work, is there a chance of having the biographical pictures of the wagons that you are constructing? Thanks
Can t wait to see the rest of it
Hi Catalin,
This is already a completed project. Yesterday Couldn't have time to upload the rest of the image links. Will try do send more today..
mozart
Joined: May 17, 2004
KitMaker: 70 posts
Armorama: 66 posts
Posted: Tuesday, May 22, 2012 - 12:18 AM UTC
I used laser cut wood and plastic beams to complete side panels.


Interior & exterior of side panels

Side cargo hatch opening


Side cargo hatch door and lock:

Rear panel and cargo hatch opening

Front pannel

Used this method to produce hexagon nuts to apply on plastic "U" profiles:


0.1mm bras plate

tape


Elevated deck panels


Doors


Interior & exterior of side panels
Side cargo hatch opening
Side cargo hatch door and lock:
Rear panel and cargo hatch opening
Front pannel
Used this method to produce hexagon nuts to apply on plastic "U" profiles:
0.1mm bras plate
tape
Elevated deck panels
Doors

Totalize

Joined: February 04, 2009
KitMaker: 743 posts
Armorama: 549 posts
Posted: Tuesday, May 22, 2012 - 01:26 AM UTC
Incredible build Cem, This is monumental in its scope.
Will be following this one for sure. Awesome work.
Will be following this one for sure. Awesome work.

asmodeuss
Joined: November 19, 2011
KitMaker: 1,389 posts
Armorama: 1,388 posts

Posted: Tuesday, May 22, 2012 - 01:59 AM UTC
Just amazing Cem! i'm suscribing right now. Thanks for sharing, very informative.
Phil
Phil
mozart
Joined: May 17, 2004
KitMaker: 70 posts
Armorama: 66 posts
Posted: Tuesday, May 22, 2012 - 06:42 PM UTC
A sample image fixed panels


Rear panel finishing:

From the ref. drawing I discovered that upper deck support pillars are made of "U" shape iron pipes (shown on fig.7 "Abweisbügel")


Upper deck:


Upper deck hatch


Rear panel finishing:
From the ref. drawing I discovered that upper deck support pillars are made of "U" shape iron pipes (shown on fig.7 "Abweisbügel")
Upper deck:
Upper deck hatch
cestus72

Joined: February 06, 2011
KitMaker: 230 posts
Armorama: 227 posts
Posted: Wednesday, May 23, 2012 - 03:10 AM UTC
One of my model dream is do something like that one day , you have a magic hands
bill1
Joined: August 14, 2005
KitMaker: 3,938 posts
Armorama: 520 posts
Posted: Wednesday, May 23, 2012 - 06:02 AM UTC
Yo Sem,
Thats what i call scratch building! Massive work and oh so clean..
Keep up the good work.
Greetz Nico
Thats what i call scratch building! Massive work and oh so clean..
Keep up the good work.
Greetz Nico
mozart
Joined: May 17, 2004
KitMaker: 70 posts
Armorama: 66 posts
Posted: Wednesday, May 23, 2012 - 07:12 PM UTC
Hi Nico,
many more to post)


The Roof


Assembly rehearsal 2


Detailing


Assembly rehearsal 3


Roof finishing


Flakvierling from Tamiya
I now to day there are many new verities of 1/35 Flakvierling model kits my other brands. But this kit was with me since a decade and I wanted to use it with upgrade sets.


Road wheels

All panels ready for painting

Lower Deck


many more to post
) The Roof
Assembly rehearsal 2
Detailing
Assembly rehearsal 3
Roof finishing
Flakvierling from Tamiya
I now to day there are many new verities of 1/35 Flakvierling model kits my other brands. But this kit was with me since a decade and I wanted to use it with upgrade sets.
Road wheels
All panels ready for painting
Lower Deck
ahandykindaguy
Joined: August 20, 2008
KitMaker: 1,295 posts
Armorama: 1,191 posts

Posted: Thursday, May 24, 2012 - 04:53 AM UTC
Cem seriously intricate details on your railcars! the way you make stuff out of tiny pieces of brass and wire is unbelievable. You are making door handles and hinges " look " easy, I know the truth however... absolutely wonderful craftsmanship!
I look in often, and always know I will be amazed by your quality of work.
Have a great day!
Dave
I look in often, and always know I will be amazed by your quality of work.
Have a great day!
Dave
mozart
Joined: May 17, 2004
KitMaker: 70 posts
Armorama: 66 posts
Posted: Friday, May 25, 2012 - 02:02 AM UTC
Thanks Dave,
I used this fixture method to assemble all panels on correct angles and order.


All panels and doors hatches and decks are painted

That's how it looks after assembly


Decals from Archer Dry Transfer ans markings are painted over by masking...


Flakvierling Finishing:


I used this fixture method to assemble all panels on correct angles and order.
All panels and doors hatches and decks are painted
That's how it looks after assembly
Decals from Archer Dry Transfer ans markings are painted over by masking...
Flakvierling Finishing:

Plasticbattle

#003

Joined: May 14, 2002
KitMaker: 9,763 posts
Armorama: 7,444 posts

Posted: Friday, May 25, 2012 - 09:09 PM UTC
Fantastic build Cem. Really enjoying this thread. 

 |

WEB HOSTING BY


Copyright ©2021 Armorama and Kitmaker Network, a subsidiary of Silver Star Enterprises
All Rights Reserved. Please read our Conditions of Use and Privacy Policy.
All Rights Reserved. Please read our Conditions of Use and Privacy Policy.