Campaigns
Where Armorama group builds can be discussed, organized, and updates posted.
88 campaign
greif8
Visit this Community
Bayern, Germany
Joined: January 17, 2006
KitMaker: 673 posts
Armorama: 116 posts
Posted: Thursday, March 07, 2013 - 06:50 PM UTC
Hi Mark, I have had a lot more time then normal "at the bench", hence the speed of construction. I will be following your build with interest as you have some really nice aftermarket stuff to pimp you kit out. I decided on an oob early on, as I figured the gun crew and build the diorama base were going to add considerably to the build time. If you have any questions once you get started, I have been keeping a small list of things that the instructions are either wrong or not clear on. There are not many so far, but there are a few.

Sincerely,
Ernest


Quoted Text

Wow Ernest,

You are kicking butt! I am still in the "thinking about it" stage.... I have been working with the extensive Voyager update for the Trumpeter - Sturer Emil kit. Although the instructions are pretty good, I find that sometimes subtle, often huge modifications to the basic kit slow me down for long periods of time.. I'll be watching for problems or gotchas.

Mark

retiredyank
Visit this Community
Arkansas, United States
Joined: June 29, 2009
KitMaker: 11,610 posts
Armorama: 7,843 posts
Posted: Friday, March 08, 2013 - 01:30 PM UTC
It's official, I'm in with a KT.
miniman11
Visit this Community
England - South East, United Kingdom
Joined: March 07, 2012
KitMaker: 164 posts
Armorama: 163 posts
Posted: Friday, March 08, 2013 - 10:56 PM UTC
hi guys,

everyones off with a flying start and its really cool to see the campaign have so much interest.

Matt-do you have an idea what KT kit you will be building?

cheers,
Luca
greif8
Visit this Community
Bayern, Germany
Joined: January 17, 2006
KitMaker: 673 posts
Armorama: 116 posts
Posted: Saturday, March 16, 2013 - 09:01 PM UTC
Hi guys, my progress really slowed down the past week. The transport sections of the kit are riddled with ejection pin marks and there are several very prominent seams that had to be (partially) dealt with. I ended up leaving some of the ejector pin marks as I could not figure out how to remove them with destroying the kit part. Fortunately, the majority of them are in places that will be difficult to see on the finished product. I managed to lose one of the fender braces that flew into space off my tweezers and ended up replacing it with brass rod. At any rate the kit is now ready for cleaning and painting.

Below are the transport bogies,
Ernest


greif8
Visit this Community
Bayern, Germany
Joined: January 17, 2006
KitMaker: 673 posts
Armorama: 116 posts
Posted: Sunday, March 17, 2013 - 06:18 AM UTC
Everything has been washed and is now primed. I used soldering wire in place of the flexible plastic that came with the kit for the cables on the reels. The stuff that Dragon supplied was very stiff and too hard to roll nicely. The second photo shows the parts primed and ready to paint. I'll let the primer cure over night and airbrush the base coat tomorrow - at least that is the plan.

Ernest


ChiefGunner
Visit this Community
Setubal, Portugal
Joined: July 24, 2010
KitMaker: 205 posts
Armorama: 203 posts
Posted: Monday, March 18, 2013 - 07:28 AM UTC
Hi!!!!
Initiation of the my 88.
So far no problems, unless the instructions are a bit complicated


Regards,
retiredyank
Visit this Community
Arkansas, United States
Joined: June 29, 2009
KitMaker: 11,610 posts
Armorama: 7,843 posts
Posted: Monday, March 18, 2013 - 07:32 AM UTC

Quoted Text

hi guys,

everyones off with a flying start and its really cool to see the campaign have so much interest.

Matt-do you have an idea what KT kit you will be building?

cheers,
Luca


Dragons King Tiger Henschell turret w/zimm #6303 & Friulli tracks. I may get the Big Ed set for it, as well.
MLD
Visit this Community
Vermont, United States
Joined: July 21, 2002
KitMaker: 3,569 posts
Armorama: 2,070 posts
Posted: Tuesday, March 19, 2013 - 04:44 AM UTC
If you're looking for a heck of a deal on a qualifying kit, look no farther than the Squadron deal of the day, today 3-19-13.
Vk 4502 (P) for $22

What they DON'T tell you is that the kit has a full turret interior.
It's a heck of a deal for $22

http://www.squadron.com/dealoftheday.asp

too bad I'd already started mine before the kickoff date. It's a fun little kit, the exterior would be a quick build/weathering project if there were'nt a full interior..
ltb073
Visit this Community
New York, United States
Joined: March 08, 2010
KitMaker: 3,662 posts
Armorama: 3,078 posts
Posted: Wednesday, March 20, 2013 - 01:11 AM UTC
Some real nice progress here guys
I was originally going to go with the old Tamiya 88mm Gun Flak 36/37 here but then I realized that some guys were building Tigers Well I said self love those Tigers, but now I have a lot of Jadgpathers dew to arrive today so I will have to decide when I get closer to starting which may not be for a while as Panzer 38(t) Brigade is next on deck but im folowing here
Dragon164
#226
Visit this Community
British Columbia, Canada
Joined: February 20, 2012
KitMaker: 1,909 posts
Armorama: 1,066 posts
Posted: Wednesday, March 20, 2013 - 11:03 AM UTC
Got some work done on mine some of the Atak zimmerit is on, the only issues so far are that the front glacis is a little tricky to fit and the piece for the side is a little small leaves a small gap at the bottom. It would be nice if there were some instructions included or online but I'm managing.

Cheers Rob.
greif8
Visit this Community
Bayern, Germany
Joined: January 17, 2006
KitMaker: 673 posts
Armorama: 116 posts
Posted: Thursday, March 21, 2013 - 08:20 AM UTC
Hi guys, looks like some good builds have started up. I am sure there is going to be some nice eye candy to oogle in the near future. My build has progressed to the painting and the beginning of the weathering phase. I have decided to try out a couple of techniques that I either have no experience with, the use of filters, or have only tried once before - chipping.

The diorama I am planning will show an 88 emplaced in the middle of an engagement during the time period of Operations Battleax and Brevity. My research shows DAK vehicles during early desert operations were painted with a locally produced tan/yellow color over panzer grey. The overspray worn very quickly, as most field paint jobs tend to do; and the pictures in my reference books do a good job showing this wear and teat on the paint. This makes for a perfect setting to practice chipping and scuffing the paint.

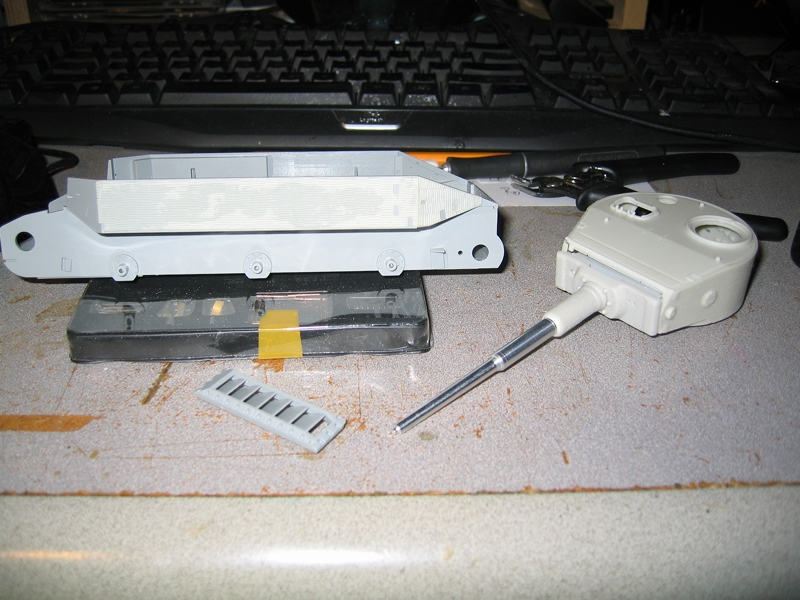
I sprayed an enamel panzer grey base coat and let that cure for 3 days. You can see the parts with the grey base coat in photos 1 and 2. As an aside I normally complete a lot more of the general construction on kits before I spray, but this one has quite a few nooks and crannies and I decided I could do a better job spraying major sub-assemblies first; we shall se how this works out when it comes time to put it all together. After the curing was complete, I sprayed the parts with two coats of AK Interactive Chipping Fluid. As you can see, I then sprayed the cruciform platform and gun shield a yellowish/tan I made by mixing Tamiya XF57, XF59 and XF60 in a 2/4/4 ratio thinned 50/50.

The only other time I have tried chipping was using the "salt chipping" technique; so time to try something new! Using clean water and a couple of fairly stiff brushes I began to work on the gun shield; the effect I am after is a moderately heavy worn look. I will say that this technique gives one very good control once you learn how long to wait for the water to work into the area you are working and how hard to stroke/scrub the area. Obviously I have some practicing to do to get the technique "down" and the first effort on the kit part, I practiced a while on scrap, leaves something to be desired, but is - barely - good enough for a first run.

Enough blathering from me, enjoy the photos!


ChiefGunner
Visit this Community
Setubal, Portugal
Joined: July 24, 2010
KitMaker: 205 posts
Armorama: 203 posts
Posted: Friday, March 22, 2013 - 01:51 AM UTC
HELP!!!!
Someone can tell me, why the "Behelfslafette" , the same as Dragon 1/35 88mm Flak 37, have clear plastic parts?
Regards,
Dragon164
#226
Visit this Community
British Columbia, Canada
Joined: February 20, 2012
KitMaker: 1,909 posts
Armorama: 1,066 posts
Posted: Friday, March 22, 2013 - 04:34 AM UTC
Could they be for the optics?
The sight and such.

Cheers Rob.
ChiefGunner
Visit this Community
Setubal, Portugal
Joined: July 24, 2010
KitMaker: 205 posts
Armorama: 203 posts
Posted: Friday, March 22, 2013 - 04:42 AM UTC
Hi,
The "Behelfslafette" is the crucuform base.
Regards,
ChiefGunner
Visit this Community
Setubal, Portugal
Joined: July 24, 2010
KitMaker: 205 posts
Armorama: 203 posts
Posted: Saturday, March 23, 2013 - 09:03 AM UTC
Dry fit.


Regards,
GVoakes
Visit this Community
Manitoba, Canada
Joined: September 04, 2007
KitMaker: 193 posts
Armorama: 132 posts
Posted: Sunday, March 24, 2013 - 02:59 AM UTC
Hello all!

Well, I've actually been underway since just after the start date, but between work and other things I have not had a chance to post any images or updates.

To start - what I'll be building. The new Orange box Tiger I.


The kit, corrections sheet and some of the reference materials I pulled together.

I've managed to get some of the bigger assemblies pieced together, and test fitted. Most of the bits in the picture were not permanently attached at this time.


It's not a terrible kit, but the tweaks list is definitely necessary if you want to create an accurate model. Dragon includes the sprues from earlier and later versions, so there are multiple versions of the same part (idler wheels, drive sprockets, etc.) and Dragon's instructions, as usual, leave something to be desired. Still, a nice looking kit so far, and for the price it really can't be beat!

More to come!
strongarden
Visit this Community
Florida, United States
Joined: May 14, 2012
KitMaker: 730 posts
Armorama: 624 posts
Posted: Tuesday, March 26, 2013 - 02:01 PM UTC
Hello All

I finally dug these out of the stash.
Originally I was gonna try a braille Tiger, but after reviewing the great work here I've changed my mind to model 88 Field Gun.

Hope to get started soon.


I had stored these forever w/o the boxes.

The Mule SdKfz11


If at all any problem w/ my choice, just say so...
Cheers Dave
ChiefGunner
Visit this Community
Setubal, Portugal
Joined: July 24, 2010
KitMaker: 205 posts
Armorama: 203 posts
Posted: Wednesday, March 27, 2013 - 08:36 AM UTC
Hi!

My 88 WIP.


Regards,
ChiefGunner
Visit this Community
Setubal, Portugal
Joined: July 24, 2010
KitMaker: 205 posts
Armorama: 203 posts
Posted: Thursday, March 28, 2013 - 12:55 PM UTC
Hi!!
My 88 after a coat of Johnson Klear, next step... weathering.


Regards,
greif8
Visit this Community
Bayern, Germany
Joined: January 17, 2006
KitMaker: 673 posts
Armorama: 116 posts
Posted: Monday, April 01, 2013 - 06:52 AM UTC
Some nice progress on some sweet builds! I have managed to chip/wear a few more parts. Overall I am fairly satisfied with the chipping, though I may go back and touch up a few areas. The cruciform platform took a few sessions to complete and I had to fix a couple of small parts that I managed to "scrub" off. I am pretty satisfied with the way the barrel turned out; hopefully I won't screw up the rest of the weathering on it.

Enjoy the photos,
Ernest


ChiefGunner
Visit this Community
Setubal, Portugal
Joined: July 24, 2010
KitMaker: 205 posts
Armorama: 203 posts
Posted: Tuesday, April 02, 2013 - 06:58 AM UTC
Hi all!!!

Dragon 88mm PaK 43/3 L/71 mit Behelfslafette - FINISHED


Regards,
Chiefgunner
Nito74
Visit this Community
Lisboa, Portugal
Joined: March 04, 2008
KitMaker: 5,386 posts
Armorama: 4,727 posts
Posted: Tuesday, April 02, 2013 - 07:39 AM UTC
Great work ChiefGunner !!

Here's the link for the Campaign Gallery, don't forget to post your photos.

88 Gallery
ChiefGunner
Visit this Community
Setubal, Portugal
Joined: July 24, 2010
KitMaker: 205 posts
Armorama: 203 posts
Posted: Tuesday, April 02, 2013 - 09:02 AM UTC
John,

Pictures uploaded.

Regards,
greif8
Visit this Community
Bayern, Germany
Joined: January 17, 2006
KitMaker: 673 posts
Armorama: 116 posts
Posted: Wednesday, April 10, 2013 - 05:24 PM UTC
Very nice work on the 88 ChiefGunner. The camo on the barrel looks especially outstanding.

Ernest
greif8
Visit this Community
Bayern, Germany
Joined: January 17, 2006
KitMaker: 673 posts
Armorama: 116 posts
Posted: Wednesday, April 10, 2013 - 05:32 PM UTC
I completed the basic assembly and wearing/chipping on actual gun. I still have a bit of detail painting to do, a couple of touchups and than weathering. Overall I am satisfied with the way the paint job turned out. I hit the sweet spot I wanted with the "worn" look of a weapon that recieved a hasty field application of paint over the factory paint job and has served a few months in North Africa. The HS technique turned out to be a lot easier to carry out then I thought it would; much greater control the the salt chipping technique. Hopefully I won't screw up the rest of the weathering.

Enjoy the photos,
Ernest