Texas, United States
Joined: March 17, 2006
KitMaker: 1,117 posts
Armorama: 1,115 posts
Posted: Wednesday, June 19, 2013 - 02:59 PM UTC
On the workbench:
T-62M
ZTZ 99 MBT
Lav-25A2 with MILES Gear
M7 Priest X2

#330
Queensland, Australia
Joined: July 15, 2011
KitMaker: 175 posts
Armorama: 72 posts
Posted: Thursday, June 20, 2013 - 10:29 PM UTC
Some progress shots of my Aussie Grant.


The bits that make up the upper hull went together better than I thought they would.
Isere, France
Joined: April 23, 2011
KitMaker: 735 posts
Armorama: 606 posts
Posted: Sunday, June 23, 2013 - 09:18 PM UTC
Hello, i Still undecided , I was unable to make my choice between the sherman mkIII Sherwood Rangers and the stuart 144 th RAC
steph
Florida, United States
Joined: May 14, 2012
KitMaker: 730 posts
Armorama: 624 posts
Posted: Tuesday, June 25, 2013 - 10:25 AM UTC
I'm deciding to go with the Tamiya Stuart from the stash.
I searched around and found this example:
8th King's Royal Hussars North Africa 1941

Hope it works for this, in spite of the kit's shortcomings.
Cheers Dave

"No beast so fierce but knows some touch of pity.
But I know none, and therefore am no beast."
SgtRam
 Contributing Writer
#197
Ontario, Canada
Joined: March 06, 2011
KitMaker: 3,971 posts
Armorama: 2,859 posts
Posted: Tuesday, June 25, 2013 - 10:43 AM UTC
Geez, I have not decided what to build for this campaign yet? I do have a British Chaffee that I was planning on adding Canadian markings to, maybe that will be my choice. Or a Churchill Mk.III?
Florida, United States
Joined: May 14, 2012
KitMaker: 730 posts
Armorama: 624 posts
Posted: Sunday, June 30, 2013 - 04:21 AM UTC
Sory, I meant 8th King's Royal Irish Hussars.
Dave
"No beast so fierce but knows some touch of pity.
But I know none, and therefore am no beast."
Niedersachsen, Germany
Joined: May 12, 2013
KitMaker: 128 posts
Armorama: 125 posts
Posted: Sunday, June 30, 2013 - 11:54 PM UTC
Currently Building:
too many kits to list hehe
#417
Ontario, Canada
Joined: March 01, 2004
KitMaker: 3,123 posts
Armorama: 2,539 posts
Posted: Monday, July 01, 2013 - 10:41 AM UTC
Quoted Text
8th King's Royal Hussars North Africa 1941
Hope it works for this, in spite of the kit's shortcomings.
Without wanting to sound like a complete "Richard", whether it works depends upon how accurate you want your model to be. The Tamiya kit is a horsehoe turreted diesel. The pictured vehicle is an octagonal-sided gasoline powered tank. It also has a number of additional stowage boxes that were used by the Brits in N. Africa and the Tamiya kit comes with none of them.
The horseshoe turret version _was_ used in N. Africa, but I'm not sure if by that unit and even so, still needs the gasoline conversion and the stowage boxes.
If you are fine with all that, though, go ahead and build it as a Hussars vehicle. The object is to have fun. Build consistent with that and you can't go wrong!
Paul
Paul Roberts
Past Editor, Boresight
Armor Modeling and Preservation Society
#073
Pennsylvania, United States
Joined: October 05, 2002
KitMaker: 2,659 posts
Armorama: 1,512 posts
Posted: Tuesday, July 02, 2013 - 07:51 AM UTC
Looking good everyone.
Got a little more done on my AFV Club M-10 Achilles.
Getting some of the lower hull assembly done. I'm making a British version so I have removed the spaced armor bolts off of the sides and mounted the grouser rack flush to the hull. So far the assembly has been going ok.

This next photo shows the turrent floor, painted Olive Drab and then I used 2 different Ak Interactive pigments to show dirt and wear.

and now back to work..
Delbert
Just Your Everyday Average Model Builder
Florida, United States
Joined: May 14, 2012
KitMaker: 730 posts
Armorama: 624 posts
Posted: Tuesday, July 02, 2013 - 11:20 AM UTC
Paul Thank You for this useful information. No worries, don't even think of that, maybe I'm being the "Richard" by trying to utilize all these oold kits from the stash.


I'd like to stay as accurate as possible, so any help is greatly appreciated. My focus is to stay true to the Campaign Req. and I just have to do a little more research, which I find enjoyable and relaxing.
Cheers

Dave
"No beast so fierce but knows some touch of pity.
But I know none, and therefore am no beast."
California, United States
Joined: June 30, 2008
KitMaker: 2,408 posts
Armorama: 2,394 posts
Posted: Thursday, July 04, 2013 - 09:12 AM UTC
California, United States
Joined: June 30, 2008
KitMaker: 2,408 posts
Armorama: 2,394 posts
Posted: Saturday, July 06, 2013 - 03:47 PM UTC


Well here is a photo backdrop thrown in quickly. I'm thinking of cutting the verlinden bridge down the middle and widen it out to the size of the photo. The sides won't be exact as thethe original but maybe close as iI'll get. Otherwise I'll need to just fabricate a street to match the photo instead. This may all turn out too lame but I'll try out any ideas.
Also the left side of the photo will need to be cut as the far left tank came out more as 1/35 scale.
California, United States
Joined: November 01, 2009
KitMaker: 657 posts
Armorama: 481 posts
Posted: Saturday, July 06, 2013 - 04:26 PM UTC
Greg
Love it man, I have a similar Idea for my Sherm IB and FF in the Battle of Voorhitzen. Great work. I am trying to trade my M4A2 Late for a FireFly VC. Keep it up, I just finished my First Armor Build ever in the Sherman GB, and getting ready to build my Second, Either a Sherman or Cromwell for here. I am trying to find Info on 1st Hussars if the had Firefly IC's or VC and SHIII's or V's.
PS. Speedy recovery on that Knee, my friend.
" For those who fought for it Freedom has a flavor the protected will never know"
Italeri T-55, Syrian Army 6 Day War Taken out. 2%
AFV IDF Shot. 6 Day War 0%..
California, United States
Joined: June 30, 2008
KitMaker: 2,408 posts
Armorama: 2,394 posts
Posted: Saturday, July 06, 2013 - 05:24 PM UTC
Thanks Eugene. Hope your research is productive foryour coming build. I'll have to stop by the Sherman group too. I uave a Jumbo for that one I can't look at. A few more EEC to attach to it. I'm getting the knee in pretty good shape already. It must be easier the second time around since I did the other knee in 08'. I might have to give up sparring and jits I guess. Just stick to pad work or pick upbswimming or something lol. Take it easy
California, United States
Joined: June 30, 2008
KitMaker: 2,408 posts
Armorama: 2,394 posts
Posted: Monday, July 08, 2013 - 09:55 AM UTC
SgtRam
Contributing Writer #197
Ontario, Canada
Joined: March 06, 2011
KitMaker: 3,971 posts
Armorama: 2,859 posts
Posted: Tuesday, July 09, 2013 - 12:16 PM UTC
Well made my mind up, and throwing my kit into the ring. It is the AFV Club Churchill Mk.III, with RB barrel, extra AFV Club PE set, and AFV Club workable track. At this time, plans are for the Ontario Regiment as they trained in England.


Looking forward to seeing the builds as this progresses. Lets have some fun.
SgtRam
Contributing Writer #197
Ontario, Canada
Joined: March 06, 2011
KitMaker: 3,971 posts
Armorama: 2,859 posts
Posted: Saturday, July 13, 2013 - 02:49 PM UTC
Getting a little work done. For those have not seen AFV Club Churchill suspension detail, it is amazing.


The actual springs, really make a difference.
California, United States
Joined: June 30, 2008
KitMaker: 2,408 posts
Armorama: 2,394 posts
Posted: Friday, July 19, 2013 - 12:25 PM UTC
Kevin - I love AFV Club kits. That Churchill has great details.

I think I'm going to reposition the airborne guys head and limbs to interact better with the tank commander. Tanks primed and base coated with overhead highlight spray.

sorry this one out of focus

minimal gear added to the Cromwell since 4 figures will be on it anyways
California, United States
Joined: June 30, 2008
KitMaker: 2,408 posts
Armorama: 2,394 posts
Posted: Tuesday, July 23, 2013 - 02:13 PM UTC

Today's update: I tried Future floorwax for the first time and so far I think that stuff is so easy! So decals on and stars stenciled. I fixed the airborne figure with a screaming head and pointer finger, and then put him in a better position in the scene I think. I'll be making a Nijmegen/Arnhem road sign for the left side of the dio next. I did away with the elevated bridge and just staying flat like the picture background.
Alberta, Canada
Joined: April 07, 2010
KitMaker: 1,028 posts
Armorama: 45 posts
Posted: Thursday, July 25, 2013 - 02:38 AM UTC
Hi. I admit to you that I have been an aircraft builder, and have never completed an armor subject. None-the-less, I've entered this campaign to try and build a Canadian Dingo using the MiniArt kit.
Looking at other fine armor builds here, I find myself confused. It seems that great modellers are building the entire subject before they apply paint. I'm not understanding this, and it leads to my questions.
Is it not easier to paint parts before they are attached? And if not, how do you paint bogey's and shovels, chains and radios so accurately if they are already glued on? Is this all done by brush?
I know this is a lot, but, I'm interested in learning. My wish is to finish the campaign.
Thankyou.
To prevent being called an 'expert', screw something up good every now and again.
California, United States
Joined: June 30, 2008
KitMaker: 2,408 posts
Armorama: 2,394 posts
Posted: Thursday, July 25, 2013 - 03:14 AM UTC
Ben - everyone is going to be a little different on how they paint, but for me I build everything first then paint following the Shep Paine rule, 'if you can see it. You can paint it (with a brush).' This way you don't have to try to glue together painted partsor have glue ooze over your nice paintjob when addi g stowage, etc.
If there's an interior, then you build and paint that first before glueing the upper hull. Then I stuff paper towel into the holes or tape before painting the outer stuff. I spray the outer black first since things will have shadow; especially the places you can't reach with a brush. Then spray the base coat colors. Stencils/decals/transfers. Next filters. Brush paint tools and details. Chipping if any. Washes. Streaking or fading. Dust or mud. Dry or wet effects. Done with pigments or paint. Fuel stains. Grab a tank art book by Rinaldi or a mig weathering dvd and it will really help. Look around the painting section here on armorwma. Hth
California, United States
Joined: June 30, 2008
KitMaker: 2,408 posts
Armorama: 2,394 posts
Posted: Thursday, July 25, 2013 - 03:34 AM UTC
Ps. Typing with a smartphone doesn't work well here but I'm trying. An item like a radio or dashboard gauges that are real difficult to paint I would do separate then add.

it's nice to practice new painting techniques on old or cheaper models. You learn with each build. I only do 1/48 scale now but the same painting techniques work with all scales. Just the amount of detail you want to add will vary. Hope you have fun and success. Just ask opinions along the way but remember itsyour model and do what makes you happy. Now go build
Alberta, Canada
Joined: April 07, 2010
KitMaker: 1,028 posts
Armorama: 45 posts
Posted: Thursday, July 25, 2013 - 08:12 AM UTC
Thankyou for the excellent response, Greg.
In the case of my little Dingo,I believe I'll paint the interior, wheels and suspension separately, and use the already put together technique for the rest of it. As a matter of fact, I'm working on it as I speak.
And as you suggest, I will try to search out some Rinaldi text.
Thanks again

To prevent being called an 'expert', screw something up good every now and again.
Quebec, Canada
Joined: November 15, 2002
KitMaker: 3,960 posts
Armorama: 3,579 posts
Posted: Thursday, July 25, 2013 - 08:13 AM UTC
[quote]
Quoted Text
Without wanting to sound like a complete "Richard",
Paul
Hey nothing wrong with that !!! Lol!
Rick
Quebec, Canada
Joined: November 15, 2002
KitMaker: 3,960 posts
Armorama: 3,579 posts
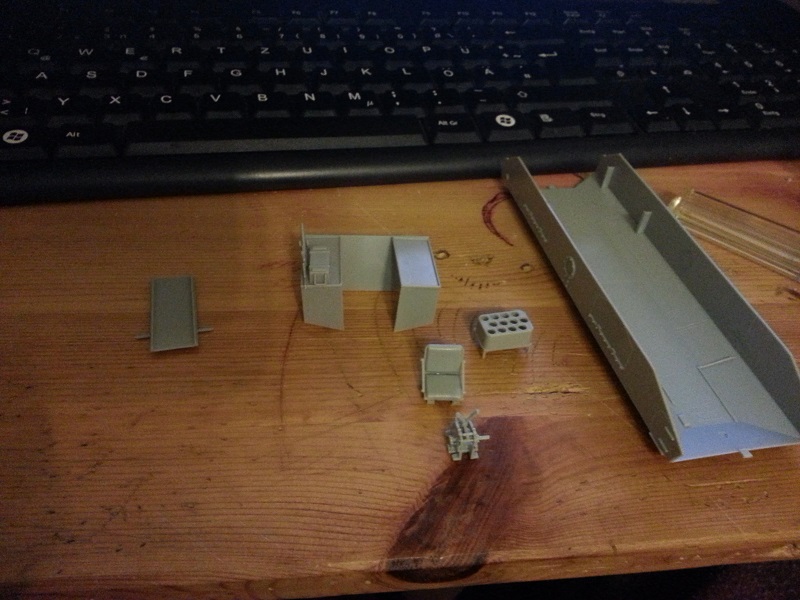
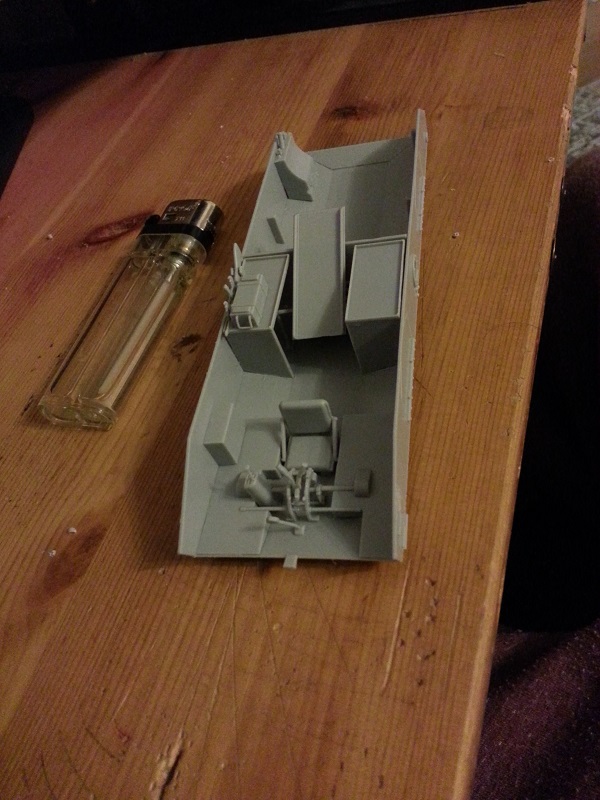
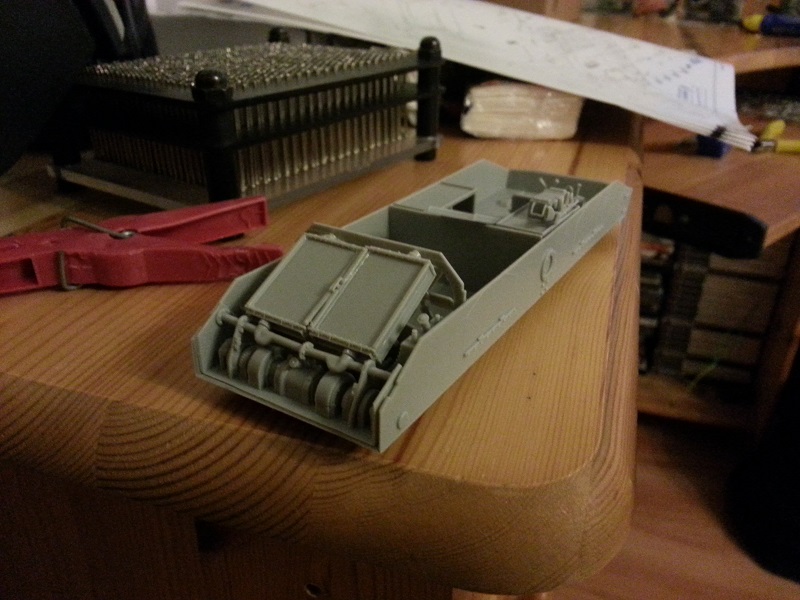
Posted: Thursday, July 25, 2013 - 08:45 AM UTC
Hi guys I just found this GB and I`m interested ...I just started a Churchill VII last week but being on vacation it is well underway... I was wondering if I can still join in ...If not well I understand and will follow anyways without being signed up.. Ì've started the turret and have removed a lot of parts from their sprues.
Let me know ..
Rick