_GOTOBOTTOM
Constructive Feedback
For in-progress or completed build photos. Give and get contructive feedback!
M109A6 Paladin
paul51
Visit this Community
Hamilton, New Zealand
Joined: January 03, 2010
KitMaker: 159 posts
Armorama: 158 posts
Posted: Sunday, December 30, 2012 - 07:25 AM UTC
This is the Iteleri kit just finnished.I think this turned out ok. The weathering is very heavy and not representative of anything Ive seen but I had some fun with it. What do think,like or hate,
Cheers Paul


HeavyArty
Visit this Community
Florida, United States
Joined: May 16, 2002
KitMaker: 17,694 posts
Armorama: 13,742 posts
Posted: Sunday, December 30, 2012 - 09:48 AM UTC
The construction looks pretty solid. You left off the radiator overflow tube that should be on the slope in front of the radiator vents on the hull though. The track is floating as well, it should be just touching the middle four road wheels. Sorry, but the weathering is really bad. It looks to me like somone just slopped some washes on it and called it a day. The weathering really detracts rom an otherwise pretty good build.
18Bravo
Visit this Community
Colorado, United States
Joined: January 20, 2005
KitMaker: 7,219 posts
Armorama: 6,097 posts
Posted: Sunday, December 30, 2012 - 10:20 AM UTC
On the plus side, you don't have any unrealistic rusting going on. There was one on ML a few months ago that was absolutely beautiful, yet could not be further from accurate insofar as some of the weathering went. I would suggest respraying with Testors sand. It's a closer color match. And if you do, you could sand off that oxbow shaped flotation gear stowage box. A lot of bang for little work. You can spray the wheels sand and then mask them with reinforcing rings for loose leaf paper - they are just the right size, and then spray the black for the tires.
For the track you can use a needle and black thread to hold the down onto the road wheels. You won't see it and thirty years later it's still the most secure method I know of. You could also run brass rods through the hull to hold the track down, but on this vehicle it shows too much. You're close to having a nice model, just needs a little more tweaking.
paul51
Visit this Community
Hamilton, New Zealand
Joined: January 03, 2010
KitMaker: 159 posts
Armorama: 158 posts
Posted: Sunday, December 30, 2012 - 12:39 PM UTC
Thankyou for your comments, If we dont share we dont learn,,I am an average modeller and do not have an artistic bone in my body. I drool over the exceptional quality of the builds posted here.I dont have a big budget and dont own an air brush to achieve some effects. Not an excuse I know but I truly enjoy this great past time and rely soley on my peers for comment. I lack an eye for detail and did not notice the points you raise. The weathering is a real problem for me, I tend not to know when to stop and shall work on this area. My build looks pretty good from 4 feet away and you are right it is pretty poor under the microscope,I endeavour to achieve the holly grail of modelling with a true show stopper one day. Again thanks guys for just taking the time,
fhvn4d
#159
Visit this Community
Massachusetts, United States
Joined: April 07, 2008
KitMaker: 803 posts
Armorama: 564 posts
Posted: Sunday, December 30, 2012 - 01:17 PM UTC
Hey Paul your learning and having fun at it too so its a win win... one thing I have noticed seems to work good... do a little then take a picture of what you did... to the naked eye it might seem like you didnt do enough, but once its photographed it seems to pop out. Probably some kind of brain mind barrier thing going on, but it seems to work for me. You have your homework... get goin!
paul51
Visit this Community
Hamilton, New Zealand
Joined: January 03, 2010
KitMaker: 159 posts
Armorama: 158 posts
Posted: Sunday, December 30, 2012 - 02:37 PM UTC
I hope I am on the road to redemption, I feel I should stop at this stage

fhvn4d
#159
Visit this Community
Massachusetts, United States
Joined: April 07, 2008
KitMaker: 803 posts
Armorama: 564 posts
Posted: Sunday, December 30, 2012 - 04:17 PM UTC
lookin good!!!
18Bravo
Visit this Community
Colorado, United States
Joined: January 20, 2005
KitMaker: 7,219 posts
Armorama: 6,097 posts
Posted: Sunday, December 30, 2012 - 04:21 PM UTC
That's a heck of a lot better. The one in my gallery is in pristine condition because that's the way it was when I saw it at Ft. Hood. Nothing wrong with doing that until you're more comfortable with weathering. Buy an old junk model and practice on it.
spartan01
Visit this Community
California, United States
Joined: December 25, 2011
KitMaker: 314 posts
Armorama: 244 posts
Posted: Monday, December 31, 2012 - 11:38 AM UTC
much better paul if you have heard of the product MIG pigments it is a great way to show sand and grit keep up the good work
retiredyank
Visit this Community
Arkansas, United States
Joined: June 29, 2009
KitMaker: 11,610 posts
Armorama: 7,843 posts
Posted: Monday, December 31, 2012 - 11:54 AM UTC
The shading on the jerry cans is a little overdone. I would also recommend pre-shading. With the color you have it, I would recommend light brown or dark yellow for the shading. The tracks are still floating on the sprockets. Other than that, it looks great!
Joel_W
Staff MemberAssociate Editor
AUTOMODELER
Visit this Community
New York, United States
Joined: December 04, 2010
KitMaker: 11,666 posts
Armorama: 1,143 posts
Posted: Monday, December 31, 2012 - 12:02 PM UTC
Paul, your 2nd effort is so much better then the 1st. It's like day & night. The weathering or should I say lack of it, now looks so much more realistic.

Weathering can be learned in small steps, and you don't need a air brush for washes and filters. There's so much information online. Just do a few Google searchers. Also You tube has dozens and dozens of weathering videos.

Joel


wildsgt
Visit this Community
Kentucky, United States
Joined: May 27, 2007
KitMaker: 327 posts
Armorama: 259 posts
Posted: Tuesday, January 01, 2013 - 01:05 AM UTC
Looking good you keep having fun
Airtake
Visit this Community
Alvsborgs, Sweden
Joined: August 29, 2012
KitMaker: 20 posts
Armorama: 19 posts
Posted: Tuesday, January 01, 2013 - 06:37 AM UTC
Looking real good now.
Great work and remember Less is moore.
paul51
Visit this Community
Hamilton, New Zealand
Joined: January 03, 2010
KitMaker: 159 posts
Armorama: 158 posts
Posted: Wednesday, January 02, 2013 - 12:26 PM UTC
This is the updated version with most alterations completed.


tanknick22
Visit this Community
United States
Joined: February 19, 2009
KitMaker: 1,139 posts
Armorama: 1,100 posts
Posted: Wednesday, January 02, 2013 - 12:36 PM UTC
robert:
the oxbow flotation stowage bin you were refering to is it that chevron shaped item just behing the drivers hatch?
18Bravo
Visit this Community
Colorado, United States
Joined: January 20, 2005
KitMaker: 7,219 posts
Armorama: 6,097 posts
Posted: Wednesday, January 02, 2013 - 12:44 PM UTC
Yes it is. The easiest way to get rid of it is to fill the underside with CA. (may be harder now but still possible) I use a barrel shaped steel cutter on a Dremel and then sand it when it's as close as I can get it. It literally takes minute to do, although you'd have to repaint yet again if you do it. Just something to think about or your next one.
On the second page of my gallery is a photo of one. You can see how thin the plastic gets, which is why it's a good idea to fill it with CA first. With accellerant, it'll cure almost instantly.
retiredyank
Visit this Community
Arkansas, United States
Joined: June 29, 2009
KitMaker: 11,610 posts
Armorama: 7,843 posts
Posted: Wednesday, January 02, 2013 - 01:20 PM UTC
That really looks good, Paul. Did you address the floating tracks issue? I only mention it, because it is very noticeable. Points off, if it went before a judge. I used the same technique of lightening the paint at the edges of the panels on my M1A2.
paul51
Visit this Community
Hamilton, New Zealand
Joined: January 03, 2010
KitMaker: 159 posts
Armorama: 158 posts
Posted: Wednesday, January 02, 2013 - 01:52 PM UTC
Yes Matt the only thing not addressed was the ox bow floatation, Thanks to all who commented,I have learnt heaps.
Scarlet_Guidon_6
Visit this Community
Alabama, United States
Joined: December 29, 2012
KitMaker: 197 posts
Armorama: 186 posts
Posted: Friday, January 04, 2013 - 07:08 PM UTC
Hi,I am new so I just saw this M109A6, Only couple of small question In the 2 Batteries and 3 battalions of M109 A3 then A6 that I commanded the muzzle breaks were the same color as the barrel. Either in Desert as you show or woodlands the muzzle breaks were the same as the tube, Also no powder stains on either the bore evacuator or the tube behind the muzzle break. Finally ,weathering be darned, I alway insisted on clean guns.Hosed down regularly and painted. I found that a clean Howitzer showed leaks and problems before they became big problems. Hydraulic,oil etc.

If someone will explaing how to upload scanned info(photos) I can update the old desert camo sand and brown also green .brown .I have it for the guns the 558 the 577 and deuce and a half plus jeeps.

HeavyArty
Visit this Community
Florida, United States
Joined: May 16, 2002
KitMaker: 17,694 posts
Armorama: 13,742 posts
Posted: Friday, January 04, 2013 - 07:27 PM UTC
Welcome Redleg99999, its always good to have another Artilleryman onboard.

Pretty much the current standard is to paint the muzzle brakes black on modern guns.

Some examples;


To post pics, it is pretty easy. First you have to upload them at a photo hosting site like Photobucket. Next, in the post window, you will see a button that has [i m g] on it. Click this and you will get image tags; [ i m g]http://put.url.here/image.file[/ im g] , but without spaces in the brackets. Copy the url (starts with http) for the pic from the photo site and replace the text between the inner brackets with it. Like this [ i m g] your url here [ / i m g]

Like this [i mg ]http://i602.photobuck et.com/albums/tt104 /vor033/US% 20Army/ 3493 5 . jpg [/ i m g]

without spaces, you get this:


Hope that helps.
18Bravo
Visit this Community
Colorado, United States
Joined: January 20, 2005
KitMaker: 7,219 posts
Armorama: 6,097 posts
Posted: Wednesday, January 09, 2013 - 03:13 PM UTC

Quoted Text

Pretty much the current standard is to paint the muzzle brakes black on modern guns.


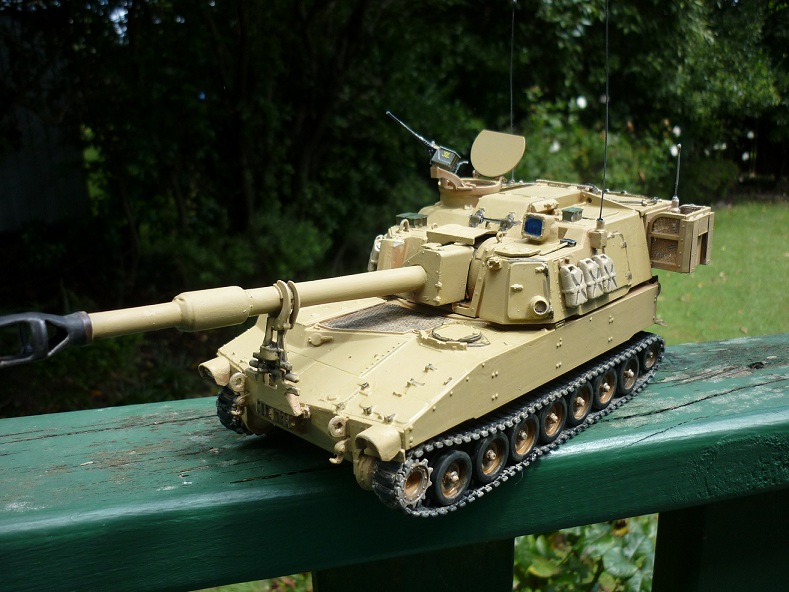
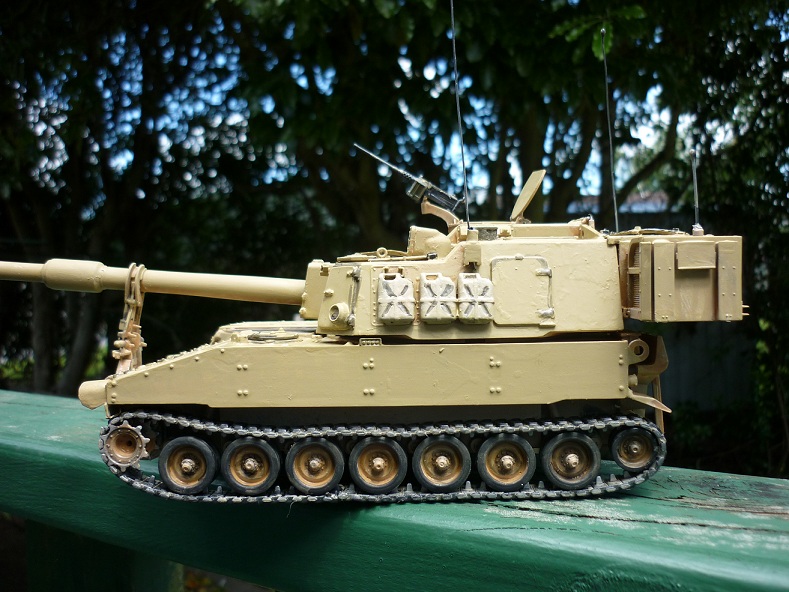
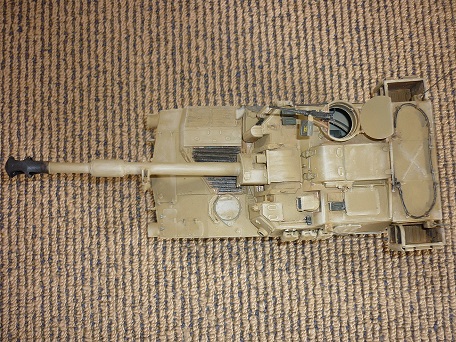
Well that's a coincidence. The Wikipedia photo above is of a Paladin that was right next to one that I modeled years ago. When I photographed them at Fort Hood they all had sand colored muzzle brakes, so I modeled mine accordingly.
All of them at Fort Hood, as of three months ago when I was there, were sand colored, so they must have gotten that photo in a window when they were black, at least for Fort Hood.

Here's the one I modeled parked next to the one in your photo. I thought the bumper number was familiar.


I believe the color of the muzzle brake might be a unit commander decision. I spoke with the good folks at Fort Carson just two days ago, and to their knowledge, the brakes have always been sand colored there. Here's a photo taken Monday:


From '08 in Iraq:


So to be totally "accurate" I guess you'll just have to just one particular vehicle that has the color you want and go with it.
I actually like the contrast of the black - just never photographed one myself.

 _GOTOTOP