

Thank you so much, Matt,
That is very fine feedback, I feel extremely privileged.
Very much appreciated.
Constructive Feedback
For in-progress or completed build photos. Give and get contructive feedback!
For in-progress or completed build photos. Give and get contructive feedback!
Hosted by Darren Baker, Dave O'Meara
Swedish M113

young_sven

Joined: May 14, 2010
KitMaker: 749 posts
Armorama: 743 posts
Posted: Saturday, June 07, 2014 - 01:02 AM UTC
ti
Joined: May 08, 2002
KitMaker: 2,264 posts
Armorama: 1,763 posts
Posted: Saturday, June 07, 2014 - 10:22 AM UTC
Like someone mentioned. This is purely work of art, as well as being the best Darn M113 I have seen. Bra jobbat.

young_sven
Joined: May 14, 2010
KitMaker: 749 posts
Armorama: 743 posts
Posted: Saturday, June 07, 2014 - 05:26 PM UTC
Hi Charles,
Thanks so much for your very kind comments both here on Armorama and on the IPMS Stockholm forum, truly appreciated!
Thanks so much for your very kind comments both here on Armorama and on the IPMS Stockholm forum, truly appreciated!
young_sven
Joined: May 14, 2010
KitMaker: 749 posts
Armorama: 743 posts
Posted: Wednesday, August 06, 2014 - 03:51 AM UTC
Hello all,
Well, its been a hot, hot summer here in Sweden - way too hot to sit at the workbench. For several weeks, I have not had any desire to work on any models.
This week it has cooled down just a little, so I have finally spent some time on this project again.
This is not a particularly exciting update, but I want to get the blogg going again.
The major exterior parts are now in place (roof, front armour and engine deck) so now it is finally starting to look like a M113.
All these major parts are from Miliminis/Iron Division and are very nice.
The fit, however, was not perfect but easily solved with a little putty and plastic strip.
I have also mounted the headlights/horn and one of the brush guards. Early M113's also had braces to support the brush guards, these will be added later.
More work is ongoing, further detailing will include scratched parts, Eduard etch, resin parts etc, so more to come soon (I hope :-) ).
Enough with the writing, here come the pics (I will put captions with each pic to describe further).
Cheers,
Sven
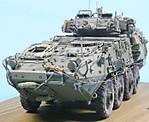
The model as it looks today. All the moulded on tie-downs have been removed and will be replaced with resin tie-downs from Tiger Models (except the ones which will be hidden under the rear hatch lid). You will note that the engine deck is incorrect for an early M113 (the resin part depicts the split engine exhaust grill, not the the early one-part grill). This will be easily fixed/hidden by adding a one piece etched grill from Eduard over the whole thing at a later stage.
The periscope housings around the drivers hatch have been removed and will be replaced with etched housings "borrowed" from a Bradley update set
The commanders position is not the one I will be using, I am just using this one as a "lid" to keep dirt and dust out from the completed interior :

Front lights and horn:

Front lights from behind with wiring (no, I have not mounted LED's in the headlights, enough is enough :-) ):

The early petrol M113's had an oval inspection hatch under the fuel filler cap, this was scribed into the resin roof, bolts added and a scratchbuilt filler cap was made. Sharp eyes will see the one resin tie down I have added, only 30+ more to go! ;-) :

The Academy (and Tamiya for that matter) trim vane extension handle/arm is not very good, very much over-simplified, so I decided to scratch build a new one:

Well, its been a hot, hot summer here in Sweden - way too hot to sit at the workbench. For several weeks, I have not had any desire to work on any models.
This week it has cooled down just a little, so I have finally spent some time on this project again.
This is not a particularly exciting update, but I want to get the blogg going again.
The major exterior parts are now in place (roof, front armour and engine deck) so now it is finally starting to look like a M113.
All these major parts are from Miliminis/Iron Division and are very nice.
The fit, however, was not perfect but easily solved with a little putty and plastic strip.
I have also mounted the headlights/horn and one of the brush guards. Early M113's also had braces to support the brush guards, these will be added later.
More work is ongoing, further detailing will include scratched parts, Eduard etch, resin parts etc, so more to come soon (I hope :-) ).
Enough with the writing, here come the pics (I will put captions with each pic to describe further).
Cheers,
Sven
The model as it looks today. All the moulded on tie-downs have been removed and will be replaced with resin tie-downs from Tiger Models (except the ones which will be hidden under the rear hatch lid). You will note that the engine deck is incorrect for an early M113 (the resin part depicts the split engine exhaust grill, not the the early one-part grill). This will be easily fixed/hidden by adding a one piece etched grill from Eduard over the whole thing at a later stage.
The periscope housings around the drivers hatch have been removed and will be replaced with etched housings "borrowed" from a Bradley update set
The commanders position is not the one I will be using, I am just using this one as a "lid" to keep dirt and dust out from the completed interior :

Front lights and horn:

Front lights from behind with wiring (no, I have not mounted LED's in the headlights, enough is enough :-) ):

The early petrol M113's had an oval inspection hatch under the fuel filler cap, this was scribed into the resin roof, bolts added and a scratchbuilt filler cap was made. Sharp eyes will see the one resin tie down I have added, only 30+ more to go! ;-) :

The Academy (and Tamiya for that matter) trim vane extension handle/arm is not very good, very much over-simplified, so I decided to scratch build a new one:


Maki


Joined: February 13, 2002
KitMaker: 5,579 posts
Armorama: 2,988 posts
Posted: Wednesday, August 06, 2014 - 04:04 AM UTC
Looking real good. I know it is exhausting to remove all those tie downs, but the effort will be well worth it... So, I wish you a steady hand and a lot of nerves.

Mario
Mario

young_sven
Joined: May 14, 2010
KitMaker: 749 posts
Armorama: 743 posts
Posted: Wednesday, August 06, 2014 - 04:22 AM UTC
Hello Mario!
Thanks for your kind comments and for continuing to follow my build :-)
Haha, yes, the tiedowns will be a test of endurance, but I hope that the end result will be worth it. Can't be worse than replacing the LED's 2-3 times, right? ;-)
Thanks for your kind comments and for continuing to follow my build :-)
Haha, yes, the tiedowns will be a test of endurance, but I hope that the end result will be worth it. Can't be worse than replacing the LED's 2-3 times, right? ;-)
young_sven
Joined: May 14, 2010
KitMaker: 749 posts
Armorama: 743 posts
Posted: Friday, August 08, 2014 - 01:51 AM UTC
Things have been moving a little quicker this week (last week of my vacation), but will probably slow down considerably when I get back to work.
The exterior detailing continues, as follows:
1. Brush guards and support braces have now been added to the front light/horn clusters. Note that I removed the etched part I previously mounted and made these with plastic strip instead. the reason is that I feel that the Eduard etch is a little bit too thin and delicate.
2 The Tamiya trim vane is too oversimplified, so I chose to scratchbuilt this part. The Academy part represents a later version of the trim vane (which was extended at the top end) and is not great either, to be honest. Anyway, its fun to scratchbuild :-)
3. The rear hatch was detailed on the inside with plastic strip, small springs etc to better capture the detail. the Tamiya and Academy parts are very much simplified, and Tamiya even managed to mould the unlocking mechanism at the wrong end of the hatch!
So, lets move on to the pics. I will add captions where needed.
Thanks as always for looking!
Sven
Some pics of the entire model this far. Note that the trim vane (and its arm) and the rear hatch are only placed temporarily for the photographs. The second set of hinges for the trim vane remain to be mounted.


Some close ups:


rfbaer

Joined: June 12, 2007
KitMaker: 1,866 posts
Armorama: 1,696 posts
Posted: Friday, August 08, 2014 - 02:59 AM UTC
That's just plain sweet!
young_sven
Joined: May 14, 2010
KitMaker: 749 posts
Armorama: 743 posts
Posted: Friday, August 08, 2014 - 03:25 AM UTC
Thanks Russel! Much appreciated.
Cheers,
Sven
Cheers,
Sven
young_sven
Joined: May 14, 2010
KitMaker: 749 posts
Armorama: 743 posts
Posted: Wednesday, August 13, 2014 - 10:27 PM UTC
Hello again!
Well, some more work has been done now on the exterior. The roof has been detailed with various hasps and hooks (Eduard), brush guards (scratch), antenna base (RB Model), tools (Tasca and Formations) etc.
The rear has also received a little attention, but there are still some thing remaining such as adding the rear lights and fuel cans.
I am considering the exterior build to be 90% done at this stage.
The largest remaining task is building and detailing the commanders positions, adding episcopes at the driver's and commander's positions and of course the tracks.
Lets move on to the pics, captions have beed added as needed.
Thanks as always for looking.
Sven
Some overviews:


Detail pics from the front. The trim vane and extending arm are only taped in place and I see now that the trim vane is crooked and the arm is in the wrong place (too far to the right in the pic). This will of course be done properly when the parts are glued in place. A couple of hinges for the trim vane remain to be added.


Engine deck with Eduard grills. The details under the grills we pre-painted with OD to avoid missing any spots there later.

Machined antenna base from RB Models. Here you can also see one of the four scratchbuilt brush guards. Eduard of course include these parts in their M113 sets, but I feel they are a little too flimsy.
In the pics you can also see the backdated fuel cap with inspection hatch. Also in the pic, some of the many microscopic tie-downs from Tiger Models (I recommend these very highly, I personally feel that they are easier to work with than etch)

The tools which are more or less hidden under the rear hatch. The sledgehammer is from Tasca, the rest is Formations.

View from the rear. The ramp is going to be open, so you won't see this side of it on the competed model.
Lamps and fuel cans remain to be mounted. I used the mudguards from Academy, as they were nicer than Tamiya's.

1stjaeger

Joined: May 20, 2011
KitMaker: 1,744 posts
Armorama: 1,727 posts

Posted: Thursday, August 14, 2014 - 02:49 AM UTC
Sven, this is jaw-dropping!!!
Your work IS indeed a work of art!!!!
It's a pity you have to close the vehicle...that interior is perfect!!!!!!
Congratulations Sir!!!!
Cheers
Romain
young_sven
Joined: May 14, 2010
KitMaker: 749 posts
Armorama: 743 posts
Posted: Thursday, August 14, 2014 - 03:12 AM UTC
Hello Romain,
Thank you so much for your very kind words, I am extremely happy that you like the model.
I will have as many hatches as possible open, including of course the rear ramp in the down position to try and display as much of the interior as possible, even though some details will be hidden/less visible now when the roof is mounted.
Cheers,
Sven

retiredyank
Joined: June 29, 2009
KitMaker: 11,610 posts
Armorama: 7,843 posts
Posted: Thursday, August 14, 2014 - 11:12 PM UTC
A true labor of love.

young_sven
Joined: May 14, 2010
KitMaker: 749 posts
Armorama: 743 posts
Posted: Thursday, August 14, 2014 - 11:30 PM UTC
Thanks Matt!
M113 is one of my favourite vehicles, and so much fun to be able to do a Swedish one.
I do wish somebody would release a new, state of the art kit soon.. Meng, Trumpeter, AFV Club, Takom: are you listening? :-)
As a side-note: I was informed by a friend that the antenna base on my model is actually incorrect (too modern for this era). It will be replaced with a correct "Vietnam era" antenna base before painting starts.
jrutman
Joined: April 10, 2011
KitMaker: 7,941 posts
Armorama: 7,934 posts
Posted: Wednesday, August 20, 2014 - 05:24 AM UTC
Looking through the rear ramp opening in your model makes me think I am back in Baumholder in 1978. I can almost smell the diesel and hear the radio breaking squelch.
J
J
J
J
young_sven
Joined: May 14, 2010
KitMaker: 749 posts
Armorama: 743 posts
Posted: Wednesday, August 20, 2014 - 05:44 AM UTC
Hi Jerry,
I am glad the model can bring back some of those special memories, sounds like good times :-)
Very nice compliment, much appreciated!
I am glad the model can bring back some of those special memories, sounds like good times :-)
Very nice compliment, much appreciated!
Plasticat
Joined: September 03, 2003
KitMaker: 448 posts
Armorama: 245 posts

Posted: Wednesday, August 20, 2014 - 11:27 AM UTC
I was in Baumholder in 78 also! C Btry 1/83 FA.
young_sven
Joined: May 14, 2010
KitMaker: 749 posts
Armorama: 743 posts
Posted: Wednesday, August 20, 2014 - 11:09 PM UTC
Quoted Text
I was in Baumholder in 78 also! C Btry 1/83 FA.
Cool, on M109's? That's another model I would like to build one day :-)
Plasticat
Joined: September 03, 2003
KitMaker: 448 posts
Armorama: 245 posts
Posted: Thursday, August 21, 2014 - 01:42 AM UTC
Quoted Text
Quoted TextI was in Baumholder in 78 also! C Btry 1/83 FA.
Cool, on M109's? That's another model I would like to build one day :-)
Yeah, M109A1's.

young_sven
Joined: May 14, 2010
KitMaker: 749 posts
Armorama: 743 posts
Posted: Thursday, August 21, 2014 - 01:57 AM UTC
Quoted Text
Quoted TextQuoted TextI was in Baumholder in 78 also! C Btry 1/83 FA.
Cool, on M109's? That's another model I would like to build one day :-)
Yeah, M109A1's.
Sweet!

jrutman
Joined: April 10, 2011
KitMaker: 7,941 posts
Armorama: 7,934 posts
Posted: Friday, August 22, 2014 - 06:57 AM UTC
I started out on M113s as a driver in C1/39Inf,then as the COs jeep driver then back to the M113 Tow version(without hammerhead)then transition to the Hammerhead. Three years,E-2 up to E-5.
I looked at Baumholder the other week on Google earth and it is now back under control of the Germans,although now for civilian use. Maybe old peoples' apartments? My old base in Mainz(Lee barracks) is now student housing!!
J
I looked at Baumholder the other week on Google earth and it is now back under control of the Germans,although now for civilian use. Maybe old peoples' apartments? My old base in Mainz(Lee barracks) is now student housing!!
J
rogerjo1
Joined: November 12, 2010
KitMaker: 950 posts
Armorama: 905 posts
Posted: Sunday, August 24, 2014 - 06:50 AM UTC
Very nice Sven , looking forward to see the final result...
And the 50 cal machine gun you will have on the kit looks also very nice
saw it on ipms site...
Men kanonsnyggt bygge, hoppas kunna se den live någon gång.
And the 50 cal machine gun you will have on the kit looks also very nice
saw it on ipms site...
Men kanonsnyggt bygge, hoppas kunna se den live någon gång.
Plasticat
Joined: September 03, 2003
KitMaker: 448 posts
Armorama: 245 posts
Posted: Sunday, August 24, 2014 - 07:22 AM UTC
Quoted Text
I started out on M113s as a driver in C1/39Inf,then as the COs jeep driver then back to the M113 Tow version(without hammerhead)then transition to the Hammerhead. Three years,E-2 up to E-5.
I looked at Baumholder the other week on Google earth and it is now back under control of the Germans,although now for civilian use. Maybe old peoples' apartments? My old base in Mainz(Lee barracks) is now student housing!!
J
Wow, I can't imagine Baumholder without the US Army there, especially the 8th ID.

young_sven
Joined: May 14, 2010
KitMaker: 749 posts
Armorama: 743 posts
Posted: Sunday, August 24, 2014 - 08:29 AM UTC
Jerry, amazing how things can change so drastically over time - sad in many ways.
Roger, stort tack för berömet! Jättekul att du gillar den.!
That reminds me that I forgot to post the pics of the .50 in this thread. Now I think I will wait until the whole commanders copula is done, not far to go :-)
I hope to have the model finished by end of October, lets see if I can keep up the pace.
jrutman
Joined: April 10, 2011
KitMaker: 7,941 posts
Armorama: 7,934 posts
Posted: Monday, August 25, 2014 - 02:21 AM UTC
I will stay tuned as you are doing an outstanding job for sure. Did the Swedish version have the canvas document bag on the left side of the rear engine cover? It held the FM and drivers maint. lists plus the current 2404 maint. sheet and trip ticket if leaving the motor pool.
J
J
 |

WEB HOSTING BY


Copyright ©2021 Armorama and Kitmaker Network, a subsidiary of Silver Star Enterprises
All Rights Reserved. Please read our Conditions of Use and Privacy Policy.
All Rights Reserved. Please read our Conditions of Use and Privacy Policy.