

Glad you like it.
It's a real nice kit, just needs a little correction.
I should have the fighting compartment comming soon.
I'm trying to transfer all of my build photos to photobucket. If this worka I'll be able to post more pics.
Donald
Hosted by Darren Baker
Building A 1/16th. Scale SU-100

OldWarloke

Joined: October 14, 2012
KitMaker: 2,663 posts
Armorama: 2,649 posts
Posted: Wednesday, February 12, 2014 - 09:58 AM UTC

PantherF
Joined: June 10, 2005
KitMaker: 6,188 posts
Armorama: 5,960 posts

Posted: Wednesday, February 12, 2014 - 12:39 PM UTC
JUST received an email stating I'll get mine Tuesday! I'm calling in sick! LOL
Looking forward to your pictures and progress! Have fun with it!
Jeff
Looking forward to your pictures and progress! Have fun with it!
Jeff

OldWarloke
Joined: October 14, 2012
KitMaker: 2,663 posts
Armorama: 2,649 posts
Posted: Sunday, February 16, 2014 - 05:09 AM UTC
Have some more finished.
Just 1 pic right now.
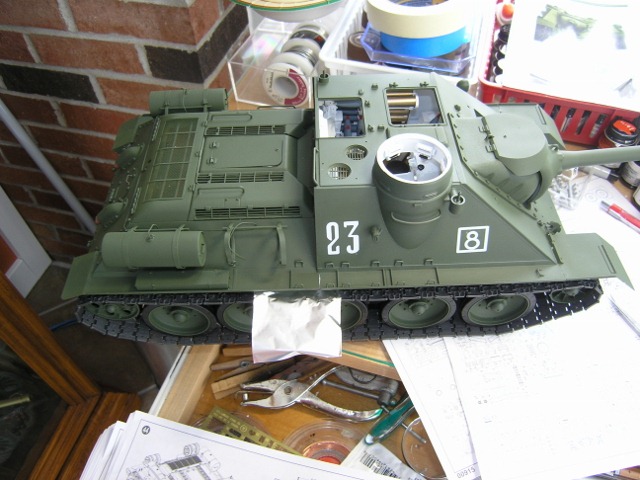
Got the wheels and track on.
The pic is showing the fitting of the upper hull to the lower.
The aluminum foil is to keep the upper hull from bonding to the lower while joining the front and rear sections together.
I am building this kit so the upper and lower can be separated for viewing.
Now i'll have to start adding the small fittings.
Happy Modeling
Donald
Just 1 pic right now.
Got the wheels and track on.
The pic is showing the fitting of the upper hull to the lower.
The aluminum foil is to keep the upper hull from bonding to the lower while joining the front and rear sections together.
I am building this kit so the upper and lower can be separated for viewing.
Now i'll have to start adding the small fittings.
Happy Modeling
Donald
rotxxyyzz

Joined: September 05, 2006
KitMaker: 43 posts
Armorama: 37 posts
Posted: Sunday, February 16, 2014 - 07:17 PM UTC
looks good already
OldWarloke
Joined: October 14, 2012
KitMaker: 2,663 posts
Armorama: 2,649 posts
Posted: Tuesday, February 18, 2014 - 04:54 AM UTC
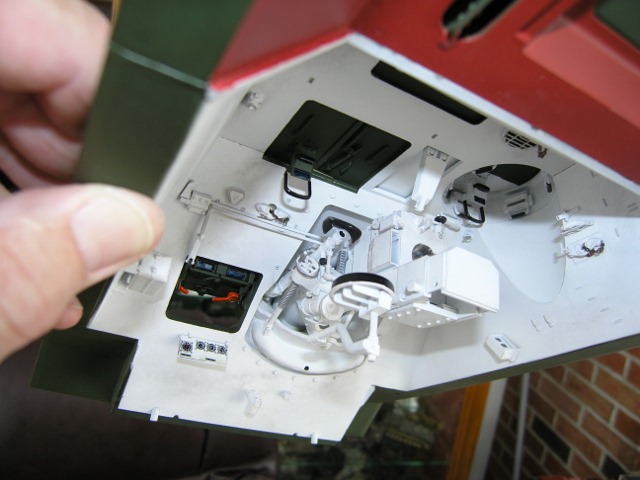
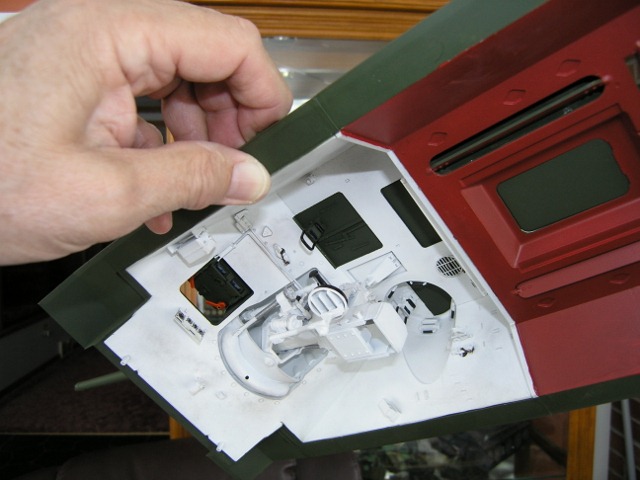
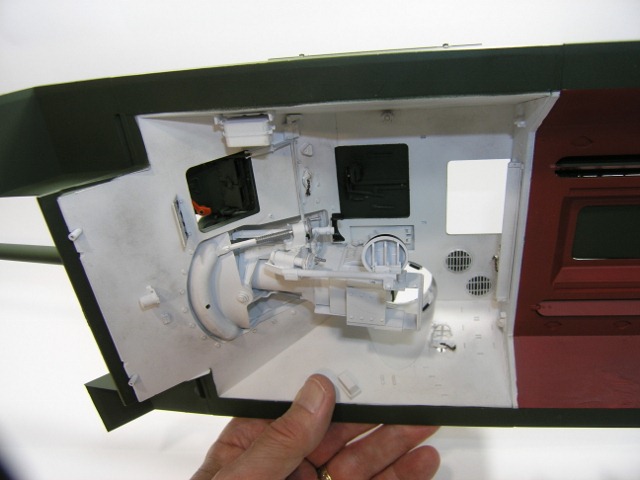
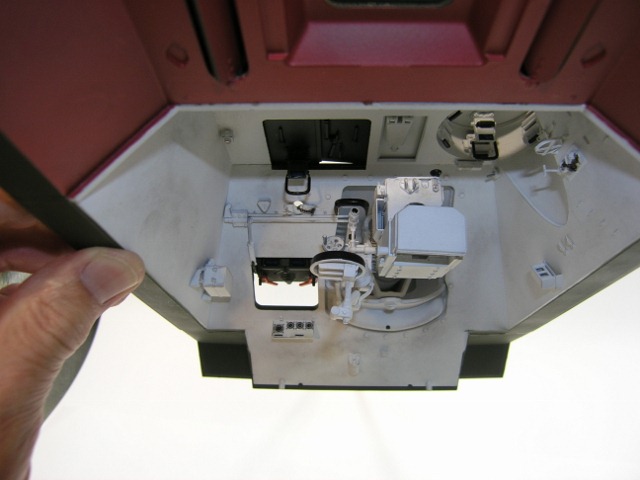
Today we have 3 pics of the interior of the fighting compartment.
PantherF
Joined: June 10, 2005
KitMaker: 6,188 posts
Armorama: 5,960 posts
Posted: Tuesday, February 18, 2014 - 05:01 AM UTC
So nice. 
Jeff
Jeff
OldWarloke
Joined: October 14, 2012
KitMaker: 2,663 posts
Armorama: 2,649 posts
Posted: Thursday, February 20, 2014 - 05:10 AM UTC
OldWarloke
Joined: October 14, 2012
KitMaker: 2,663 posts
Armorama: 2,649 posts
Posted: Thursday, February 20, 2014 - 09:56 AM UTC
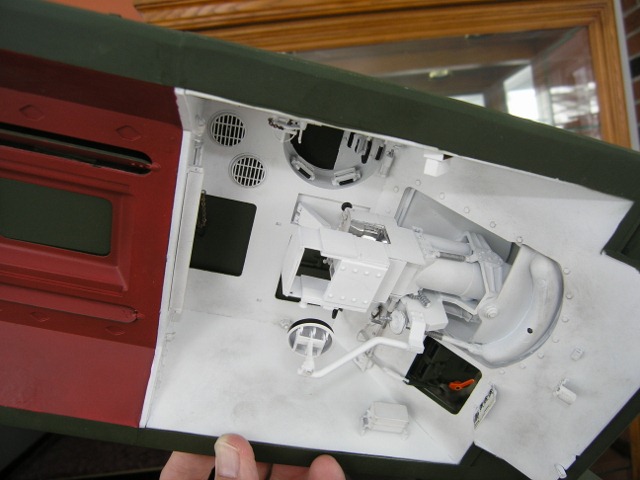
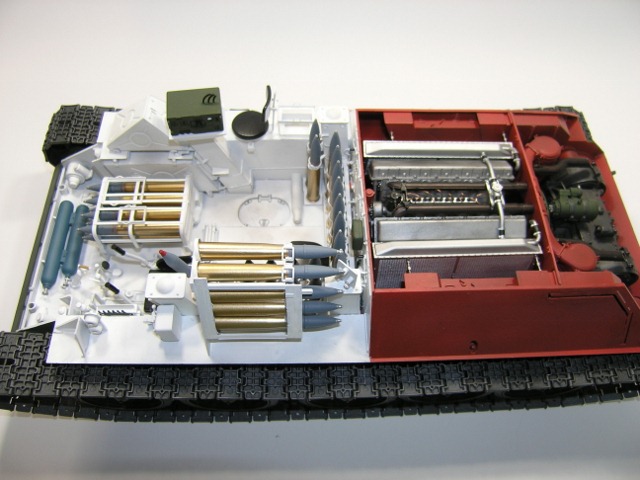
Here are two shots of the complete interior both fighting and engine compartments.

OldWarloke
Joined: October 14, 2012
KitMaker: 2,663 posts
Armorama: 2,649 posts
Posted: Friday, February 21, 2014 - 05:40 AM UTC
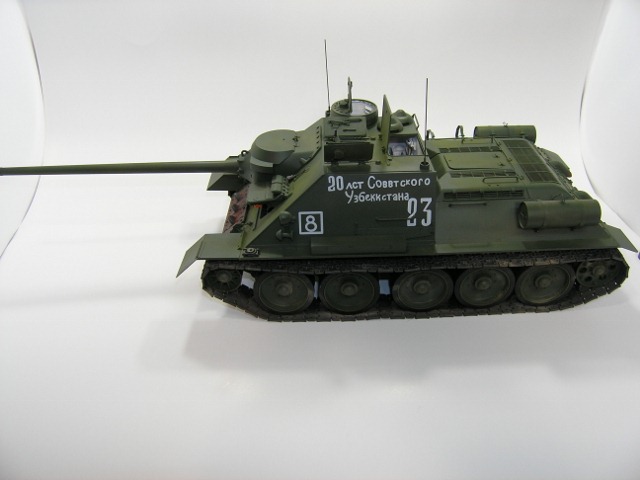
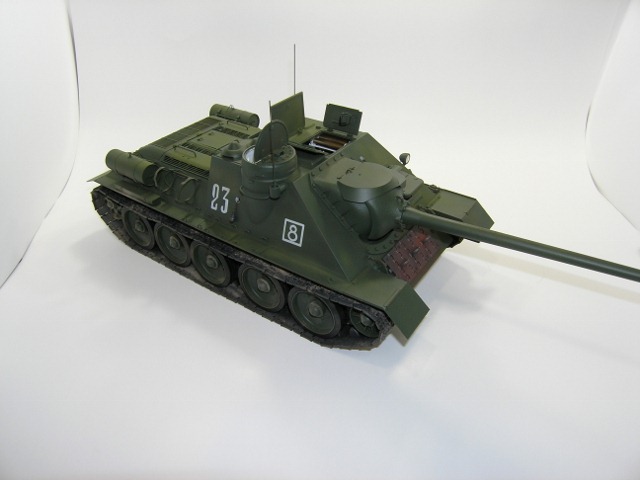
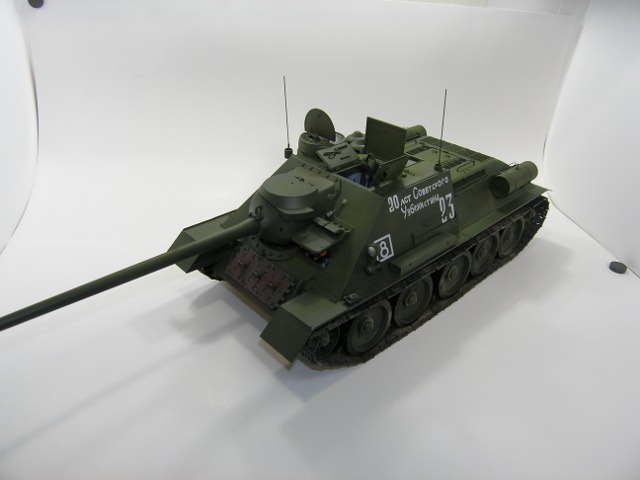
WELL I FINALLY FINISHED IT
OldWarloke
Joined: October 14, 2012
KitMaker: 2,663 posts
Armorama: 2,649 posts
Posted: Friday, February 21, 2014 - 05:48 AM UTC
Here are some more


If you want the commanders hatch operable, you will have to drill and pin it with fine wire. The kit would have you glue it in one position, It's not hard to do.
Donald
If you want the commanders hatch operable, you will have to drill and pin it with fine wire. The kit would have you glue it in one position, It's not hard to do.
Donald
OldWarloke
Joined: October 14, 2012
KitMaker: 2,663 posts
Armorama: 2,649 posts
Posted: Friday, February 21, 2014 - 05:57 AM UTC
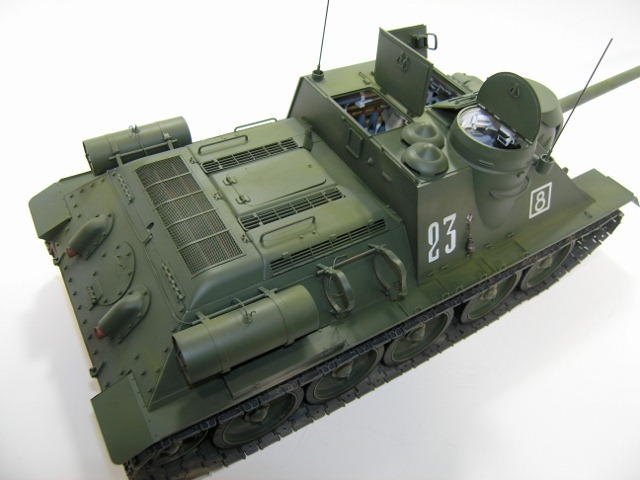
I'll soon be done here

Above is the upper engine hatch, it to has been drilled and pined to make it operable.
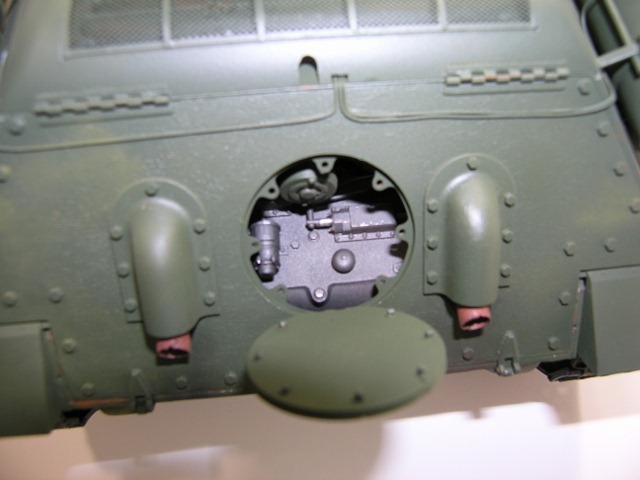
Above here is the rear access hatch to the transmission, not much is visable through it. I added small studs where the bolts would be.
( OF NOTE THE WHOLE UPPER HULL IS NOW ONE PIECE AND CAN BE LIFTED OFF FOR VIEWING THE INTERIOR.)
A small strip of plastic needs to be glued along the bottom egge of the upper rear armor plate, as there is a gap there.
Donald
Above is the upper engine hatch, it to has been drilled and pined to make it operable.
Above here is the rear access hatch to the transmission, not much is visable through it. I added small studs where the bolts would be.
( OF NOTE THE WHOLE UPPER HULL IS NOW ONE PIECE AND CAN BE LIFTED OFF FOR VIEWING THE INTERIOR.)
A small strip of plastic needs to be glued along the bottom egge of the upper rear armor plate, as there is a gap there.
Donald
OldWarloke
Joined: October 14, 2012
KitMaker: 2,663 posts
Armorama: 2,649 posts
Posted: Friday, February 21, 2014 - 06:08 AM UTC
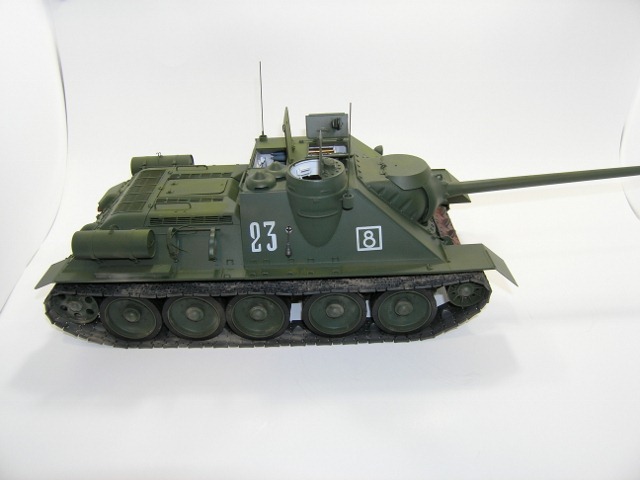
These will be the final two pictures on this build.

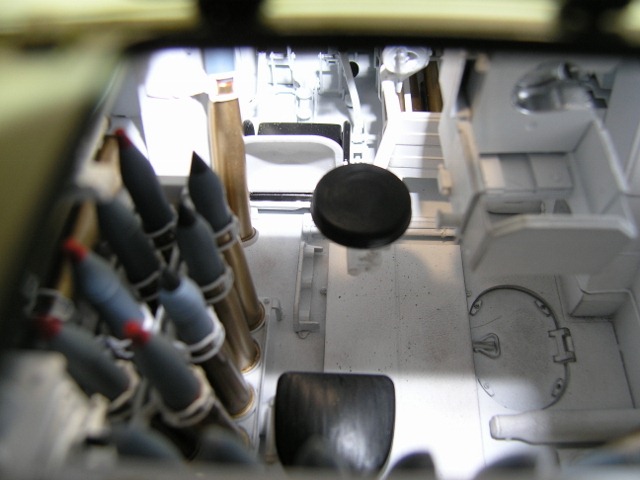
These two pictures were taken through the hatch.
I hope that you all enjoy these,eventually I'll have to repost them from One Drive like I have fore other builds, they will be a lot smaller then.
These two pictures were taken through the hatch.
I hope that you all enjoy these,eventually I'll have to repost them from One Drive like I have fore other builds, they will be a lot smaller then.
OldWarloke
Joined: October 14, 2012
KitMaker: 2,663 posts
Armorama: 2,649 posts
Posted: Friday, February 21, 2014 - 06:35 AM UTC
This will be the final post on this build, NO PICTURES,just a list of the mistakes that I have found with this kit to help any who wish to build it.
Donald
#1 The left munitions back suport bar numbered SE71 is really SE11
#2 The left side munitions clamp suport numbered sE70 is really SE71
#3 The munitions clamps SD58 & SG9 are not interchangeable so make sure you get the right one in the right place. The SD58 are slightly larger to fit lower on the shells.
#4 The track count on the instructions is wrong, it calls for 34 of both types. You will need at least 36 of each per side. You might getaway with 35, but that would put the idler closer to the road wheels.
#5 Don't use the two SD23 parts as they were added to the museum tank to ease moveing it arround and wern't on the operational vehicle.
#6 You will have to add a thin strip of plastic allong the bottom edge of part P2 the upper rear hull armor plate as there is a small gap there (a holdover from Trumpeters 2003 T34 kits).
Well thats about it.
Donald
Donald
#1 The left munitions back suport bar numbered SE71 is really SE11
#2 The left side munitions clamp suport numbered sE70 is really SE71
#3 The munitions clamps SD58 & SG9 are not interchangeable so make sure you get the right one in the right place. The SD58 are slightly larger to fit lower on the shells.
#4 The track count on the instructions is wrong, it calls for 34 of both types. You will need at least 36 of each per side. You might getaway with 35, but that would put the idler closer to the road wheels.
#5 Don't use the two SD23 parts as they were added to the museum tank to ease moveing it arround and wern't on the operational vehicle.
#6 You will have to add a thin strip of plastic allong the bottom edge of part P2 the upper rear hull armor plate as there is a small gap there (a holdover from Trumpeters 2003 T34 kits).
Well thats about it.
Donald
PantherF
Joined: June 10, 2005
KitMaker: 6,188 posts
Armorama: 5,960 posts
Posted: Friday, February 21, 2014 - 06:40 AM UTC
Very nicely done and thanks for the 'mistake list' too!
Jeff
Jeff

pgb3476
Joined: March 11, 2007
KitMaker: 977 posts
Armorama: 976 posts

Posted: Friday, February 21, 2014 - 06:44 AM UTC
This was a great project to follow along with and an excellent effort. But only one call out and I should have said something earlier in the thread. Soviet guns came from the factory in complete 4B0. Not white on the inside....sorry. This comment does not dimmish your effort in the least.
Greg
Greg
OldWarloke
Joined: October 14, 2012
KitMaker: 2,663 posts
Armorama: 2,649 posts
Posted: Friday, February 21, 2014 - 10:04 AM UTC
It's good to know about the gun color, I'll remember that if I do any future russian armor.
My next project is to do Trumpeters 1/16th. Tiger II with interior. I see that it was started previously here, but I don't know if it was ever finished.
My next project is to do Trumpeters 1/16th. Tiger II with interior. I see that it was started previously here, but I don't know if it was ever finished.
Mox1983

Joined: August 27, 2010
KitMaker: 114 posts
Armorama: 104 posts
Posted: Saturday, February 22, 2014 - 07:18 AM UTC
What an excellent build!
If I may add a small correction though, the supplied radio is an R-113 from the '50s and is missing the PSU and maybe intercom boxes. Some info on it here - http://www.radista.info/en_vhf_radio.html#R113
If I may add a small correction though, the supplied radio is an R-113 from the '50s and is missing the PSU and maybe intercom boxes. Some info on it here - http://www.radista.info/en_vhf_radio.html#R113

Mendes

Joined: April 19, 2012
KitMaker: 182 posts
Armorama: 181 posts

Posted: Saturday, April 05, 2014 - 01:31 AM UTC
wow...this kit is really big!
Awesome job!
I like it a lot...
Cheers
Awesome job!
I like it a lot...
Cheers
OldWarloke
Joined: October 14, 2012
KitMaker: 2,663 posts
Armorama: 2,649 posts
Posted: Sunday, August 09, 2015 - 09:09 PM UTC
Link is Gone
pgb3476
Joined: March 11, 2007
KitMaker: 977 posts
Armorama: 976 posts
Posted: Sunday, August 09, 2015 - 10:21 PM UTC
Looks great.
Andrushka

Joined: October 08, 2014
KitMaker: 3 posts
Armorama: 3 posts
Posted: Monday, February 08, 2016 - 06:41 AM UTC
Good day.
There is a problem with the kit. The radio in the kit (I have the same problem with my Trumpeter 1/16 T-34/85)is R-113. The R-113 was introduced in to service in middle 1950. In WW2 vehicle should be 9R or 9RM or 9RS.
There is a problem with the kit. The radio in the kit (I have the same problem with my Trumpeter 1/16 T-34/85)is R-113. The R-113 was introduced in to service in middle 1950. In WW2 vehicle should be 9R or 9RM or 9RS.
OldWarloke
Joined: October 14, 2012
KitMaker: 2,663 posts
Armorama: 2,649 posts
Posted: Monday, February 08, 2016 - 05:37 PM UTC
Quoted Text
Good day.
There is a problem with the kit. The radio in the kit (I have the same problem with my Trumpeter 1/16 T-34/85)is R-113. The R-113 was introduced in to service in middle 1950. In WW2 vehicle should be 9R or 9RM or 9RS.
I am aware of the radio being wrong for a WW2 build , but I never said it was a WW2 build. I just built it to show what was in the kit and how it went together. This was built almost 2 years ago . I'm surprised anyone is still viewing it.
Donald
Andrushka
Joined: October 08, 2014
KitMaker: 3 posts
Armorama: 3 posts
Posted: Tuesday, February 09, 2016 - 05:53 AM UTC
Good day. The model looks very-very good. I'm just looking for solution for my Trumpeter T-34/85 radio problem.
Removed by original poster on 02/10/16 - 02:53:24 (GMT).
 |

WEB HOSTING BY


Copyright ©2021 Armorama and Kitmaker Network, a subsidiary of Silver Star Enterprises
All Rights Reserved. Please read our Conditions of Use and Privacy Policy.
All Rights Reserved. Please read our Conditions of Use and Privacy Policy.