_GOTOBOTTOM
Armor/AFV: Axis - WWII
Armor and ground forces of the Axis forces during World War II.
Hosted by Darren Baker
Tamiya/Italeri Sdkfz 10
Thudius
Visit this Community
Uusimaa, Finland
Joined: October 22, 2012
KitMaker: 1,194 posts
Armorama: 1,077 posts
Posted: Thursday, September 04, 2014 - 07:01 AM UTC


Armorama have once again sent me a kit for review, this time around it's the Italeri Sdkfz 10 reboxed by Tamiya for the Japanese market. Tamiya does this quite often for reasons unknown to me. Staff Jim did a brief video preview of what's in the box here https://armorama.kitmaker.net/features/5649 Fast forward to 1:45 if you don't want to see the other latest Tamiya offerings. As Jim notes, you get the oldish Italeri kit plus some Tamiya figures and accessories. If you've never seen the Italeri kit or derivatives but remember the ancient ESCI kit, let me assure you the Italeri kits are originals and nothing is borrowed or reworked from the ESCI kits.

Having said that, lets get into some general observations before we start gluing. I tried to get sprue shots, but my camera is being less than cooperative for these kind of pics. Moving along, you get several sprues in light grey plastic which is a tad soft for my liking, link and length tracks and the stuff shown in the video. Molding on the half track is not quite up to current standards; my example has a bit of shift and there is some flash to be found and some of the parts could be crisper. However, there are plenty of fine details as found in most Italeri kits. The instructions have been redone by Tamiya and are what you would expect from them: clear and with colour call outs.

This will be a mostly OOB build (famous last words) and I will point out accuracy issues and suggested fixes as needed. Looking over the instructions I decided to alter the assembly sequence a little bit, more on that as we go. For references I'll be using some nice walk arounds on Prime Portal and Panzer Tracts 22-1. Let's get cracking.

The instructions have you start with the floor tub that gets dropped into the one piece lower hull. Detail is adequate but can be improved with a little scratch building or of course pe sets for which there are quite a few choices. A couple of sink marks were found on drive covers. These are a bit tricky to fill, not much room here.


The dash and firewall go together easily enough, again detail is the same as above. 3 immediate problems: the larger dial needs to have the raised detail removed, you get a decal which is nicer, but not 100% accurate either. No foot pedals and there is a bit of a gap between the transmission housing and shaft cover. The dial was sanded down with a flat diamond burr and the gap was more or less eliminated with judicious sanding of the tabs and the transmission face.


The gear levers are again adequate, if not slightly thick (easily replaced with stretched sprue and strip etc) and the gear cover is over simplified. Overall, not a bad impression of this area. The seats are somewhat clunky, I think they should have some sort of buttons and so on for the cushions. The frame is molded on and looks a right mess. I will replace that with stretched sprue, much easier than trying to sand it to a round profile. The front side supports/racks need to have the pins sanded down for a better fit with the end caps.


Moving on to the lower hull I noticed something funky with the fenders. The shape is off in 3 ways, the photos below should illustrate this. The overlays are from Panzer Tracts 22-1 for discussion purposes only.


I decided to leave them as is, there would be too much involved to try to get them accurate. In Italeri's defence, their reference example may have had simplified fenders made by a sub contractor or refurbished after the war. In any case, they aren't right for what is purportedly an Ausf A if I'm understanding my refs correctly.

One thing to improve the look of the fenders is to thin them from underneath and to blend some of the curves a little more by scraping.


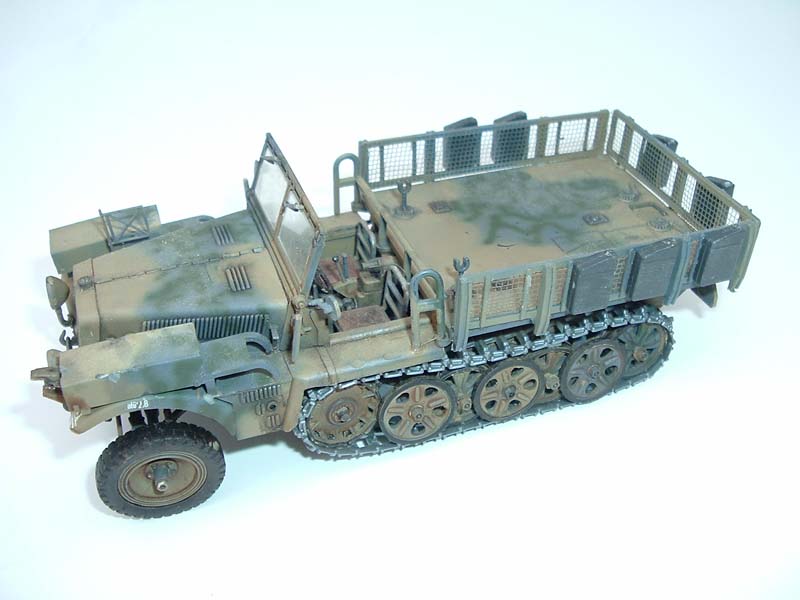
While stuff was drying I got on with the wheels and a few other pieces. The wheels are adequate, the tread detail could be a little more defined. You need to eyeball the offset on the tread halves and fill in ejector pin marks on the backsides of the hub. You will find quite a few ejector marks that need to be dealt with on this kit. Resin replacements abound for the myriad tread types should you so choose. The grill needed to have the slats opened up a little as some were flashed over and a sink mark filled in on the top. As you can see, I started on the rear cargo bays. The whole rear end is a multi piece affair that looks to be fun alignment wise and thus chose to glue up these first and then attach to the fenders after the fenders are attached to the hull.


So, a decent start to what should be another fun little exercise. As always, comments and questions are welcomed. I should be able to squeeze in a few hours over the next couple of days so stay tuned.

Kimmo
Thudius
Visit this Community
Uusimaa, Finland
Joined: October 22, 2012
KitMaker: 1,194 posts
Armorama: 1,077 posts
Posted: Friday, September 05, 2014 - 12:34 AM UTC
A minor update today. Filled and cleaned up some of yesterday's work and got to thinking about the fenders. The fenders are done up in several pieces with the fit being pretty good. There are a few things that bother me in the way they're molded and meant to be put together. First off, the rear mud guards and flaps can use some thinning for a more scale appearance, and ditto for the braces and license plate assembly and so forth. The braces aren't really accurate as far as I can tell from my refs. They look to be single armed and mounted on the top of the fenders. I could really use a couple of better shots to make sure. The convoy light is somewhat anemic but otherwise looks the part. I trimmed the mounting tab off the license plate assembly and sanded down a bit, more sanding will be necessary once it sets.


The rear guards attach to the fenders with a Y brace. As I plan to mount the fenders to the hull first, I glued the Ys to the guards and just press fit the parts together to get the angle correct.


As you can see, there's a mighty hefty attachment point on the bottom of the fender. There's also a tab at the front end which will probably be visible. So, my idea is to remove the tab and circle, the fit of the fenders looks good enough to not have to worry about misalignment. I'll then need to trim the tab off the Ys and add a bit of strip to compensate for the missing thickness.

Some of you may be thinking to yourself that wow, this is a dog of a kit. Well, yes and no, it all depends on what your level of expectation is and what you're used to building. This kit was produced in 1999, which is the tail end of old school production and technology. If you look at early Dragon releases and compare them to newer counterparts, you'll see what I mean. For us old timers, kits like this were par for the course way back when, and as such, it's no big deal to have to trim, sand, fill and make replacement parts. I don't want this to sound like an old man yells at cloud moment, but there it is.

If a modern company tried to release something like this nowadays, they'd be pilloried. Probably rightly so. I actually get a perverse sense of satisfaction building "old school" kits, provided I get them at a decent price and then improving as I see fit or as needed. This kit is a decent starting point for someone who wants to delve into photo etch and so on. The parts count is relatively low and the original boxing can be had for less than 20 local bucks meaning you can justify spending another 20 or so on after market as opposed to paying 40-50 for a new kit that may need etch etc as well. As always, it's a matter of what suits your needs and wants.

Editorial/cloud yelling over, more tomorrow if all goes according to Hoyle.

Kimmo
RobinNilsson
Staff MemberTOS Moderator
KITMAKER NETWORK
Visit this Community
Stockholm, Sweden
Joined: November 29, 2006
KitMaker: 6,693 posts
Armorama: 5,562 posts
Posted: Friday, September 05, 2014 - 01:34 AM UTC
You could add Revell to Italeri & Tamiya since this kit was also sold in Revell boxes, with/without various add-ons like guns ...

It was a vast leap upwards in buildability from the old ESCI-kit where the bottom was often warped, took a lot of
"persuasion" to stop it looking like a dog by a tree (lifting a leg ...)
/ Robin
Thudius
Visit this Community
Uusimaa, Finland
Joined: October 22, 2012
KitMaker: 1,194 posts
Armorama: 1,077 posts
Posted: Friday, September 05, 2014 - 08:04 AM UTC

Quoted Text

You could add Revell to Italeri & Tamiya since this kit was also sold in Revell boxes, with/without various add-ons like guns ...

It was a vast leap upwards in buildability from the old ESCI-kit where the bottom was often warped, took a lot of
"persuasion" to stop it looking like a dog by a tree (lifting a leg ...)
/ Robin


True that. I have a faint recollection of attempting the ESCI kit mid 80s or so. I must have suppressed the experience.

Kimmo
Thudius
Visit this Community
Uusimaa, Finland
Joined: October 22, 2012
KitMaker: 1,194 posts
Armorama: 1,077 posts
Posted: Saturday, September 06, 2014 - 12:59 AM UTC
More progress today. Glued up some more bits and pieces to be added later on, worked on the fenders and front end. I trimmed the tabs off the fenders leaving a little strip, I also shaved the mounting circles off the rear and then glued them in place. Trimmed the tabs off the Y frames and added a slice from the cut off tab.


Moving to the front, I added the lockers and side walls after I made sure the floor pan would fit in. Some nice details here. I found it better to fit the left side plate to the chassis rather than try to glue the two pieces together first. Check fit, sand and trim as necessary and don't forget to drill out the hole on the left side. Once the glue sets, I'll go back and do some filling and scraping.


The reason I added these first was to give the sidewalls something more to grab on to. Adding the sidewalls now means you should have a better shot at getting the grill and hood to line up properly. Glue and clamp as needed. You want a really good bond at the back where the walls meet the fenders and at the front fender join.


I also checked to see if the windscreen will pop in place after, and it does. Take care removing the part from the sprue and also removing the sprue struts. I needed to shave down a nub to get a better cut in one place. Support the piece and cut off with a chisel blade, then clean up the edges of the frames. It's best to clean up all the edges as best you can before removing the brace, less chance of bending or warping this way.


I also got started on the tarp. I spent a bit of time getting the frames to match better, although this in all likelihood will not be seen at all once the tarp is assembled. This is quite nicely done, the detail is pretty good and the tarp wrinkles are good as well. A little extra care in this area will be worth it.


That's it for this week, I should be able to get a session in on Monday.


Kimmo
Thudius
Visit this Community
Uusimaa, Finland
Joined: October 22, 2012
KitMaker: 1,194 posts
Armorama: 1,077 posts
Posted: Monday, September 08, 2014 - 04:18 AM UTC
Found some bench time as anticipated. Got the shimming for the firewall dash done. For some strange reason, Italeri decided to leave huge gaps in the firewall. It wasn't a straightforward plug job because of the traps formed by the sidewalls. I decided to glue down the floor tub first and clamped the hull to eliminate minor gaps.


This is what needs to be shimmed/plugged. Of course I didn't take a pic of the dash/firewall after shimming. Doh. Next update. The dash was easy enough, strips on either side and sanded to fit.


Here's what I meant about the traps.


I'll still need to putty, but now it should be relatively easy.

Speaking of putty, I dealt with the gaps around the lockers. I'm using Perfect Putty. The stuff is great for tight areas, slather some in, work it down with a wet brush and wipe excess off. Repeat as needed.


I also did work on the tarps. Yes, tarps. I'll be using the folded down version, but I wanted to show you what the closed option looks like as well. The braces for the folded down version will need to be bent inward in order to fit properly into the wall. I glued the end wings as far inboard as possible and then did some trimming, sanding and filling to blend everything in.


The closed tarp is fairly straight forward. I opted to glue the side pieces to the rear first, and then I'll glue that to the upper. The braces will go in last. A fair bit of thinning will be need to get it looking more to scale.


And that's it for today. Not sure how much bench time I'll get this week, hopefully at least a couple of hours.

Kimmo
retiredyank
Visit this Community
Arkansas, United States
Joined: June 29, 2009
KitMaker: 11,610 posts
Armorama: 7,843 posts
Posted: Monday, September 08, 2014 - 04:26 AM UTC
After building Italeri's sdkfz 7 demag, I swore never again. You are doing an excellent job, but paying extra for a newer kit is the way I choose to go.
Nito74
Visit this Community
Lisboa, Portugal
Joined: March 04, 2008
KitMaker: 5,386 posts
Armorama: 4,727 posts
Posted: Monday, September 08, 2014 - 04:49 AM UTC

Quoted Text

After building Italeri's sdkfz 7 demag, I swore never again. You are doing an excellent job, but paying extra for a newer kit is the way I choose to go.


Me too.
JPTRR
Staff MemberManaging Editor
RAILROAD MODELING
#051
Visit this Community
Tennessee, United States
Joined: December 21, 2002
KitMaker: 7,772 posts
Armorama: 2,447 posts
Posted: Monday, September 08, 2014 - 05:36 AM UTC
Kimmo,

Excellent blog about this model. I am very interested in your findings and conclusions.

Here's my attempt at the ESCI model, c. late 1970s -early 80s:


I don't recall any trouble with it but I was more a non-expert than now...
Thudius
Visit this Community
Uusimaa, Finland
Joined: October 22, 2012
KitMaker: 1,194 posts
Armorama: 1,077 posts
Posted: Monday, September 08, 2014 - 06:03 AM UTC
Thanks guys. While I haven't seen a Dragon offering in the flesh, I'm pretty sure it would win hands down on detail alone. As I said earlier, I don't mind going medieval on a kit. The shortcomings so far are mainly fit/molding related rather than incorrect, the front fenders aside, and details that can fairly easily be replaced. The real breaker will come when I get to the tracks and running gear. I have read that they're not entirely correct, but there are fixes which sound simple enough. I have a set of Modelkasten tracks in the stash to use on my 10/5 so I'll be able to give you a good idea of how off the kit's items are.

Kimmo
Thudius
Visit this Community
Uusimaa, Finland
Joined: October 22, 2012
KitMaker: 1,194 posts
Armorama: 1,077 posts
Posted: Wednesday, September 10, 2014 - 03:13 AM UTC
Managed to sneak in a few hours today. Got the dash/firewall glued in and the gap filling mostly done. I started on the driver figure and did some test fitting of the hood.

First off, here's what the dash looked like after shimming and what needed to be filled in. I managed to get enough putty in so that a liberal application of primer should level things out nicely.


I added the axle and tow hooks to the front, these need to go in before you add the grill and hood along with two suspension arms which I'll add next time. I added a blocking sheet to represent the rad and to hide the open space.


Now comes the fun news. More gappage. I'm not entirely sure how this gap came to be, but it looks like a simple strip job fix. I added a piece of styrene on the firewall side to help with dry fitting. The hood is tricky to get sitting properly without glue, and of course I don't want to glue until I know everything sits right. The gaps on the sides of the dash will be dealt with as soon as I get the windshield in place.


On to Hans, our driver. He sort of looks like a Hans. Or maybe Ulrich. Anyways, he fits in the seat and the legs go into the opening. I did a bit of work though, first off I cut apart his feet (he's got ankle boots on, not quite appropriate for an early war figure), then repositioned the lower legs to touch the floor. A cut at the back of the knee and a bend, plug with a wedge of sprue and out comes the putty. I still need a final sanding/shaping on the left leg. I used Perfect Putty for the major gap and then built up with Citadel's Green Stuff. Green Stuff is much better, but also much pricier. I find it sands and shapes better.


The other figures have jack boots. Not sure if the uniforms are late or early pattern though. The detail is reasonably good although some improvements can be made which we'll get to as the build progresses.

And that's another session in the books. I may not get another chance this week, but hopefully a few hours can be found.

Kimmo

Thudius
Visit this Community
Uusimaa, Finland
Joined: October 22, 2012
KitMaker: 1,194 posts
Armorama: 1,077 posts
Posted: Thursday, September 11, 2014 - 12:51 AM UTC
Snuck in a few hours today, I should have been doing a translation, but priorities are priorities Got the hood/dash gap sorted and started on figure number 2.

I think this came about when I trimmed to get the transmission gap to disappear. I think there would have been a small gap in any case. A strip of 40 thou was glued and trimmed/sanded to fit. The hoods now fit nicely at the rear, a shim may be needed at the front end. I got some black primer onto the "rad" and surrounding areas as well.


Another thing I noticed is the fit of the windshield is loose, one of the side supports is noticeably thinner than than the other. This is undoubtedly to allow the windshield to pop into place easily, a little work will be needed here. I also had to shave down the dash a wee bit on the vertical as it was sitting proud, again due to moving the whole assembly further back. In retrospect, it would be wiser to shim the transmission face or the gear box rather than move the assembly back.

As to the next figure, I alluded to some improvements that can be made, I'll touch on those here. This isn't meant to be a figure tutorial, look up Andy Evans' posts for a better understanding and inspiration on all things figure related. The most basic improvements that you can make to any injection molded figure are to make undercuts to sharpen details such as collars, pockets, belts etc. Squaring up detail helps too.

My tools of choice are below. Sandpaper, files and liquid cement come in handy for smoothing things out. Redefining folds and poses is another can of worms, but not terribly difficult, as I've shown earlier. Ulrich's knee is drying as I write.


I tried to get a before and after set of shots, but the lighting isn't good enough to really show the changes so we'll go with the end results.


Everywhere you see a pencil line is where I've deepened or enhanced outlines and undercuts. I also did some reshaping of this chap's boots, they were a little clunky. I might do a bit more later. I won't bother with adding straps, or replacing the insignia with pe items or decals just to save time. These figures are adequate, on par with the kit. Some nice detail, fit seems to be mostly good, but plenty of room for improvement. A good set to practice on, the same can be said for the kit; a chance to use or improve basic modeling skills.

That's not meant as a dig. Basic modelling skills, are to me, essential for building good models regardless of subject, whether OOB or scratch built. Novice and expert alike need these skills. With the quality of newer releases, it's easy to forget simple things for dealing with issues when and if they arise. And before I go off on another editorial rant, until next time, thanks for tuning in.

Kimmo

RobinNilsson
Staff MemberTOS Moderator
KITMAKER NETWORK
Visit this Community
Stockholm, Sweden
Joined: November 29, 2006
KitMaker: 6,693 posts
Armorama: 5,562 posts
Posted: Thursday, September 11, 2014 - 01:13 AM UTC
A small tip about getting parts off the sprues or
removing sprue "inside" a delicate part.
Side cutters work in most cases, knife can be used
where there isn't enough room for the side cutters.
The problem with knife and side cutters is that they
exert force (at "90" degree angle to the cutting edge)
since they force a wedge into the material and this
can/will break delicate parts.
In that situation I use a small jigsaw (here in Sweden
it's called jewellers saw / juvelerarsåg). The blades
are very thin and the blades for working in metal have
very fine teeth.


/ Robin
Thudius
Visit this Community
Uusimaa, Finland
Joined: October 22, 2012
KitMaker: 1,194 posts
Armorama: 1,077 posts
Posted: Thursday, September 11, 2014 - 01:26 AM UTC
Hi Robin,

I prefer to use a single edged razor blade as often as I can, it places less stress on the parts than a regular blade and cuts with very little pressure. I also support the parts being cut on my sanding block. I tried using fine bladed saws that you attach to a knife handle and a conventional razor saw, but the sawing motion sometimes snags, and of course, the blades might damage surrounding parts. If I have any doubts on whether a part will snap or bend, I cut the surrounding sprue with the part attached and then trim the piece off after. I also tend to not go for as close a cut as possible straight off the sprue, I prefer to trim a second time to make sure I'm not damaging the part.

Kimmo
Thudius
Visit this Community
Uusimaa, Finland
Joined: October 22, 2012
KitMaker: 1,194 posts
Armorama: 1,077 posts
Posted: Saturday, September 20, 2014 - 11:23 AM UTC
Finally got myself rid of work, the things we do to afford this hobby. Anyways, did some more filling and shimming to get the dashboard and hood sorted out. I started by gluing the grill in place then adding the suspension arms. These can be fiddled in with tweezers.


I noticed the left hood panel had a gap at a sloping angle. I sanded down the kit part to get an even gap and glued some strip. I'll probably have to repeat the process on the other side.


I also thickened the right side windscreen support to eliminate a gap there. I first drilled an appropriate sized hole for the windscreen to go into. Trimmed and sanded. Voila. During the hood/windscreen test test fitting, I noticed another nice gap between dash and screen, so another strip of 20 thou was glued in place. I filled in the gaps on the sides too.


Ulrich's knee job appears to have been successful.


That's it for today. I should be able to get a longer session in tomorrow.

Kimmo
chumpo
Visit this Community
United States
Joined: August 30, 2010
KitMaker: 749 posts
Armorama: 521 posts
Posted: Saturday, September 20, 2014 - 11:46 AM UTC
That was pretty comprehensive , thank you .
Thudius
Visit this Community
Uusimaa, Finland
Joined: October 22, 2012
KitMaker: 1,194 posts
Armorama: 1,077 posts
Posted: Saturday, September 20, 2014 - 01:14 PM UTC
No problem Edmund, that's why I do these things, to pass on info and tips and of course because it's fun. Even little challenges like these are fun in my books.

Kimmo
Thudius
Visit this Community
Uusimaa, Finland
Joined: October 22, 2012
KitMaker: 1,194 posts
Armorama: 1,077 posts
Posted: Sunday, September 21, 2014 - 01:18 PM UTC
Managed to get a good session in today. The hood is now on as is the rear wall section, the seats have been reworked and the tarp almost fits now. Sure used a lot of filler and shimming and a did a lot of test fitting and scraping today.

First off, the seat frames were shaved off and new frames made from coated wire, it was just handy and roughly the right diameter.


I added the floor plate and did some clean up. The rifle racks are quite nice, as are the rifles themselves except for the trigger guard which is too square and the underside of the stock could be rounder. Otherwise, nice and crisp. You only get 2 with the set, but plenty of extra kit, enough for 5 guys I think? and a couple of machine guns. The floor plate has a curious engraved pattern and the butt holders (heh-heh) are too small to actually hold the rifle as is. I'll just shave a bit off the end of the rifle to make it look like it's sitting in there. I decided against trying to thin or replace them, pe sets will probably address this, along with the floor.


Moving on to the tarp, the cutout that butts up against the rear wall needs some serious shaving down, not just to allow the frame arms to reach their mounting holes, but to square up the sit as well. Mine needed more because I mounted the frames in deeper than was needed. Another thing that needs doing is to make a wedge cut in the bottom fold. The tarp is meant to sit against the rear wall, but won't unless you do this. Just take care not to go through the tarp as I partially did. All will get blended later, so no major deal.


The left hood panel needed a shim as per the right, sanding and trimming on all edges is needed to get a good fit and sit. A shim was used at the front to bring up the panels a bit. Oh, I shaved off the mounting stubs on the right side as they were of no use. As it is, there were still some gaps left that I decided to putty up. I mounted the windshield as well, clear plastic windows will go in last. The left side hood has a protrusion that I'm not sure should be there, it was too late to really do anything about it at this stage anyways, check your refs on this.


The rear wall was a bit tricky. I had decided that it would be easier to fill gaps if I glued up the sections first rather than in place, while this was true, the fit of the support arms was not great, and of course the whole wall assembly wasn't quite true. I trimmed the mounting tabs a little, this helped some. You'll need to fiddle and having 5 hands would help in getting everything lined up and set. None of my clamps were of any use here. The soft plastic was a blessing though, squeeze the parts for a minute or so and they should stay put. I also got some primer on in a few hard to reach places. All I can say is thank goodness for water soluble putty!


The next update will be sometime during the week, so stay tuned.

Kimmo


Thudius
Visit this Community
Uusimaa, Finland
Joined: October 22, 2012
KitMaker: 1,194 posts
Armorama: 1,077 posts
Posted: Tuesday, September 23, 2014 - 02:54 AM UTC
Squeezed in a few hours today. Cleaned up the hood panel lines some, they still need a bit of work and did some checking and cleaning up of the other puttied areas. Got primer into the front compartment, after the middle cargo bay goes in, this area will be difficult to paint. Plugged some grooves in the fenders and got the tarp attached.


As you can see, all that scraping and trimming paid off, the support frames now reach their mounting holes and the bottom of the tarp sits flush (more or less) with the rear wall. Next session I'll bend the little extensions up and blend the seams and gaps. The support frames are a bit bent, so they'll need straightening out as well.

In retrospect, I think it would probably be easier and wiser to first assemble the tarp, shave and adjust the fit to the wall, glue in place, then trim the L bends off the rear of the frame supports and just slide them in place. I'm pretty sure you can't see far enough back into the tarp section to notice the missing bend.

And that's a wrap for today. Bench time may be hard to come by this week, but any chance I get, I'll make full use of it.

Kimmo
Thudius
Visit this Community
Uusimaa, Finland
Joined: October 22, 2012
KitMaker: 1,194 posts
Armorama: 1,077 posts
Posted: Thursday, September 25, 2014 - 12:49 AM UTC
Found a couple of hours today. Blended the gaps in the tarp, added the middle cargo bay and started on the rear suspension fix.

I added the brackets to the rear wall, a bit of cutting and scraping will be needed here if you use the kit parts which are way over scale. I chopped the mounting stubs off to make life easier.


The fit of the cargo bay and side supports was less than optimal. Another chance to practice my putty skills. In all honesty, it would be easier to plug the gaps on the fenders and scratch all the supports using the kit pieces as guides.


Starting to look like a half track.


The hood panels got a wee bit of scribing.


The suspension fix turned out to be rather simple. Terry Ashley had done this by cutting the axles off and repositioning new ones. I found a few cuts did the trick. The main problems were the idler is too far back, and the torsion bars should be offset. I trimmed a little off the front, made cuts as needed and glued the pieces back together. There will be gaps to be dealt with at the rear end. The road wheels axles could sit maybe a millimetre lower, but not a huge deal in my mind. The kit is designed so you can add the track/wheel assembly at any point, a nice idea but that means everything has to fit nicely first.

Here's how it looks out of the box, the red lines are where everything should line up.


A trim and a cut later, it looks much better.


And with both pieces corrected.


The only thing that concerns me now is how the tracks are going to fit. In theory, a couple less links will be needed and life should be swell. We'll see how that works out later on. I'll try and get this done next session, provided I have enough time.

Kimmo


165thspc
#521
Visit this Community
Kentucky, United States
Joined: April 13, 2011
KitMaker: 9,465 posts
Armorama: 8,695 posts
Posted: Thursday, September 25, 2014 - 05:58 AM UTC
A small F.Y.I. : They may be a bit fiddly but you can actually leave these side panels unglued and have them work to go up or down just like the real thing!

165thspc
#521
Visit this Community
Kentucky, United States
Joined: April 13, 2011
KitMaker: 9,465 posts
Armorama: 8,695 posts
Posted: Thursday, September 25, 2014 - 07:04 AM UTC
I know this is supposed to be an OOB build but in case a few folks would like some additional reference. To that end here are a number of photos of D7 Demags currently in US Museum service:

All photos: Copyright Michael Koenig 2014; All rights reserved.


D7's are a pet project of mine. I have been fortunate enough down through the years to have had close access to three running examples and to have driven one of them.

(F.Y.I. - Anyone wishing to sponsor a book on the D7 I'm just about ready to go!)
165thspc
#521
Visit this Community
Kentucky, United States
Joined: April 13, 2011
KitMaker: 9,465 posts
Armorama: 8,695 posts
Posted: Thursday, September 25, 2014 - 07:06 AM UTC
All photos Copyright Michael Koenig 2014. All rights reserved.


Thudius
Visit this Community
Uusimaa, Finland
Joined: October 22, 2012
KitMaker: 1,194 posts
Armorama: 1,077 posts
Posted: Thursday, September 25, 2014 - 07:45 AM UTC

Quoted Text

A small F.Y.I. : They may be a bit fiddly but you can actually leave these side panels unglued and have them work to go up or down just like the real thing!


Thanks for the input Michael, I kinda realized that a little too late. The instructions don't mention these could go up or down, and pics are always welcome. If you notice anything I haven't mentioned, feel free to chime in.

Kimmo
Thudius
Visit this Community
Uusimaa, Finland
Joined: October 22, 2012
KitMaker: 1,194 posts
Armorama: 1,077 posts
Posted: Saturday, September 27, 2014 - 02:38 AM UTC
Found a few hours today so I did some filling and started to figure out the running gear and tracks. I knew going in that there was something wrong with tracks, but I wasn't sure what the problem was. As it turns out, the track pads are too narrow in pitch, by almost half when compared to the Modelkasten offering. Otherwise, the two links are pretty close in every respect.


Turning to the sprocket, it looks close enough according to the Panzer Tracts drawings, the only criticism here is that the pads are a wee bit thick and maybe the sprocket is a touch too wide overall as compared to the Modelkasten item. No pics here, the MK sprocket is metal and refuses to photograph properly, it's quite nice and the details are very fine. Not a problem in and of itself, however, now that I've moved the axles forward, this does affect the fit between the first road wheel set. The road wheels match up nicely to the drawings as well.

So, a couple of fixes to be done. First, sand the areas marked in red on the inside faces of the kit pieces. The teeth have a small ridge which might represent the doohickey on the real deal, or it might just be a bad mold seam. Either way, sand that off and then sand/scrape the inner face of the other half of the sprocket. You get it a good .5 mm thinner this way, more may be needed for the right side. Another way to get some more width to the road wheel is to glue 5 thou spacers as shown. The wheels now come flush to the edge of the track as it should.


I also added the extensions to the axle plates and trimmed/sanded to shape and profile. Happily, 40 thou was perfect for the job.


And that's it for today. Next update will be during the week, hopefully I'll get a few good sessions in and get this puppy ready for paint. Not much left to do on the vehicle, and the figures are coming along nicely.

Kimmo
 _GOTOTOP