

Tom,
Thanks for your help, it is very much appreciated! Hope to get some pics up in next few days of where I am so far...
Cheers, Paul
Hosted by Richard S.
The Green Machine

Spuggy1uk

Joined: March 24, 2014
KitMaker: 23 posts
Armorama: 22 posts
Posted: Saturday, June 27, 2015 - 04:57 AM UTC

shorty53

#330

Joined: July 15, 2011
KitMaker: 175 posts
Armorama: 72 posts

Posted: Saturday, June 27, 2015 - 02:08 PM UTC
I'm in with a Dragon M4 Mortar Carrier.


TankSGT

Joined: July 25, 2006
KitMaker: 1,139 posts
Armorama: 946 posts

Posted: Saturday, June 27, 2015 - 03:08 PM UTC
Paul if you go to the Prime Portal web site
http://primeportal.net/home.htm
They have quite a few walk a rounds on M1A1s and the bilge outlet is visible in afew. I'm pretty sure that did not change between models.
I'm rethinking my choice I don't feel like dealing with the Dragon Easy 8 suspension right now. I may opt for a Dragon M26 or M46.
Tom

Bravo1102
Joined: December 08, 2003
KitMaker: 2,864 posts
Armorama: 2,497 posts

Posted: Saturday, June 27, 2015 - 06:04 PM UTC
Quoted Text
I'm rethinking my choice I don't feel like dealing with the Dragon Easy 8 suspension right now. I may opt for a Dragon M26 or M46.
Tom
We think alike that was going to be my alternate project while working on the cannon. Right now I'm gathering pics of typical cannon for detailed the American War of Independence gun.
andromeda673
Joined: July 30, 2013
KitMaker: 584 posts
Armorama: 525 posts
Posted: Sunday, June 28, 2015 - 01:04 AM UTC
well made some more progress at the bench today, it's coming together, slowly but surely, 48th scale is fun, but damn things are small!


thanks for looking!


thanks for looking!

erichvon

Joined: January 17, 2006
KitMaker: 1,694 posts
Armorama: 1,584 posts

Posted: Sunday, June 28, 2015 - 01:55 AM UTC
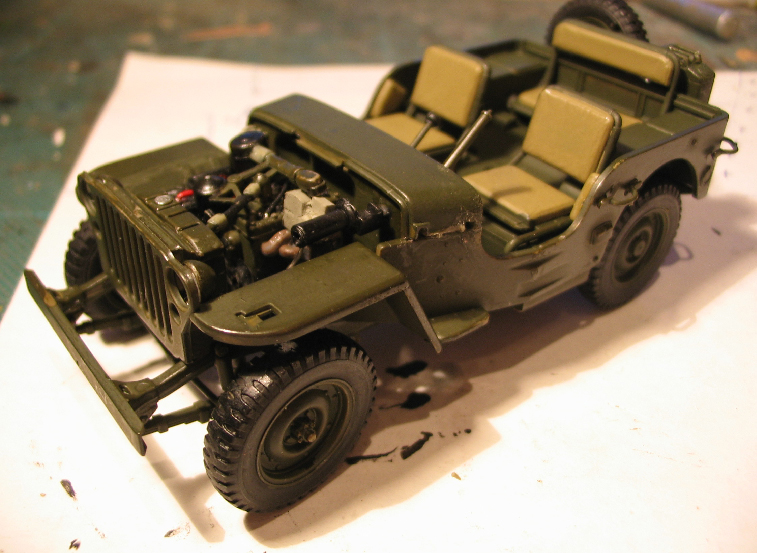
Finished the engine compartment after my little bit of scratchbuilding. Not especially happy with the carb but it resembles it so that'll do. I had to laugh while I was searching for pics as I saw a build of the same kit and someone had had the same idea but unfortunately hadn't researched it very well. He turned the voltage regulator into a washer bottle for the windscreen wipers and seemed quite pleased with himself lol. Fortunately that was about the limit of his scratching. Here's where we're up to...
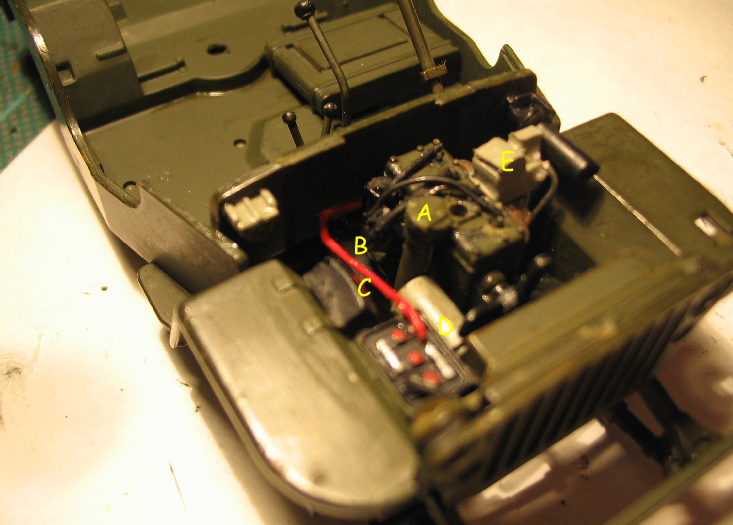
A-Oil filler pipe
B-Distributor cap & Leads
C-Starter Motor
D-Alternator
E-Carburettor
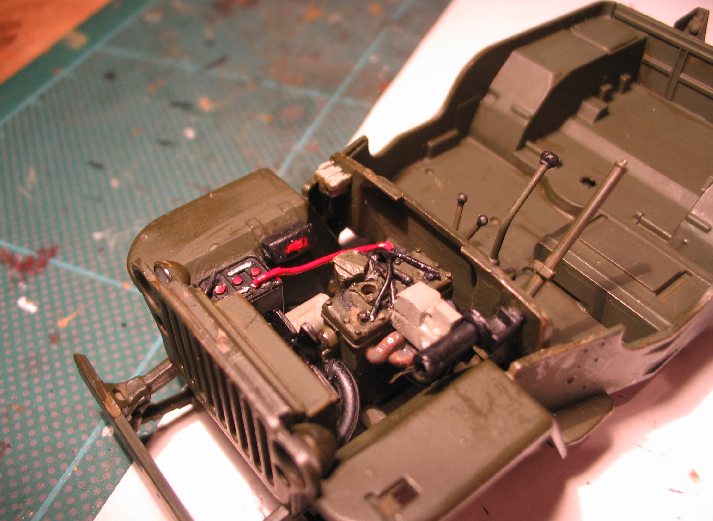
The rather crude carb and radiator hose
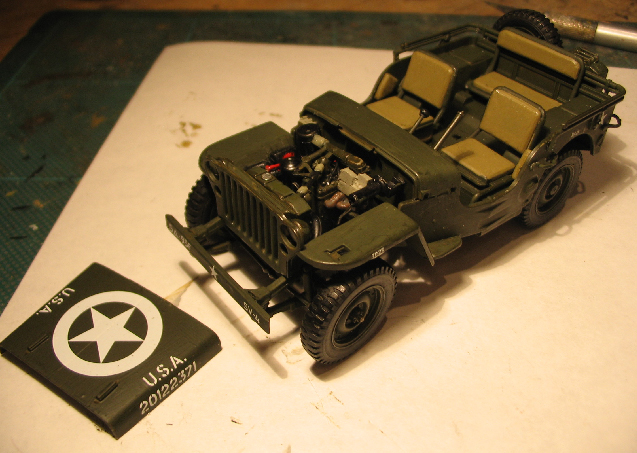
And now all tucked away...lol
A-Oil filler pipe
B-Distributor cap & Leads
C-Starter Motor
D-Alternator
E-Carburettor
The rather crude carb and radiator hose
And now all tucked away...lol

retiredyank
Joined: June 29, 2009
KitMaker: 11,610 posts
Armorama: 7,843 posts
Posted: Sunday, June 28, 2015 - 09:20 AM UTC
G.Houle: I have built one kit, in 48. They do go together quite well. I just couldn't get the finish to my liking.
Karl: Nice bit of scratch building.
Karl: Nice bit of scratch building.


Hammerhead11
Joined: May 29, 2015
KitMaker: 14 posts
Armorama: 14 posts
Posted: Sunday, June 28, 2015 - 10:42 PM UTC
Is it too late to get in on this? I am a new member to Armorama so this is my first time getting into a campaign. I have a 1/35 M10 I'd like to build for this.
andromeda673
Joined: July 30, 2013
KitMaker: 584 posts
Armorama: 525 posts
Posted: Monday, June 29, 2015 - 12:21 AM UTC
heck no!!!! Anyone can join a build at anytime, just gotta get whatever you started done by the deadline.
Enjoy and make sure to post up some pictures of what your working on, and the progress you make!
Enjoy and make sure to post up some pictures of what your working on, and the progress you make!
TankSGT
Joined: July 25, 2006
KitMaker: 1,139 posts
Armorama: 946 posts
Posted: Monday, June 29, 2015 - 03:41 PM UTC
Quoted Text
Quoted Text
I'm rethinking my choice I don't feel like dealing with the Dragon Easy 8 suspension right now. I may opt for a Dragon M26 or M46.
Tom
We think alike that was going to be my alternate project while working on the cannon. Right now I'm gathering pics of typical cannon for detailed the American War of Independence gun.
I'm going with the M46, the track punch out marks are on the outside so I only have to remove them on the front and rear upper and lower runs will be fine.
Tom
TankSGT
Joined: July 25, 2006
KitMaker: 1,139 posts
Armorama: 946 posts
Posted: Monday, June 29, 2015 - 03:43 PM UTC
As I said I will be building the Dragon Korean War M46, not sure on markings yet but I may go with the tiger.

Tom

Tom
Bravo1102
Joined: December 08, 2003
KitMaker: 2,864 posts
Armorama: 2,497 posts
Posted: Monday, June 29, 2015 - 03:50 PM UTC
Nice choice. I built that for a Korean War exhibit a bunch of years ago. A good curved file takes care of the knock out marks on the track. You might want to consider making up a side skirt panel in sheet plastic as they often had the center portion put on upside down as a holder storage especially ammo cans.
LowFiveJoe
Joined: April 28, 2015
KitMaker: 22 posts
Armorama: 16 posts
Posted: Monday, June 29, 2015 - 05:16 PM UTC
OK Gents,
I'm going to give Academy's M3 Halftrack a go. My first obstacle will be to figure out how to upload images.
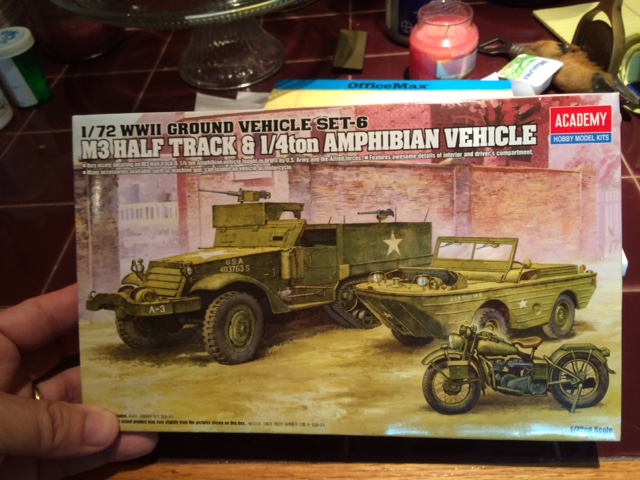
And here, hopefully, is the sprue shot with "proof of life."
I'm going to give Academy's M3 Halftrack a go. My first obstacle will be to figure out how to upload images.
And here, hopefully, is the sprue shot with "proof of life."

Hammerhead11
Joined: May 29, 2015
KitMaker: 14 posts
Armorama: 14 posts
Posted: Monday, June 29, 2015 - 07:26 PM UTC
Here is my kit, getting ready to start. I will modeling an M10 as it would have looked during the Battle of the Buldge. It will be my first time doing a white wash effect. I will also be scratch building the additional turret armor. Wish me luck.


windysean
Joined: September 11, 2009
KitMaker: 1,917 posts
Armorama: 735 posts
Posted: Monday, June 29, 2015 - 10:25 PM UTC
Hammerhead and LowFiveJoe, I'm already impressed with how quickly you both figured out the photo upload. Wishing you luck on the rest of the build-- you've already done the hard part. 
Soon I have to get to my own entry in this one, but I'll be checking in on progress in the meantime. Thanks for posting.
Cheers!
-Sean H.
Soon I have to get to my own entry in this one, but I'll be checking in on progress in the meantime. Thanks for posting.
Cheers!
-Sean H.

Kanguroo

Joined: May 07, 2006
KitMaker: 416 posts
Armorama: 312 posts
Posted: Tuesday, June 30, 2015 - 07:40 PM UTC
Hi all,
I participate the campaign with the Skybow's US WC-51 kit.
Here:


Modelling is a funny game!
Cheers,
K.
I participate the campaign with the Skybow's US WC-51 kit.
Here:


Modelling is a funny game!
Cheers,
K.
andromeda673
Joined: July 30, 2013
KitMaker: 584 posts
Armorama: 525 posts
Posted: Wednesday, July 01, 2015 - 07:23 AM UTC
well I got a hour or so at the bench and was able to get all of the assembly done tonight, tomorrow I'll start to pre-shade and then paint. This is the first model I have ever assembled, then painted. I don't know how this is going to turn out, and or what it's going to look like, but you don't know till you try right!


This chunk of HO scale railroad and rail car are from my grandpa, I always promised him I would build him enough 1/48th scale shermans to put on there so that he could run it around his 3,500 square foot layout. Sadly he passed away before I ever even got one done. I kept putting my builds before his. Eventually I'll build enough of them, fill the cargo car, then give it to my grandma.
I'm also going to build a rail yard and a building to go with everything.

Thanks for looking!
Hammerhead11
Joined: May 29, 2015
KitMaker: 14 posts
Armorama: 14 posts
Posted: Thursday, July 02, 2015 - 08:56 PM UTC
Began working on the turret for the M10. I painted the turret interior prior to assembly. I knew that most of it would be hard to see once the turret armor was added, so I wasn't concerned with adding too much detail.

Shells have been painted and installed along with two pieces of copper wire that will hold the stowage as well as the front plate to the upper armor.

All of the armor plates.

Near complete turret. I still need to clean up all of the armor plate joints and add some more detail to the hinges on the roof.


Stowage came from the kit, Thompson and helmet came from the spares.
Shells have been painted and installed along with two pieces of copper wire that will hold the stowage as well as the front plate to the upper armor.
All of the armor plates.
Near complete turret. I still need to clean up all of the armor plate joints and add some more detail to the hinges on the roof.
Stowage came from the kit, Thompson and helmet came from the spares.
TankSGT
Joined: July 25, 2006
KitMaker: 1,139 posts
Armorama: 946 posts
Posted: Friday, July 03, 2015 - 12:38 PM UTC
Brett I really like how the extra armor is coming along, Looks very good. Started my M46 last night.
Tom
Tom
retiredyank
Joined: June 29, 2009
KitMaker: 11,610 posts
Armorama: 7,843 posts
Posted: Friday, July 03, 2015 - 03:01 PM UTC
I am planning on ordering Tamiya's mine plow. Is it on sprue "E"?
TankSGT
Joined: July 25, 2006
KitMaker: 1,139 posts
Armorama: 946 posts
Posted: Friday, July 03, 2015 - 03:29 PM UTC
Quoted Text
I am planning on ordering Tamiya's mine plow. Is it on sprue "E"?
From which Kit?
Tom
retiredyank
Joined: June 29, 2009
KitMaker: 11,610 posts
Armorama: 7,843 posts
Posted: Friday, July 03, 2015 - 04:25 PM UTC
Quoted Text
Quoted TextI am planning on ordering Tamiya's mine plow. Is it on sprue "E"?
From which Kit?
Tom
M1A1 w/mine plow 35158
andromeda673
Joined: July 30, 2013
KitMaker: 584 posts
Armorama: 525 posts
Posted: Friday, July 03, 2015 - 08:25 PM UTC
Well I made some more progress today, and was able to get all of the paint put down, and the tank weathered. Now it's onto decaling and building a base.


Roughly this is how it will sit on the base, I haven't decided if I'm going to have this sitting in a field, or on a city street, or forest. I will probably just start putting things together and whatever direction it takes, then so be it.


I still have to detail the tools, and I'm thinking about adding some stowage and sand bags. This project wasn't suppose to get this in depth, but go figure, it did
erichvon
Joined: January 17, 2006
KitMaker: 1,694 posts
Armorama: 1,584 posts
Posted: Sunday, July 05, 2015 - 12:44 AM UTC
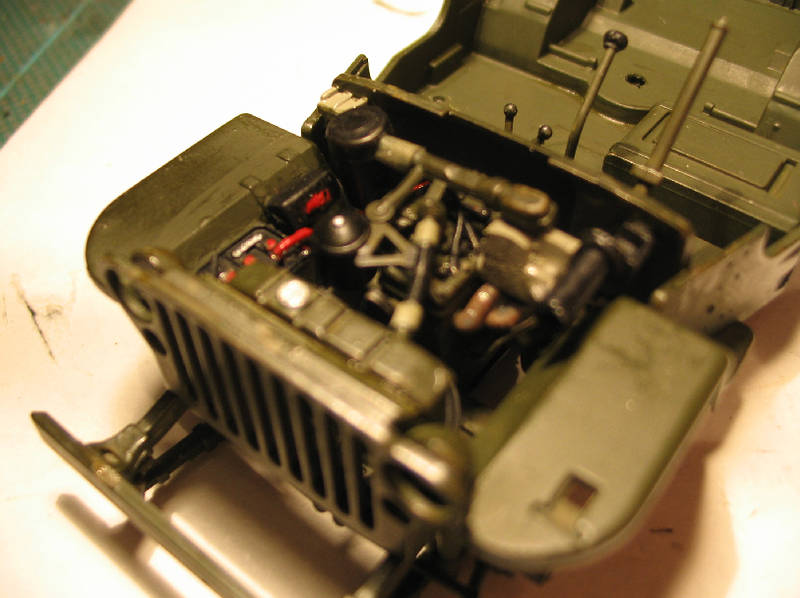
Well that must be the quickest build I've ever done for a campaign lol. Having said that the Tamiya Willys jeep was a joy to build. No fit issues and plenty of room to add to the engine.
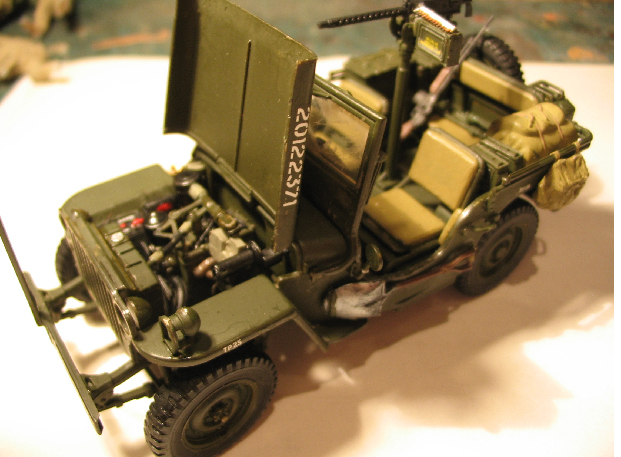
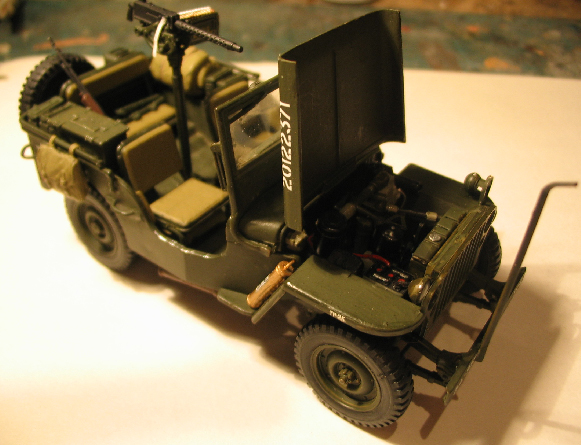
I lost one of the wiper blade motors somewhere on my desk so had to make a new one from sprue which wasn't too bad. I've done a bit of light weathering inside and I'll do the final weathering and attach the steering wheel once I've finished painting the SS figure who's going in the jeep (captured vehicle) as it's going in the Falaise dio I'm planning. I've gone for light weathering as the jeep will only have been in operational use for a matter of weeks since D-Day so isn't going to have had that much wear. An enjoyable little build. I may get another one and get the Bronco crew for it
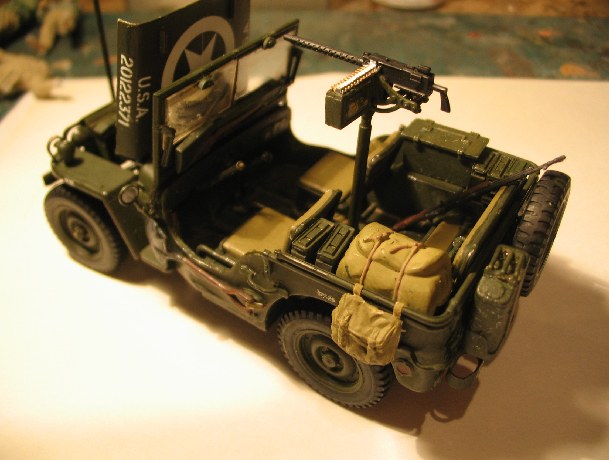
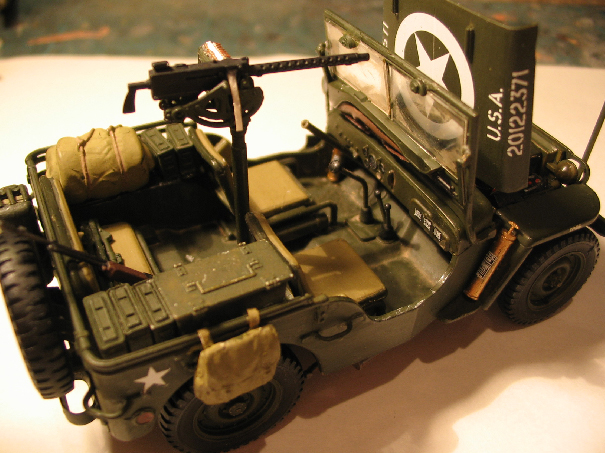
I used the AFV Club ammo and 30 cal box as I wanted the Browning ready for use and used the tripod from the same set so it could be mounted in a ground role. The ammo boxes are Verlinden ones I've had for years in the spares box. The engine details are parts of sprue cut to size and leads etc are fuse wire. A lot more flexible and durable than stretched sprue. The sling on the garand and the straps on the musette bags are made from masking tape so that the bags are actually hanging off the vehicle rather than being held in place by a mystical force.
I lost one of the wiper blade motors somewhere on my desk so had to make a new one from sprue which wasn't too bad. I've done a bit of light weathering inside and I'll do the final weathering and attach the steering wheel once I've finished painting the SS figure who's going in the jeep (captured vehicle) as it's going in the Falaise dio I'm planning. I've gone for light weathering as the jeep will only have been in operational use for a matter of weeks since D-Day so isn't going to have had that much wear. An enjoyable little build. I may get another one and get the Bronco crew for it
I used the AFV Club ammo and 30 cal box as I wanted the Browning ready for use and used the tripod from the same set so it could be mounted in a ground role. The ammo boxes are Verlinden ones I've had for years in the spares box. The engine details are parts of sprue cut to size and leads etc are fuse wire. A lot more flexible and durable than stretched sprue. The sling on the garand and the straps on the musette bags are made from masking tape so that the bags are actually hanging off the vehicle rather than being held in place by a mystical force.
andromeda673
Joined: July 30, 2013
KitMaker: 584 posts
Armorama: 525 posts
Posted: Sunday, July 05, 2015 - 01:19 AM UTC
well I managed to get some more time in at the bench, and get my 1/48 sherman done. What a great build, and it went together as every tamiya kit seems too!


I actually sprayed a coast of flat earth over the decals I installed this way the weathering all matched. The bad part was, I never took photos, I was too hurried about rushing it up to my local hobby store to put on display.
Ohhh well, thank you everyone for letting me take part in this build and what a great campaign idea!
 |

WEB HOSTING BY


Copyright ©2021 Armorama and Kitmaker Network, a subsidiary of Silver Star Enterprises
All Rights Reserved. Please read our Conditions of Use and Privacy Policy.
All Rights Reserved. Please read our Conditions of Use and Privacy Policy.