Tiger 231 - An ambitious project

#401
Washington, United States
Joined: December 08, 2013
KitMaker: 323 posts
Armorama: 221 posts
Posted: Tuesday, January 13, 2015 - 03:28 AM UTC
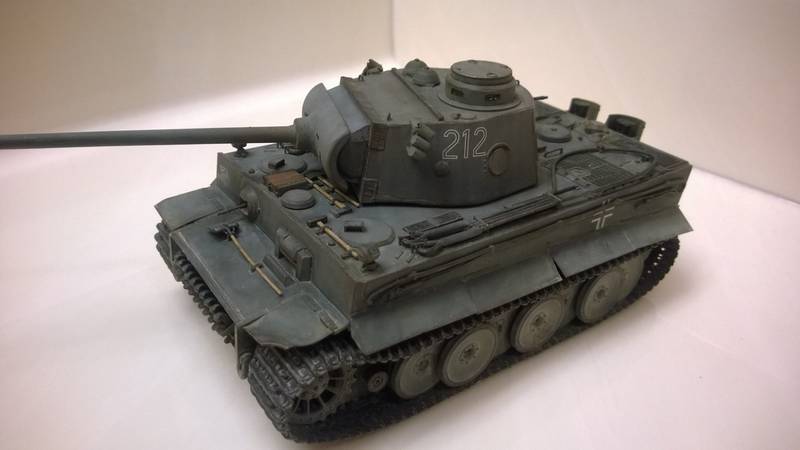
The story behind Tiger 231 from sPzAbt 503 has fascinated me over the last few years, and I finally committed to building this tank.
The Tiger itself sustained 252 hits from various caliber Soviet weapon systems (including several 76.2mm hits) during the course of a two day battle in January of 1943. This one tiger and three Panzer III's were committed in an attack on a collective farm and the Tiger quickly drew the fire of every available AT system.
Despite the almost unbelievable number of hits, the entire crew went unscathed, and the Tiger was able to leave the battlefield on its own power. This Tiger's story is truly remarkable.
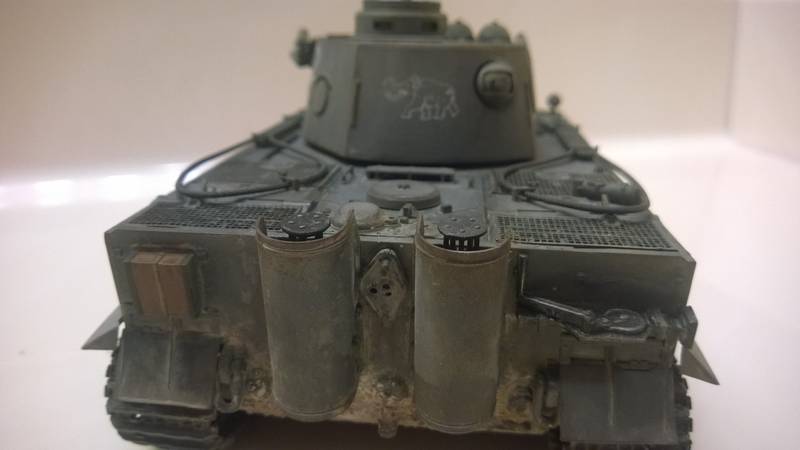
I have built my Tiger 231 from my spares collection, and I have attempted to match the specifications for the Dec 42' production vehicle. There are a few details that I had to settle on (I only had a 6 piece cleaning rod assembly instead of a 5 piece)
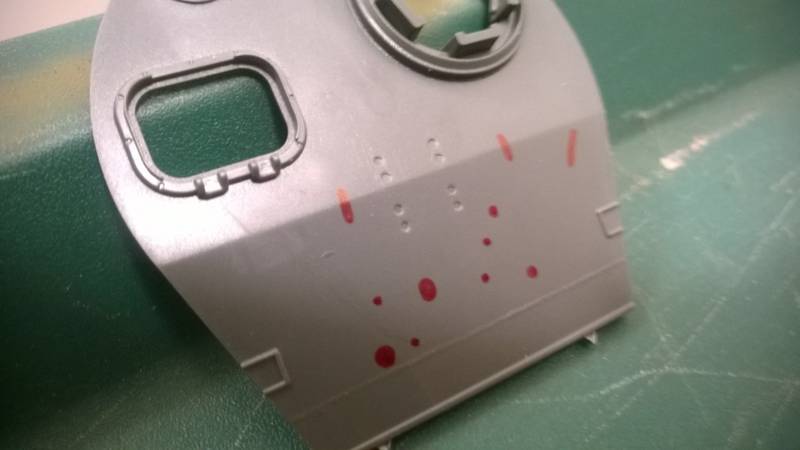
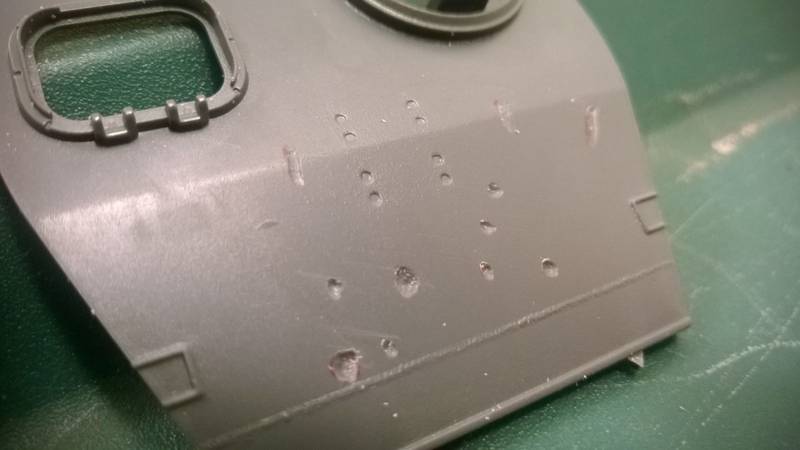
I have used a red permanent marker to map out the locations of the impact marks, and the gun barrel has been glued in a recoiled position which is accurate to the account of the battle.


Croatia Hrvatska
Joined: April 18, 2010
KitMaker: 106 posts
Armorama: 103 posts
Posted: Tuesday, January 13, 2015 - 03:19 PM UTC
interesting project and great start
transport tracks on second picture tell me it was not captured by russians? was it repaired?
North Carolina, United States
Joined: May 17, 2012
KitMaker: 1,980 posts
Armorama: 1,571 posts
Posted: Tuesday, January 13, 2015 - 06:39 PM UTC
Good catch on the tracks, Richard. I never noticed that they had been changed.
Minnesota, United States
Joined: July 20, 2004
KitMaker: 1,513 posts
Armorama: 1,449 posts
Posted: Tuesday, January 13, 2015 - 06:56 PM UTC
How did you get the DS tracks to sag?
Dan
Looking to meet other MN Armor modellers. I live in Buffalo.
#401
Washington, United States
Joined: December 08, 2013
KitMaker: 323 posts
Armorama: 221 posts
Posted: Tuesday, January 13, 2015 - 08:03 PM UTC
Richard: According to several accounts, the Tiger returned to Germany for evaluations on the damage. According to Tigers in Combat Vol. 1, the Tiger was put on display as a memorial after the evaluations but I have not seen anything to confirm this.
Dan: I glued the roadwheels and idlers on, but kept the drive sprockets off. I glued the tracks onto the drive sprocket. Once that was dry I attached the drive sprocket and then glued the tracks down. I inserted tissue paper between the hull and the tracks until they dried in place. Hopefully that made sense.
Croatia Hrvatska
Joined: April 18, 2010
KitMaker: 106 posts
Armorama: 103 posts
Posted: Tuesday, January 13, 2015 - 08:38 PM UTC
point is to glue it low enough on drive wheel or idler that it's pushed down + if spikes on tracks are big enough you can glue them to the road wheels "in air" as i do on T-55's
I also did complete sag on StuG but schurzen's covered all..
http://shrani.si/f/2o/NK/3uhVHarY/dsc00860.jpghttp://shrani.si/f/Z/eY/1jjnEzD0/dsc02472.jpgit's never perfect but still better than flying ruber tracks
Minnesota, United States
Joined: July 20, 2004
KitMaker: 1,513 posts
Armorama: 1,449 posts
Posted: Tuesday, January 13, 2015 - 08:49 PM UTC
Thanks Shawn. Are you going to share pics of the build?
Dan
Looking to meet other MN Armor modellers. I live in Buffalo.
#401
Washington, United States
Joined: December 08, 2013
KitMaker: 323 posts
Armorama: 221 posts
Posted: Tuesday, January 13, 2015 - 09:02 PM UTC
Dan, I plan on posting more pictures as the build progresses. Hopefully this weekend I can practice making impact marks on my stunt tank before I mark up the Tiger.
Ive got a super fine Dremel bit that I plan on using to make the impacts.
Minnesota, United States
Joined: July 20, 2004
KitMaker: 1,513 posts
Armorama: 1,449 posts
Posted: Tuesday, January 13, 2015 - 09:05 PM UTC
Shawn, what was your base kit?
Dan
Looking to meet other MN Armor modellers. I live in Buffalo.
#401
Washington, United States
Joined: December 08, 2013
KitMaker: 323 posts
Armorama: 221 posts
Posted: Tuesday, January 13, 2015 - 09:17 PM UTC
The base kits for this Tiger were a combination of the Cyber Hobby Tiger I (Kit# 9142), and Dragon's Tiger I Initial Production s.Pz.Abt. 502 Leningrad Region 1942/3 (Kit #6600) The barrel with canvas cover came from Panzer Art.
I also took various parts from Dragon Kits 6252, 6406, and 6700.
Napoli, Italy
Joined: April 17, 2014
KitMaker: 652 posts
Armorama: 600 posts
Posted: Tuesday, January 13, 2015 - 09:25 PM UTC
Hi Shawn,
This is a great project and I hope you will complete the job successfully.
Great start so far. I'm following the progress of job !
Cheers
Giovanni
Alberta, Canada
Joined: August 20, 2008
KitMaker: 1,295 posts
Armorama: 1,191 posts
Posted: Wednesday, January 14, 2015 - 06:47 AM UTC
Looking good thus far Shawn. I will be following your work in progress as you move along. Will you be mounting this monstrosity onto a base or small dio, or will it just adorn a shelf in your room. Just curious is all, I'm a big fan of even small dioramas and vignettes.
Keep up the good work man,
Dave

Do what you love, and love what you do... then everything else is simply an extension of that which drives your heart.
Minnesota, United States
Joined: July 20, 2004
KitMaker: 1,513 posts
Armorama: 1,449 posts
Posted: Wednesday, January 14, 2015 - 07:30 AM UTC
Shawn,
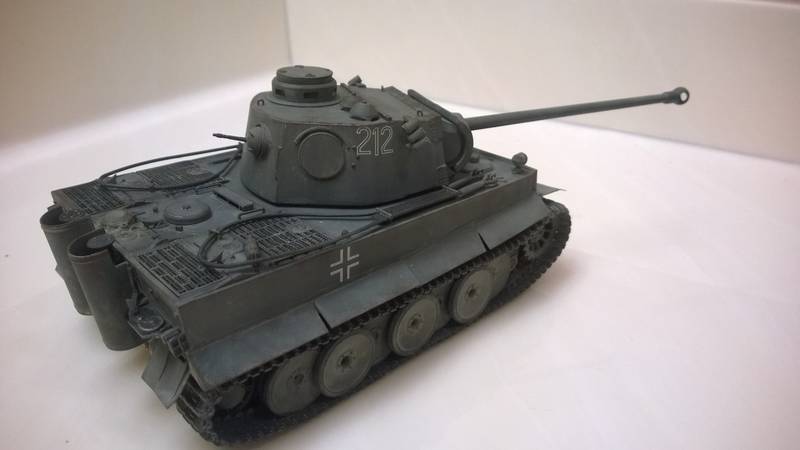
I just noticed that on the top photo it has the drivers visor; the other photos not.
Dan
Looking to meet other MN Armor modellers. I live in Buffalo.
#401
Washington, United States
Joined: December 08, 2013
KitMaker: 323 posts
Armorama: 221 posts
Posted: Wednesday, January 14, 2015 - 08:28 AM UTC
Quoted Text
Shawn,
I just noticed that on the top photo it has the drivers visor; the other photos not.
Dan
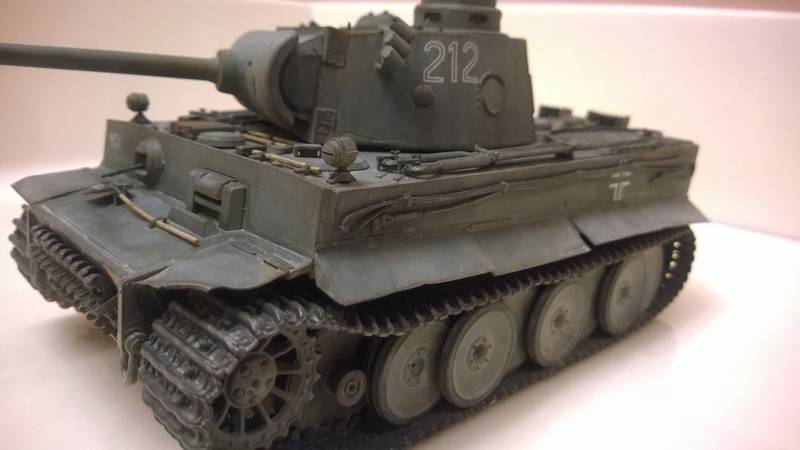
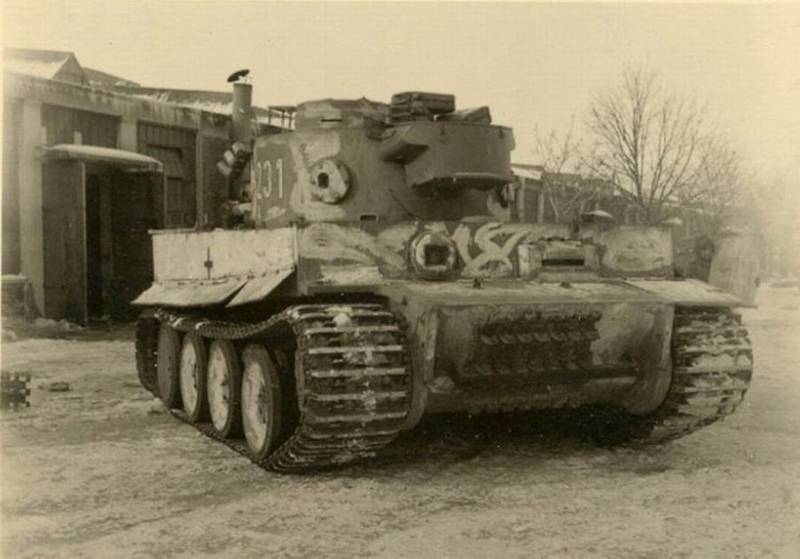
The very first photo was taken prior to the battle - if you notice, there are no other battle scars on the Tank - just a freshly applied white wash. The Platoon Leader's account of the engagement claims the driver's vision block took a direct hit with a 76.2mm round (didn't penetrate, but the driver was unable to see out of the vision block)- explaining its absence in the post battle pictures.
I am planning on depicting the tank just after it returned from the engagement, and prior to the entrainment back to Germany. I will have some spent shells on the engine deck, loose tools, and some other stowage as well.
Another interesting point is that the commanders cupola took 15 hits, one of which was a 45mm round and none of them penetrated either. I imagine the commander had a nice headache after that hit.
Dave, I think I may just display the finished product on the shelf as is. I move fairly regularly for my job so dio's and bases are logistically difficult.
Namabiiru
 Associate Editor
#399
Rhode Island, United States
Joined: March 05, 2014
KitMaker: 2,888 posts
Armorama: 1,920 posts
Posted: Wednesday, January 14, 2015 - 08:34 AM UTC
I also noticed the side skirts are present in the before- photo, and absent in after- photos.

#401
Washington, United States
Joined: December 08, 2013
KitMaker: 323 posts
Armorama: 221 posts
Posted: Thursday, January 15, 2015 - 05:40 AM UTC
Minnesota, United States
Joined: July 20, 2004
KitMaker: 1,513 posts
Armorama: 1,449 posts
Posted: Thursday, January 15, 2015 - 06:04 AM UTC
I like that your gray is really gray and not bluish as the current fad is.
Dan
Looking to meet other MN Armor modellers. I live in Buffalo.
Texas, United States
Joined: April 07, 2009
KitMaker: 1,063 posts
Armorama: 1,049 posts
Posted: Thursday, January 15, 2015 - 07:17 AM UTC
Your 231 is coming along really well. Shawn. And I agree with Dan about the gray color,, that is one mean looking H2!
Even my pick-up is panzer grey.
North Carolina, United States
Joined: May 17, 2012
KitMaker: 1,980 posts
Armorama: 1,571 posts
Posted: Thursday, January 15, 2015 - 12:50 PM UTC
Now there's a Tiger turret you don't see every day! Nice job on it.
#401
Washington, United States
Joined: December 08, 2013
KitMaker: 323 posts
Armorama: 221 posts
Posted: Thursday, January 15, 2015 - 11:39 PM UTC
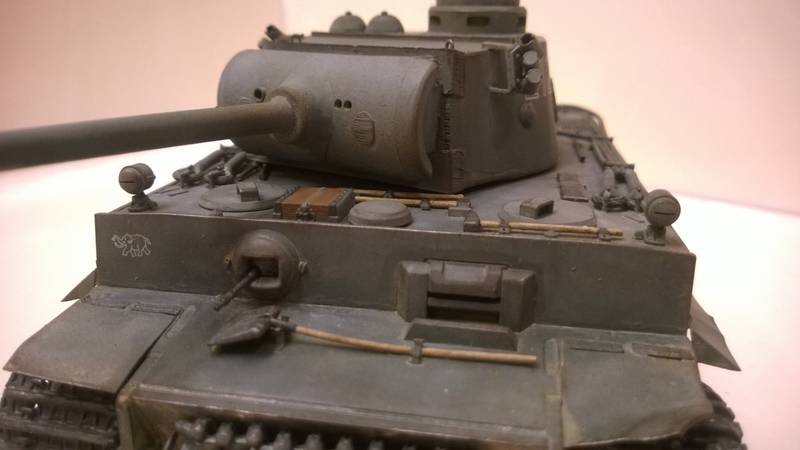
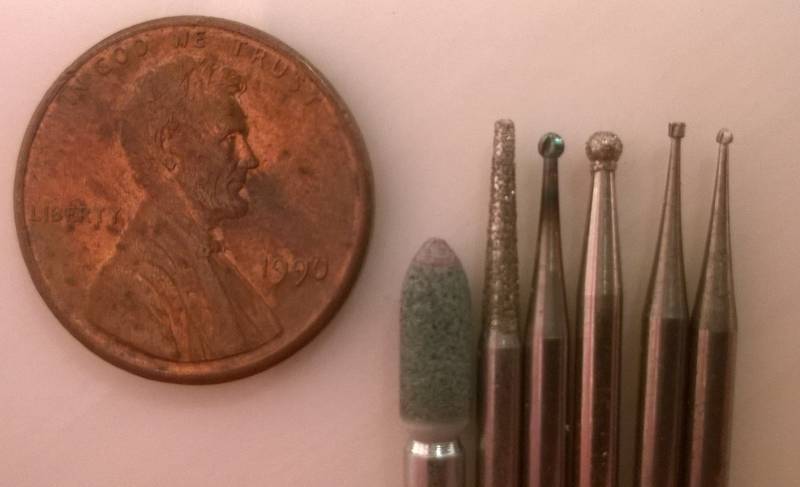
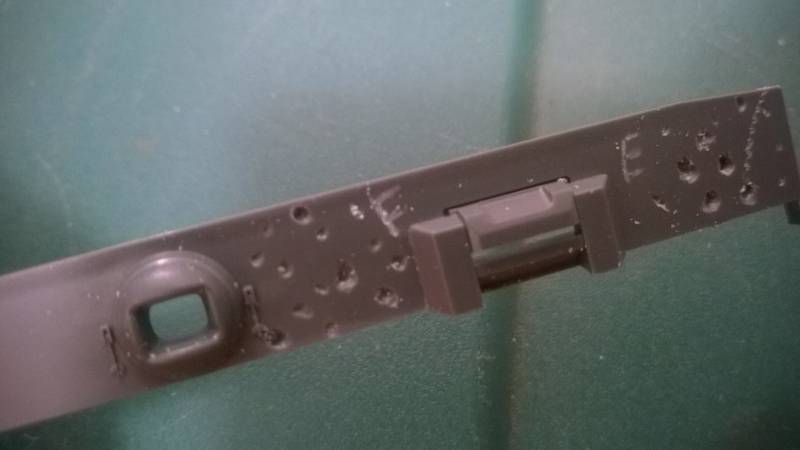
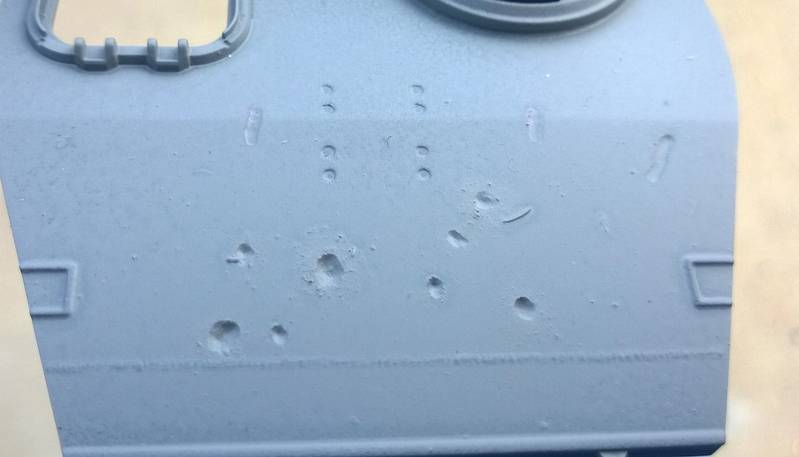
I did some experimenting this morning with different Dremel bits to replicate impact marks. The first picture below shows the bits I used on my scrap pieces. The penny is there to show scale and I will be referencing the bits as A thru F (from left to right)
I tried marking off the areas on the scrap pieces where I used each bit, and labeled them accordingly. My initial assessment is that bit A is decent for glancing hits. Bit C might be ideal for a larger caliber impact. Overall I think bit F is the best suited for making smaller caliber impacts - particularly those from AT Rifles. With some careful handling, Bit F also allows you to make larger impacts.
I used a combination of Bits A and F on the Turret Roof piece. Later on today I will experiment with heating screwdriver tips to create dents/impacts.
Any feedback or tips are appreciated!
Minnesota, United States
Joined: July 20, 2004
KitMaker: 1,513 posts
Armorama: 1,449 posts
Posted: Saturday, January 17, 2015 - 07:39 PM UTC
Put some primer on it and see what the gouges look like.
Dan
Looking to meet other MN Armor modellers. I live in Buffalo.
#401
Washington, United States
Joined: December 08, 2013
KitMaker: 323 posts
Armorama: 221 posts
Posted: Sunday, January 18, 2015 - 12:44 AM UTC
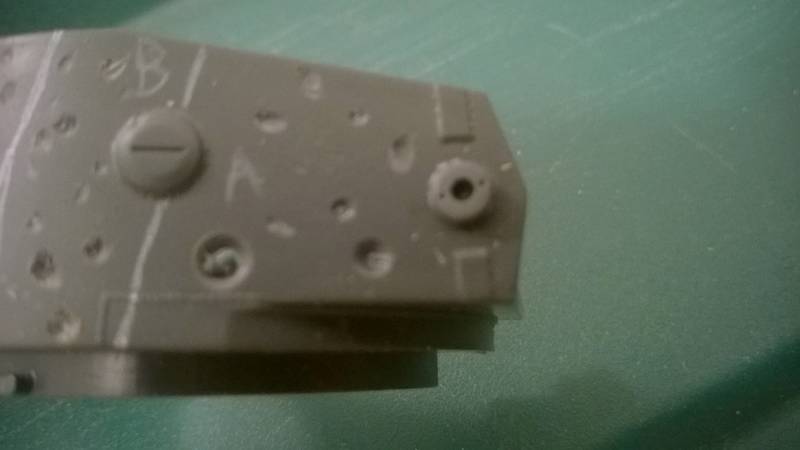
Earlier today I did some more impact testing - this time using a lighter to heat up dental picks and some small screwdrivers. Honestly I was not impressed with the results. I feel like this method is better suited for making penetrating hits, and not glancing blows or non penetrating hits.
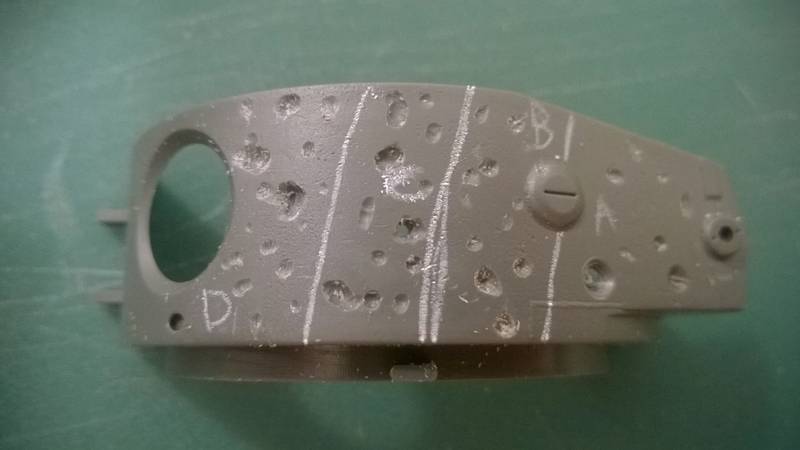
I continued my work with the previous pieces that I tested the Dremel bits on. I stippled some Mr. Surfacer 500 around the impacts I made on the Tiger turret roof piece, and then primed it. I think the stippled Mr. Surfacer creates a nice effect around the impact points.
Minnesota, United States
Joined: July 20, 2004
KitMaker: 1,513 posts
Armorama: 1,449 posts
Posted: Sunday, January 18, 2015 - 05:25 AM UTC
Looking to meet other MN Armor modellers. I live in Buffalo.
Alberta, Canada
Joined: August 20, 2008
KitMaker: 1,295 posts
Armorama: 1,191 posts
Posted: Sunday, January 18, 2015 - 07:12 AM UTC
I concur with Dan's agreement.
Do what you love, and love what you do... then everything else is simply an extension of that which drives your heart.
North Carolina, United States
Joined: May 17, 2012
KitMaker: 1,980 posts
Armorama: 1,571 posts
Posted: Sunday, January 18, 2015 - 01:01 PM UTC
I concur with Dave, who concurred with Dan, who concurred with you.