

Dioramas
Do you love dioramas & vignettes? We sure do.
Do you love dioramas & vignettes? We sure do.
Hosted by Darren Baker, Mario Matijasic
ISAF Bundeswehr Fennek & UAV

Armorsmith

Joined: April 09, 2015
KitMaker: 1,063 posts
Armorama: 1,000 posts
Posted: Tuesday, December 22, 2015 - 08:38 PM UTC
Impressive work. Glad you cleared your modelers block. Anxious to see the finished product.

Karl187

#284

Joined: October 04, 2006
KitMaker: 3,094 posts
Armorama: 2,942 posts

Posted: Wednesday, December 23, 2015 - 04:56 PM UTC
Simon- Thanks for checking out the thread. You mentioned 'Academy' decals- I'm just wondering did you mean the Trumpeter ones? If so I already got a heads up from a friend that the decals in the Trumpeter Bundeswehr kit are terrible- I wasn't planning to use them anyway because, as you noticed, I have the Crossdelta ones. I'll be doing an update about them soon.
Jason- I'm very glad your enjoying the build. I too read about the recent deaths of US Servicemen in Afghanistan- a truly awful tragedy- my thoughts and prayers are with their loved ones also.
Jerry- It means a lot to me to have you look in on proceedings here. Plus you usually spot things I have overlooked and you are right on the money here. I went and took a look at the figure and that arm did look out of proportion- in fact the area I had re-sculpted was much too thick compared to the original resin bits, not to mention the elbow was not correct as you said. I've went back over it and sanded it down in several places to bring it more in line in terms of shape and thickness. I'll get some new pictures of it up soon. Thanks so much for offering your advice on it!
Hans-Hermann- As always thanks for keeping up with me on this thread. Your references and knowledge on this has proven invaluable. However, I'm a bit confused here- hopefully you can help me solve this conundrum.
If you take a look at these references (which are yours from Prime Portal actually!!) you can see a wire running from the back of the SGL's to the front.


Now I know some SGL's caps are secured with small chains but that appears to be a braided cable of some sort- which is what I was attempting to replicate with the pieces of sprue. I'm just wondering if maybe there is a chain underneath the SGL's that can't be seen here and maybe that is what you are referring to?
David- Thanks so much for the compliments. I'll have an update soon of some more progress on the figures and UAV and the painting on the Fennek itself.
Jason- I'm very glad your enjoying the build. I too read about the recent deaths of US Servicemen in Afghanistan- a truly awful tragedy- my thoughts and prayers are with their loved ones also.
Jerry- It means a lot to me to have you look in on proceedings here. Plus you usually spot things I have overlooked and you are right on the money here. I went and took a look at the figure and that arm did look out of proportion- in fact the area I had re-sculpted was much too thick compared to the original resin bits, not to mention the elbow was not correct as you said. I've went back over it and sanded it down in several places to bring it more in line in terms of shape and thickness. I'll get some new pictures of it up soon. Thanks so much for offering your advice on it!
Hans-Hermann- As always thanks for keeping up with me on this thread. Your references and knowledge on this has proven invaluable. However, I'm a bit confused here- hopefully you can help me solve this conundrum.
If you take a look at these references (which are yours from Prime Portal actually!!) you can see a wire running from the back of the SGL's to the front.
Now I know some SGL's caps are secured with small chains but that appears to be a braided cable of some sort- which is what I was attempting to replicate with the pieces of sprue. I'm just wondering if maybe there is a chain underneath the SGL's that can't be seen here and maybe that is what you are referring to?
David- Thanks so much for the compliments. I'll have an update soon of some more progress on the figures and UAV and the painting on the Fennek itself.


jrutman
Joined: April 10, 2011
KitMaker: 7,941 posts
Armorama: 7,934 posts
Posted: Wednesday, December 23, 2015 - 07:35 PM UTC
Looks like there are rubber caps on the top and the bottom of the tubes? Maybe Hans is confusing the electrical wires with the cap retaining wires? Or,a breakdown in communication?
Looks like you are spot on in your interpretation to me.
J
Looks like you are spot on in your interpretation to me.
J
Karl187
#284
Joined: October 04, 2006
KitMaker: 3,094 posts
Armorama: 2,942 posts
Posted: Friday, December 25, 2015 - 10:38 PM UTC
Jerry- Yeah as you say they do look like wires- I was thinking maybe they have now switched from wires to chains. I'm sure Hans-Hermann will set us straight!
Update:
So in my last update I introduced you to two of the three figures. The third and final figure was taken from Trumpeter's Bundeswehr set. This set has its pros and cons- the pros are the fact that you get several very nicely detailed G36K's (much nicer than the Blackdog G36- I will try and get a comparison photo) with folding stocks, an option of smoked or solid magazines, the parts for an LMG variant, and an MP7 with several fittings for its attachment rails. You also get four figures, a choice of helmets, boonie hats, camelbacks, side arms and various attachments for the MOLLE style vests and some attachments for the older issue vests in the Flecktarn color. You get decals as well for Flecktarn and Steppentarn camouflage.
The cons of the set are that the detail on the figures is very bad in some places- originally I wanted to use the figure standing with the MP7 but his arms just seemed to bear no relation to the torso- it was like the moulding detail was just forgotten. That said, the heads are not bad and include glasses. But they aren't even as good as the Blackdog resin heads. Some of the equipment is also way out of size and lacks sharpness- the personal radio packs for instance. The boonie hats also are not great- lacking some of the shape- they look too floppy and one has the strap tied up around the outer side rims but placed on a figures head it looked like a cowboy hat. The Steppentarn camo also seems way too dark not the decal sheet and is very different from the Crossdelta sheet which seems much more accurate in terms of shape and shade. (I will try and get a comparison shot of the decal sheets).
That being said- the figure I used who is kneeling and holding his weapon was quite good- apart from the right hand which was missing its fingers- but I managed to hide it behind the left.


You can see some of the fit problem areas in the figure- the arms, hands and you can see the gap between the vest and the backpack. I plan to use some dissolved putty to fill the gaps around the pack (there are gaps on the bottom edge too).
Now I'm sure most of you will have had your fill of turkey over the last couple of days but I've got another one coming up for you- namely the UAV in the Blackdog set.
The ALADIN UAV included in the Blackdog kit with the two Bundeswehr figures is often used by teams operating the Fennek for recon. Its a fairly simple drone with no landing gear, a small two prop on the nose, sensors on the forward body, a long wing in the middle and a small rear wing connected by a shaft to the body. Here are some excellent references from Hans-Hermann.


So as you can see it is a fairly simple and quite elegant design- so this puzzles me as to how Blackdog can manage to get it so wrong in resin. For me, looking at this, it should have about seven parts- the props, the main body, the main wing (perhaps moulded straight and with instructions as to where to bend it to get the outer edges flared up), the centre shaft and the rear wing in two parts. Instead of that fairly simple layout Blackdog made the centre wing in three parts- a middle and two sides with no proper positive/negative attachment points- and the rear wing in three or possibly five parts. Why 'possibly'? Well studying the photographs of the real thing I realized there are some parts in the kit that don't seem to be needed- they are shaped as if they attach to the rear upright wing but in the real thing this is a simple design sitting on the rear of the shaft.
I did try and do it Blackdogs way but the main wing simply wouldn't go together no matter what I tried to brace/support it with. Then the central shaft kindly snapped in half as I worked on the wing. Luckily I had been planning for construction to go sideways.
I regrouped and planned out my re-working of the kit. This started by using pieces of an etch fret to support each wing.


Then I replaced the central shaft with some brass rod, sanded flat at one end to accept the upright rear wing.

I then had to cover up the etch fret pieces on the underside. Luckily Blackdog had cast the wings very thin- too thin I reckon. So to both cover the fret pieces and give the wing a bit more thickness (and to make it even more sturdy) I smothered some putty on it in a thin layer.

I still have some work to do on the UAV- but I'm going to prime it first so I can see some of the problem areas better.
In my next update I'll return to the figure with the wonky elbow that Jerry pointed out and I'll have some shots of the painting stages on the Fennek itself.
As always, thanks so much for reading and taking the time to check out the thread. All comments are very welcome. Hope you are all are having a nice Christmas holiday!
HermannB

Joined: October 14, 2008
KitMaker: 4,099 posts
Armorama: 4,067 posts
Posted: Friday, December 25, 2015 - 11:41 PM UTC
Hi Karl,
good question about the SGL. you are right about the cable. It is fixed on the mount and connects the front and end rubber caps. Basically, the 76 mm Wegmann SGL consists of the tub with the cabs and a mount that varies from vehicle to vehicle, I mean the Leo 2 has other mounts that Fennek. I looks that I have to ask more questions when I see a Fennek in 2016.
Maybe this link will give some clarification:
http://www.kmweg.com/home/armament-systems/grenade-launcher-system/76-mm-wegmann-protection-system/product-information.html
Cheers
H.-H.
SpaceXhydro

Joined: March 13, 2015
KitMaker: 418 posts
Armorama: 235 posts
Posted: Saturday, December 26, 2015 - 01:50 AM UTC
That is some amazing detail you put into your diorama and props. 

pablo_g

Joined: October 21, 2003
KitMaker: 529 posts
Armorama: 500 posts

Posted: Saturday, December 26, 2015 - 04:33 PM UTC
Hi,
Amazing built Karl, details in interior are great I like it so much.
Amazing built Karl, details in interior are great I like it so much.
Karl187
#284
Joined: October 04, 2006
KitMaker: 3,094 posts
Armorama: 2,942 posts
Posted: Saturday, December 26, 2015 - 10:14 PM UTC
Hi Hans-Hermann- thanks for the info and the link- there's some great stuff on that site.
Hyder- Many thanks for taking the time to check out the thread- I'm glad you like it.
Pawel- Thank you for stopping by- for some reason these days, when I build a vehicle with a nice interior, I can't help adding the odd extra thing or two! Many thanks for the kind words, I really appreciate it.
Hyder- Many thanks for taking the time to check out the thread- I'm glad you like it.
Pawel- Thank you for stopping by- for some reason these days, when I build a vehicle with a nice interior, I can't help adding the odd extra thing or two! Many thanks for the kind words, I really appreciate it.
jrutman
Joined: April 10, 2011
KitMaker: 7,941 posts
Armorama: 7,934 posts
Posted: Saturday, December 26, 2015 - 11:24 PM UTC
Interesting addition with the drone. Nice touch. I dwell in WWII so much I forget about all the new toys.
J
J
Karl187
#284
Joined: October 04, 2006
KitMaker: 3,094 posts
Armorama: 2,942 posts
Posted: Sunday, December 27, 2015 - 08:36 PM UTC
Jerry- Cheers mate! The drone is a nice piece to include in a figure kit, just a pity its not the best quality in this case.
I have a small update for today.
The figure Jerry pointed out with the wonky elbow was worked on- the area was sanded down to the same thinness as the rest of the arm and the elbow area was sanded as well to a better shape.


I also did some comparison shots of the decal sheets. The first up is the Steppentarn camo- the Trumpeter sheet is on the left and the Crossdelta sheet is on the right.

As you can see they are a good bit different. The Trumpeter one, to me, appears too dark and the pattern doesn't seem to be correct either. The Crossdelta one gets it right I think.
The Flecktarn sheet from Trumpeter in the photo below is on the left and the Crossdelta one is on the right.

The Trumpeter sheet here is definitely a better effort than their Steppentarn with decent colors but the pattern itself appears too large compared to the Crossdelta one. Although the Crossdelta one here appears a little faded but I think it will work nicely in terms of scale.
I also did another comparison shot of the Trumpeter G36K compared to the Blackdog version- the Trumpeter version is the black color and the Blackdog is the cream color.

The Trumpeter one is a much better version- and much more sturdy than the rather flimsy resin one.
I've also got some paint on the Fennek itself.
Tamiya Primer was up first.

Then followed by a sand color from the AMMO smart set for Bundeswehr vehicles in Afghanistan. This is a set with three colors- sand, grey-sand and a kind of reddish/pink-sand. Fennek's mostly seem to use only the sand and grey-sand and, indeed, the color chart in the kit has only those two colors.

This is only my second time using AMMO paints. My first attempt ended abruptly on a build of a Russian GAZ Tiger when the first paint onto the primer surface started retreating and then fish-eyeing. I couldn't seem to get it to stop doing that so I went back to Tamiya paint for that build. Since then I've read some posts here on Armorama about people encountering the same problem- but various reasons seem to have been behind the fish-eye problem.
I did a test on the bottom of the Fennek using the paint on a primered part and then a non-primered part. Interestingly, the fish-eyeing seemed to be worse on the non-primered part. Surface tension was given as one of the reasons for this fish eye problem and I think, from my experience here, this is partly true. A light coat of the AMMO paint is the best way to go about laying it down- too much paint and the fish eyeing appears. That said it also appears quite suddenly from time to time but I think it may be to do with accidentally swamping the area with paint. Air pressure also seems to affect it. I will talk more about it when I am further on in the painting. But so far I'm very happy with the coverage of the paint and the color.
Thanks for reading.
HermannB
Joined: October 14, 2008
KitMaker: 4,099 posts
Armorama: 4,067 posts
Posted: Sunday, December 27, 2015 - 09:07 PM UTC
FYI: What`s called Steppentarn is known as Tropentarn 3-Farb Flecktarn. The Uniform is known as Uniform Trockenheisse Gebiete or dry-hot areas uniform. And the G36 is the standard long-barreled version compared with the short-barreled version known as G36k.
Infos on G36 here:
http://www.heckler-koch.com/en/products/military/assault-rifles/g36/g36/technical-data.html
Infos on G36 here:
http://www.heckler-koch.com/en/products/military/assault-rifles/g36/g36/technical-data.html

Krischan
Joined: July 03, 2005
KitMaker: 17 posts
Armorama: 1 posts
Posted: Sunday, January 03, 2016 - 12:33 PM UTC
Good morning Karl,
since you are building an early version of the Fennek you could probably still add this detail:

It is a russian-type IR-searchlight, a field conversion by the crews as the early Fenneks lacked IR-lights for the driver.
Greetings
Christian
since you are building an early version of the Fennek you could probably still add this detail:
It is a russian-type IR-searchlight, a field conversion by the crews as the early Fenneks lacked IR-lights for the driver.
Greetings
Christian
jrutman
Joined: April 10, 2011
KitMaker: 7,941 posts
Armorama: 7,934 posts
Posted: Sunday, January 03, 2016 - 07:35 PM UTC
The vehicle is looking very clean and concise with the first coats on it. Nice palette for your finish!
I don't envy you with the decals though as they have always been the bane of my modeling existence. These look doubly tricky to me. How do you get them to conform to all of the recesses that are in the average figgie? How do they take paint after they are on for shadowing and highlights,etc?
Inquiring minds want to know?
J
ComaBlack

Joined: September 19, 2010
KitMaker: 194 posts
Armorama: 148 posts
Posted: Sunday, January 03, 2016 - 08:09 PM UTC
Quoted Text
The vehicle is looking very clean and concise with the first coats on it. Nice palette for your finish!
I don't envy you with the decals though as they have always been the bane of my modeling existence. These look doubly tricky to me. How do you get them to conform to all of the recesses that are in the average figgie? How do they take paint after they are on for shadowing and highlights,etc?
Inquiring minds want to know?
J
Plenty of Micro-set during application, and a coat or two of Micro-sol afterwards. I cut the decal into thin strips running from top to bottom and match the edges as closely as possible. CrossDelta decals vary in thickness between patterns; the flecktarn sheet is quite thick with an opaque white backing for example, whereas the US 3-colour desert is thin and nearly transparent with no backing. The troppentarn may be simular. Lots of patience and practise is the best way. They take acrylic paint and ink washes just fine.
ComaBlack
Joined: September 19, 2010
KitMaker: 194 posts
Armorama: 148 posts
Posted: Sunday, January 03, 2016 - 08:16 PM UTC
Quoted Text
FYI: What`s called Steppentarn is known as Tropentarn 3-Farb Flecktarn. The Uniform is known as Uniform Trockenheisse Gebiete or dry-hot areas uniform. And the G36 is the standard long-barreled version compared with the short-barreled version known as G36k.
Infos on G36 here:
http://www.heckler-koch.com/en/products/military/assault-rifles/g36/g36/technical-data.html
G-36c doesn't typically have the tall optical sight/carry handle of the standard G-36 though. The Trumpy one is closer to an export variant. The wide degree of modularity makes exact identification of a 1/35 version almost impossible.
Karl187
#284
Joined: October 04, 2006
KitMaker: 3,094 posts
Armorama: 2,942 posts
Posted: Sunday, January 03, 2016 - 10:42 PM UTC
Just wanting to say thanks for all the interesting info, nice comments and helpful info that has been posted in this thread- really amazing!
Hans-Hermann- thanks for the info on the correct name for the uniform pattern- and for the info on the G36. I've been calling the standard issue the 'G36K' wrongly for ages- thanks for setting me straight on that.
Christian- Thanks for checking out the thread and for leaving that interesting piece of info and reference photo- I would have thought there was an IR light already attached, fascinating info. Unfortunately I've just finished the camo pattern painting and I don't want to risk damaging it by working on it to add this but I'm sure this piece of info will come in handy for others building this version.
Jerry- I'm going to cover the decals in a future update. For now I can tell you that what Simon said was spot-on- plenty of Micro-Set and Sol and cut the pattern into manageable strips to apply around gear etc. This particular Crossdelta pattern is quite thick, as Simon also said, so it can go on right over a primer coat without the grey primer color bleeding through the decal. I wanted to try out the Crossdelta decals as I've heard good things about them but I can honestly say it is taking WAY longer than painting and can be quite fiddly at times.
Simon- Thanks for checking out the thread and answering some questions. It sounds like you have a lot more experience with decals than I do- this is my first time trying to do a whole figure uniform with decals. I am planning to augment the color somewhat with acrylic colors thinned down into glazes once I get them finished. Also thanks for the additional info on the G36.
So I have an update of the camo painting.


I used the AMMO By Mig smart set for the colors.

For some reason Fennek's only seem to use two of the colors in their patterns so both Sand Beige and Grey Beige were used here, with silly putty used to mask the pattern. I followed the pattern set out in the kit itself. For the most part the pattern is good- I tackled it by doing the sides, front and then tackling the top deck and rear. Problem was some of the pattern didn't add up- this is a common and very annoying problem with color charts in kits (at least I find it is). If the vehicle is split in three, the front third and rear third are where some extra planning is needed- nothing major in all honesty- just a slight re-working of the pattern so it flows properly.
I will say a few words on the AMMO paint because I've had trouble with their paint in the past and I know others have too. My problem was getting a 'fish eye' effect when i first used their paint (on a GAZ Tiger)- several things were blamed- surface tension, surface dirt, oil from fingers, mould release agent (unlikely since for me the problem occurred over primer), in-correct air pressure, atomization issues, paint improperly mixed etc.
That was with their orange cap bottles- since then their bottles now come with a yellow cap- denoting that an agitator ball has been placed inside the bottle for easier mixing- and it does work very nicely. The only problems I encountered with the paint this time was a slight bit of surface tension- where going with a light coat seemed to solve the problem. The other problem was 'fish eyeing' again- but the worst cases of this were caused by me spraying too much paint in one area- i.e. over-saturating the area with paint. Once dry, the fish eyeing could be covered up with a further spraying of paint. An added bonus of these paints is that they hand-brush very nicely so tidying up fiddly areas (the MG Mount for example) is nice and simple.
I also painted the DEF Model wheels.

These wheels come with a choice of two masks- allowing you to either mask the rubber or the hubs- so you can choose which to do first. I used the rubber masks and sprayed the hubs. A minimal amount of touching up was required afterward- all in all they were really easy to do.
So now I've got to get stuck into the detail painting of the Fennek. I will also get an update done soon on the figures.
Thanks for reading.
jrutman
Joined: April 10, 2011
KitMaker: 7,941 posts
Armorama: 7,934 posts
Posted: Tuesday, January 05, 2016 - 09:26 PM UTC
I will have to try some of those MIG colors. I have some of their weathering stuff and I really like their mud and dirt stuff,etc.
J
J
Karl187
#284
Joined: October 04, 2006
KitMaker: 3,094 posts
Armorama: 2,942 posts
Posted: Friday, January 22, 2016 - 10:31 PM UTC
I have to start this update with an apology for yet another delay in this build! Since the New Year a few things have been keeping me away from the bench. The delay has also been compounded by my underestimation of the time it would take to put decals on the figures.
A few of you expressed an interest in figure decals so I will explain a bit about how I tackled them.
For a start I will say it has taken far, far longer than painting would and it is very tedious and annoying- making Fruil single link tracks is one of those long, boring jobs but even that is more enjoyable than doing these decals. The problem is partly to do with modern figures and their multitudes of equipment.
Equipment and pockets on uniforms, seam changes, straps etc- they all require a different approach. A leg pocket, for instance, will not be cut from a continuous piece of cloth- it won't match the pattern coming up from the ankle or down from the thigh because it is sowed on top of that. So wrapping, say, the whole leg in a big bit of decal is a no-go. Same for pouches on the vest- two pouches side by side will not have a continuous bit of camouflage pattern between them because they are made from separate bits of material. This requires cutting small decals- sometimes smaller than 1/72 'NO STEP' aircraft decals. And then you have to make sure all these separate small parts look correct and don't look like a load of strips cut and pasted on.
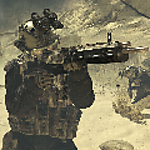
So far I have fully decalled one figure- but it is still not finished as various solid color areas need to be painted in- strapping and edging etc- and after that the decals need some further treatment to blend them in better.


As you can see the pattern is probably more accurate than you might achieve with a paint brush- but I reckon with time and patience you could get a very nice result with a brush and it would be a lot simpler and less annoying to do.
The above figure was one of the resin Blackdog figures and it took the decals very nicely with some Micro Sol. The Crossdelta decals sat down very nicely even around awkward areas.
However, on the Tamiya figure I had to do the vest and pouches in the old Flecktarn pattern- and even though it was by Crossdelta it didn't conform anywhere near as well as their Steppentarn sheet and it looks very dark and indistinct for the pattern it is supposed to represent.
The vest was a particularly awkward shape and required lots of small strips- the problem is you can notice this quite easily- not much I can do about that though. I am hoping with a coat of Future and some acrylic washes it will become less noticeable.


I'm not entirely sure, but I reckon the Tamiya plastic doesn't take quite as well to the decals- even with plenty of Micro-Sol- the sharper detail on the resin seems to show up much better under the decals.
My approach to this is partly why it is taking so long- so many tiny pieces of decal to cut, wet, place and let dry- its monotonous and very annoying. I did use a slightly different approach on the other Blackdog figure- I was thinking to myself that there must be a quicker way and then I realized if I put tape on the area to decal and then pencilled in where the decal had to stop- then I could place the marked tape onto the decal sheet and cut out the shape. That worked nicely- but only on areas where you could use larger cuts of decal- for the pouches and other smaller areas it will likely be back to using small bits of decal.


I'm also working on dealing the helmet and boonie hats on the three heads- the helmet was easy enough but the shape of the boonie hats is proving difficult.
So even when I get the decals done that still isn't the figures finished but at least its the long and boring bit done!
For what its worth I think the decals are nice looking for the most part but it has not been enjoyable for me to do- I would prefer painting to doing the decals. However, some patterns in 1/35 are very difficult and decals are a good way of over-coming it but its not a short-cut- it'll likely take much longer to decal, particularly if the figure has lots of equipment and pouches etc.
Hopefully I will get the rest of the decals sorted soon and then I can move on and get some paint on them and start giving them some acrylic washes. I'm not sure what the next update will cover as I have work to do in a few places including on the Fennek itself, the UAV, the UAV control systems and the base!!
Thanks for reading.
A few of you expressed an interest in figure decals so I will explain a bit about how I tackled them.
For a start I will say it has taken far, far longer than painting would and it is very tedious and annoying- making Fruil single link tracks is one of those long, boring jobs but even that is more enjoyable than doing these decals. The problem is partly to do with modern figures and their multitudes of equipment.
Equipment and pockets on uniforms, seam changes, straps etc- they all require a different approach. A leg pocket, for instance, will not be cut from a continuous piece of cloth- it won't match the pattern coming up from the ankle or down from the thigh because it is sowed on top of that. So wrapping, say, the whole leg in a big bit of decal is a no-go. Same for pouches on the vest- two pouches side by side will not have a continuous bit of camouflage pattern between them because they are made from separate bits of material. This requires cutting small decals- sometimes smaller than 1/72 'NO STEP' aircraft decals. And then you have to make sure all these separate small parts look correct and don't look like a load of strips cut and pasted on.
So far I have fully decalled one figure- but it is still not finished as various solid color areas need to be painted in- strapping and edging etc- and after that the decals need some further treatment to blend them in better.


As you can see the pattern is probably more accurate than you might achieve with a paint brush- but I reckon with time and patience you could get a very nice result with a brush and it would be a lot simpler and less annoying to do.
The above figure was one of the resin Blackdog figures and it took the decals very nicely with some Micro Sol. The Crossdelta decals sat down very nicely even around awkward areas.
However, on the Tamiya figure I had to do the vest and pouches in the old Flecktarn pattern- and even though it was by Crossdelta it didn't conform anywhere near as well as their Steppentarn sheet and it looks very dark and indistinct for the pattern it is supposed to represent.
The vest was a particularly awkward shape and required lots of small strips- the problem is you can notice this quite easily- not much I can do about that though. I am hoping with a coat of Future and some acrylic washes it will become less noticeable.


I'm not entirely sure, but I reckon the Tamiya plastic doesn't take quite as well to the decals- even with plenty of Micro-Sol- the sharper detail on the resin seems to show up much better under the decals.
My approach to this is partly why it is taking so long- so many tiny pieces of decal to cut, wet, place and let dry- its monotonous and very annoying. I did use a slightly different approach on the other Blackdog figure- I was thinking to myself that there must be a quicker way and then I realized if I put tape on the area to decal and then pencilled in where the decal had to stop- then I could place the marked tape onto the decal sheet and cut out the shape. That worked nicely- but only on areas where you could use larger cuts of decal- for the pouches and other smaller areas it will likely be back to using small bits of decal.


I'm also working on dealing the helmet and boonie hats on the three heads- the helmet was easy enough but the shape of the boonie hats is proving difficult.
So even when I get the decals done that still isn't the figures finished but at least its the long and boring bit done!
For what its worth I think the decals are nice looking for the most part but it has not been enjoyable for me to do- I would prefer painting to doing the decals. However, some patterns in 1/35 are very difficult and decals are a good way of over-coming it but its not a short-cut- it'll likely take much longer to decal, particularly if the figure has lots of equipment and pouches etc.
Hopefully I will get the rest of the decals sorted soon and then I can move on and get some paint on them and start giving them some acrylic washes. I'm not sure what the next update will cover as I have work to do in a few places including on the Fennek itself, the UAV, the UAV control systems and the base!!
Thanks for reading.
HermannB
Joined: October 14, 2008
KitMaker: 4,099 posts
Armorama: 4,067 posts
Posted: Saturday, January 23, 2016 - 12:02 AM UTC
Hi Karl, good work on the dacals. Maybe I give it a try for myself. One idea for figures placement. Change the kneeling figure against a a soldier that operates the control unit. It is highly unlikely that you use an UAV without anyone at the controls. The videos I provided show that the control unit sits on the "luggage" compartmemt on the front of the vehicle.
jrutman
Joined: April 10, 2011
KitMaker: 7,941 posts
Armorama: 7,934 posts
Posted: Saturday, January 23, 2016 - 12:44 AM UTC
It may have taken inordinately longer but the result looks great! Those patterns look harder than erbsenmuster to paint so the decals may be worth it.
Nice build and not what I am used to so very interesting as well.
J
Nice build and not what I am used to so very interesting as well.
J
ComaBlack
Joined: September 19, 2010
KitMaker: 194 posts
Armorama: 148 posts
Posted: Saturday, January 23, 2016 - 05:20 AM UTC
Masterful work, they look amazing. I'm totally stealing your idea with the tape. I've also found a lot of inconstancy in the quality of CrossDelta camo. Some are opaque and white backed, and some are clear. Like you noticed, the quality of the printing varies too. Their woodland sheet was meant to have faded versions as well, but mine didn't.
Karl187
#284
Joined: October 04, 2006
KitMaker: 3,094 posts
Armorama: 2,942 posts
Posted: Saturday, January 23, 2016 - 04:20 PM UTC
Thanks so much for the comments guys.
Hans-Hermann- you should definitely consider giving the decals a go- just be prepared for it to take a while! I understand your comments about the figure- I guess I should explain why I picked the kneeling guy. Basically I'm going to have the UAV about to launch up on a hill and behind that will be a small stone well. The UAV Control systems will be set up around the well which is also up on the hill to give a good view of the surrounding area. Thats if I actually manage to scratch build decent control units as my scratch building skills aren't exactly brilliant! The kneeling guy will be placed just beside the controls, ready to take control once the UAV is launched. Then the other figure with the rifle will be placed down on the road-way near the Fennek keeping watch.
Jerry- Thanks for the comments bud- I think you are right on the money in terms of the detail of the pattern the decals provide- its just the monotony of doing them takes away the enjoyment I usually get when I paint figures!
Simon- Very kind of you to say- thanks so much!! You should definitely use the tape thing- it makes covering some of the larger areas much easier. I think you are right about the decals- the Flecktarn sheet just doesn't want to conform the way the Steppentarn one does- it seems thicker. Luckily both patterns weren't opaque so I could easily lay them down over a coat of primer without worrying about the color coming through. The faded decals sound interesting- was this for US Woodland camo?
SpaceXhydro
Joined: March 13, 2015
KitMaker: 418 posts
Armorama: 235 posts
Posted: Saturday, January 23, 2016 - 08:28 PM UTC
Those look stunning, especially with camouflage on the Fennek and the soldier.
Karl187
#284
Joined: October 04, 2006
KitMaker: 3,094 posts
Armorama: 2,942 posts
Posted: Monday, January 25, 2016 - 11:02 PM UTC
Quoted Text
Those look stunning, especially with camouflage on the Fennek and the soldier.
Thanks for the kind words SpaceX. I'm looking forward to seeing what the camo on the figures and the Fennek is like once I have some paint on the base. That is, when I get finishing the base

 !
!HermannB
Joined: October 14, 2008
KitMaker: 4,099 posts
Armorama: 4,067 posts
Posted: Friday, January 29, 2016 - 05:05 PM UTC
FYI Bundeswehr will deploy Fennek and other AFV to Mali under the MINUSMA mandate. Lets see if the vehicle will be painted in Umtarnfarben.
 |

WEB HOSTING BY


Copyright ©2021 Armorama and Kitmaker Network, a subsidiary of Silver Star Enterprises
All Rights Reserved. Please read our Conditions of Use and Privacy Policy.
All Rights Reserved. Please read our Conditions of Use and Privacy Policy.