CMOT
 Editor-in-Chief
England - South West, United Kingdom
Joined: May 14, 2006
KitMaker: 10,954 posts
Armorama: 8,571 posts
Posted: Sunday, January 22, 2017 - 10:52 PM UTC
Klaus Eberl shares with us a large number of images of his M60A3 TTS.
Link to Item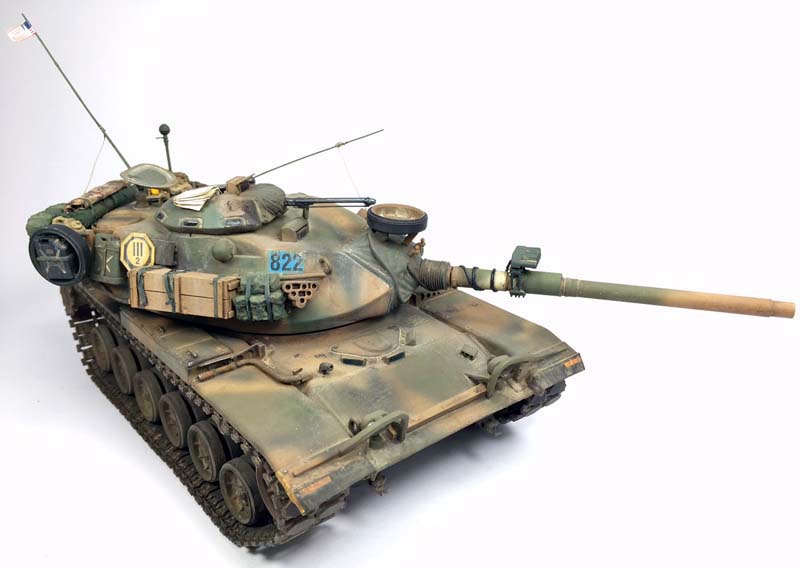
If you have comments or questions please post them here.
Thanks!
England - South East, United Kingdom
Joined: September 17, 2005
KitMaker: 56 posts
Armorama: 55 posts
Posted: Monday, January 23, 2017 - 02:20 AM UTC
Hi,
congratulations. Beautifully done, great weathering. Hope you will post more of your work.
All the best, Kip.
Bayern, Germany
Joined: October 14, 2008
KitMaker: 4,099 posts
Armorama: 4,067 posts
Posted: Monday, January 23, 2017 - 02:26 AM UTC
The old Esci kit still has some potential. I always loved building them in comparison with Tamiya or the Academy close.
ve seen these beauties in action during exercises over here. Believe me, these can be very intimitating when you encouter them on a Feldweg.

CAD Images mean nothing.
What does a rivet counter count on a cast or welded tank hull?
Vermont, United States
Joined: March 16, 2015
KitMaker: 67 posts
Armorama: 67 posts
Posted: Monday, January 23, 2017 - 02:40 AM UTC
Wow, very beautifully done! Thank you for sharing, Klaus!
Region de Valparaiso, Chile
Joined: July 28, 2005
KitMaker: 1,569 posts
Armorama: 1,385 posts
Posted: Monday, January 23, 2017 - 03:34 AM UTC
Thanks for your comments gents, I must say I really enjoyed building this one, even adding PE (not particulary keen on it, usually use only mesh).
I still like old Esci/Italeri/ Revel M60, even using AM parts keep cost down compared with the great ones from AFV Club (shipping to Chile it's not cheap). Only thing I don't like are link and lenght track.
Cheers

https://www.facebook.com/klauseberlmodellbau/

#041
Kobenhavn, Denmark
Joined: July 20, 2006
KitMaker: 10,069 posts
Armorama: 4,677 posts
Posted: Monday, January 23, 2017 - 04:04 PM UTC
Very nice build, Klaus. I really like the weathering on the running gear.
Thanks for Sharing

Campaign'oholic - 252+ campaigns completed
Region de Valparaiso, Chile
Joined: July 28, 2005
KitMaker: 1,569 posts
Armorama: 1,385 posts
Posted: Monday, January 23, 2017 - 05:45 PM UTC
https://www.facebook.com/klauseberlmodellbau/
Kentucky, United States
Joined: September 26, 2007
KitMaker: 162 posts
Armorama: 116 posts
Posted: Monday, January 23, 2017 - 06:01 PM UTC
Klaus, well done on the M60A3. Interesting how items are stow on the turret. Is this based on any tank or photo?

Al Qahirah, Egypt / لعربية
Joined: October 06, 2013
KitMaker: 244 posts
Armorama: 180 posts
Posted: Monday, January 23, 2017 - 06:54 PM UTC
That is one very nice model Klaus, I really am impressed especially with the weathering on the bottom and sides of the chassis. may I ask how do you create that rough grainy surface at the bottom and sides?
I'd rather regret doing some things in my life than to regret having done nothing with my life...
Region de Valparaiso, Chile
Joined: July 28, 2005
KitMaker: 1,569 posts
Armorama: 1,385 posts
Posted: Monday, January 23, 2017 - 07:43 PM UTC
Thanks for your comments guys
#Duane, not ased on any particular pics, just look a lot and tried to be logical in how I placed the stowage
#Hussein, I used AK interactive products mixed with plaster to achice dried mud.
Cheers
https://www.facebook.com/klauseberlmodellbau/
Manitoba, Canada
Joined: January 03, 2016
KitMaker: 3,791 posts
Armorama: 3,778 posts
Posted: Monday, January 23, 2017 - 09:26 PM UTC
Nicely Done! I particularly like the wooden crate on the side of the turret -it really stands out! Great weathering! And any tank would be intimidating if encountered on a feldweg. Even a Weasel commands respect when you're afoot..
Kentucky, United States
Joined: September 26, 2007
KitMaker: 162 posts
Armorama: 116 posts
Posted: Monday, January 23, 2017 - 10:17 PM UTC
Klaus, and it sounds like you had a good time building, painting and weathering this tank. As all modeling should be.

Region de Valparaiso, Chile
Joined: July 28, 2005
KitMaker: 1,569 posts
Armorama: 1,385 posts
Posted: Tuesday, January 24, 2017 - 03:05 AM UTC
Thanks guys, really appreciate your comments, I enjoyed this build so much That I'm working now on some figures and a small diorama to place it.
Cheers
https://www.facebook.com/klauseberlmodellbau/
Joined: September 05, 2011
KitMaker: 37 posts
Armorama: 30 posts
Posted: Thursday, January 26, 2017 - 08:07 AM UTC
Your tracks are very well done. They look very realistic - almost perfect. The dust effect overall is also a highlight. I think you over did the chipping, though. These tanks were painted on a regular basis. The spare tracks strapped to the bussel rack should be swapped with the backpacks on the sides of the turret, too, as the crew members regular climbed up there, and stepping on someone's backpack is frowned upon. You should also add a bulb to the end of the antenna, as they wouldn't be used w/o them (saftey hazard). Excellent build, though - a masterpiece. These were the vehicles in my cav platoon while in Germany in the 80s.
New Jersey, United States
Joined: July 25, 2006
KitMaker: 1,139 posts
Armorama: 946 posts
Posted: Thursday, January 26, 2017 - 05:12 PM UTC
Nicely done, just a note from a dino rider. Your Hoffman device cable enters the turret through the gunners telescope port. A physical impossibility without removing the 105D gunners telescope. It was usually routed through the right side opening which was the coax MG port. If this tank is equipped with TTS the seachlight mounts would not be mounted. Passive gunners sights almost always had a searchlight.
Over all you have done a great job representing one of the tanks I crewed. I could not find fault in your workmanship, just some minor quirks that a tanker would notice.
Tom
"ALLONS" 11TH ACR BLACKHORSE
"Death Before Dismount"
19K40/ Dino Rider 19F10
Region de Valparaiso, Chile
Joined: July 28, 2005
KitMaker: 1,569 posts
Armorama: 1,385 posts
Posted: Thursday, January 26, 2017 - 11:15 PM UTC
Quoted Text
Your tracks are very well done. They look very realistic - almost perfect. The dust effect overall is also a highlight. I think you over did the chipping, though. These tanks were painted on a regular basis. The spare tracks strapped to the bussel rack should be swapped with the backpacks on the sides of the turret, too, as the crew members regular climbed up there, and stepping on someone's backpack is frowned upon. You should also add a bulb to the end of the antenna, as they wouldn't be used w/o them (saftey hazard). Excellent build, though - a masterpiece. These were the vehicles in my cav platoon while in Germany in the 80s.
Thanks for your comments and valuable input, will be considered for sure in my next one (AFV Club)
cheers
https://www.facebook.com/klauseberlmodellbau/
Region de Valparaiso, Chile
Joined: July 28, 2005
KitMaker: 1,569 posts
Armorama: 1,385 posts
Posted: Thursday, January 26, 2017 - 11:19 PM UTC
Quoted Text
Nicely done, just a note from a dino rider. Your Hoffman device cable enters the turret through the gunners telescope port. A physical impossibility without removing the 105D gunners telescope. It was usually routed through the right side opening which was the coax MG port. If this tank is equipped with TTS the seachlight mounts would not be mounted. Passive gunners sights almost always had a searchlight.
Over all you have done a great job representing one of the tanks I crewed. I could not find fault in your workmanship, just some minor quirks that a tanker would notice.
Tom
Thanks buddy, always good to get first hand info from peaople that actually crew the tanks. About the Hoffman device cable, it´s alredy fixed
serchlight mount will be removed from nex build.
Cheers
https://www.facebook.com/klauseberlmodellbau/
New Jersey, United States
Joined: July 25, 2006
KitMaker: 1,139 posts
Armorama: 946 posts
Posted: Friday, January 27, 2017 - 12:36 AM UTC

I was the tank commander of this tank. It was an M60A3 TTS in Fort Drum New York early 90s.
Tom
"ALLONS" 11TH ACR BLACKHORSE
"Death Before Dismount"
19K40/ Dino Rider 19F10
Region de Valparaiso, Chile
Joined: July 28, 2005
KitMaker: 1,569 posts
Armorama: 1,385 posts
Posted: Friday, January 27, 2017 - 01:48 AM UTC
Thomas great picture, good reference for future builds, guess I got the paint job and weathering right, I was afraid that was a bit too dull, but I got it ok.
Cheers
https://www.facebook.com/klauseberlmodellbau/
New Jersey, United States
Joined: July 25, 2006
KitMaker: 1,139 posts
Armorama: 946 posts
Posted: Friday, January 27, 2017 - 11:18 AM UTC

You did indeed Klaus. Although it looks like you did your kit in MERDC 4 color. My tank is in the 3 color NATO cammo applied at the factory. She got so dirty its hard to tell. This was a gunnery camp and cross country was at a minimum. It was cold and wet. All the dirt above the the sponsons was tracked in on the crews boots. You can also see where the brass from the 50cal
goes.
Tom
"ALLONS" 11TH ACR BLACKHORSE
"Death Before Dismount"
19K40/ Dino Rider 19F10
Region de Valparaiso, Chile
Joined: July 28, 2005
KitMaker: 1,569 posts
Armorama: 1,385 posts
Posted: Friday, January 27, 2017 - 10:58 PM UTC
I noticed your tank was painted in 3 tone NATO, but the amoubt of dirt its amazing, your pics are a great reference for us to try to replicate in our builds.Thanks for sharing both the pics and your experience.
Cheers
https://www.facebook.com/klauseberlmodellbau/


