

Greg, judging by the correct proportions of the cab I'd say this has to be the MENG Hilux. The MIG one had rear doors that were too narrow.
Regards,
Eric
Dioramas
Do you love dioramas & vignettes? We sure do.
Do you love dioramas & vignettes? We sure do.
Hosted by Darren Baker, Mario Matijasic
Buffalo and a Backhoe
WXerock

#450

Joined: July 19, 2015
KitMaker: 672 posts
Armorama: 668 posts

Posted: Monday, March 20, 2017 - 04:43 AM UTC

Stickframe
#362
Joined: December 01, 2013
KitMaker: 1,661 posts
Armorama: 1,202 posts

Posted: Monday, March 20, 2017 - 07:43 AM UTC
Hi guys - thanks for having a look -
Hi Jerry, yes, after the Buffalo - this little guy was a breeze! and fun "weathering" - I mixed and matched several Vallejo colors to get a look that seems convincing - thanks for checking it out - I'm considering doing another car or truck...? Tbd as of now...thanks for taking the time -
Hi Alex - thanks - glad you like it, and more so that you noticed those wires - good eye! I decided as long as I put the time into the slat armor, it would be a real failure to skip the wiring - thanks for taking the time to drop by -
Tim - crap!! You're right! I'll dig the upper lenses out - - and try for something else more in keeping with the situation of the ill fated truck - thanks for keeping me honest lol
Hi Greg and Eric - yes, it's the Meng version - it's a nice kit and goes together as advertised - I'd build another, maybe operational tho...
Ok - time to dig out those lenses -
Cheers
Nick
Stickframe
#362
Joined: December 01, 2013
KitMaker: 1,661 posts
Armorama: 1,202 posts
Posted: Monday, March 27, 2017 - 01:52 AM UTC
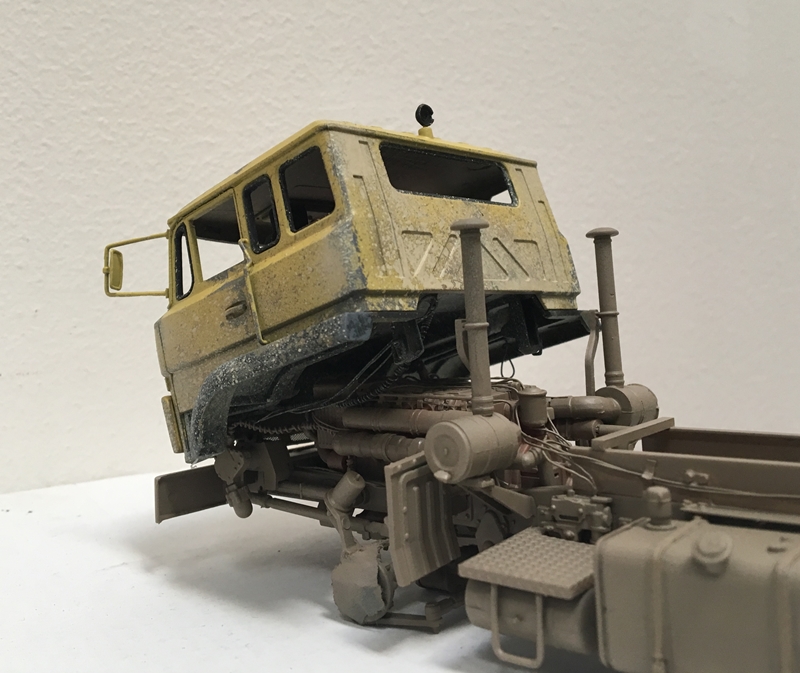
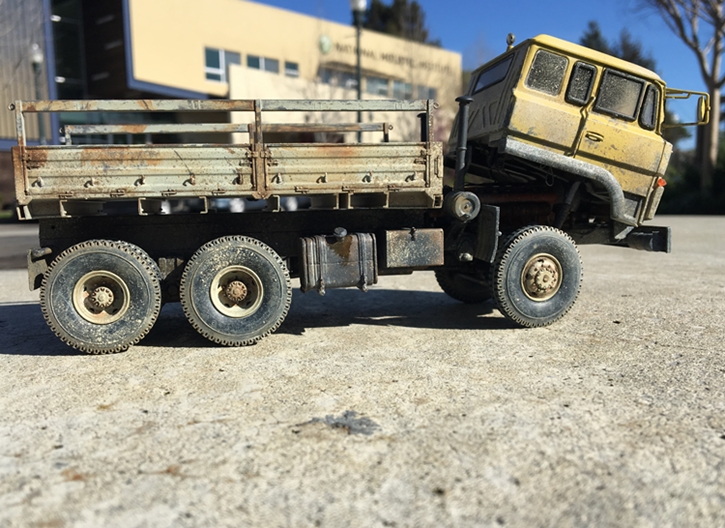
Hi model builders, this is still moving along as a loosely defined project - but, it is getting closer.
Up today, I want a truck sitting along the roadside - so, here you have it. A one time, tractor (an old(er) that's been sitting around here for a long time). Trumpeter kit, and the bed from something newer. The older kit is not great - very chunky sprues/connections, lots of seams, weird plastic and so on....anyway, it seems to be moving along.
I'm not sure yet how much "weather" or decrepitude this truck will get...I'll probably leave the cab tilted forward, so you can see the engine -maybe a broken down truck? - don't know yet...you'll see mixing and matching.
You'll see some evergreen glued onto the rims, as its not there in the kit part - so, the fairly nice tires dont seat well, so, i added my own bead lock and they work fine...
OK - please have a look:
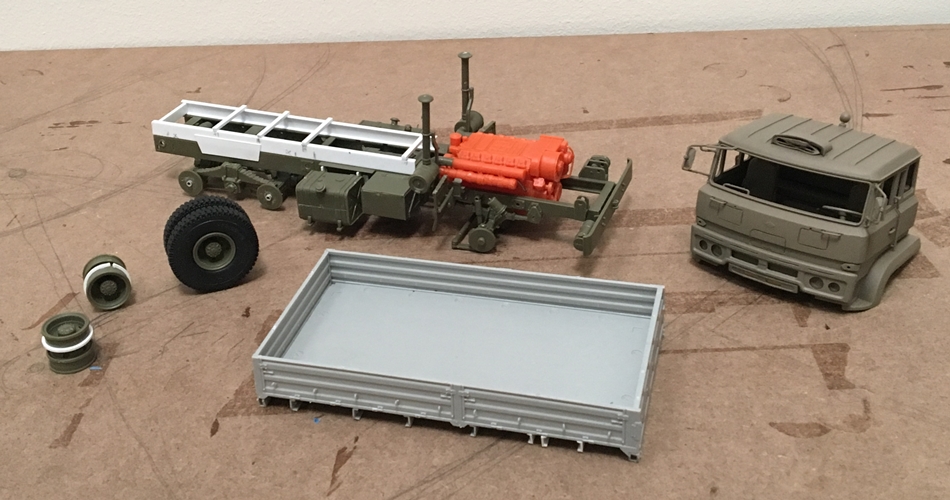
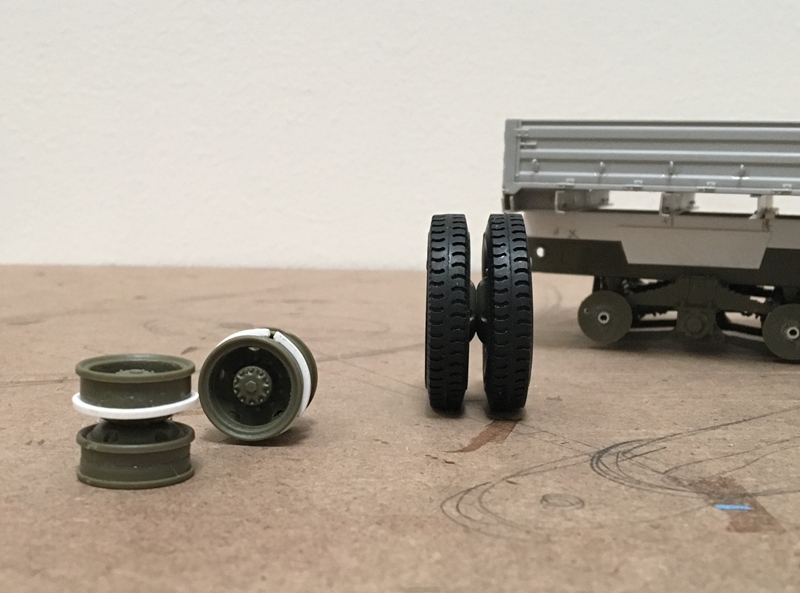
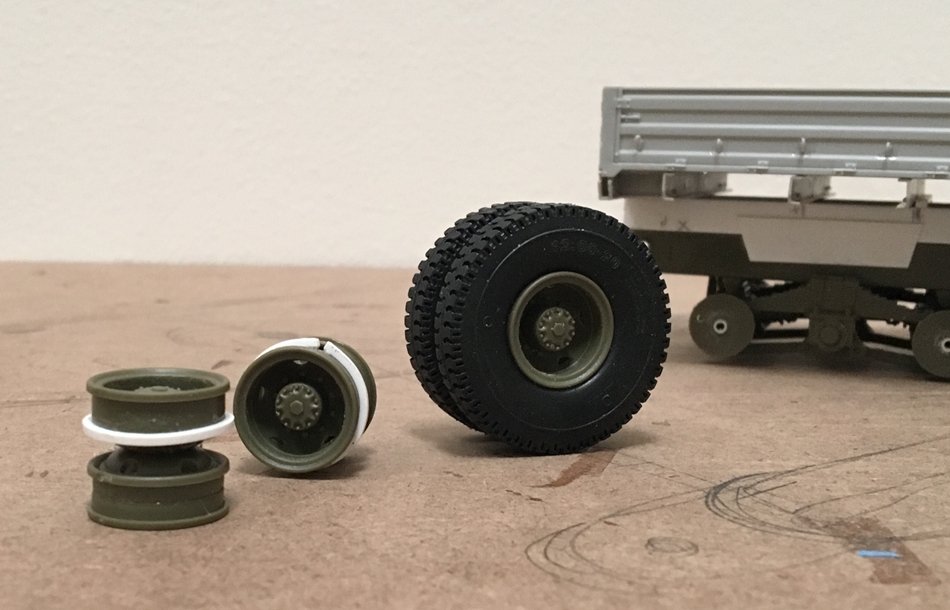
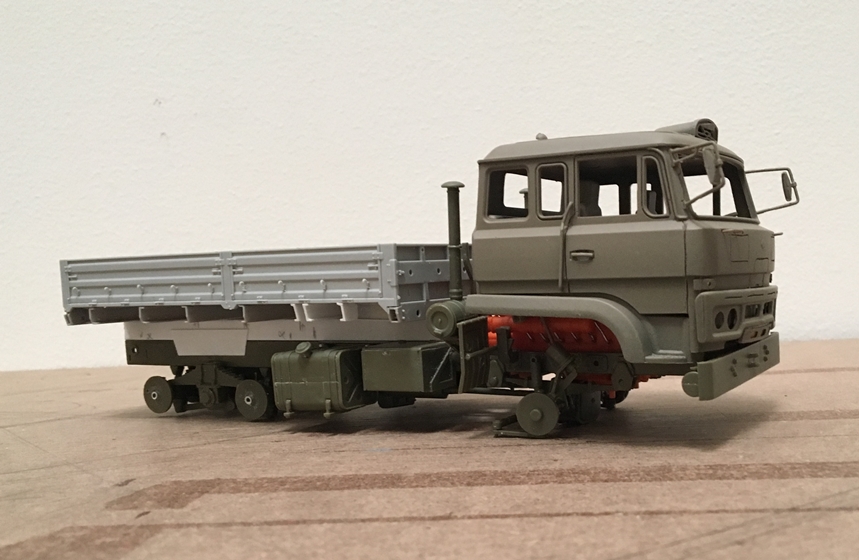
So, not the best, but not a mess either - next up, a few details, prime and paint! then - how much weather?! - we'll see -
thanks for having a look
cheers
Nick
Up today, I want a truck sitting along the roadside - so, here you have it. A one time, tractor (an old(er) that's been sitting around here for a long time). Trumpeter kit, and the bed from something newer. The older kit is not great - very chunky sprues/connections, lots of seams, weird plastic and so on....anyway, it seems to be moving along.
I'm not sure yet how much "weather" or decrepitude this truck will get...I'll probably leave the cab tilted forward, so you can see the engine -maybe a broken down truck? - don't know yet...you'll see mixing and matching.
You'll see some evergreen glued onto the rims, as its not there in the kit part - so, the fairly nice tires dont seat well, so, i added my own bead lock and they work fine...
OK - please have a look:
So, not the best, but not a mess either - next up, a few details, prime and paint! then - how much weather?! - we'll see -
thanks for having a look
cheers
Nick

165thspc

#521
Joined: April 13, 2011
KitMaker: 9,465 posts
Armorama: 8,695 posts
Posted: Monday, March 27, 2017 - 02:37 AM UTC
Not a mess at all - it's good looking. i like it!

Stickframe
#362
Joined: December 01, 2013
KitMaker: 1,661 posts
Armorama: 1,202 posts
Posted: Wednesday, March 29, 2017 - 04:12 AM UTC
Hi Mike good! you are the "truck man"! your seal of approval is a good one to have!
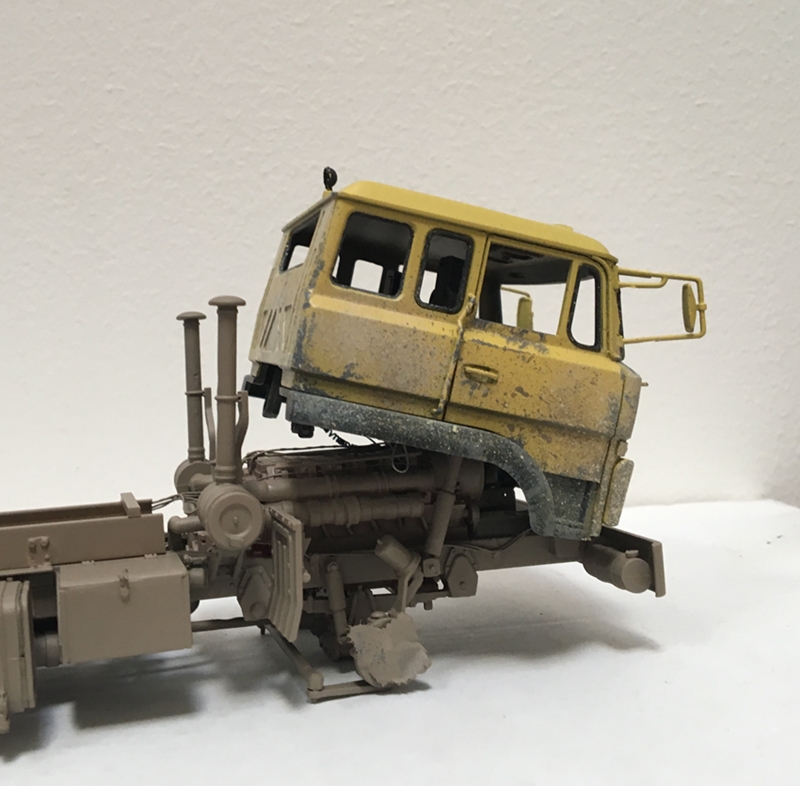
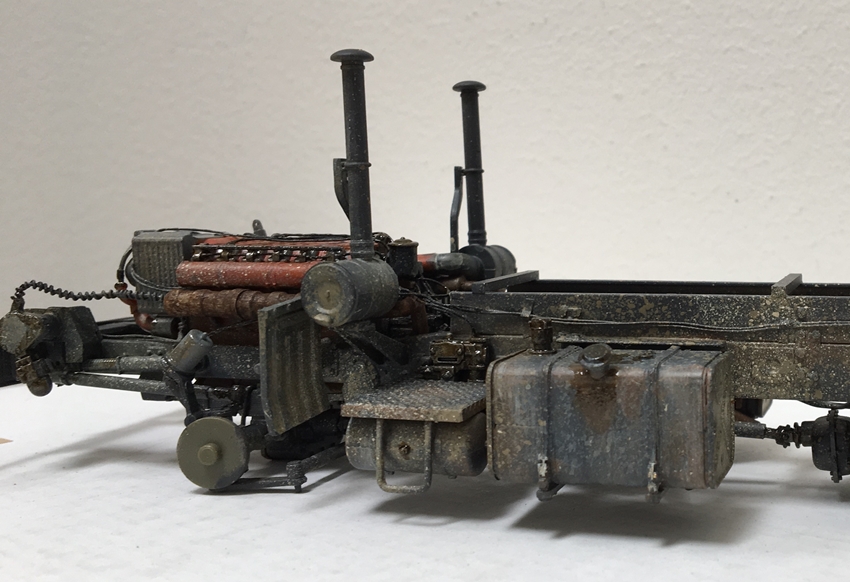
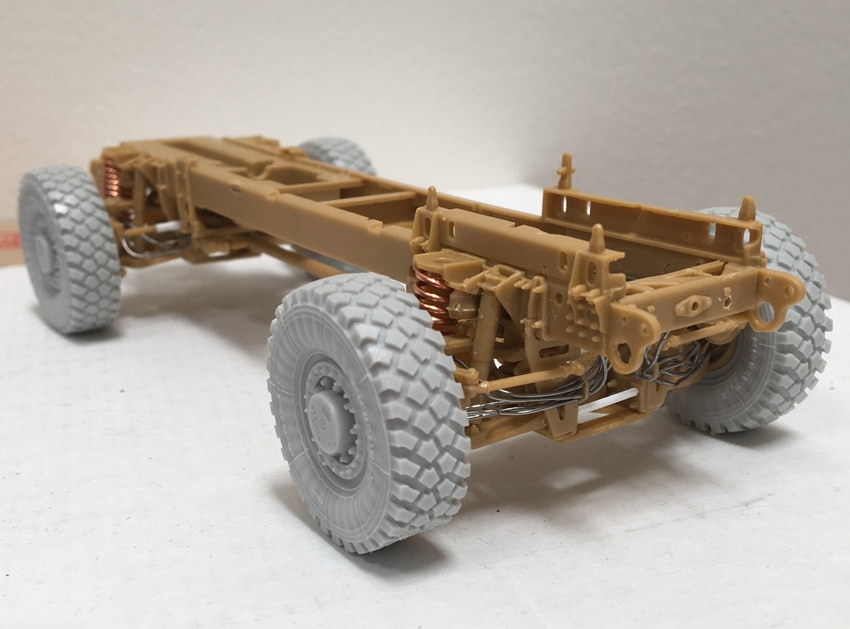
I'm sure, or at least hope you all guessed I would not leave the truck's rolling chassis as is - it, and other parts got some attention:
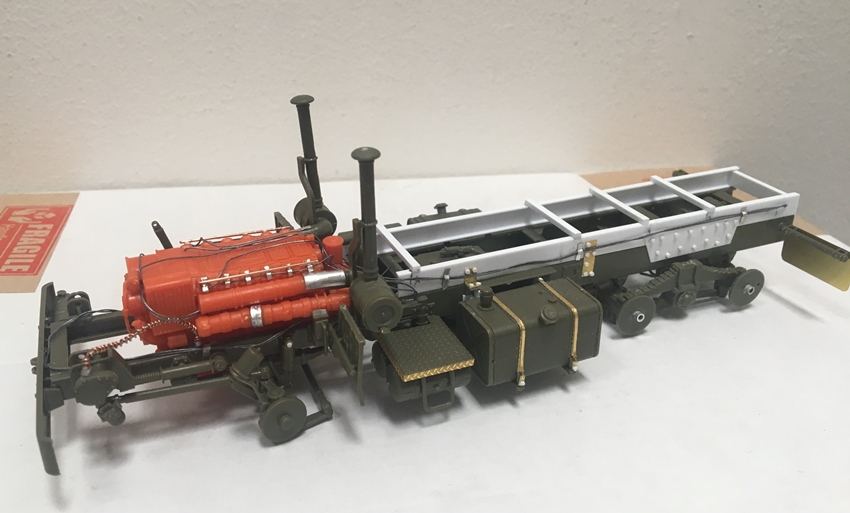
Above, you'll see some of the bare necessities - some bolts, some wires, some plates and best of all, not a single new part! all stuff from the junk and raw materials pile! Even added a very indicative fuel injection rack - While it could have received lots more detail....sorry...not this time! it will get grime and dirt, and illustrate the intent!
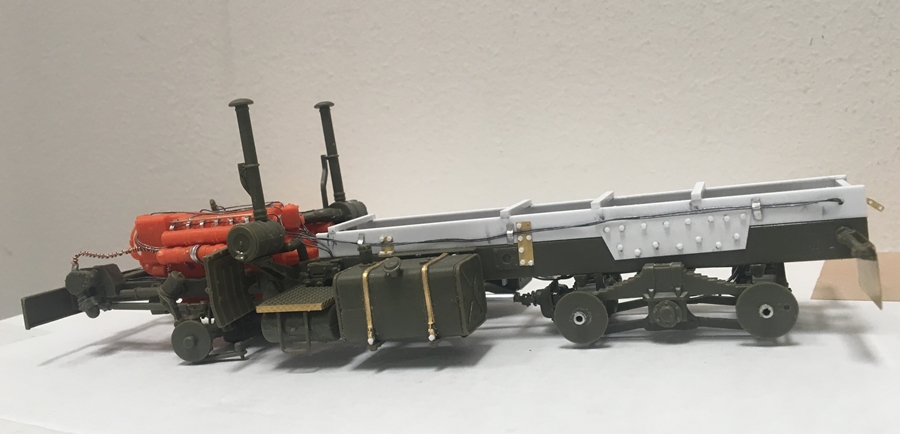
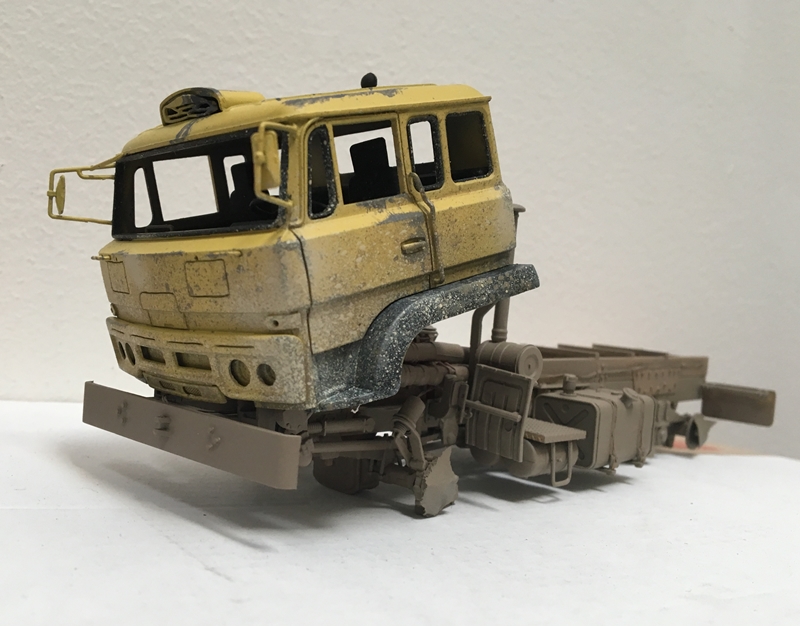
And below - - the idea is this truck is broken down and not destroyed - and, when running, used for hard service. I'm adding weather to the cab - the chassis is only primed. Getting the grime and wear to look convincing on the cab has been fun. Its almost, but not quite done. Next up the chassis -I'll mask off the engine, maybe tranny/transfer case, then paint it all - either black or dark grey - then, hit the engine - take a look:
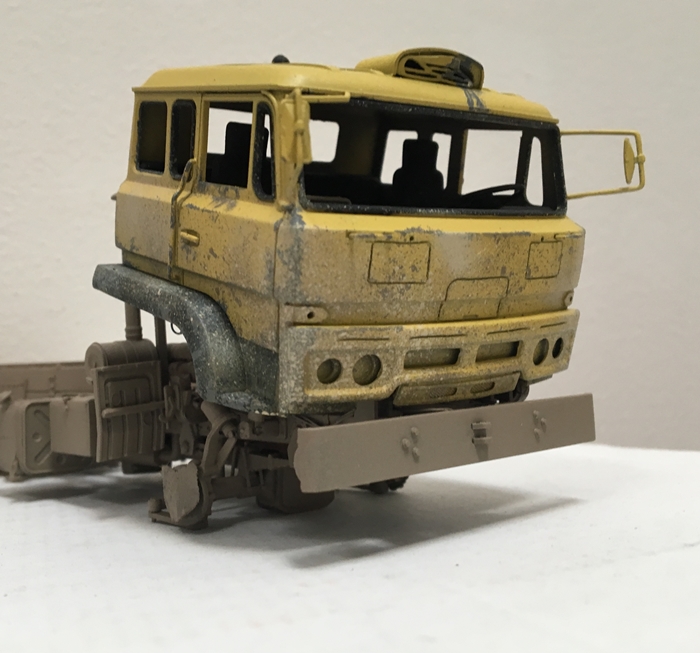
And there's where it sits today - tonight, more weather, window, and lights etc -
for the dio...I'm thinking country lane, toyota in in a ditch, the work truck broken down nearby and a patrol rolling up - cautious about the exact nature of this roadside spectacle.....I'm thinking deep, narrow drainage ditch one side, low wall on the other, surrounded by farmers fields...with the dirt road bisecting....we'll see - for now, still fooling around with the trucks
OK - thanks for having a look -
cheers
Nick
I'm sure, or at least hope you all guessed I would not leave the truck's rolling chassis as is - it, and other parts got some attention:
Above, you'll see some of the bare necessities - some bolts, some wires, some plates and best of all, not a single new part! all stuff from the junk and raw materials pile! Even added a very indicative fuel injection rack - While it could have received lots more detail....sorry...not this time! it will get grime and dirt, and illustrate the intent!
And below - - the idea is this truck is broken down and not destroyed - and, when running, used for hard service. I'm adding weather to the cab - the chassis is only primed. Getting the grime and wear to look convincing on the cab has been fun. Its almost, but not quite done. Next up the chassis -I'll mask off the engine, maybe tranny/transfer case, then paint it all - either black or dark grey - then, hit the engine - take a look:
And there's where it sits today - tonight, more weather, window, and lights etc -
for the dio...I'm thinking country lane, toyota in in a ditch, the work truck broken down nearby and a patrol rolling up - cautious about the exact nature of this roadside spectacle.....I'm thinking deep, narrow drainage ditch one side, low wall on the other, surrounded by farmers fields...with the dirt road bisecting....we'll see - for now, still fooling around with the trucks
OK - thanks for having a look -
cheers
Nick
jrutman
Joined: April 10, 2011
KitMaker: 7,941 posts
Armorama: 7,934 posts
Posted: Wednesday, March 29, 2017 - 06:48 PM UTC
Well Sir,
The time has come !! I hereby deem you the "Master of Trucks". This title shall henceforth allow the bestowed to obtain free coffee for the nominal price of $.50 per cup.
Really nice work as usual and this scenerio reminds me of dozens of similar scenes I saw in Iraq.
J
The time has come !! I hereby deem you the "Master of Trucks". This title shall henceforth allow the bestowed to obtain free coffee for the nominal price of $.50 per cup.
Really nice work as usual and this scenerio reminds me of dozens of similar scenes I saw in Iraq.
J
165thspc
#521
Joined: April 13, 2011
KitMaker: 9,465 posts
Armorama: 8,695 posts
Posted: Thursday, March 30, 2017 - 12:54 PM UTC
Really like all that extra detailing you added to the chassis Mr. Master. That's right up my alley!
Buy ya a cup a coffee?
Buy ya a cup a coffee?

Dioramartin

Joined: May 04, 2016
KitMaker: 1,476 posts
Armorama: 1,463 posts
Posted: Thursday, March 30, 2017 - 04:06 PM UTC
Looks like another masterpiece of dereliction in the making Nick er oh Master of Trucks. Sorry I cant freight you the dio base Im slaving over but it wont roll up spooky though you describe it almost exactly. btw if the pickups melted orange indicators are still a problem I had an idea - semi-chewed gummybear 

Stickframe
#362
Joined: December 01, 2013
KitMaker: 1,661 posts
Armorama: 1,202 posts
Posted: Tuesday, April 04, 2017 - 10:37 AM UTC
Guys - - Thanks for having a look - and, thanks!! for the nice words - they mean a lot coming from you guys! except,....  I better not screw this build up! the pressure is on.....lol -
OK - here's an update - the big truck is now done - I've included a couple of progress pics followed by some of the results - please have a look:
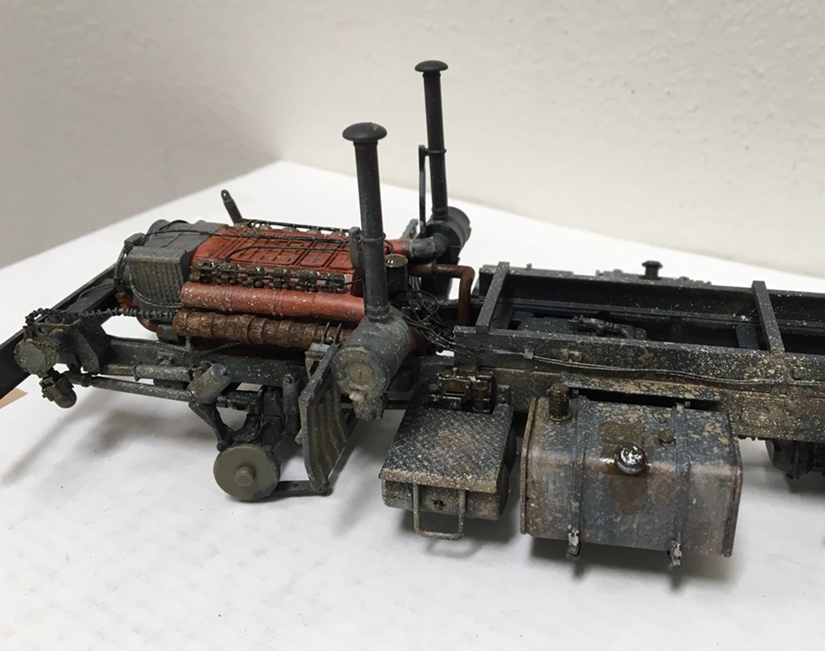
Above, you can see the guts of this truck - I've got to say, I'm pleased to see nice results using methods that don't cost a fortune (various details) and are not that hard to do - specifically in comparison to everything about the Buffalo - lol - and, what it looks like as a whole:
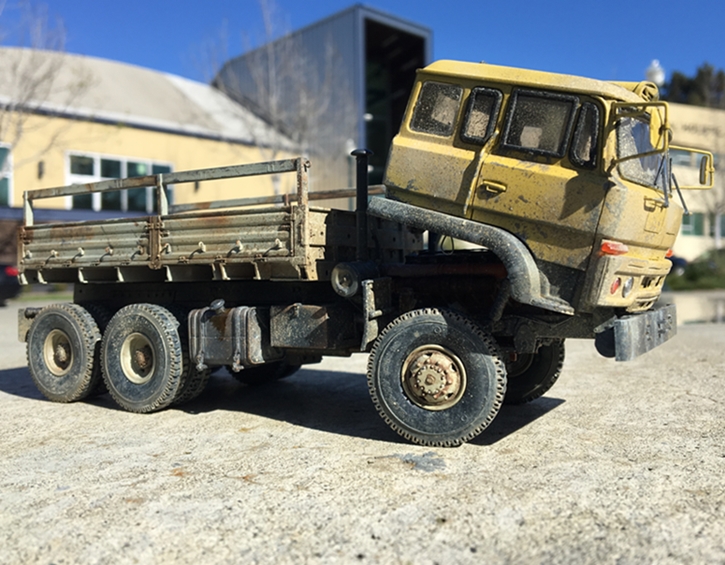
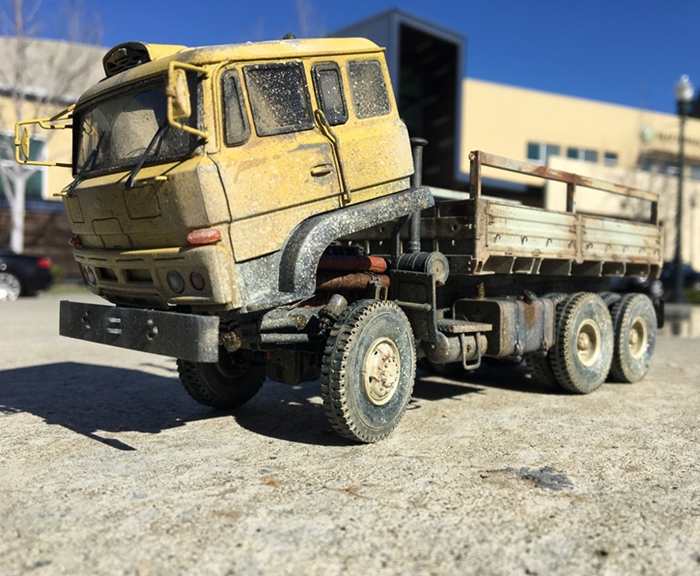
And there you have it! a broken down truck that works hard when it's running! For something that started in a bit of non-serious effort to use a kit that had been sitting around for a while, I've got to say - I like the results! hope you guys do to!
Next - something of the opposite of above - a kit I've built a few of - and, unlike above not easy or all that pleasant to build....no parts fit well, there's lots of flash, on everything....it's complicated....and it's relatively new....first, a few pics from and on the sprue:
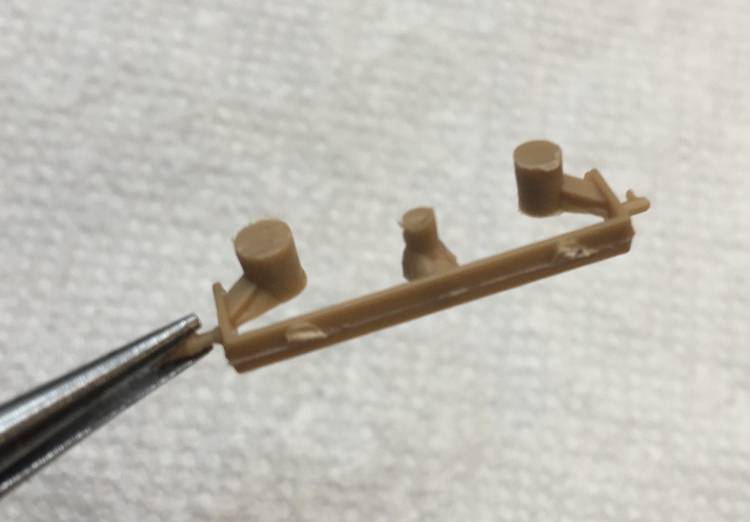
Above....you'll see a typically sloppy part - it's about an inch long...take a look at those blobs of extra plastic - and how thick they are! unhappily, this is common...
Next - a bit of flash anyone?:
these parts are tiny - really just little plastic nubs - but, each require lots of clean up!!
And what are these used for??? My favorite, the Panda MATV!

While a big time PITA to build, I really like the results when done -and now, having built a few, I know exactly where to deviate from the instructions regarding assembly steps - and go in aware, the build will be slow, slow, slow - as a result of all of the clean up....and sometimes poor fit....
OK - that's all folks! thanks for having a look -
Cheers,
Nick
I better not screw this build up! the pressure is on.....lol - OK - here's an update - the big truck is now done - I've included a couple of progress pics followed by some of the results - please have a look:
Above, you can see the guts of this truck - I've got to say, I'm pleased to see nice results using methods that don't cost a fortune (various details) and are not that hard to do - specifically in comparison to everything about the Buffalo - lol - and, what it looks like as a whole:
And there you have it! a broken down truck that works hard when it's running! For something that started in a bit of non-serious effort to use a kit that had been sitting around for a while, I've got to say - I like the results! hope you guys do to!
Next - something of the opposite of above - a kit I've built a few of - and, unlike above not easy or all that pleasant to build....no parts fit well, there's lots of flash, on everything....it's complicated....and it's relatively new....first, a few pics from and on the sprue:
Above....you'll see a typically sloppy part - it's about an inch long...take a look at those blobs of extra plastic - and how thick they are! unhappily, this is common...
Next - a bit of flash anyone?:
these parts are tiny - really just little plastic nubs - but, each require lots of clean up!!
And what are these used for??? My favorite, the Panda MATV!
While a big time PITA to build, I really like the results when done -and now, having built a few, I know exactly where to deviate from the instructions regarding assembly steps - and go in aware, the build will be slow, slow, slow - as a result of all of the clean up....and sometimes poor fit....
OK - that's all folks! thanks for having a look -
Cheers,
Nick
165thspc
#521
Joined: April 13, 2011
KitMaker: 9,465 posts
Armorama: 8,695 posts
Posted: Tuesday, April 04, 2017 - 02:16 PM UTC
Nick, your morning sun light photos of the finished truck are outstanding. Really blew me away! Also the rusty floor treatment of the loadbox is exceptional! Kudos!
As to your remarks regarding the M-ATV thanks for giving me something to look forward to. (I have to admit I sort of knew in advance what I was getting myself into.)
Mike
As to your remarks regarding the M-ATV thanks for giving me something to look forward to. (I have to admit I sort of knew in advance what I was getting myself into.)
Mike
Dioramartin
Joined: May 04, 2016
KitMaker: 1,476 posts
Armorama: 1,463 posts
Posted: Tuesday, April 04, 2017 - 05:48 PM UTC
Relaaaax Nick, its really OK you just toss another gem in our general direction, we dont mind at all. Beautiful job on the truck, definitely looks like it needs a total 100K mile service...or scrapping.
As for the M-ATV, maybe we need to start a new forum: Masochist Modelling or Masomods for short and I guess blowing up stuff classes as Sadomods. Bon chance anyway!
As for the M-ATV, maybe we need to start a new forum: Masochist Modelling or Masomods for short and I guess blowing up stuff classes as Sadomods. Bon chance anyway!
jrutman
Joined: April 10, 2011
KitMaker: 7,941 posts
Armorama: 7,934 posts
Posted: Tuesday, April 04, 2017 - 06:25 PM UTC
Master of Trucks proving again he is well.....the master of trucks.
J
J
Stickframe
#362
Joined: December 01, 2013
KitMaker: 1,661 posts
Armorama: 1,202 posts
Posted: Tuesday, April 11, 2017 - 12:46 AM UTC
Hi guys - -thanks for taking a few minutes and leaving your comments - they're appreciated! Not sure if dealing with complicated builds is just a requisite for the honors you guys are throwing my way! thanks tho! Tim, as you will see below....I'm not making this build easier! Nothing like a complicated truck or two to build!
Unless, of course you decide to make it more complicated - in this case, well, I'm doing my part to make it a bit and a lot more complicated -
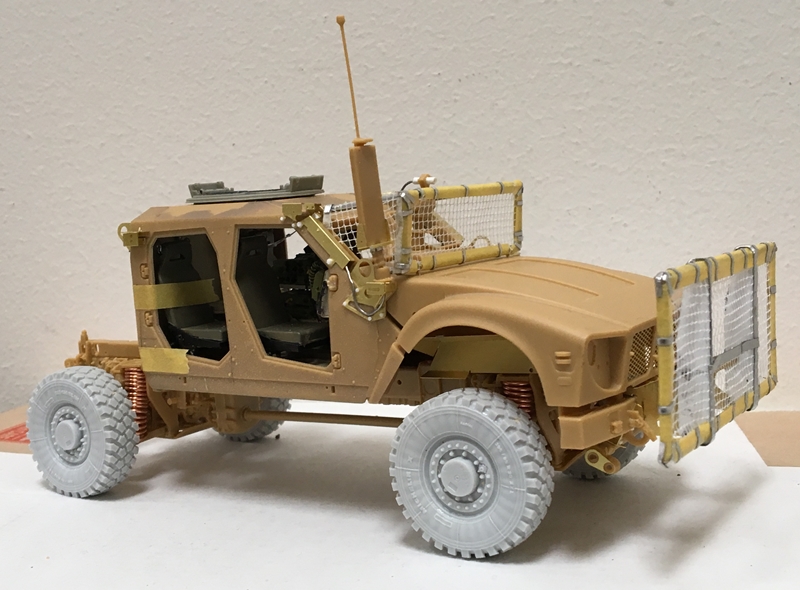
On the bit more complicated side, I decided to add some interior details to the cabin - but, I've lost my MATV book with the nice pics...so, some scouring on line and having built a few of these, memory to the rescue - and, I didn't want to buy and wait for some of the nice resin parts - like the Blast Models comms set - - So, relying more on memory than facts, I made my own - and did some other mods - please take a look:
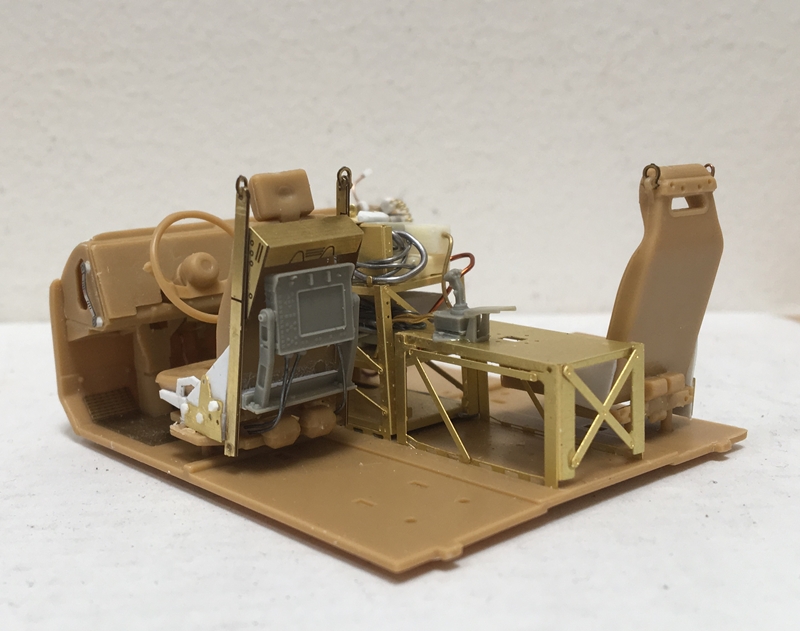
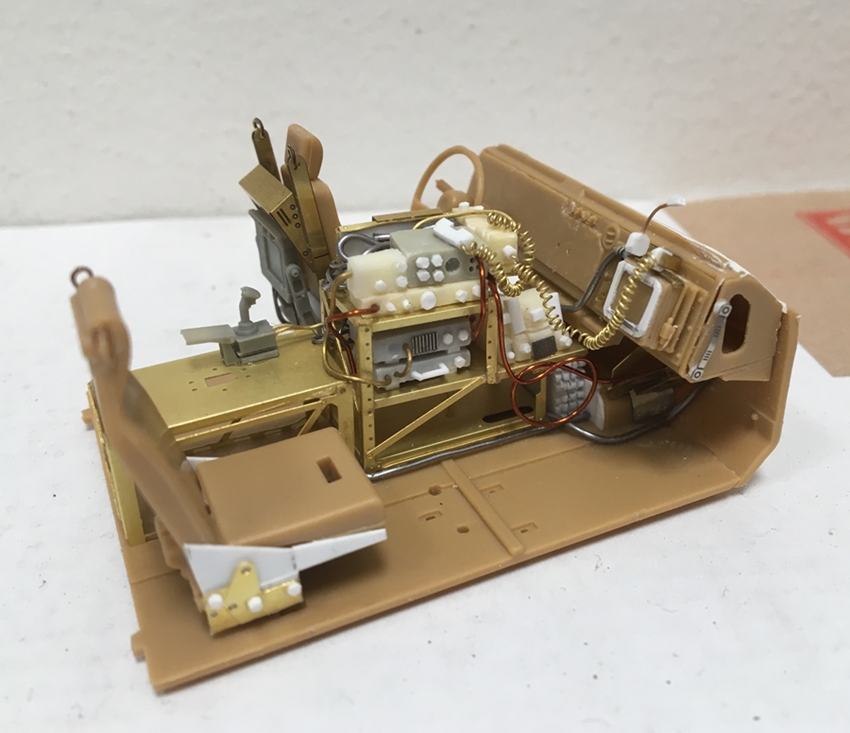
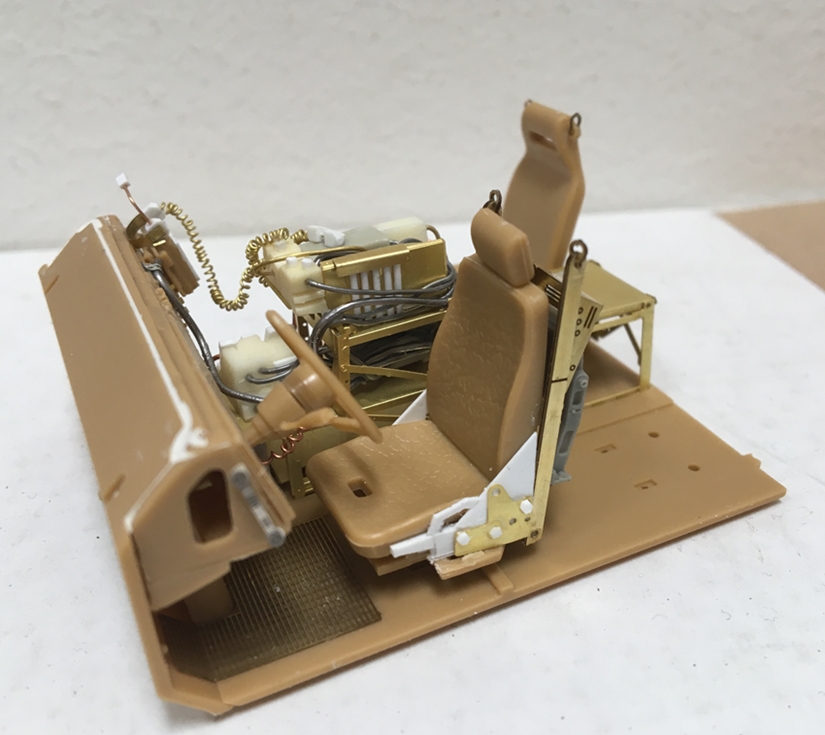
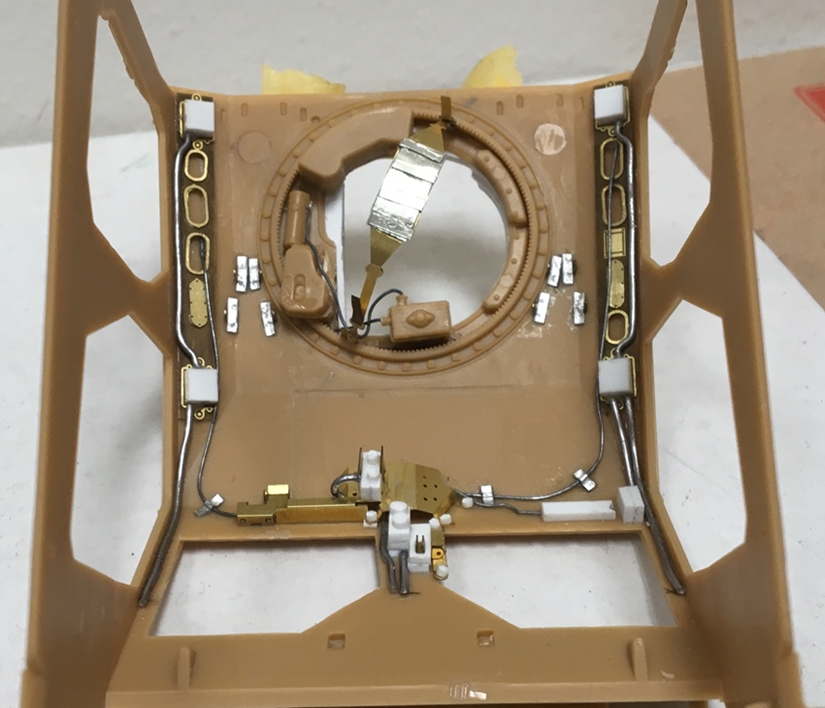
Some of the brass is from the kit, some from the Eduard interior kit, some from the junk box...and with some paint:
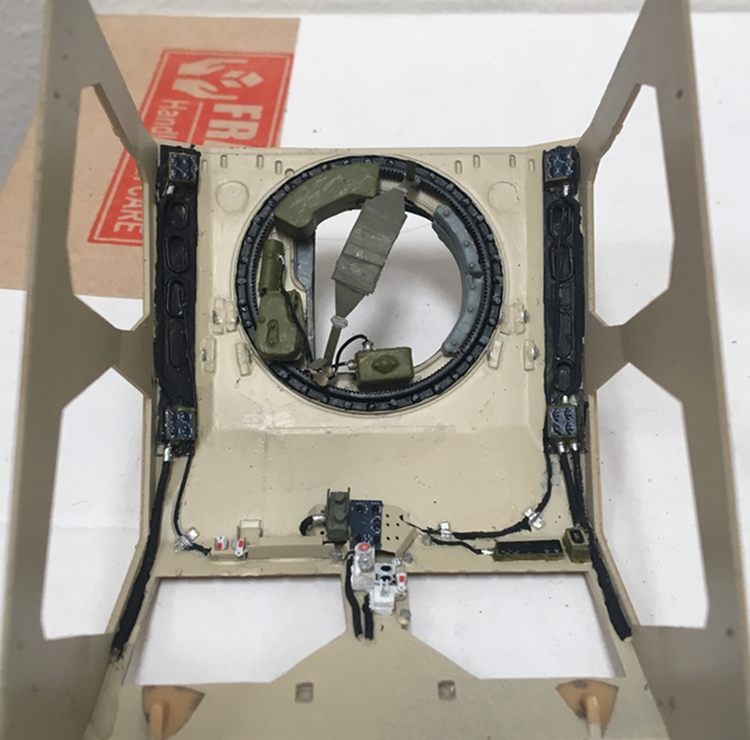
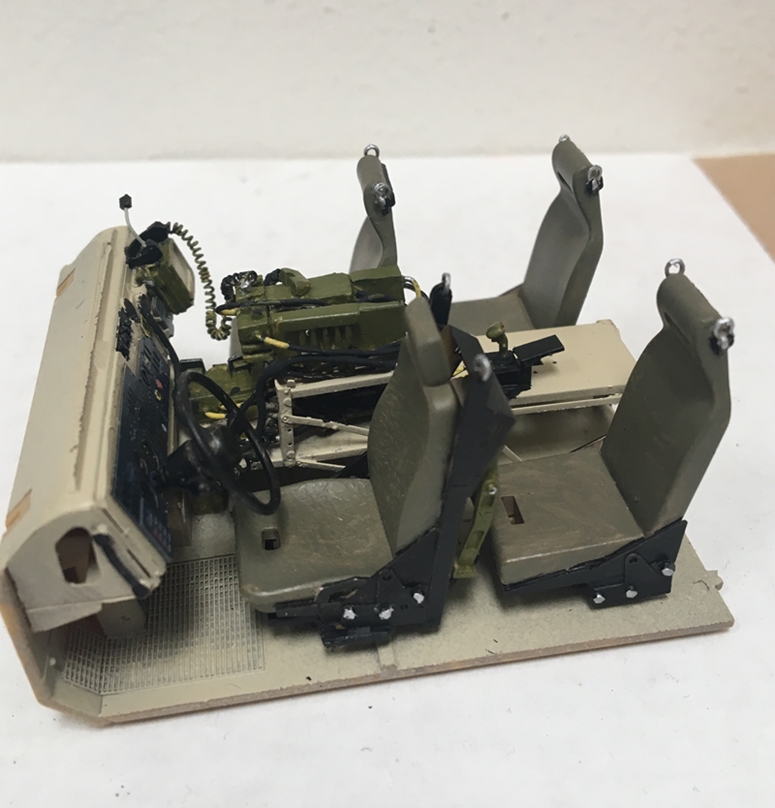
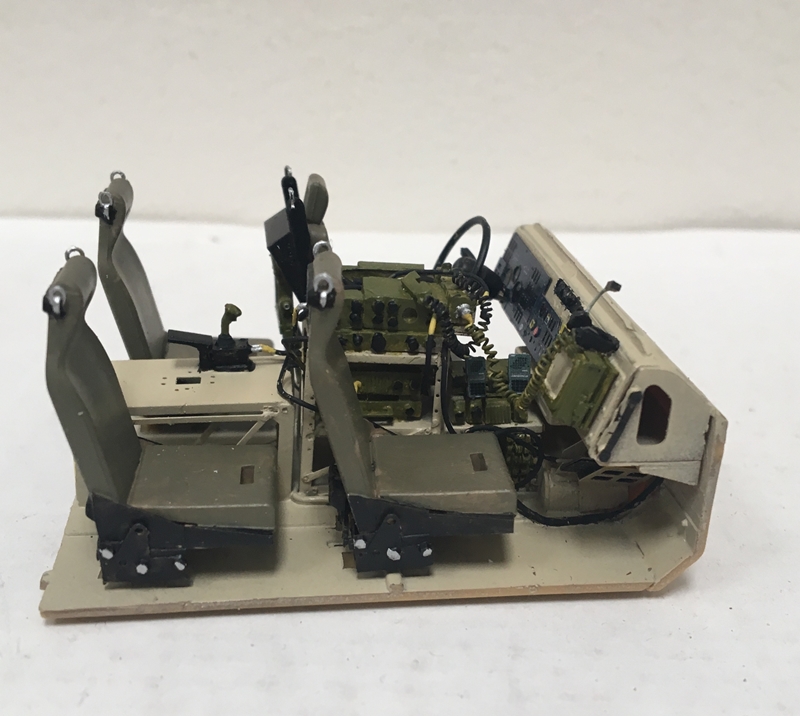
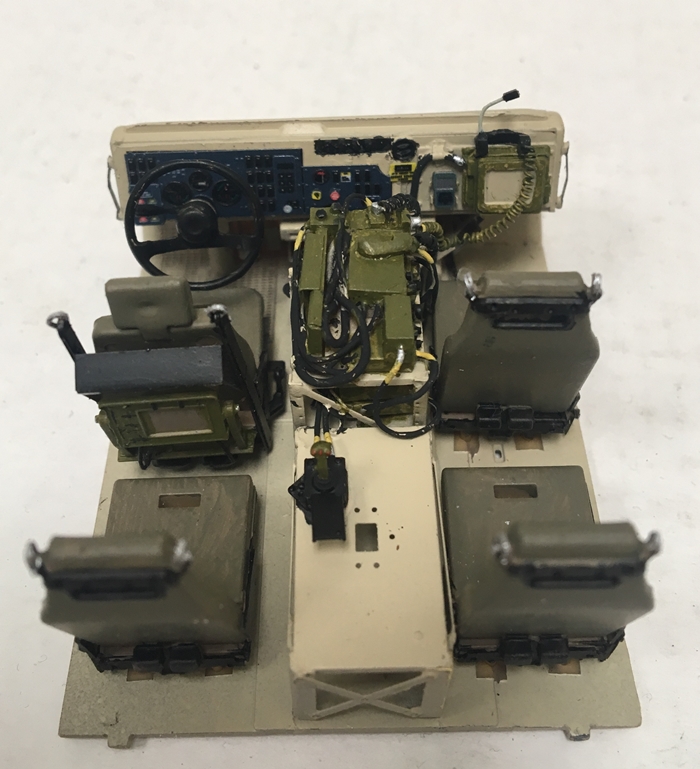
So, not exactly my finest work....some of the paint needs some help! - but, not bad either. The nice color detail is from the Eduard set. On the good side, as this will be very hard to see, and my various blunders with my el-chapo coms set won't be too obvious, but, neither will the nice eduard parts...who knows though - I will of course build this with a few of the doors open!
Now, the complicated part - don't be fooled, what you are about to see was a really big headache to build!! and, I'm not even a third of the way through with it!
The MATV does not have bar/slat armor, and instead uses a steel/fabric mesh - while is appears simple enough, it is actually somewhat complex and ingenious. So, as the Buffalo received the monstrously tedious bar armor....voila:
"oh, how hard could that be?"...hard - both to figure out how to make work, and then to do it...
Lots of head scratching and rooting around in the junk box for the materials to bring this together....
And there you have a fair amount of work....I remain optimistic that it will look good when done - for now, the screen isn't glued to the truck - just dry fit - I might glue it tho - - I think I can squeeze the window in even if i paint the whole unit (door/screen) as one piece. I didn't think I could - but, seeing it now, maybe, which would make this easier...again, I'm guessing, some of you are wondering - "how hard can this be?"...my answer, it's not easy!! 
Ok - take care, and thanks for having a look!
Cheers
Nick
Unless, of course you decide to make it more complicated - in this case, well, I'm doing my part to make it a bit and a lot more complicated -
On the bit more complicated side, I decided to add some interior details to the cabin - but, I've lost my MATV book with the nice pics...so, some scouring on line and having built a few of these, memory to the rescue - and, I didn't want to buy and wait for some of the nice resin parts - like the Blast Models comms set - - So, relying more on memory than facts, I made my own - and did some other mods - please take a look:
Some of the brass is from the kit, some from the Eduard interior kit, some from the junk box...and with some paint:
So, not exactly my finest work....some of the paint needs some help! - but, not bad either. The nice color detail is from the Eduard set. On the good side, as this will be very hard to see, and my various blunders with my el-chapo coms set won't be too obvious, but, neither will the nice eduard parts...who knows though - I will of course build this with a few of the doors open!
Now, the complicated part - don't be fooled, what you are about to see was a really big headache to build!! and, I'm not even a third of the way through with it!
The MATV does not have bar/slat armor, and instead uses a steel/fabric mesh - while is appears simple enough, it is actually somewhat complex and ingenious. So, as the Buffalo received the monstrously tedious bar armor....voila:
"oh, how hard could that be?"...hard - both to figure out how to make work, and then to do it...
Lots of head scratching and rooting around in the junk box for the materials to bring this together....
And there you have a fair amount of work....I remain optimistic that it will look good when done - for now, the screen isn't glued to the truck - just dry fit - I might glue it tho - - I think I can squeeze the window in even if i paint the whole unit (door/screen) as one piece. I didn't think I could - but, seeing it now, maybe, which would make this easier...again, I'm guessing, some of you are wondering - "how hard can this be?"...my answer, it's not easy!!
Ok - take care, and thanks for having a look!
Cheers
Nick
WXerock
#450
Joined: July 19, 2015
KitMaker: 672 posts
Armorama: 668 posts
Posted: Tuesday, April 11, 2017 - 06:42 AM UTC
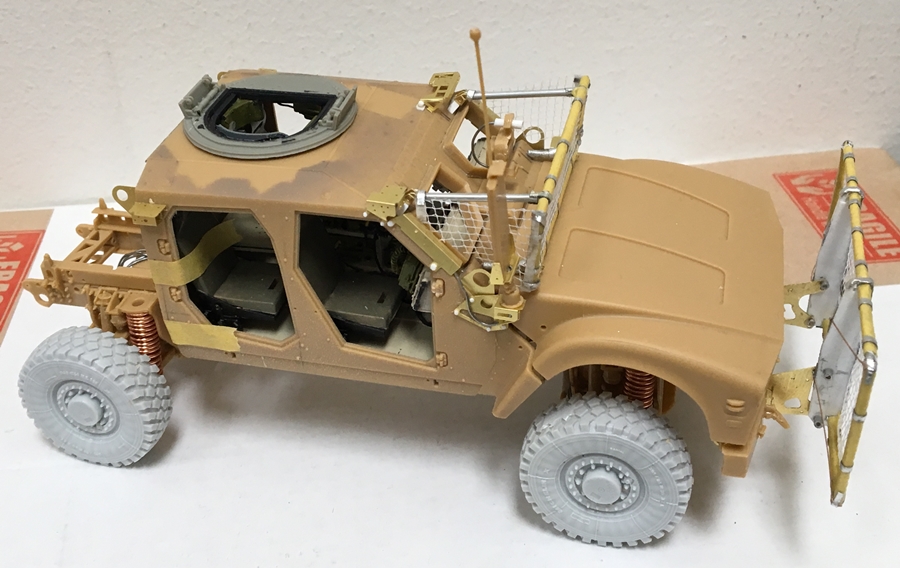
Nick, looking at your work on the frames for the QinetiQ Q-Net armor and I am impressed like crazy. They are outstanding. That said I think you oriented the net wrong. You have them oriented in a diamond pattern but in all of the photos I've seen they are oriented like squares.
Regards,
Eric
Regards,
Eric
Stickframe
#362
Joined: December 01, 2013
KitMaker: 1,661 posts
Armorama: 1,202 posts
Posted: Tuesday, April 11, 2017 - 08:42 AM UTC
Hi Eric - thanks for taking the time to comment....crap - you are right! I didn't notice what in retrospect is a very obvious detail - the grid pattern is indeed square and not diagonal....so, the rest will be done the right way.
At this point - the screen on the driver's door is going to stay as is. What I didn't note, is during construction - the whole thing received ample amounts of CA - inside the yellow tape and so on. I didn't want it to peel off. Now, not only will it not peel apart, I would destroy the aluminum frame the mesh is stretched over if I tried to tear it apart...which would be a problem as it was no picnic building the frame and don't want to do it again - I have several more to build....woohoo. Hopefully this blunder won't be that obvious when done. I'm planning to leave the doors open - maybe/hopefully there will be enough else going on that this will go unnoticed.
Thanks again Eric -
Nick
Dioramartin
Joined: May 04, 2016
KitMaker: 1,476 posts
Armorama: 1,463 posts
Posted: Tuesday, April 11, 2017 - 10:30 AM UTC
Uh-oh Jerrys gonna tear your Master of Trucks pips off!
although youve got a good case at the court-martial, this aint a truck. Im trying to think of a way to ease your maso-modelling pain
pity you cant tilt this cab 45 degrees forward, at least theyd look square then

Stickframe
#362
Joined: December 01, 2013
KitMaker: 1,661 posts
Armorama: 1,202 posts
Posted: Tuesday, April 11, 2017 - 10:59 AM UTC
Hi Tim - haha!! I appreciate your attitude on this one! You're right - I'll be in big troubles with Jerry!! On the other hand, he is the one who turned me on to using lead foil - mostly for figures, but in this case, for lots of other parts too! (thanks Jerry!), so not a total loss. Haha - and, yes, maso-modeling! Indeed...why build this stuff?!? This has been one of the more tedious tasks I've tried to far - diagonal mesh or not, it better look great when it's done!!!
Cheers
Nick
Cheers
Nick
jrutman
Joined: April 10, 2011
KitMaker: 7,941 posts
Armorama: 7,934 posts
Posted: Tuesday, April 11, 2017 - 06:30 PM UTC
Hah,no pips will be rescinded here! Maybe a crack across the knuckles with an old slide rule but no demotions.
You may think we would look at that screen frame as easy peesy but I say-au contrare ! Looks very difficult to me and my version would have split pea sized blobs of CA on every joint !
That screen and frame really rocks O-Master of Trucks !
The interior is great as well buddy.
Already looking forward to the next update,
J

justsendit
Joined: February 24, 2014
KitMaker: 3,033 posts
Armorama: 2,492 posts
Posted: Wednesday, April 12, 2017 - 01:24 AM UTC
WOW, Nick! The truck looks great! And thats an awesome bundle of Styrene/PE/Brass/Foil/Copper/Aluminum/CA youve created there!
Cheers!🍺
mike
Cheers!🍺
mike
PolishBrigade12
Joined: January 31, 2009
KitMaker: 380 posts
Armorama: 366 posts

Posted: Wednesday, April 12, 2017 - 07:38 AM UTC
This looks like one heck of a fun build Nick. Those outside pics really bring out all that detailed weathering, chipping, etc. Incredible work buddy, incredible! These rigs looks spooky real, and that's not an easy task. Bravo!
Cheers, Ski.
Cheers, Ski.

165thspc
#521
Joined: April 13, 2011
KitMaker: 9,465 posts
Armorama: 8,695 posts
Posted: Wednesday, April 12, 2017 - 11:47 PM UTC
Ditto my friend, ditto
 As to your wiring woes; how about assorted colors of UV paint for sign lettering, etc. then add a black light to your standard night time studio lighting set up? Was in a head shop the other day and saw several beautifully done paintings being displayed in daylight but the black light was still strong enough that the UV colors really popped!
As to your wiring woes; how about assorted colors of UV paint for sign lettering, etc. then add a black light to your standard night time studio lighting set up? Was in a head shop the other day and saw several beautifully done paintings being displayed in daylight but the black light was still strong enough that the UV colors really popped!Dioramartin
Joined: May 04, 2016
KitMaker: 1,476 posts
Armorama: 1,463 posts
Posted: Thursday, April 13, 2017 - 07:35 PM UTC
Hmm Ive never heard of a head shop before but next time Im over there I must enquire where the nearest one is, sounds like a mind-blowing experience
Stickframe
#362
Joined: December 01, 2013
KitMaker: 1,661 posts
Armorama: 1,202 posts
Posted: Tuesday, April 18, 2017 - 01:43 AM UTC
Hi guys - thanks to all of you for taking the time to leave some comments!
Jerry -- thx - yes...the magic of CA...CA is to me, as Milliput is to you!!! i hoped those SAT questions would be worth something some day...lol...thanks
Hi Mike - thanks - I do enjoy the mixing and matching of parts - adds a whole new realm of "challenge"...haha
Hi Ski - glad you like the pics - yes, i do love the outdoors -taking those photos becomes a real test - if something doesn't look right, the sunlight really makes it obvious...sort of funny, despite that bright natural light, some things, you think will be really obvious, like some interior details...sometimes just aren't...and the sunlight proves that too....
Mike and Tim....so, you guys are hangin' around the head shop eh????...yeah, Mike - - I know the type of black light art you're describing - as a kid I had a Led Zeppelin 1 album cover as a black light poster...cool! as for the reflective paint - that's an interesting idea....i didn't even know it was avail....maybe under an eave or two on the Bladerunner project...hmm..
OK- another update on my MATV - - I'm still building the mesh screen - sort of in parallel with other parts of the truck - so far, so tedious and so good!!
Please take a look:
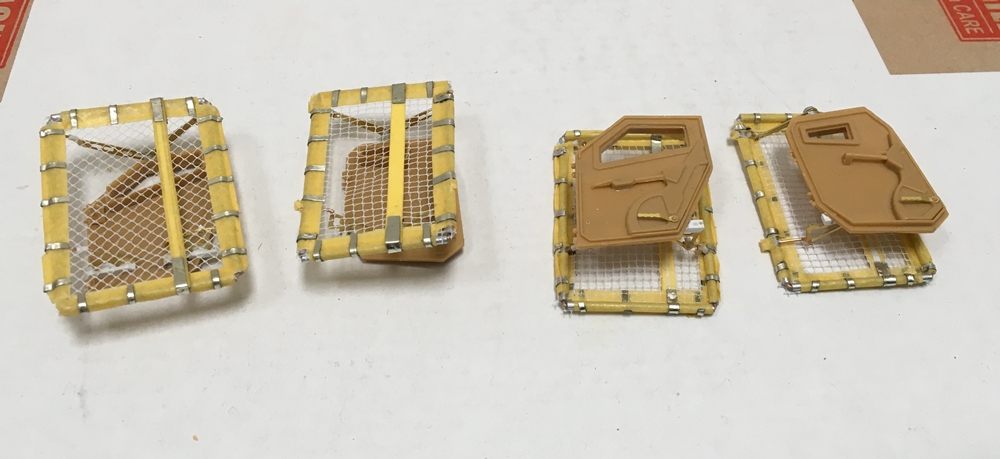
And there you have it - now, just about halfway done with that mesh! Getting the framework to go together required a fair amount of thought....and keeping it all generally square was not a picnic....anyway, so far, so good!
thanks for taking a look -
cheers
Nick
Jerry -- thx - yes...the magic of CA...CA is to me, as Milliput is to you!!! i hoped those SAT questions would be worth something some day...lol...thanks
Hi Mike - thanks - I do enjoy the mixing and matching of parts - adds a whole new realm of "challenge"...haha
Hi Ski - glad you like the pics - yes, i do love the outdoors -taking those photos becomes a real test - if something doesn't look right, the sunlight really makes it obvious...sort of funny, despite that bright natural light, some things, you think will be really obvious, like some interior details...sometimes just aren't...and the sunlight proves that too....
Mike and Tim....so, you guys are hangin' around the head shop eh????...yeah, Mike - - I know the type of black light art you're describing - as a kid I had a Led Zeppelin 1 album cover as a black light poster...cool! as for the reflective paint - that's an interesting idea....i didn't even know it was avail....maybe under an eave or two on the Bladerunner project...hmm..
OK- another update on my MATV - - I'm still building the mesh screen - sort of in parallel with other parts of the truck - so far, so tedious and so good!!
Please take a look:
And there you have it - now, just about halfway done with that mesh! Getting the framework to go together required a fair amount of thought....and keeping it all generally square was not a picnic....anyway, so far, so good!
thanks for taking a look -
cheers
Nick
jrutman
Joined: April 10, 2011
KitMaker: 7,941 posts
Armorama: 7,934 posts
Posted: Tuesday, April 18, 2017 - 06:18 PM UTC
It is a joy as always to see this level of work you do O Truckmeister.
Another thing that stands out to me is the metamorphosis of the standard HMMV. I was in the 82nd Abn when we first replaced the good ol jeep with the HMMV and this new stuff is so so different from that first iteration.
And I say the good ol jeep tongue in cheek,because they were old,but they were not good ! LoL
J
ahandykindaguy

Joined: August 20, 2008
KitMaker: 1,295 posts
Armorama: 1,191 posts

Posted: Wednesday, April 19, 2017 - 04:06 AM UTC
Hey Stick! It looks awesome good sir. That mesh is the cats meow man! Not wanting to ruffle your feathers, and it is obvious how much time and effort yo have already put in...
But...
Thinking about how you like to work...have you considered the option on the slanted mesh door, of just cutting it out, putting in a piece with the proper orientation, and perhaps muddying up the door somehow to hide the fact that the mesh isn't covered by the yellow tape cover? Or draping some kit over the door to block the rear view?
Just thinking of the old divert the attention from the obvious type of solution... not trying to convince you to take a mulligan!
 |

WEB HOSTING BY


Copyright ©2021 Armorama and Kitmaker Network, a subsidiary of Silver Star Enterprises
All Rights Reserved. Please read our Conditions of Use and Privacy Policy.
All Rights Reserved. Please read our Conditions of Use and Privacy Policy.