


Hosted by Darren Baker
M1A2 primer.......

swede82

Joined: October 24, 2013
KitMaker: 135 posts
Armorama: 93 posts
Posted: Wednesday, March 22, 2017 - 12:26 AM UTC
Quick question. Can't find any info on this, when the Abrams are refurbished in Lima, they are bead blasted to bare shiny metal. Now no reference is made or photos, but is there a primer layed on under the desert tan? If I chip and scrap the finish, does bear metal show or a primer??

HeavyArty

Joined: May 16, 2002
KitMaker: 17,694 posts
Armorama: 13,742 posts
Posted: Wednesday, March 22, 2017 - 12:42 AM UTC
The primer is black.

The CARC paint used on them is a two-part epoxy paint that is very resilient and doesn't really chip or scrape off. Primer very rarely shows through.
The CARC paint used on them is a two-part epoxy paint that is very resilient and doesn't really chip or scrape off. Primer very rarely shows through.
swede82
Joined: October 24, 2013
KitMaker: 135 posts
Armorama: 93 posts
Posted: Wednesday, March 22, 2017 - 02:09 AM UTC
Thanks Gino, I guess that will save me some effort during the weathering phase. Put my chipping stuff away. 
SWATdoc

#503
Joined: June 29, 2006
KitMaker: 147 posts
Armorama: 138 posts
Posted: Wednesday, March 22, 2017 - 11:01 AM UTC
Hello Howard,
I am confident that Gino is on top of things, however, this may be worth considering as well.
In the early 90's, our M2's were primed in a gloss white at the heavy maintenance depot. The civilians doing the painting said it was the same for the M1's when they would rotate through.
I have no idea how long white was used or when the color was changed.
Respectfully,
Allen

chnoone
Joined: January 01, 2009
KitMaker: 1,036 posts
Armorama: 1,033 posts
Posted: Wednesday, March 22, 2017 - 12:39 PM UTC
Quoted Text
Thanks Gino, I guess that will save me some effort during the weathering phase. Put my chipping stuff away.
On the contrary .... when in use, like in harsh environments such as Hohenfeld/JMRC the side-skirts and the lower hull areas get pretty "banged-up". You will have scratches and scrape marks right down to the bear metal ... so patching up the camo after an EX would leave an visible "uneven" surface.
Also on the lids of the turret stowage bins the anti-skid and paint chips of right down to the bear metal.
Gino is right that the CARC paint is much more resistant to damage then previously used paint products, but there are limitation too .... especially when you scrape or bang into a tree/rocks or such.
You would have to look into what theater of operation you wish to place your project. Also in what time-line .... vehicles used in Europe in the 90's to early 2000 were certainly expose to much more wear'n tear than those stationed in the US.
On TAN colored vehicles this would be less obvious than with NATO-camo at first glance .... two very good reference (in detail) are the to books by Ralph Zwilling on the M1A1 AIM published by WWP and his latest on the M1A2 SEP V2 published by TANKOGRAD.
Cheers
Christopher

HeavyArty
Joined: May 16, 2002
KitMaker: 17,694 posts
Armorama: 13,742 posts
Posted: Wednesday, March 22, 2017 - 04:39 PM UTC
I didn't say that CARC doesn't chip or scratch at all. It doesn't usually chip and scratch as much as the latest fad in chipping of models shows though. Like Christopher said, take a look at reference pics to see how little or much you should actually chip or scratch one depending on where it is.

RobinNilsson

Joined: November 29, 2006
KitMaker: 6,693 posts
Armorama: 5,562 posts
Posted: Wednesday, March 22, 2017 - 05:47 PM UTC
"You will have scratches and scrape marks right down to the bear metal ... so patching up the camo after an EX would leave an visible "uneven" surface."
That would be interesting to replicate
Instead of the current "fashion" of "chipped to h*ll and back" it would be refreshing to see a "scratched and touched up"
/ Robin
That would be interesting to replicate
Instead of the current "fashion" of "chipped to h*ll and back" it would be refreshing to see a "scratched and touched up"
/ Robin
Bravo1102
Joined: December 08, 2003
KitMaker: 2,864 posts
Armorama: 2,497 posts

Posted: Wednesday, March 22, 2017 - 07:07 PM UTC
The bolts were sometimes painted in place. So changing a headlight could strip off all the CARC paint. At least on the refurnished M1s given to the National Guard in the 1990s. Also over time all the NATO CARC flaked off in huge swathes leaving a mish-mosh of sand and green.
That's why the ones refurbished today are stripped and repainted.
That's why the ones refurbished today are stripped and repainted.
chnoone
Joined: January 01, 2009
KitMaker: 1,036 posts
Armorama: 1,033 posts
Posted: Thursday, March 23, 2017 - 02:26 AM UTC
Quoted Text
"You will have scratches and scrape marks right down to the bear metal ... so patching up the camo after an EX would leave an visible "uneven" surface."
That would be interesting to replicate
Instead of the current "fashion" of "chipped to h*ll and back" it would be refreshing to see a "scratched and touched up"
/ Robin
Here's how I usually do it .... Gepard turret:
A few thin layers of Tamiya Putty applied with a toothpick or such ....
Smear the selected area ... dosen't have to cover all at once and let to dry a little.
2nd layer of putty "filling in" the uncovered areas and let it dry a little
3rd layer "building up/ making thicker" individual areas with more depth.

Spray with grey Tamiya primer ... keeps the top layers a little softer.
Then with blade or toothpick imprint dents, scratches, flaking etc. in different depths .... let to dry. Try doing this while the primer is just starting to dry and but still soft.
Sand over the whole area with very fine wet sandpaper gradually making the whole surface sort of even.

Respray with primer and wet sanding again until satisfactory effect "blending in" the edges of dents and scratches.
Then I spray the factory yellowish primer on and seal it with a layer of KLEAR.
Apply the NATO camo ... but in the areas I later want to work on like the Leo2 front skirts ... each color layer is individually sealed/separated by another layer of KLEAR.
This enables me to carefully sand of the top layer down to the next or the next right down to the yellow primer or the grey primer as the platform for bear metal. And/or use a blade and carefully scrape of individual layer of camo paint.
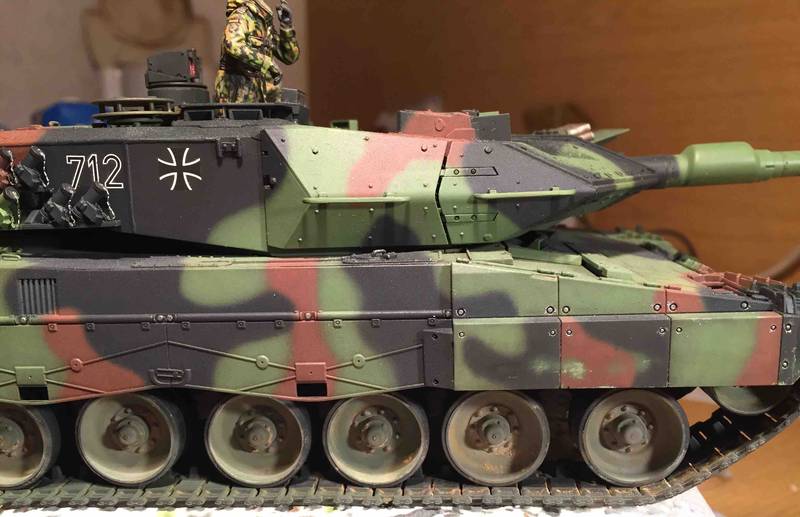
Original/real thing:
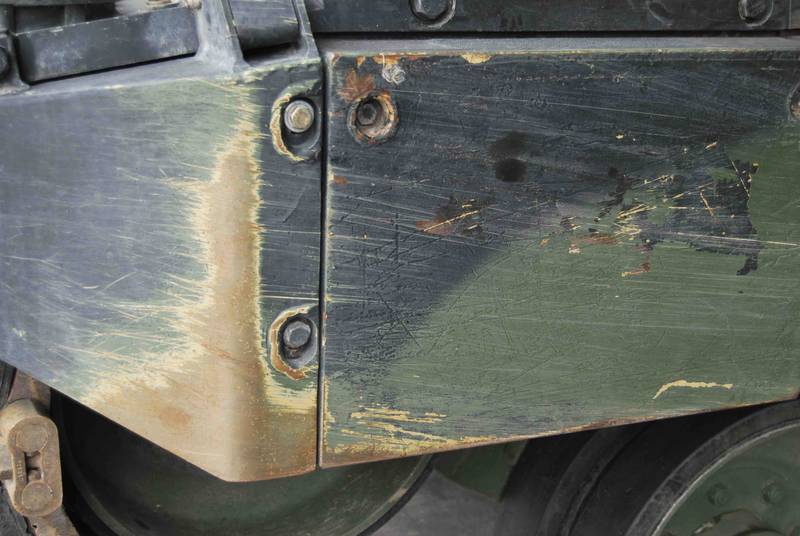
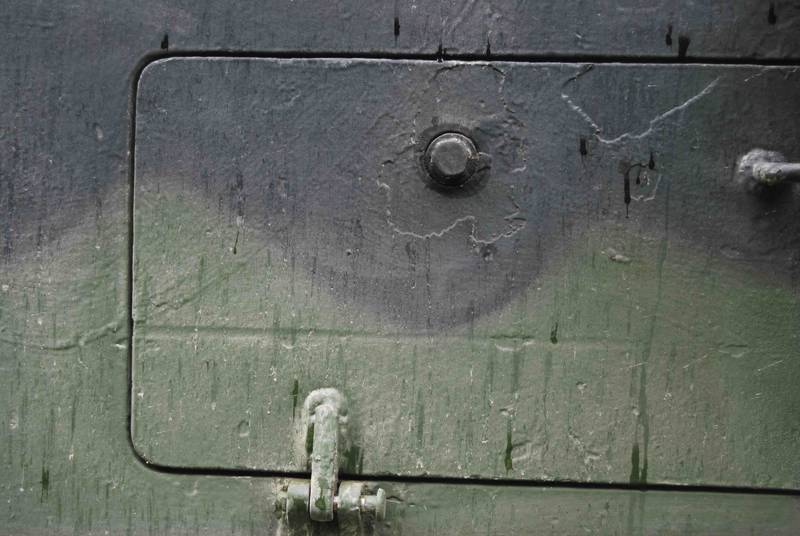
On the Gepard turret I tried to simulate the "Touch up work" without any significant wear'n tear effects.
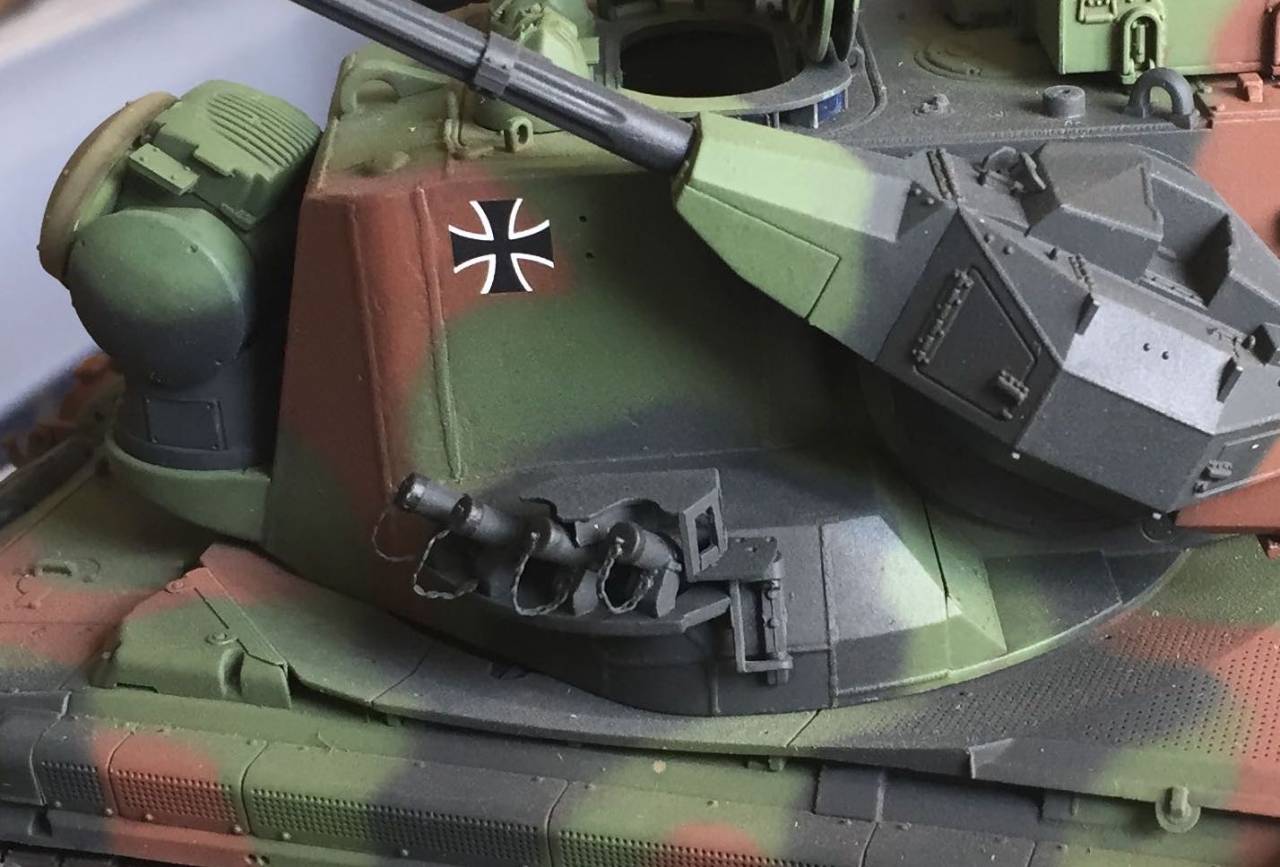
In the last years of service the German Army didn't invest much on the Gepard ... just the regular repaint with new over old color .... If you get to look at some close up pics of the later Gepards in service you will see how "crude" the surface has become over their years.
This might be too tedious for many modelers to reproduce because it is very time consuming ... but I am not a big fan of all this "chipping" hype ... I like to reproduce close to the original as possible.
So I make a dent or a scratch rather then painting it on .... the effect is very subtle in comparison but when you view the kit from different angles after the weathering you will notice the how close to reality the overall appearance can be.
Hope this helps
Cheers
Christopher:-H
Cuny12

Joined: April 04, 2010
KitMaker: 378 posts
Armorama: 348 posts
Posted: Thursday, March 23, 2017 - 04:56 AM UTC
This is an Interesting question with some good info being shared, Kudos to those who are sharingin a constructive and positive manner.
I had a look at tank mega factory and recall seeing the insides of road wheels being white not sure on why this was the case.
I think In any case a point that is often missed with chipping is what areas are prone to being damaged from experience with real vehicles the crew habituated areas such as hatch areas where ammo is passed through or other heavy blunt objects were often chipped and scuffed away.
Lower areas such as skirts wheels and hull areas could be quite bad in terms of wear marks, my big point is often chipping and damage is replicated without the thought of the panel or skirt being over done that realisticly it would have been ripped off but it's perfectly still aligned on the model.
The other side is where is the vehicle operating for example Iraq M1s were used to push through walls and other manageable urban structures which understandably would create deep scratches and scuffs and on multi coloured vehicles colour transfer scuffs between colours, think shopping mall car parks someone scuffs your car trying to park and leaves a scuff mark of paint on your car.
The other thing is the M240 which I know from experience ejected cartridges often chipped paint work around the mount though small at the first eventually the marks become a mix of depth and rust marks.
I hope this is somewhat helpful in terms of ideas.
Cheers Ben.
chnoone
Joined: January 01, 2009
KitMaker: 1,036 posts
Armorama: 1,033 posts
Posted: Thursday, March 23, 2017 - 09:17 PM UTC
Here are some pics of an M1A1 HA I am building right now.
The kit will specifically represent a tank of the 1-4 CAV in Germany on EX Troop Challenge 2001. This unit fielded their HA into early 2003 I believe, before switching to AIMs.
So their M1A1 HAs in EX Troop Challenge 2001 and 2002 looked really beat up.
In 2001 most tanks sported 2 extra boxes on the rear bustle rack:
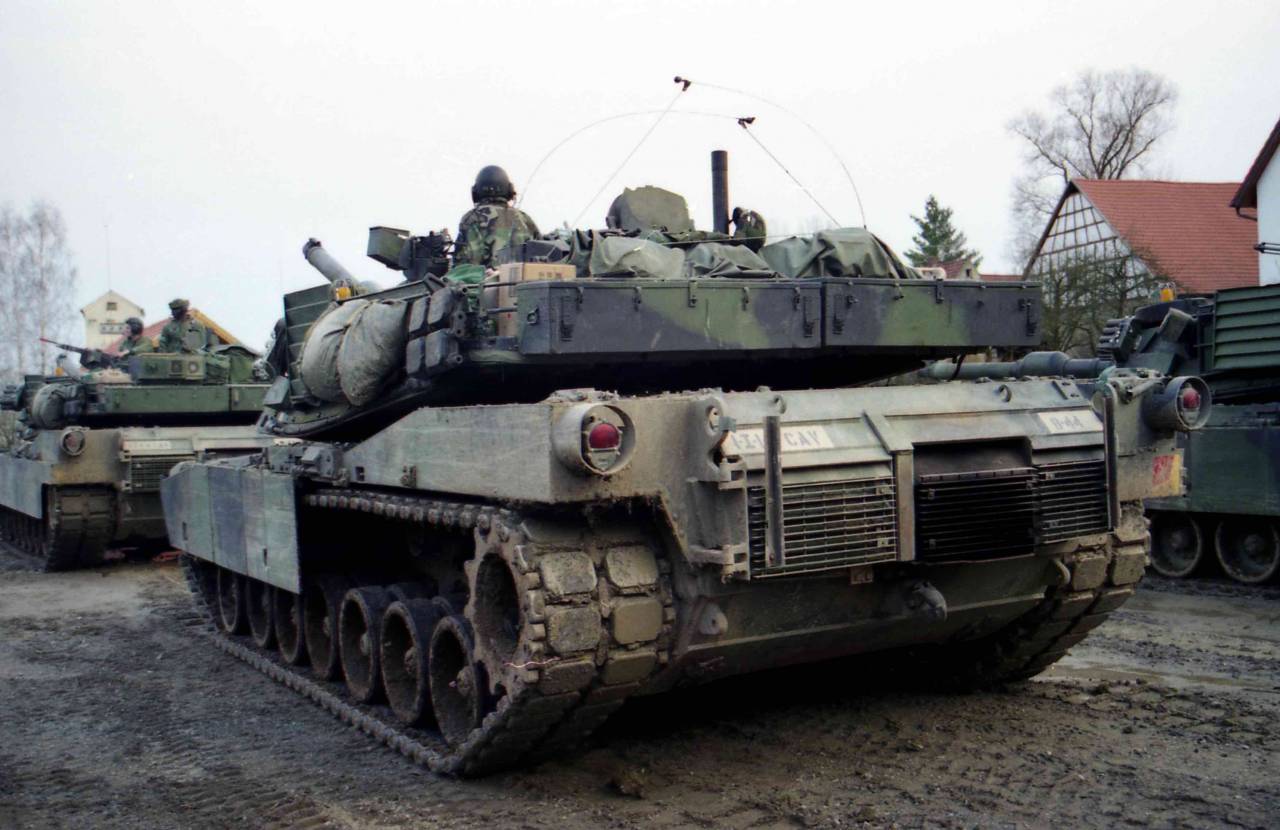
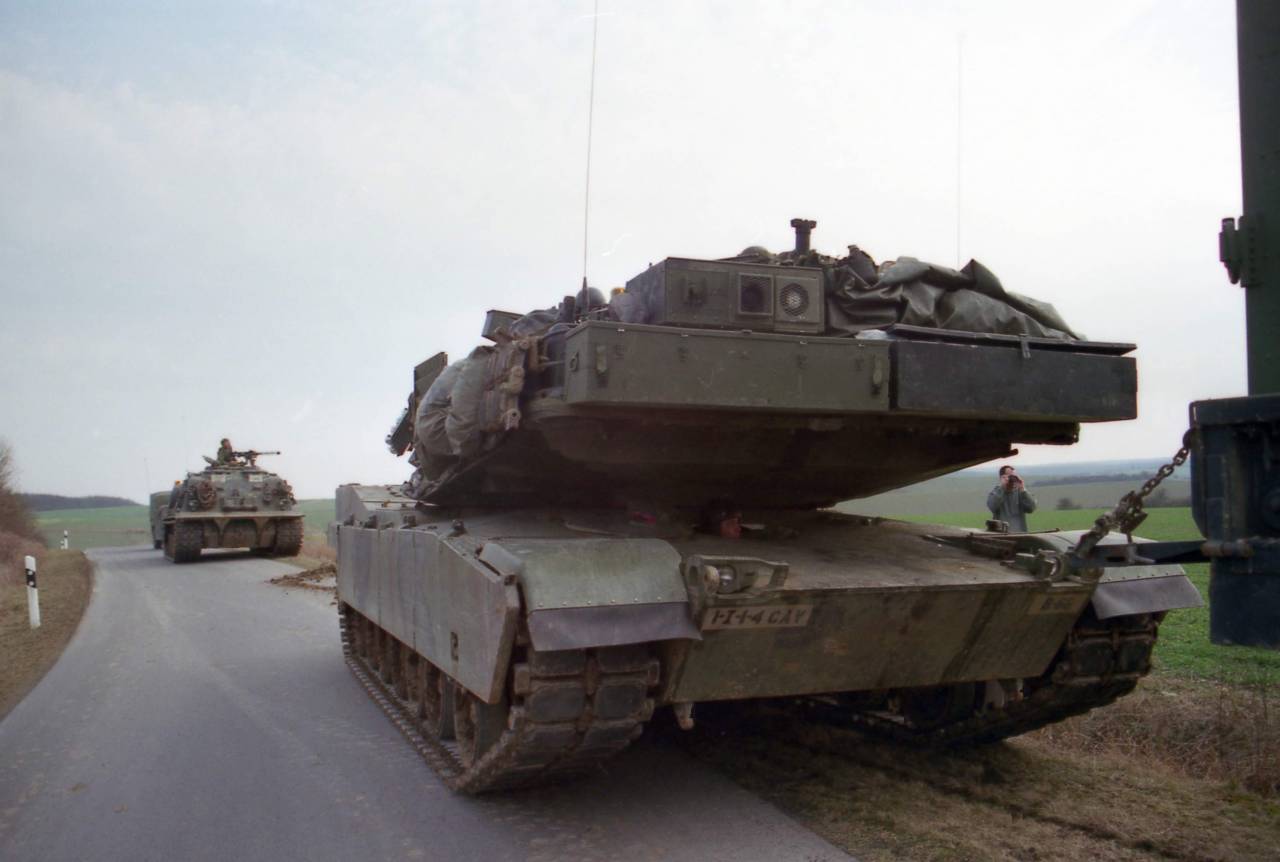
This unique feature caught my attention and to reproduce a heavily "worn n' torn" appearance. Possessing a couple of hours of original video footage from that EX concludes that all their tracks look this way .... and worse.
And this is the way I hope to achieve it:


Cheers
Christopher
The kit will specifically represent a tank of the 1-4 CAV in Germany on EX Troop Challenge 2001. This unit fielded their HA into early 2003 I believe, before switching to AIMs.
So their M1A1 HAs in EX Troop Challenge 2001 and 2002 looked really beat up.
In 2001 most tanks sported 2 extra boxes on the rear bustle rack:
This unique feature caught my attention and to reproduce a heavily "worn n' torn" appearance. Possessing a couple of hours of original video footage from that EX concludes that all their tracks look this way .... and worse.
And this is the way I hope to achieve it:
Cheers
Christopher
swede82
Joined: October 24, 2013
KitMaker: 135 posts
Armorama: 93 posts
Posted: Friday, March 24, 2017 - 12:49 AM UTC
Thanks Alan .......
swede82
Joined: October 24, 2013
KitMaker: 135 posts
Armorama: 93 posts
Posted: Friday, March 24, 2017 - 01:09 AM UTC
WOW....all of you have some great ideas and skills! I am planning to do the M1A2 TUSK. I have looked a LOT of Iraqi tan vehicles and it appears that, yes, it would be rare to see any primer, more of a tear, scrape or gouge in the finish with a different "tone" to the paint. It looks that the lighter metal of the fenders and storage boxes show the greatest amount of wear. After that, mainly the grime and crud of a vehicle in steady combat. The only consistent place on the vehicle that shows the most beating is the lower bow, from material being thrown up and damage to the front fenders and rubber mud flaps. After that, rust on the tracks and other areas banged or scraped during use.I see a lot of shading and filter work to bring it to life. Again, thanks to all who took the time to share with me, I really appreciated the help!!!!

Tankrider
Joined: October 07, 2002
KitMaker: 1,280 posts
Armorama: 1,208 posts
Posted: Friday, March 24, 2017 - 01:33 AM UTC
Quoted Text
Hello Howard,
I am confident that Gino is on top of things, however, this may be worth considering as well.
In the early 90's, our M2's were primed in a gloss white at the heavy maintenance depot. The civilians doing the painting said it was the same for the M1's when they would rotate through.
I have no idea how long white was used or when the color was changed.
Respectfully,
Allen
My experiences in Germany in 1993, when the tank battalion that I was assigned to deactivated was similar to Allen's. Our LN applied green over tan M1A1HAs were repainted in NATO-flage CARC, as they were destined for PREPO AFLOAT - APS 4 or 5 maybe??? in 1994. After the dings and scrapes were sanded down and spot painted with white primer, then overall green with the black and brown patterns chalked on the green paint.
Kinda funny as I met up with my tank that I had in 1991, M1A1 L11171, in the TACOM maintenance facility/draw yard in January 2005 as 3ID deployed to Iraq for the second time. L11171 was back to its factory CARC tan and was drawn by either 1-64AR or 3-15IN in 2nd BCT 3ID. I always have hoped that that tank served its crew in Iraq as well as it did for me in Germany.
John
swede82
Joined: October 24, 2013
KitMaker: 135 posts
Armorama: 93 posts
Posted: Friday, March 24, 2017 - 05:37 AM UTC
What I knew of "tracked" vehicles came from 2 tours in the 'Nam as a Combat Engineer. I knew they carried a lot of water and goodies and drew fire and RPG's like a magnet. The -48's and -60's with their 90 mm and can rounds were impressive but I was more comfortable with the Grunts on foot.
swede82
Joined: October 24, 2013
KitMaker: 135 posts
Armorama: 93 posts
Posted: Monday, March 27, 2017 - 01:01 AM UTC
jOHN, AGAIN NO REAL INFO, BUT IS IT A SAFE BET THAT THE REACTIVE ARMOR, THE CURVED PLATES, ON THE tusk ii IS A CERAMIC COATED PART? iT WOULD SHOW MORE SCRAPES THAN RUSTING OR ANY OTHER DAMAGE THAT METAL WOULD SHOW?
HeavyArty
Joined: May 16, 2002
KitMaker: 17,694 posts
Armorama: 13,742 posts
Posted: Monday, March 27, 2017 - 02:34 AM UTC
Yes, the rounded tiles that are part of TUSK II are ceramic, so they would not show rust.
swede82
Joined: October 24, 2013
KitMaker: 135 posts
Armorama: 93 posts
Posted: Thursday, March 30, 2017 - 11:45 PM UTC
Appreciate it !! AATW .........
 |

WEB HOSTING BY


Copyright ©2021 Armorama and Kitmaker Network, a subsidiary of Silver Star Enterprises
All Rights Reserved. Please read our Conditions of Use and Privacy Policy.
All Rights Reserved. Please read our Conditions of Use and Privacy Policy.