Crusader to Gazala Campaign
Alberta, Canada
Joined: February 10, 2008
KitMaker: 221 posts
Armorama: 217 posts
Posted: Wednesday, April 11, 2018 - 01:31 AM UTC
Yes Gary and Peter this project has a lot of extra stuff. So I thought I better get started on it before it is too late. Also thank you for welcoming me to the campaign all the way back in January. There are so many beautiful kits being put together here.

I have actually gone with the Voyager Photo etch instead of the Eduard set as it was specifically for this kit. I will also be using some interior parts from the Academe M3 Lee.

So getting right to it. I have started off with the lower hull. The three part transmission housing has no cast texture to it. So I removed the foundry cast numbers and taped up the arias where other parts will be glued on later.


I then added my own texture using Squadron green putty diluted with some Testers liquid cement.

I applied new numbers with Archer resin decals. I do believe it looks a bit better now.


The suspension is quite similar to that of Tasca/Asuka bogies and fit together well. All I added was a cast texture that wasnt there and the volute spring adjustment bolts. That should do it for now.
Cheers

Todd
http://www.mvpa.org/
"Live, So That You May Live Forever".
Queensland, Australia
Joined: August 06, 2005
KitMaker: 3,353 posts
Armorama: 3,121 posts
Posted: Wednesday, April 11, 2018 - 07:40 AM UTC
Off to a fine start Todd. Those Archer resign foundry marks and weld seams are great aren't they?
On the Bench:
Dust, styrene scraps, paint splotches and tears.

#424
Queensland, Australia
Joined: April 23, 2015
KitMaker: 4,648 posts
Armorama: 2,248 posts
Posted: Wednesday, April 11, 2018 - 08:00 AM UTC
Todd,
Welcome again and great start! Love the added texture! I'm really surprised they didn't mold it on. All of that PE is really gonna set it apart.
Gaz
"Artillery adds dignity, to what would otherwise be an ugly brawl."
Frederick The Great
Western Australia, Australia
Joined: May 05, 2006
KitMaker: 900 posts
Armorama: 510 posts
Posted: Thursday, April 12, 2018 - 05:19 AM UTC
Tried to make use of the rubber band tracks for the Stuart, but epic fail. They are slightly too short so have to be stretched which is easy, but that means you need four hands to hold the ends together and secure them, becuse the pins are so flexible it won't hold itself in place while you secure everything. Eventually I got the first one done and had nicely shaped mushroom pins to hold on, but because the tracks are so stretchy, the hole just expanded and slipped right over the pin anyway

Might be able to staple them, but my not being an octopus and trying to hold everything while somehow getting a stapler in place sounds like too much faffing about.
The kit also comes with indy-link(non-workable), so here is what I am reduced to...

Don't you feel more like you do now than you did when you came in?
Queensland, Australia
Joined: August 06, 2005
KitMaker: 3,353 posts
Armorama: 3,121 posts
Posted: Thursday, April 12, 2018 - 08:06 AM UTC
Iain, sorry about the rubber band tracks. However, with indy tracks like that you can usually make them Quasi workable. Just glue the end connector to one track pin, slip the next track pin piece in the second hole but do not glue it. Then add the end connector on the other side by adding glue only to the track pin opposite the one you glued first up. This will mean the other link should be free to move in the end connector without falling out once glue has set.
Do this for all the links and they will be part moveable. Just remember, for the links that curve around the idler and sprocket, make sure the point part of the end connector points to the centre of the idler/sprocket where the track fits between teeth, not 90 degrees from the face of the track pad like the runs will have.

On the Bench:
Dust, styrene scraps, paint splotches and tears.
Queensland, Australia
Joined: August 06, 2005
KitMaker: 3,353 posts
Armorama: 3,121 posts
Posted: Thursday, April 12, 2018 - 08:19 AM UTC
If the pins go deep enough into the end connector part, an alternative is to carefully trim off the part of the end connector that has the bolt on it (that holds the track pins in real life), slide the other part over the track pins and just add glue the end of the pins where you will replace the clamp section... don't get any on the 'guidehorn' part trapped in between.
or you can just keep your sanity and put up with the non-workable ones you have

On the Bench:
Dust, styrene scraps, paint splotches and tears.
Western Australia, Australia
Joined: May 05, 2006
KitMaker: 900 posts
Armorama: 510 posts
Posted: Thursday, April 12, 2018 - 08:20 AM UTC
Quoted Text
Iain, sorry about the rubber band tracks. However, with indy tracks like that you can usually make them Quasi workable. Just glue the end connector to one track pin, slip the next track pin piece in the second hole but do not glue it. Then add the end connector on the other side by adding glue only to the track pin opposite the one you glued first up. This will mean the other link should be free to move in the end connector without falling out once glue has set.
Well dang, that's a fine idea. Fortunately the ten links I have already assembled will do as top or bottom straight run.
Don't you feel more like you do now than you did when you came in?
Western Australia, Australia
Joined: May 05, 2006
KitMaker: 900 posts
Armorama: 510 posts
Posted: Friday, April 13, 2018 - 11:09 AM UTC
One row of tracks are done. Turns out with a little care I can build them into a "workable" set. Pre-painting everything means that the pins fit quite snugly into the holes in the end connectors...

and apart from a couple of broken pins it went together pretty well. Just waiting for the glue on the broken bits to finish drying, and then I can try and put it all together and feed it onto the tank. Just have to hope it's long enough as the indy links only come with two more links per side than the rubber band tracks.

Then side 2!
Don't you feel more like you do now than you did when you came in?
Alberta, Canada
Joined: February 10, 2008
KitMaker: 221 posts
Armorama: 217 posts
Posted: Friday, April 13, 2018 - 06:55 PM UTC
Good Looking track Iain.
Quoted Text
Off to a fine start Todd. Those Archer resign foundry marks and weld seams are great aren't they?
Thanks and yes Peter I love the Archer stuff. I need to order another set of the resin foundry marks and numbers. I have been using them a lot lately.
Cheers
Todd
http://www.mvpa.org/
"Live, So That You May Live Forever".
Alberta, Canada
Joined: February 10, 2008
KitMaker: 221 posts
Armorama: 217 posts
Posted: Friday, April 13, 2018 - 07:35 PM UTC
Quoted Text
Todd,
Welcome again and great start! Love the added texture! I'm really surprised they didn't mold it on. All of that PE is really gonna set it apart.
Gaz
Thanks very much Gaz. Yes, after building Takoms Mk V for the WWI campaign (first time in a very long time that I have built a model Right out of the box) I was shocked at the lack of cast texture. Then I started following Gary Boxalls M3 Grant build and new I was in for a bit of a challenge. I will be putting an interior into the M3 as well. I think it will still be a lot of fun.

Cheers
Todd
http://www.mvpa.org/
"Live, So That You May Live Forever".
#298
Hong Kong S.A.R. / 繁體
Joined: August 08, 2002
KitMaker: 1,182 posts
Armorama: 665 posts
Posted: Sunday, April 15, 2018 - 08:00 AM UTC
Hawaii, United States
Joined: August 27, 2006
KitMaker: 1,646 posts
Armorama: 1,557 posts
Posted: Sunday, April 15, 2018 - 08:18 AM UTC
Aloha All,
Many great looking builds since I last checked in.
I've been silent, but not completely idle. Small update on my SAS Jeep. I got a couple of Tamiya's Allied Vehicles Accessory Set to solve my jerry can dilemma, so they are looking pretty nice. Also assembled the racks. Next will be to figure out the straps to mount some of the dangling stowage, then it will be time for some paint.


Happy Modeling,
Zon
"Certainty of death.
Small chance of sucess.
What are we waiting for?"
-Gimli, Return of the King.
Queensland, Australia
Joined: August 06, 2005
KitMaker: 3,353 posts
Armorama: 3,121 posts
Posted: Sunday, April 15, 2018 - 01:51 PM UTC
Great work guys. They are really coming together now.
On the Bench:
Dust, styrene scraps, paint splotches and tears.
#424
Queensland, Australia
Joined: April 23, 2015
KitMaker: 4,648 posts
Armorama: 2,248 posts
Posted: Sunday, April 15, 2018 - 01:56 PM UTC
Iain,
I'm glad to see your track issues have improved.
EMan,
That 25 pounder looks great!
Zon,
Your Jeep looks excellent. The twin MG's look really cool.
Gaz
"Artillery adds dignity, to what would otherwise be an ugly brawl."
Frederick The Great
England - South East, United Kingdom
Joined: November 08, 2005
KitMaker: 12 posts
Armorama: 6 posts
Posted: Monday, April 16, 2018 - 05:48 PM UTC
Some amazing work on here. Finally making some progress on the tropicalised Mk1 Hurricane. Too much etch and resin for my taste, and lots of tidying up of join lines too.
Queensland, Australia
Joined: August 06, 2005
KitMaker: 3,353 posts
Armorama: 3,121 posts
Posted: Tuesday, April 17, 2018 - 12:53 AM UTC
Very impressive Clive. I'd say as much as it was hard work, it has really paid off for you.
On the Bench:
Dust, styrene scraps, paint splotches and tears.
#424
Queensland, Australia
Joined: April 23, 2015
KitMaker: 4,648 posts
Armorama: 2,248 posts
Posted: Tuesday, April 17, 2018 - 09:17 AM UTC
"Artillery adds dignity, to what would otherwise be an ugly brawl."
Frederick The Great
#298
Hong Kong S.A.R. / 繁體
Joined: August 08, 2002
KitMaker: 1,182 posts
Armorama: 665 posts
Posted: Thursday, April 19, 2018 - 11:58 AM UTC
England - South East, United Kingdom
Joined: November 08, 2005
KitMaker: 12 posts
Armorama: 6 posts
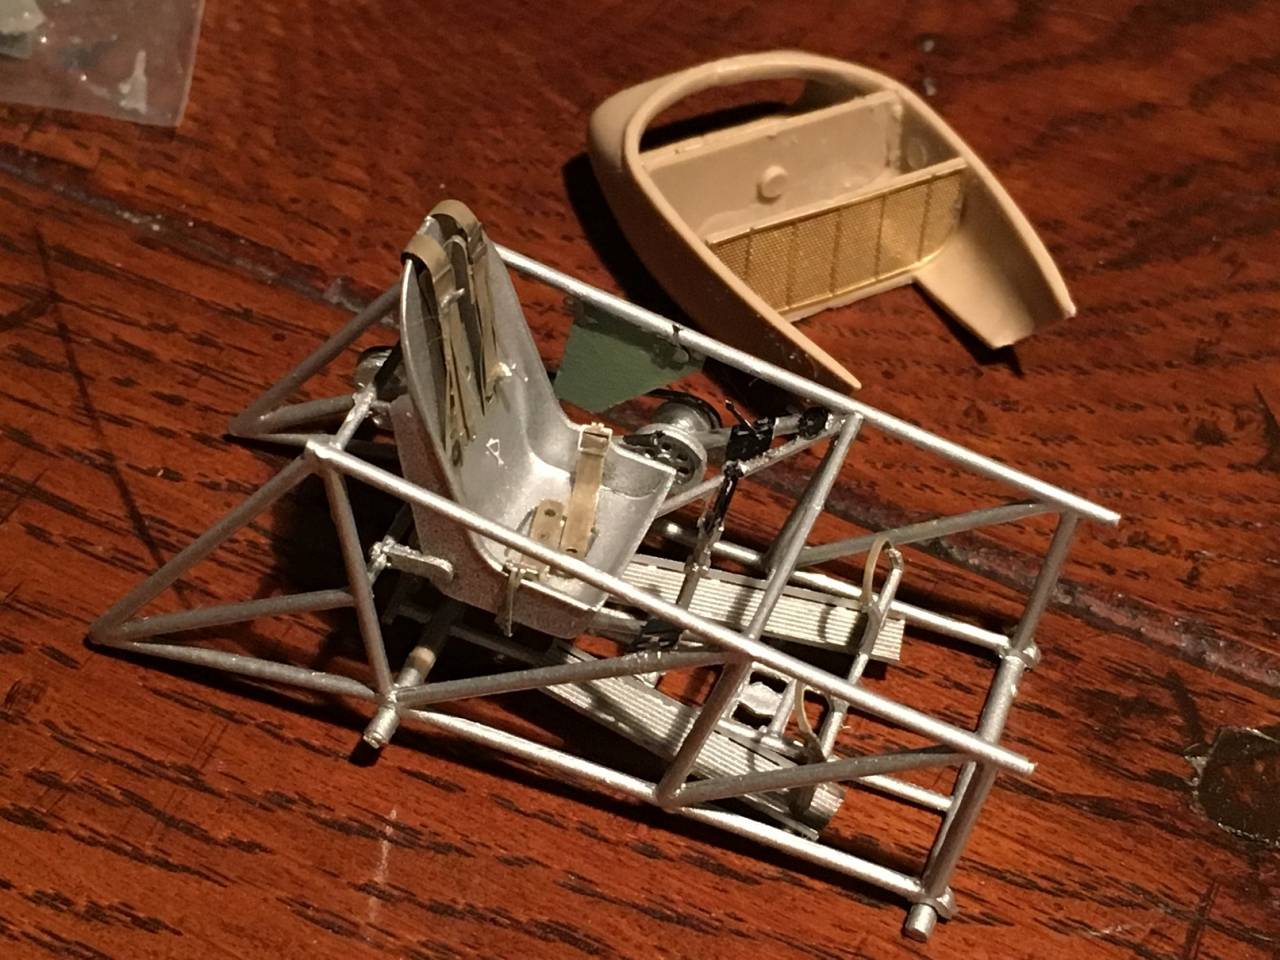
Posted: Thursday, April 19, 2018 - 02:41 PM UTC
Thanks for the kind words Peter and Gary - now have the instrument panel nearly done and fuselage sides together, so hopefully progress will pick up
Queensland, Australia
Joined: August 06, 2005
KitMaker: 3,353 posts
Armorama: 3,121 posts
Posted: Friday, April 20, 2018 - 01:44 AM UTC
Good to see this one coming along so well Lap Man. Nice pre-shade work
On the Bench:
Dust, styrene scraps, paint splotches and tears.
#424
Queensland, Australia
Joined: April 23, 2015
KitMaker: 4,648 posts
Armorama: 2,248 posts
Posted: Friday, April 20, 2018 - 05:14 AM UTC
"Artillery adds dignity, to what would otherwise be an ugly brawl."
Frederick The Great
Western Australia, Australia
Joined: May 05, 2006
KitMaker: 900 posts
Armorama: 510 posts
Posted: Saturday, April 21, 2018 - 04:15 PM UTC
Don't you feel more like you do now than you did when you came in?
Uusimaa, Finland
Joined: October 01, 2016
KitMaker: 514 posts
Armorama: 171 posts
Posted: Saturday, April 21, 2018 - 05:09 PM UTC
And more progress:

Had near disaster with the "14" decals on both sides. They were badly misaligned, and I had lift them with scalpel. Luckily they didn't tear. Neither of them are exactly on right location, but much closer than originally.
I'm leaving most of the small stencils off, because they tend to distract in this scale (48th) in my opinion.
California, United States
Joined: April 26, 2016
KitMaker: 362 posts
Armorama: 285 posts
Posted: Saturday, April 21, 2018 - 11:28 PM UTC
Hi Guys, WIP update. Rough outline on my display base. First time working with pink foam as the base, made some outcropping with plaster moldings. As always trying some new material and techniques


"Gonna start blastin"
...Stumpy
Rio Bravo 1959
Alabama, United States
Joined: September 22, 2008
KitMaker: 476 posts
Armorama: 447 posts
Posted: Sunday, April 22, 2018 - 01:47 AM UTC
Iain, Stuart Honey looks ready to roll. Congratulations.