Bayern, Germany
Joined: January 17, 2006
KitMaker: 673 posts
Armorama: 116 posts
Posted: Sunday, February 04, 2018 - 01:06 PM UTC
A lot of truly outstanding work in this campaign! The Marder and T64 look the biz! I have not had much to post on my F4F-4 Wildcat build of late. Most of the work I have been doing is filling and sanding, not very photo worthy at all. Below are a few shots of the wing interiors; I plan to display the build with folded wings, and a shot or two of the wing to fuselage join. Finally there are a few photos of the pilot figure I built for display with the model. The lighting of my workbench is overly direct and harsh, washing out most of the subtle shading on the face and uniform, but it gives a decent look at the finished product.
 F4F-4 Wings
 by
Ernest Roth, on Flickr
 F4F-4 Wings2
 by
Ernest Roth, on Flickr
 IMG_0703
 by
Ernest Roth, on Flickr
 IMG_0701
 by
Ernest Roth, on Flickr
 IMG_0698
 by
Ernest Roth, on Flickr
 Pilot2
 by
Ernest Roth, on Flickr
 IMG_0699
 by
Ernest Roth, on Flickr

#401
Washington, United States
Joined: December 08, 2013
KitMaker: 323 posts
Armorama: 221 posts
Posted: Sunday, February 04, 2018 - 06:36 PM UTC
Ernest,
Absolutely phenomenal work on that pilot. I cant wait to see how the whole Wildcat turns out.
Mark,
Can you share that email address used for ordering replacement parts?
#453
Texas, United States
Joined: August 28, 2016
KitMaker: 1,925 posts
Armorama: 601 posts
Posted: Tuesday, February 06, 2018 - 07:09 AM UTC
Ernest,
Your aircraft will be the first one I have seen with folded wings. This will interesting to see how it is done and looks. I say that because I have yet to build an aircraft model.
Mark
Bayern, Germany
Joined: January 17, 2006
KitMaker: 673 posts
Armorama: 116 posts
Posted: Saturday, February 10, 2018 - 01:08 AM UTC
Thank you for the kind words Shawn.
Ernest
Quoted Text
Ernest,
Absolutely phenomenal work on that pilot. I cant wait to see how the whole Wildcat turns out.
Mark,
Can you share that email address used for ordering replacement parts?
Bayern, Germany
Joined: January 17, 2006
KitMaker: 673 posts
Armorama: 116 posts
Posted: Saturday, February 10, 2018 - 01:09 AM UTC
I hope the wing fold turns out as well, we shall see.
Ernest
Quoted Text
Ernest,
Your aircraft will be the first one I have seen with folded wings. This will interesting to see how it is done and looks. I say that because I have yet to build an aircraft model.
Mark
Bayern, Germany
Joined: January 17, 2006
KitMaker: 673 posts
Armorama: 116 posts
Posted: Saturday, February 10, 2018 - 01:16 AM UTC
I did some very minor scratchbuilding adding fastening parts for the Jury Struts to the wings and leading edge of the horizontal stabilizers. I will have to make the Jury Struts as well, and I am still working out how, and what, to make them out of. I also finished the base painting of the model. I sprayed a random pattern of black before spraying the BlueGrey base coat. It is hard to see under the direct lighting on the bench, but the base coat has a subtle "depth" to it. I hope it will really come out when a spray the highlighting/fading in a later step, we shall see if I can bring the effect off.
 IMG_0705
 by
Ernest Roth, on Flickr
 IMG_0706
 by
Ernest Roth, on Flickr
 IMG_0707
 by
Ernest Roth, on Flickr
Sofiya, Bulgaria
Joined: November 26, 2017
KitMaker: 393 posts
Armorama: 369 posts
Posted: Saturday, February 10, 2018 - 04:27 PM UTC
Hi,guys!
I present you the final look of my project in the campaign.
It is a real pleasure for me to participate in this campaign, as it was the first one for me.
Thanks everyone for the comments.
Here's what I made up.


Success!
#453
Texas, United States
Joined: August 28, 2016
KitMaker: 1,925 posts
Armorama: 601 posts
Posted: Tuesday, February 13, 2018 - 05:26 AM UTC
Kalin,
Very nice finish, you did a awesome job with those models. Not over weathered but looks like they done some traveling and fighting. Nice dust effects.
Mark
#453
Texas, United States
Joined: August 28, 2016
KitMaker: 1,925 posts
Armorama: 601 posts
Posted: Tuesday, February 13, 2018 - 05:29 AM UTC
Ernest,
You must have used a microscope to see those fastners to attached them as you did. Nice work.
Mark
Sofiya, Bulgaria
Joined: November 26, 2017
KitMaker: 393 posts
Armorama: 369 posts
Posted: Wednesday, February 14, 2018 - 02:41 AM UTC
Thanks Mark!
I hope it was interesting to me as well. I will follow with interest the further progress in the campaign!

Bayern, Germany
Joined: January 17, 2006
KitMaker: 673 posts
Armorama: 116 posts
Posted: Wednesday, February 14, 2018 - 11:41 AM UTC
Hi Kalin, very nice work on the prime mover and the artillery piece. They look they have seen some campaigning!
Ernest
Maryland, United States
Joined: September 30, 2010
KitMaker: 430 posts
Armorama: 291 posts
Posted: Thursday, February 15, 2018 - 03:36 PM UTC
Ernest, fantastic work on your model. Paintwork on the pilot figure is wonderfully rendered. Amazing small details you've added to the wings and stabilizers.
Kalin, your halftrack and howitzer tuned out magnificently. Nice, subtle weathering.
Good luck everyone on their projects. Bill
Tank Destroyer campaign......Bandai 1/48 Hetzer
Shep Paine Tribute campaign......Brit. Paras vs Ostwind
Maryland, United States
Joined: September 30, 2010
KitMaker: 430 posts
Armorama: 291 posts
Posted: Thursday, February 15, 2018 - 03:45 PM UTC
Tank Destroyer campaign......Bandai 1/48 Hetzer
Shep Paine Tribute campaign......Brit. Paras vs Ostwind
Wisconsin, United States
Joined: April 05, 2007
KitMaker: 2,023 posts
Armorama: 1,234 posts
Posted: Thursday, February 15, 2018 - 06:03 PM UTC
Nice lookin' Marder Bill ! And your figures, WOW ! Is there a diorama in the future for the Marder ? If so, I hope that you'll share it with us !
On the bench :
A whole bunch of figures, Too many half built kits and a (gasp) wing thing
#453
Texas, United States
Joined: August 28, 2016
KitMaker: 1,925 posts
Armorama: 601 posts
Posted: Thursday, February 15, 2018 - 06:10 PM UTC
Bill,
Excellent build. Really like the weathering, looks like you have a light coat of dust which really tone down the decals so they look as faded as the rest of the paint job.
Mark
Arkansas, United States
Joined: June 29, 2009
KitMaker: 11,610 posts
Armorama: 7,843 posts
Posted: Thursday, February 15, 2018 - 08:20 PM UTC
Ideals are peaceful. History is violent.
Bayern, Germany
Joined: January 17, 2006
KitMaker: 673 posts
Armorama: 116 posts
Posted: Saturday, February 17, 2018 - 01:39 AM UTC
Excellent job on your Marder Bill. I like the restrained weathering, it is a nice counterpoint to the builds that display the subject looking like it has been in the elements for 20 years.
Ernest
Bayern, Germany
Joined: January 17, 2006
KitMaker: 673 posts
Armorama: 116 posts
Posted: Saturday, February 17, 2018 - 01:42 AM UTC
A bit more progress. I am trying out the Maketar Masks for the insignia on this build. They are more work than decals, and I had a bit of a struggle getting the circular portion of the mask to be circular. I am sure there are some tricks that make the process somewhat easier. I have to say the insignia looks pretty good once spraying was complete. I did not get everything perfect, but got close enough to satisfy me for a first time run through. The final photos shows the test fit of the very simple scratchbuilt jury struts that I made. I am at the phase where I'll be installing the engine and landing gear, and I'll post some photos when I have finished those steps. Comments and advice are welcome, especially in the area of the masked and sprayed insignia.
Ernest
 IMG_0709
 by
Ernest Roth, on Flickr
 IMG_0713
 by
Ernest Roth, on Flickr
 IMG_0714
 by
Ernest Roth, on Flickr
United Kingdom
Joined: September 17, 2012
KitMaker: 462 posts
Armorama: 417 posts
Posted: Tuesday, February 20, 2018 - 01:09 AM UTC
Hello!
here are the real start-up pictures


Will get stuck into this very soon.
cheers
Matthew
Maryland, United States
Joined: September 30, 2010
KitMaker: 430 posts
Armorama: 291 posts
Posted: Tuesday, February 20, 2018 - 02:33 PM UTC
Ivanhoe, Mark, and Ernest....thank you for the kind comments.
Ernest, the painted isignia is beautifully done.
Matthew H., good luck with your VK 3001 build.
Matthew N., the engine and cab turned out wonderfully.
Happy modeling. Bill
Tank Destroyer campaign......Bandai 1/48 Hetzer
Shep Paine Tribute campaign......Brit. Paras vs Ostwind
Maryland, United States
Joined: December 21, 2005
KitMaker: 241 posts
Armorama: 124 posts
Posted: Thursday, March 01, 2018 - 11:30 PM UTC
fantastic work Panzerman.
Cheers!
chuck
Maryland, United States
Joined: December 21, 2005
KitMaker: 241 posts
Armorama: 124 posts
Posted: Thursday, March 01, 2018 - 11:39 PM UTC
Maryland, United States
Joined: September 30, 2010
KitMaker: 430 posts
Armorama: 291 posts
Posted: Friday, March 02, 2018 - 05:21 AM UTC
Chuck, your Gigant is progressing nicely. The P.E. screens are a nice accent detail. Great job on the open tool box. You got the curved lid perfectly bent. Keep up the good work. Bill
Tank Destroyer campaign......Bandai 1/48 Hetzer
Shep Paine Tribute campaign......Brit. Paras vs Ostwind
#401
Washington, United States
Joined: December 08, 2013
KitMaker: 323 posts
Armorama: 221 posts
Posted: Saturday, March 03, 2018 - 11:32 PM UTC
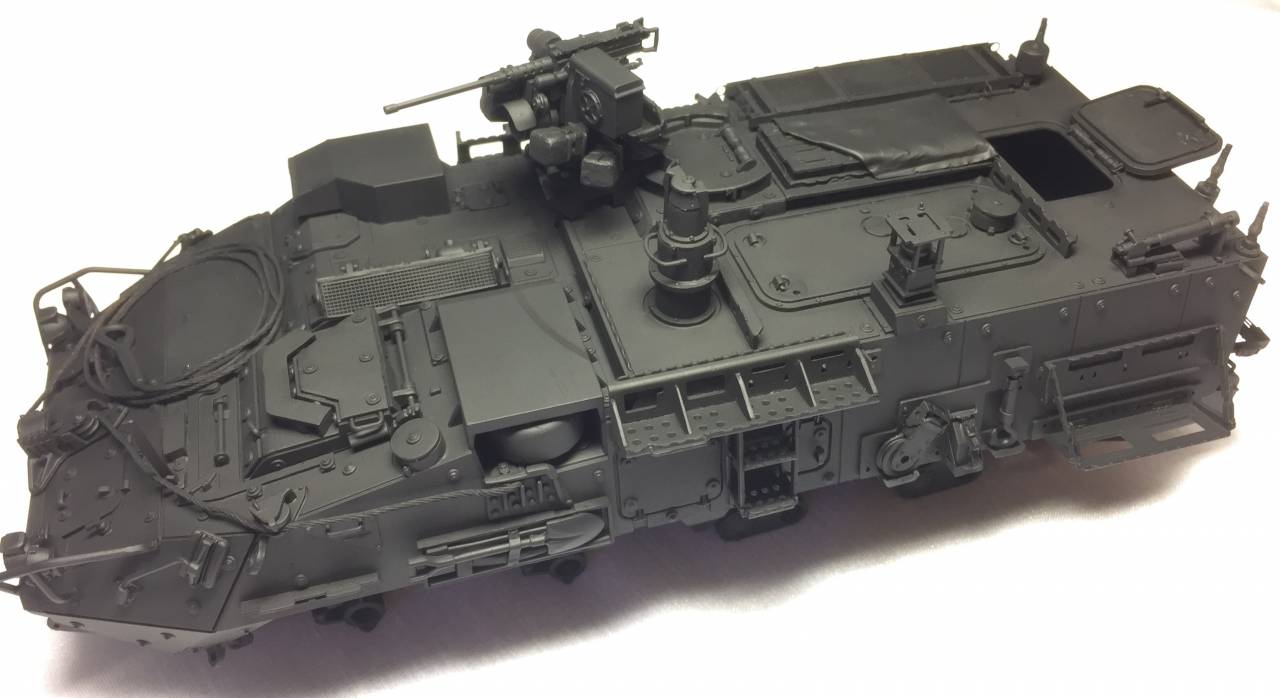
Update on the NBCRV. Ive finished all the sub assemblies and moved into the priming. Due to all of the surface details and irregular shapes the priming has taken a lot longer than normal. The wheels, stowage, and figure have all been primed as well, and they wont be added onto the vehicle until I finish the painting process.
One interesting thing I noticed about the kit is that it did not include the air horn commonly found on the Stryker vehicles. The real air horn is not omitted from the real NBCRV, and this must have been an oversight by Trumpeter.
The kit does not include a winch cable or the head for it, so I salvaged a tow cable end from a German AFV. This was the closest thing I could find in my spares box without actually shelling out any more money on this project for a more accurate cable end.
Bayern, Germany
Joined: January 17, 2006
KitMaker: 673 posts
Armorama: 116 posts
Posted: Tuesday, March 06, 2018 - 02:02 AM UTC
Well folks the build had a bit of a disaster a couple of weeks ago. I was away bowling in a tournament with my sons and my sister-in-law visited with my 10 year old nephew. He does not do well when told to stay out of places he is not supposed to go into and knowing that I always lock the "man cave" up if am going to be away when they come over - if I know they are coming that is; which sadly this time I did not. The young man got his hands on the build and it did not fare well at all. Needless to say I was not best pleased about this when I got home, and was even less pleased to hear my sister-in-law thought I was to blame as I did not lock the room and "Oh little Tobias could have gotten injured if he had gotten his hands on some sharp tools or poison stuff." Unsurprisingly, this caused a family dust up; I am a fairly recently retired NCO serving in the infantry, so I don't react well to stupid.
At any rate, now that the drama is out of the way; I have rebooted the build - I had another kit in the stash, and after a few days of grumbling pulled it out and got started. I did not have another Grand Phoenix AM cockpit, but as I mentioned earlier in the thread most of its detail is wasted due to the curvature of the fuselage hiding the majority of it. On the bright side, I get to test my new macro lens for my new camera with this reboot. I still have a lot to learn to get the right balance of light, distance and camera settings to get the most out of the lens, but it sure does get up close and personal with the subject - ALL the little mistakes show up in their glory when they are shot 1:1!
Here are few examples of the reboot build's pit, and the new scratchbuilt attachment points, that I like a lot better then the first ones I did, still in the early phase of fitting.
Enjoy!
 IMG_0719
 by
Ernest Roth, on Flickr
 IMG_0718
 by
Ernest Roth, on Flickr
 IMG_0717
 by
Ernest Roth, on Flickr
 IMG_0716
 by
Ernest Roth, on Flickr
 IMG_0720
 by
Ernest Roth, on Flickr
 IMG_0722
 by
Ernest Roth, on Flickr