

You are doing a truly excellent job, on all fronts. The M48 does not really sing to me, but your build is inspiring. I have one suggestion, concerning your base. You could cut some balsa or bass wood to the contour of the edges and glue or tack it on. I believe afv's and tanks look much better on wooden bases. Your build, though.
Jeff: What "cover" do you speak of?
Hosted by Darren Baker
Dragon`s M48A3 mod.B Build log

retiredyank

Joined: June 29, 2009
KitMaker: 11,610 posts
Armorama: 7,843 posts
Posted: Tuesday, August 22, 2017 - 05:29 PM UTC


Kevlar06

Joined: March 15, 2009
KitMaker: 3,670 posts
Armorama: 2,052 posts
Posted: Tuesday, August 22, 2017 - 08:45 PM UTC
Quoted Text
You are doing a truly excellent job, on all fronts. The M48 does not really sing to me, but your build is inspiring. I have one suggestion, concerning your base. You could cut some balsa or bass wood to the contour of the edges and glue or tack it on. I believe afv's and tanks look much better on wooden bases. Your build, though.
Jeff: What "cover" do you speak of?
I think Jeff was talking about the searchlight cover, which has a heavy sag to it in the resin model. Luftan brought it up earlier in his posting, and I commented on it in mine. The real thing is made out of canvas for the early models, and a "rubberized" coated nylon material for the later models, with a hard insert sandwiched between two layers of material over the lens which keeps it flat against the lens when installed. The only way to get a "heavy sag" like that on the real thing would be to remove the hard insert on the inside of the cover. Many of these covers were actually painted with designs by the crews in Vietnam. The book "Vietnam Tracks" has several photos. A few wrinkles would be acceptable.
VR, Russ
Luftan

Joined: June 04, 2016
KitMaker: 87 posts
Armorama: 76 posts
Posted: Tuesday, August 22, 2017 - 10:01 PM UTC
Thank you all for your encouragement and feedback 
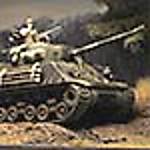
As for the engine deck weld line, I must say I did very little photo research. I thought it would be a nice accent to otherwise detail-less open space.
I found this picture online of a M48A3. The weld line is present, but not as pronounce as mine.
@Jeff
I have never heard of Spade Ace track before. Turns out they are rarely sold here in Japan. I could probably get it imported from China, but the transportation fee would be quite expensive Im afraid.
The searchlight covers will stay as is. The cover is moulded directly to the searchlight, so creating a new cover will require some saw work. It is impossible to do that kind of work this late in the build
Small PE frets around the mantlet cover was not so difficult to attach. Tedious, but simple CA glue job. The whole mantlet area is a lot more complicated with the real vehicle. If you want to achieve perfect realism, it would require more work around that area. Me? Im too lazy!
@Matt
Thank you for your kind words. I actually attached a flat wood piece on the bottom to give the whole base more stability (in looks). I did however, paint the entire thing with matt black. Here is how it looks now.

One of the reason why I never built a diorama was the necessity to build a base your self. Im terrible at wood work. I used plastic sheet solely to avoid the use of wood.
But I agree. Nothing beats a nice clean wooden base with proper finish to it. Someday I will try!
Not much progress today.

The searchlight cover was first airbrushed with Tamiya acrylic buff deluded with lacquer thinner. This way, the paint flows much better through my cheap airbrush. I later brush painted shadow and highlight to achieve a more artsy looks.
Same technique with the mantlet cover. I noticed that in most pictures, the mantlet cover are usually lighter greenish colour rather than tan. I used Vallejo khaki. Dark grey and skin tone colour was mixed for shadow/highlight.
Less than a month to complete. I am losing hope haha.
As for the engine deck weld line, I must say I did very little photo research. I thought it would be a nice accent to otherwise detail-less open space.
I found this picture online of a M48A3. The weld line is present, but not as pronounce as mine.
@Jeff
I have never heard of Spade Ace track before. Turns out they are rarely sold here in Japan. I could probably get it imported from China, but the transportation fee would be quite expensive Im afraid.
The searchlight covers will stay as is. The cover is moulded directly to the searchlight, so creating a new cover will require some saw work. It is impossible to do that kind of work this late in the build
Small PE frets around the mantlet cover was not so difficult to attach. Tedious, but simple CA glue job. The whole mantlet area is a lot more complicated with the real vehicle. If you want to achieve perfect realism, it would require more work around that area. Me? Im too lazy!
@Matt
Thank you for your kind words. I actually attached a flat wood piece on the bottom to give the whole base more stability (in looks). I did however, paint the entire thing with matt black. Here is how it looks now.
One of the reason why I never built a diorama was the necessity to build a base your self. Im terrible at wood work. I used plastic sheet solely to avoid the use of wood.
But I agree. Nothing beats a nice clean wooden base with proper finish to it. Someday I will try!
Not much progress today.
The searchlight cover was first airbrushed with Tamiya acrylic buff deluded with lacquer thinner. This way, the paint flows much better through my cheap airbrush. I later brush painted shadow and highlight to achieve a more artsy looks.
Same technique with the mantlet cover. I noticed that in most pictures, the mantlet cover are usually lighter greenish colour rather than tan. I used Vallejo khaki. Dark grey and skin tone colour was mixed for shadow/highlight.
Less than a month to complete. I am losing hope haha.
Kevlar06
Joined: March 15, 2009
KitMaker: 3,670 posts
Armorama: 2,052 posts
Posted: Wednesday, August 23, 2017 - 09:38 AM UTC
Luftan-- excellent work. Don't fret over the small stuff, I think it's coming together just fine. One more small critique though-- the lip on the inside of the loaders hatch should be the same color as the exterior of the tank-- not white. I think the searchlight cover looks fine, the sag is what it would look like with the hard insert removed. The weld line on the rear deck will almost be unnoticeable under a coat of dirt. Keep up the great work!
VR, Russ
VR, Russ
Luftan
Joined: June 04, 2016
KitMaker: 87 posts
Armorama: 76 posts
Posted: Wednesday, August 23, 2017 - 10:16 PM UTC
Quoted Text
Luftan-- excellent work. Don't fret over the small stuff, I think it's coming together just fine. One more small critique though-- the lip on the inside of the loaders hatch should be the same color as the exterior of the tank-- not white. I think the searchlight cover looks fine, the sag is what it would look like with the hard insert removed. The weld line on the rear deck will almost be unnoticeable under a coat of dirt. Keep up the great work!
VR, Russ
Thank you Russ.
Yes. I have a bad habit of painting the hatches with accent colour. I do it knowing its historically wrong. I can't stop my self from opening the white paint bottle
Same with the hatch opening for the commander`s mini cupola.

If the white ends up standing out too much, I might cover it up with olive drab. I plan on weathering the hatch area quite heavily, so it shouldn't be too visible anyways. The figure will also be mounted to partially cover the hatch opening.
Kenaicop

#384
Joined: August 23, 2005
KitMaker: 1,426 posts
Armorama: 1,316 posts

Posted: Thursday, August 24, 2017 - 12:18 AM UTC
Looking great. I may have missed it, but what brand of paint did you use for the main olive drab color?
Kevlar06
Joined: March 15, 2009
KitMaker: 3,670 posts
Armorama: 2,052 posts
Posted: Thursday, August 24, 2017 - 01:04 AM UTC
Luftan,
The M60 coupula has a smaller hatch on top, but as a former TC I occasionally sat on the hatch with my feet propped up on the center of the coupula sill behind the TCs periscope to "relax" when we were parked. I kept a folded OD green terry-cloth towel in the the turret to sit on because the hatch was very hard- perhaps you can use a similar towel to cover up the white in the TCs coupula.
VR, Russ
Luftan
Joined: June 04, 2016
KitMaker: 87 posts
Armorama: 76 posts
Posted: Friday, August 25, 2017 - 10:43 AM UTC
Quoted Text
Looking great. I may have missed it, but what brand of paint did you use for the main olive drab color?
Hi. I almost always try to use Mr.Colour when I am airbrushing, unless I have other reasons (hair spray etc). For the olive drab, I mixed 304 and 128 in 1:1 ratio.
@Russ
Thanks for the tip! The figure that will be mounted on the commander`s cupola would be half standing up with his feet on the edge. It might be a good idea to add a piece of cloth later on, if it doesn't obstruct the fit.
I could find very little detail on the inside of the mod.B cupola, so I had to use my imagination. Dragon didn't add any detail to the inside of the hatch unfortunately.
bat-213

Joined: December 30, 2011
KitMaker: 902 posts
Armorama: 788 posts
Posted: Saturday, August 26, 2017 - 10:44 AM UTC
 your build looks great ,love all the add ons ,very nice build .

Luftan
Joined: June 04, 2016
KitMaker: 87 posts
Armorama: 76 posts
Posted: Tuesday, August 29, 2017 - 09:57 AM UTC
Thank you Roy 
I begun painting the stowage on the turret. They were all glued during assembly, so painting them turned out to be a quite tedious work.
I mostly used Vallejo paint range for stowage.

Its a shame Legend doesn't provide decals for their resin sets. I had to scavenge some decals for US ammo canisters. They are probably for 50cal ammunition, but they will be placed on 40mm bofors canisters.

The turret stowage isn't 100% done yet, but the main layout would be like above. Is there anything I should modify, or add? Adding some fresh food/fruits might be a good idea.
I remember making a bucket full of tomatoes for my Panzer.II.

After minor tweaking and fix ups, I will coat the entire model with semi-gloss clear to protect the decals and enamel paint. Then I will move on to filtering and pin-wash.
I begun painting the stowage on the turret. They were all glued during assembly, so painting them turned out to be a quite tedious work.
I mostly used Vallejo paint range for stowage.
Its a shame Legend doesn't provide decals for their resin sets. I had to scavenge some decals for US ammo canisters. They are probably for 50cal ammunition, but they will be placed on 40mm bofors canisters.
The turret stowage isn't 100% done yet, but the main layout would be like above. Is there anything I should modify, or add? Adding some fresh food/fruits might be a good idea.
I remember making a bucket full of tomatoes for my Panzer.II.
After minor tweaking and fix ups, I will coat the entire model with semi-gloss clear to protect the decals and enamel paint. Then I will move on to filtering and pin-wash.
Kevlar06
Joined: March 15, 2009
KitMaker: 3,670 posts
Armorama: 2,052 posts
Posted: Tuesday, August 29, 2017 - 10:26 AM UTC
Luftan, it looks fabulous!! My tank never went anywhere without a case of sodas aboard somewhere-- Cokes were a favorite-- perhaps you could find one of those printed cardboard Vietnam era boxes somewhere. You could also include a copy of a period magazine too. We sometimes loaded one of the sponson boxes with ice from the mess hall, and put the sodas in the box-- they'd stay cool even in the summer for several hours-- almost all day. Probably wouldn't last long in Vietnam though. You could also add some pairs of jungle boots with the laces tied together, and perhaps some smoke grenades with the spoons hung on a strap on the commander's coupula. But-- it looks really good just as it is.
VR, Russ
VR, Russ
Luftan
Joined: June 04, 2016
KitMaker: 87 posts
Armorama: 76 posts
Posted: Tuesday, August 29, 2017 - 02:26 PM UTC
Thank you for the awesome real life story! It's quite rare to hear stories from people who actually rode in these vehicles (even if it's not exactly the same type).
Legend actually gives few bottols shaped like coke bins, but they are solid resin. I might have to go with the clear glass set from miniart, and print my own decal.
Smoke grenade around command cupola is definitely something I want to challenge. Conveniently, legend also provides 10 or so M18 smoke grenades. But they have no decals....
How were these smoke grenades attached? I see a string going through the circle ring, but where was the string attached to?
I also see a case of 50cal ammo stowed next to the commander cupola. Not sure how it's connected either.
Kevlar06
Joined: March 15, 2009
KitMaker: 3,670 posts
Armorama: 2,052 posts
Posted: Tuesday, August 29, 2017 - 07:49 PM UTC
Luftan-- Coke cans are what I was referring to-- not bottles, which would be hard to carry on an armored vehicle (but not impossible). As for the smoke grenades, a strap of webbing material could be wound from one side of the coupula from the opening for the machine gun to the side of the hatch-- on the left side. The grenades would be hung by the spoon through the strap. That way they were available for easy access. Generally speaking, there would have been a selection of colors, which would be used for various purposes such as to mark a "dust off" landing zone, aircraft tageting, or for cover and concealment (the colors would change for specific purposes on a daily basis so the enemy could not mimic marking operations-- and would be referenced in the daily CEOI extract---Communications Electronics Operating Instructions).
VR, Russ
VR, Russ
Kenaicop
#384
Joined: August 23, 2005
KitMaker: 1,426 posts
Armorama: 1,316 posts
Posted: Tuesday, August 29, 2017 - 09:25 PM UTC
CEOI's! Haven't thought about them in decades! I used to issues those, what a pain. My favorite part of being commo, not, was being called out to fix someone's radio in the middle of the night, usually a 2nd Lt., only to discover his Vinson was on with no fill. You would think the crew would know this, maybe they did and the Lt wouldn't listen, who knows. Memories But I was promoted to Lt one night by a LTC for fixing his stuff, sort of did a papal blessing on me, he wouldn't put it in writing though, lol.
But I was promoted to Lt one night by a LTC for fixing his stuff, sort of did a papal blessing on me, he wouldn't put it in writing though, lol. 
jwest21
Joined: October 16, 2006
KitMaker: 3,374 posts
Armorama: 3,126 posts
Posted: Tuesday, August 29, 2017 - 11:04 PM UTC
Whoa...this is amazing
Luftan
Joined: June 04, 2016
KitMaker: 87 posts
Armorama: 76 posts
Posted: Thursday, August 31, 2017 - 09:21 PM UTC
Thanks Jason!
@Russ
Thank you for the clear up! Coke cans might present difficulty DIY-ing, since they are quite small. It might be hard for me to create a decal that small with enough details.
I remember reading somewhere, that Vietcong used to intercept what US troops were up to after learning about the each use of smoke colours. I am really hoping to get hands on Bravo6`s smoke grenade set, as they come with decals in box. Unfortunately, no luck finding them here in Japan so far
I only have 15 days before the big convention. Its probably one of the biggest, if not the biggest hobby show for AFV in Japan. I really want to finish my diorama, but I may need to give up.
After hand painting the stowages on the turret, I gave the entire model a clear coat of Mr.Colour semi-gloss.
I applied light oil-wash to give more variety to otherwise mono-tone olive drab, and moved on to wash. For this model, I decided to give the entire tank a rather thick coat of enamel wash. I usually avoid this method for few reasons.
1. If not done right, the model will simply look dirty in an unrealistic way.
2. Enamel thinner eats through plastic like a butter. If you are not careful, tiny parts will fly over everywhere.

After the wash dried, I damp cotton sticks with enamel thinner, and gently wipe off 95% of the wash. You want to keep the dark wash around the details. If you are good at it, you can also create streak line as a bonus
With 100 or so cotton sticks into the trash, the model received a coat of Tamiya Acrylic flat. This time, the clear coat will protect the pin-wash from blending into the 1st layer of wash.

[img]http://i.imgur.com/TJIcEp8.jpg" BORDER="0">
The tank is starting to look ugly... in a good way!
I will add more stowage later on in the build, as well as create scratches and more streak lines.


@Russ
Thank you for the clear up! Coke cans might present difficulty DIY-ing, since they are quite small. It might be hard for me to create a decal that small with enough details.
I remember reading somewhere, that Vietcong used to intercept what US troops were up to after learning about the each use of smoke colours. I am really hoping to get hands on Bravo6`s smoke grenade set, as they come with decals in box. Unfortunately, no luck finding them here in Japan so far
I only have 15 days before the big convention. Its probably one of the biggest, if not the biggest hobby show for AFV in Japan. I really want to finish my diorama, but I may need to give up.
After hand painting the stowages on the turret, I gave the entire model a clear coat of Mr.Colour semi-gloss.
I applied light oil-wash to give more variety to otherwise mono-tone olive drab, and moved on to wash. For this model, I decided to give the entire tank a rather thick coat of enamel wash. I usually avoid this method for few reasons.
1. If not done right, the model will simply look dirty in an unrealistic way.
2. Enamel thinner eats through plastic like a butter. If you are not careful, tiny parts will fly over everywhere.
After the wash dried, I damp cotton sticks with enamel thinner, and gently wipe off 95% of the wash. You want to keep the dark wash around the details. If you are good at it, you can also create streak line as a bonus
With 100 or so cotton sticks into the trash, the model received a coat of Tamiya Acrylic flat. This time, the clear coat will protect the pin-wash from blending into the 1st layer of wash.
[img]http://i.imgur.com/TJIcEp8.jpg" BORDER="0">
The tank is starting to look ugly... in a good way!
I will add more stowage later on in the build, as well as create scratches and more streak lines.
Luftan
Joined: June 04, 2016
KitMaker: 87 posts
Armorama: 76 posts
Posted: Friday, September 01, 2017 - 08:51 PM UTC
Little more work in my spare time.
Not much, but progress is a progress.
I painted milk can that came with Legend`s Panzer.II stowage set.

As you can tell by the looks, I used hair spray technique for this. I first painted the entire can with rust colours using red/white. After a thing layer of hair spray, Tamiya Acrylic`s flat white was airbrushed. Give it 20 or so minutes to dry, and start pealing off the white using stiff brush and water.
You can vary the chipping effect by altering the thickness of the top spray, hair spray and time for drying.
Next up, I moved on to the side ammo stowage.
Legend provides chunk of 50cal ammunition boxes lined up on metal bracket. It look good enough, but I decided to scratch build the entire thing for easier painting. Luckily, Legend provides 10 or so extra ammo boxes.

I decided to keep one of the boxes open, and show the ammunition for more interesting looks.
Not much, but progress is a progress.
I painted milk can that came with Legend`s Panzer.II stowage set.
As you can tell by the looks, I used hair spray technique for this. I first painted the entire can with rust colours using red/white. After a thing layer of hair spray, Tamiya Acrylic`s flat white was airbrushed. Give it 20 or so minutes to dry, and start pealing off the white using stiff brush and water.
You can vary the chipping effect by altering the thickness of the top spray, hair spray and time for drying.
Next up, I moved on to the side ammo stowage.
Legend provides chunk of 50cal ammunition boxes lined up on metal bracket. It look good enough, but I decided to scratch build the entire thing for easier painting. Luckily, Legend provides 10 or so extra ammo boxes.
I decided to keep one of the boxes open, and show the ammunition for more interesting looks.
Luftan
Joined: June 04, 2016
KitMaker: 87 posts
Armorama: 76 posts
Posted: Saturday, September 02, 2017 - 10:06 PM UTC
More progress.
I do like fiddling around with small detail, rather than big things like diorama. As Russ mentioned few replies ago, some M48s can be seen with smoke grenades chained around their commander cupolas. I really wanted to replicate this.
Legend provides ok-ish smoke grenades. I cut off the top edge, and made the circle pin out of 0.2mm steel wire. These were then attached to smoke grenades using CA glue.

After priming the metal wire, I first painted the entire thing with white. Masked the white line using thin masking stripes, then sprayed on Brown-Violet (used for ww2 Luftwaffe planes).
Since there were no decals provided for the smoke grenades, I had to come up with an alternative. I simply used some spare decal from Tamiya`s modern US equipment set. Its a shame that the iconic "M18" insignia isn't there, but this`ll do fine.

Still not quite sure how to attach them to the cupola. Its looking alright, but I might need a thicker string.
I do like fiddling around with small detail, rather than big things like diorama. As Russ mentioned few replies ago, some M48s can be seen with smoke grenades chained around their commander cupolas. I really wanted to replicate this.
Legend provides ok-ish smoke grenades. I cut off the top edge, and made the circle pin out of 0.2mm steel wire. These were then attached to smoke grenades using CA glue.
After priming the metal wire, I first painted the entire thing with white. Masked the white line using thin masking stripes, then sprayed on Brown-Violet (used for ww2 Luftwaffe planes).
Since there were no decals provided for the smoke grenades, I had to come up with an alternative. I simply used some spare decal from Tamiya`s modern US equipment set. Its a shame that the iconic "M18" insignia isn't there, but this`ll do fine.
Still not quite sure how to attach them to the cupola. Its looking alright, but I might need a thicker string.
Steven000

Joined: August 07, 2016
KitMaker: 191 posts
Armorama: 120 posts
Posted: Saturday, September 02, 2017 - 11:18 PM UTC
That looks very nice Luftan!
Great project ; )
Kind regards
Steven
Great project ; )
Kind regards
Steven
JSSVIII
Joined: March 28, 2007
KitMaker: 1,169 posts
Armorama: 1,067 posts
Posted: Sunday, September 03, 2017 - 01:06 AM UTC
Amazing work Luftan!
Kevlar06
Joined: March 15, 2009
KitMaker: 3,670 posts
Armorama: 2,052 posts
Posted: Sunday, September 03, 2017 - 01:52 AM UTC
Very, Very nice Luftan, like the real thing in fact. Here's a suggestion for you though.. the coupula view ports have a rubber waterproofing packing held in place with an oval metal insert with threaded bolts-- pop out one of those bolts and use it as an attachment point for the end of the strap.. you can make a wider strap out of foil, and run it up to the base of the MG mount or alternatively into the MG opening at the front of the coupula if you want-- but I think the cord you have looks good too.
VR, Russ
VR, Russ
Luftan
Joined: June 04, 2016
KitMaker: 87 posts
Armorama: 76 posts
Posted: Sunday, September 03, 2017 - 07:24 AM UTC
Thanks guys.
@Russ
I can't exactly picture what you are describing. Apologise for my poor comprehensive skills, but do you have any reference photo that I can work from??
@Russ
I can't exactly picture what you are describing. Apologise for my poor comprehensive skills, but do you have any reference photo that I can work from??
Luftan
Joined: June 04, 2016
KitMaker: 87 posts
Armorama: 76 posts
Posted: Sunday, September 03, 2017 - 10:13 AM UTC
Nevermind. I think I get what you mean.
That's actually a good idea. Better than putting the string through the openin of the hatch. It should be an easy work too!
That's actually a good idea. Better than putting the string through the openin of the hatch. It should be an easy work too!
Kevlar06
Joined: March 15, 2009
KitMaker: 3,670 posts
Armorama: 2,052 posts
Posted: Sunday, September 03, 2017 - 10:15 AM UTC
Luftan-- I'll look for some images, I might have some, that I can send via email. I'll PM you my address. But in short, if you look at your photos, there is a an oval metal seal on the viewports that surround the coupula. The seal has some raised bumps on it-- those are actually bolts that are removeable so the seals in the ballistic glass in the viewport can be replaced. These could be removed and a longer bolt put in with a wire loop in it, or a canvass webbing strap could be fastened to. The other end could be looped around the base of the machine gun post, or threaded around the front of the coupula to the opening for the coupula mounted MG, or even to the other side of the coupula. There are also retaining bolts with wire safety wires on the trunnion mounts for the coupula mounted MG on the left side, and removable bolts on the cap over the trunnion on the right side, wires or straps can be attached to those too.
VR, Russ
VR, Russ
Luftan
Joined: June 04, 2016
KitMaker: 87 posts
Armorama: 76 posts
Posted: Wednesday, September 06, 2017 - 09:53 PM UTC
Ive been working on the model quite extensively for past few days.
Im am excited to show you the progress. Russell has given me plenty of good reference photos of his model and the real tank, and that has given me lots of inspiration to work from.
In the last post, I washed the entire model with thin enamel paint, and filtered it using some oil. The tank looks ok, but it needs more beating, more detail, more scratches and dirt.


With the combination of enamel and oil paint, the plastic starts looking like thick metal (I hope so). Tiny chips were created using sponge, and others were hand painted with a thin brush.
I need to be careful not to over-do it. Too much is never too good.
After I was done with scratches and streaks, I covered the model once again with Tamiya Acrylic flat clear thinned with lacquer.
Then I proceeded on tasking off the masks for the glass details. Moment of truth!

Some clear parts had some leaks, but overall, the results were acceptable. I was especially happy with the front driver lights. M48 has 2 sets of front light, one IR and one ordinary light. I was able to recreate this detail pretty well.

Lasty, Russel told me that barbwire were frequently carried on a tank for extra protection. The barbwire kits they sell here in Japan didn't quite look nice for 1/35 use, so I decided to make it my self.
I used the internal thin wires from old USB cable.

They were first twisted using a drill. Ends were CA glued so it doesn't get untangled. After that, I started rapping same wire one by one, just like the real thing.
Im am excited to show you the progress. Russell has given me plenty of good reference photos of his model and the real tank, and that has given me lots of inspiration to work from.
In the last post, I washed the entire model with thin enamel paint, and filtered it using some oil. The tank looks ok, but it needs more beating, more detail, more scratches and dirt.
With the combination of enamel and oil paint, the plastic starts looking like thick metal (I hope so). Tiny chips were created using sponge, and others were hand painted with a thin brush.
I need to be careful not to over-do it. Too much is never too good.
After I was done with scratches and streaks, I covered the model once again with Tamiya Acrylic flat clear thinned with lacquer.
Then I proceeded on tasking off the masks for the glass details. Moment of truth!
Some clear parts had some leaks, but overall, the results were acceptable. I was especially happy with the front driver lights. M48 has 2 sets of front light, one IR and one ordinary light. I was able to recreate this detail pretty well.
Lasty, Russel told me that barbwire were frequently carried on a tank for extra protection. The barbwire kits they sell here in Japan didn't quite look nice for 1/35 use, so I decided to make it my self.
I used the internal thin wires from old USB cable.
They were first twisted using a drill. Ends were CA glued so it doesn't get untangled. After that, I started rapping same wire one by one, just like the real thing.
 |

WEB HOSTING BY


Copyright ©2021 Armorama and Kitmaker Network, a subsidiary of Silver Star Enterprises
All Rights Reserved. Please read our Conditions of Use and Privacy Policy.
All Rights Reserved. Please read our Conditions of Use and Privacy Policy.