Beginners Guide to Photo Etch

#464
British Columbia, Canada
Joined: December 02, 2016
KitMaker: 267 posts
Armorama: 196 posts
Posted: Wednesday, October 11, 2017 - 07:39 AM UTC
Well doing another build as I recall old skills and develop new.
Photo etch is another new tool to me and I need some help.
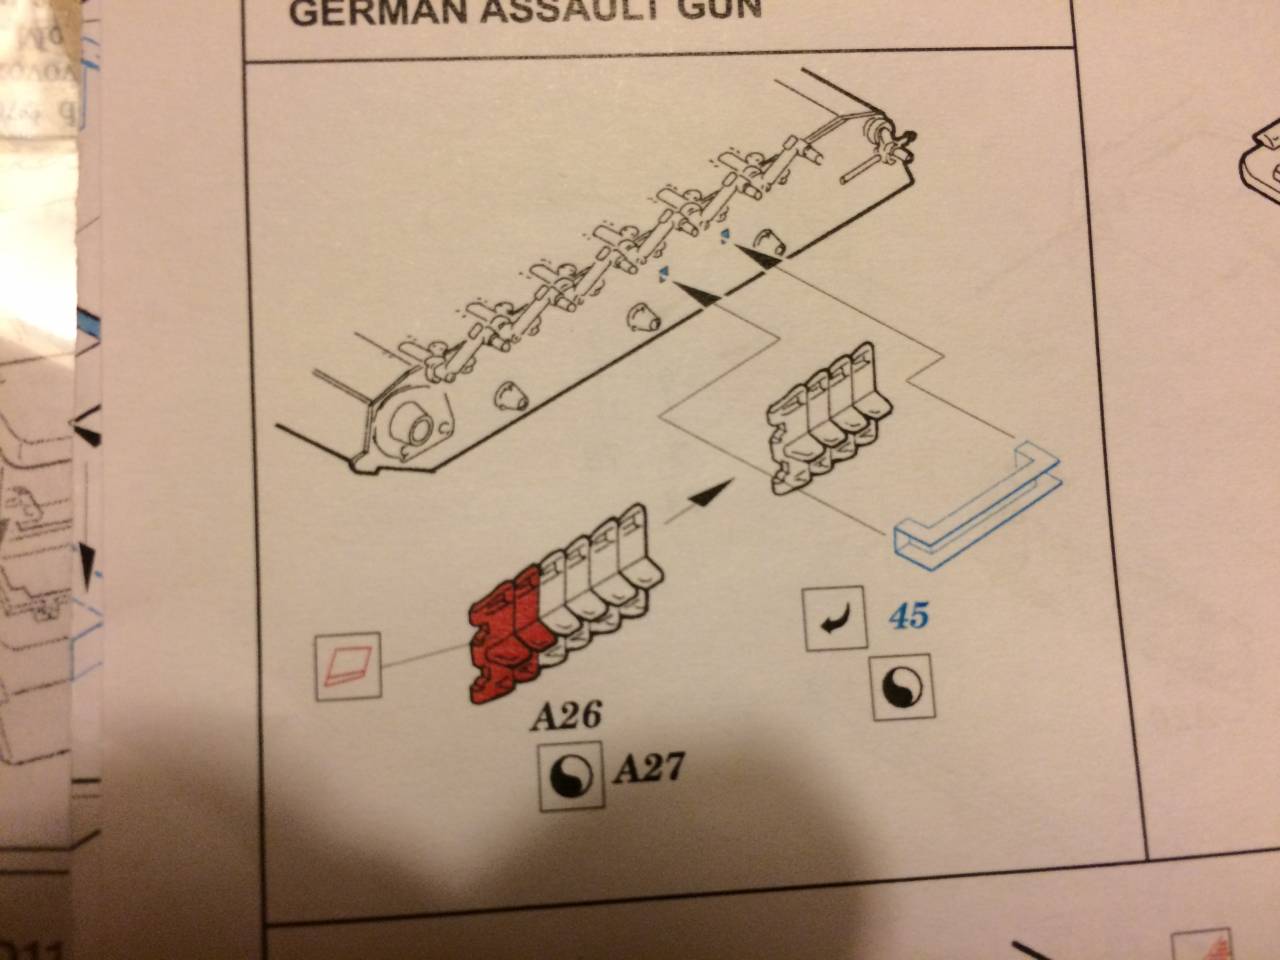
This is the instruction for making this piece, pretty straight forward. Now there I do not see any instructions telling me to remove any parts from the photo etch.
Yet there is more metal there than shown, do I cut off the excess?
#464
British Columbia, Canada
Joined: December 02, 2016
KitMaker: 267 posts
Armorama: 196 posts
Posted: Wednesday, October 11, 2017 - 08:11 AM UTC
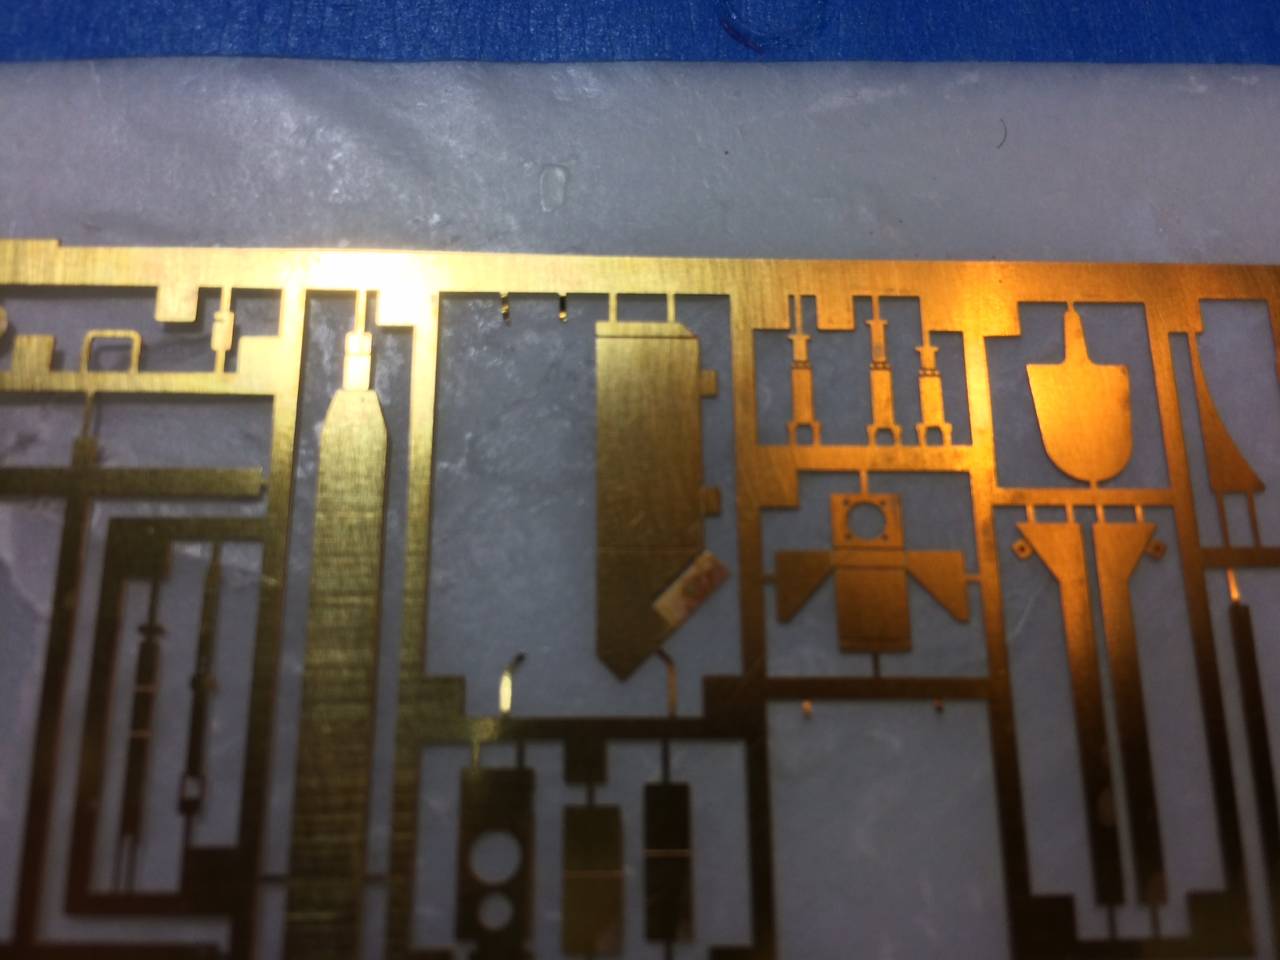
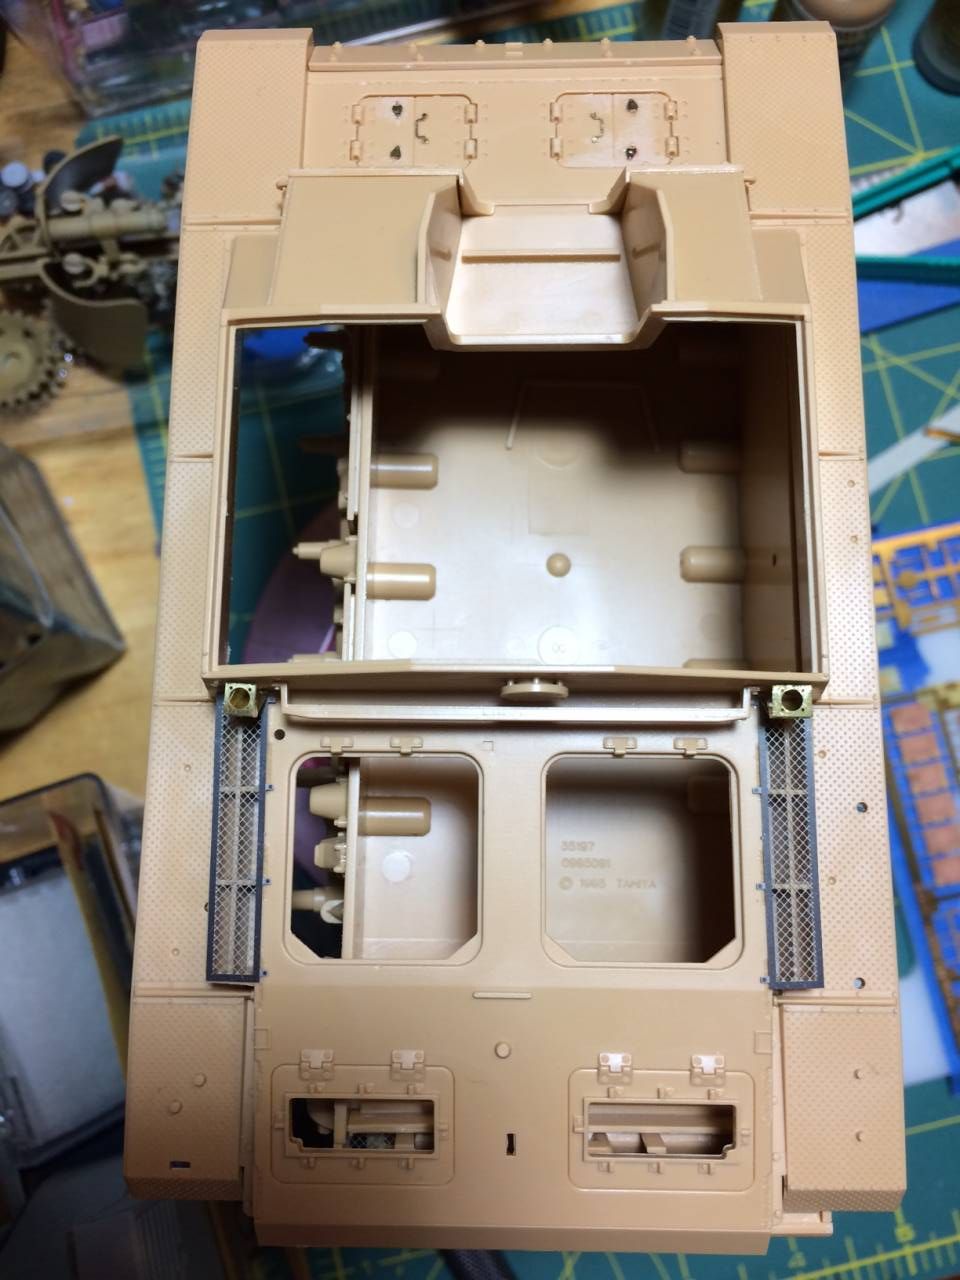
Now, I think I did this wrong, though it looked good at first.
Shields are upside down, right?
Also none of the, online, reference photos show those shields, but they do show the flex shield. The kit one is thicker and does look off.
The photo etch is for a Stug III G early, Tamiya, and I am just adding the pieces that look like they would be there, or I see them in a reference photo.
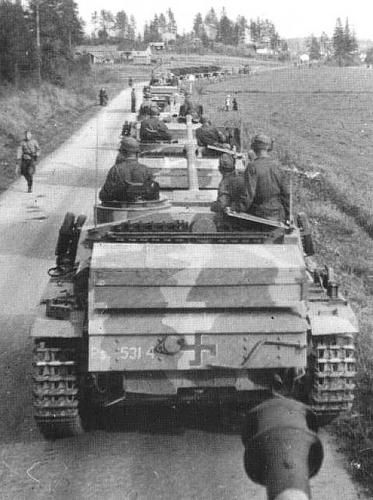
Found a photo, online, of a Finnish Stug with these shields, shrouds, on.
Hame, Finland
Joined: August 14, 2006
KitMaker: 40 posts
Armorama: 35 posts
Posted: Thursday, October 12, 2017 - 07:32 PM UTC
#464
British Columbia, Canada
Joined: December 02, 2016
KitMaker: 267 posts
Armorama: 196 posts
Posted: Thursday, October 12, 2017 - 09:18 PM UTC
Thank you, been looking at that already and, well, not going to put the spare tread holder on the added plate as that came about after the war it appears.
This photo is the one that seems to show the L shaped shields at the rear.
#464
British Columbia, Canada
Joined: December 02, 2016
KitMaker: 267 posts
Armorama: 196 posts
Posted: Thursday, October 12, 2017 - 11:20 PM UTC
Maybe I am not getting any answers because the image is not that clear? Or the question is not clear enough?
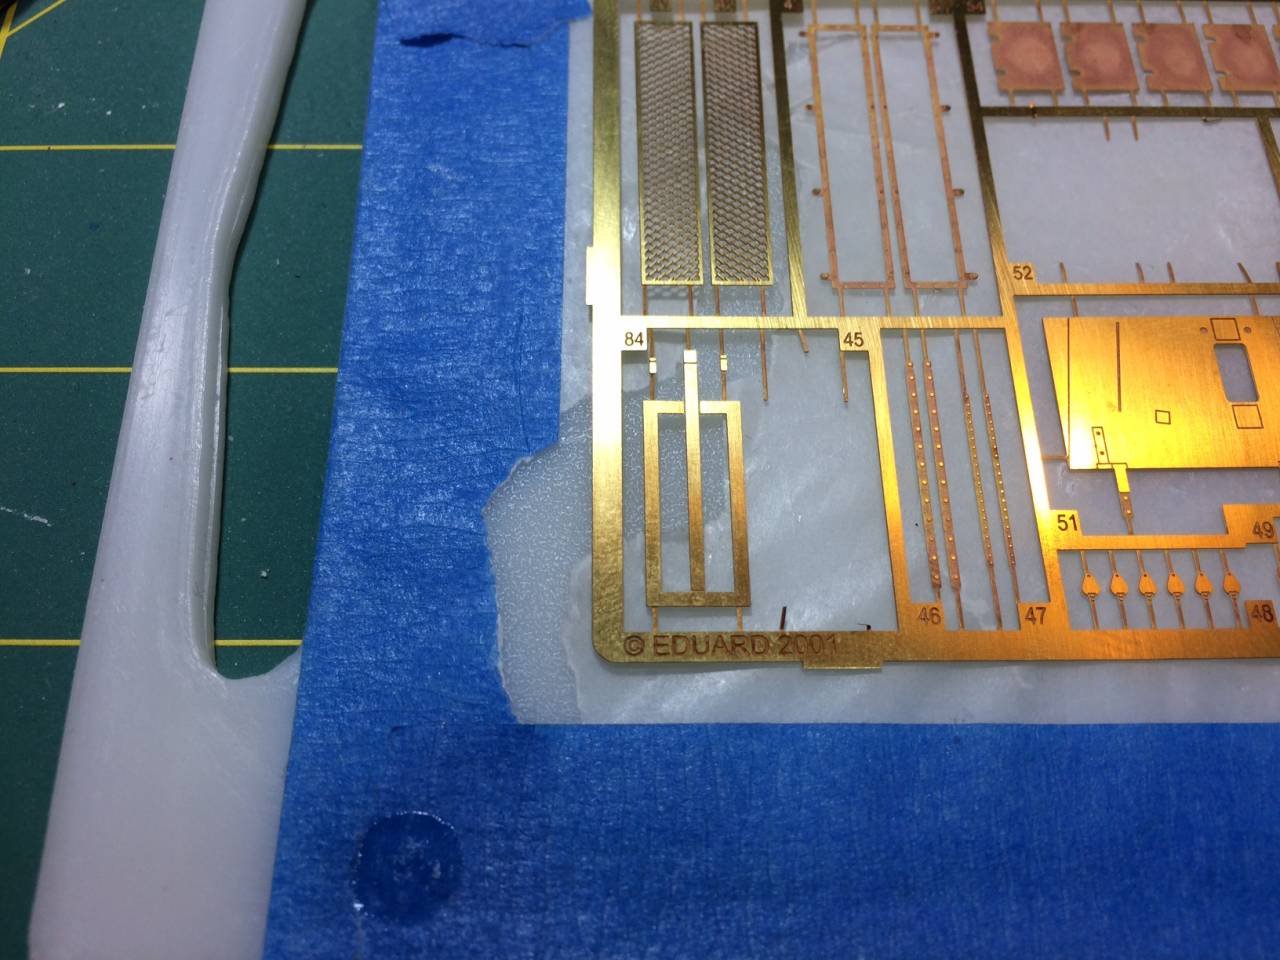
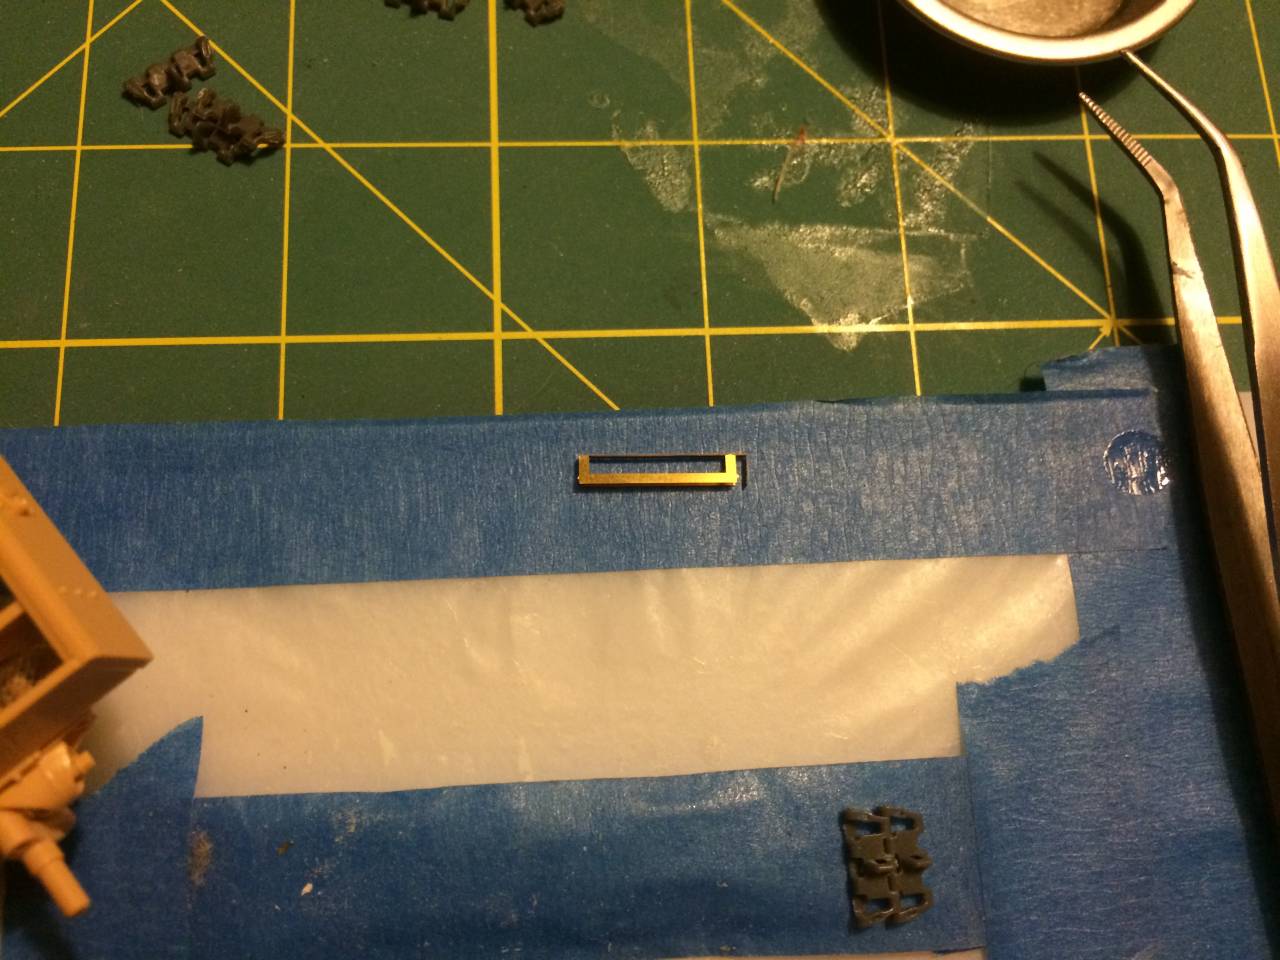
This is another of the brackets, as you can see there are fold lines, in an odd place, but no cut marks.
This one has a cut mark though and there is where my confusion lies. As the other has fold marks but no cut marks.
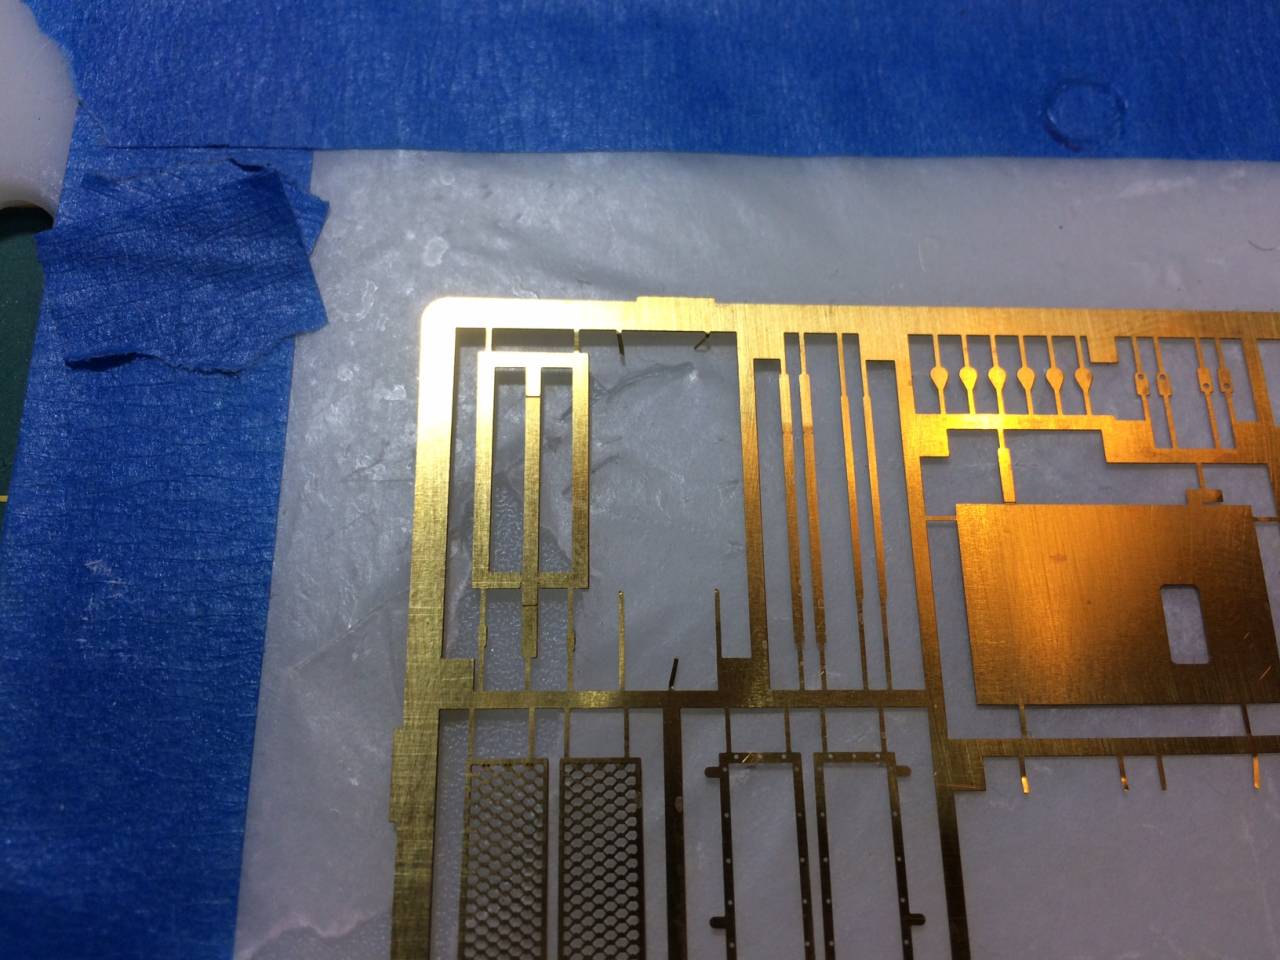
More fold marks present on this one, but again, they are in a position where you cannot fold it when it is all a solid piece.
So, maybe I should just cut it and see how it works?
Well this is embarrassing, so after looking at the photos a little closer and then looking at the actual photo-etch I believe I need a more powerful magnifying glass. There are cut-here marks that I just did not see, before.
Pennsylvania, United States
Joined: October 16, 2006
KitMaker: 3,374 posts
Armorama: 3,126 posts
Posted: Friday, October 13, 2017 - 07:39 AM UTC
Nice work! My favorite StuG
Alabama, United States
Joined: August 13, 2017
KitMaker: 6 posts
Armorama: 6 posts
Posted: Friday, October 13, 2017 - 04:36 PM UTC
By "cut mark" do you mean fold mark?
New Jersey, United States
Joined: September 22, 2006
KitMaker: 1,081 posts
Armorama: 1,066 posts
Posted: Friday, October 13, 2017 - 07:07 PM UTC
Get one of those pe bending tools . they come in handy !
#464
British Columbia, Canada
Joined: December 02, 2016
KitMaker: 267 posts
Armorama: 196 posts
Posted: Friday, October 13, 2017 - 09:29 PM UTC
Quoted Text
By "cut mark" do you mean fold mark?
I zoomed into the photo to give a more clear view.
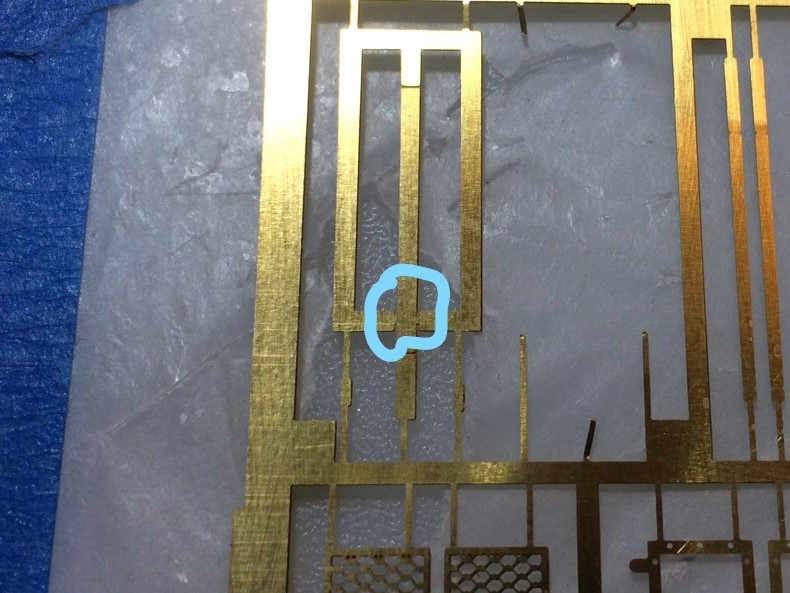
Those little indents are cut marks, which I had not noticed before. But cut that spot and the bar folds up the way it is supposed to.
#464
British Columbia, Canada
Joined: December 02, 2016
KitMaker: 267 posts
Armorama: 196 posts
Posted: Friday, October 13, 2017 - 09:32 PM UTC
Quoted Text
Get one of those pe bending tools . they come in handy !
Got one off eBay and it is one of the small ones, like the Bug, works nice but again this is my first time, really, doing the photo etch and, well you know, it is a skill. Enjoying it though.
#464
British Columbia, Canada
Joined: December 02, 2016
KitMaker: 267 posts
Armorama: 196 posts
Posted: Friday, October 13, 2017 - 09:37 PM UTC
So during all my prowling on the web for information on photo-etch I have found a few things that are not clear.
First I did not find any mention about setting up for doing this. By that I mean there was no mention of how to set up the work flow.
What I ended up doing, as I made a build error, minor but still a pain, was to sit down and mark on the instructions, all the pieces that could be affected by replacement with photo-etch. Then on the photo etch instructions I wrote the step number from the instructions in to alert me when that should be dealt with. After that I marked all parts that may be modified with red ink so that I knew to look at the instructions and ensure that I did not miss anything.
Next I am confused about burnishing, do I have to do that to all photo-etch?
Should I solder all photo etch or can I just glue the pieces together?
#464
British Columbia, Canada
Joined: December 02, 2016
KitMaker: 267 posts
Armorama: 196 posts
Posted: Saturday, October 14, 2017 - 04:51 AM UTC
So got a little more work done.
Need to work on placement, but so far this is going okay. At least the little photo-etch parts do not go shooting across the room.
CA is a challenge though.
The front hatches.
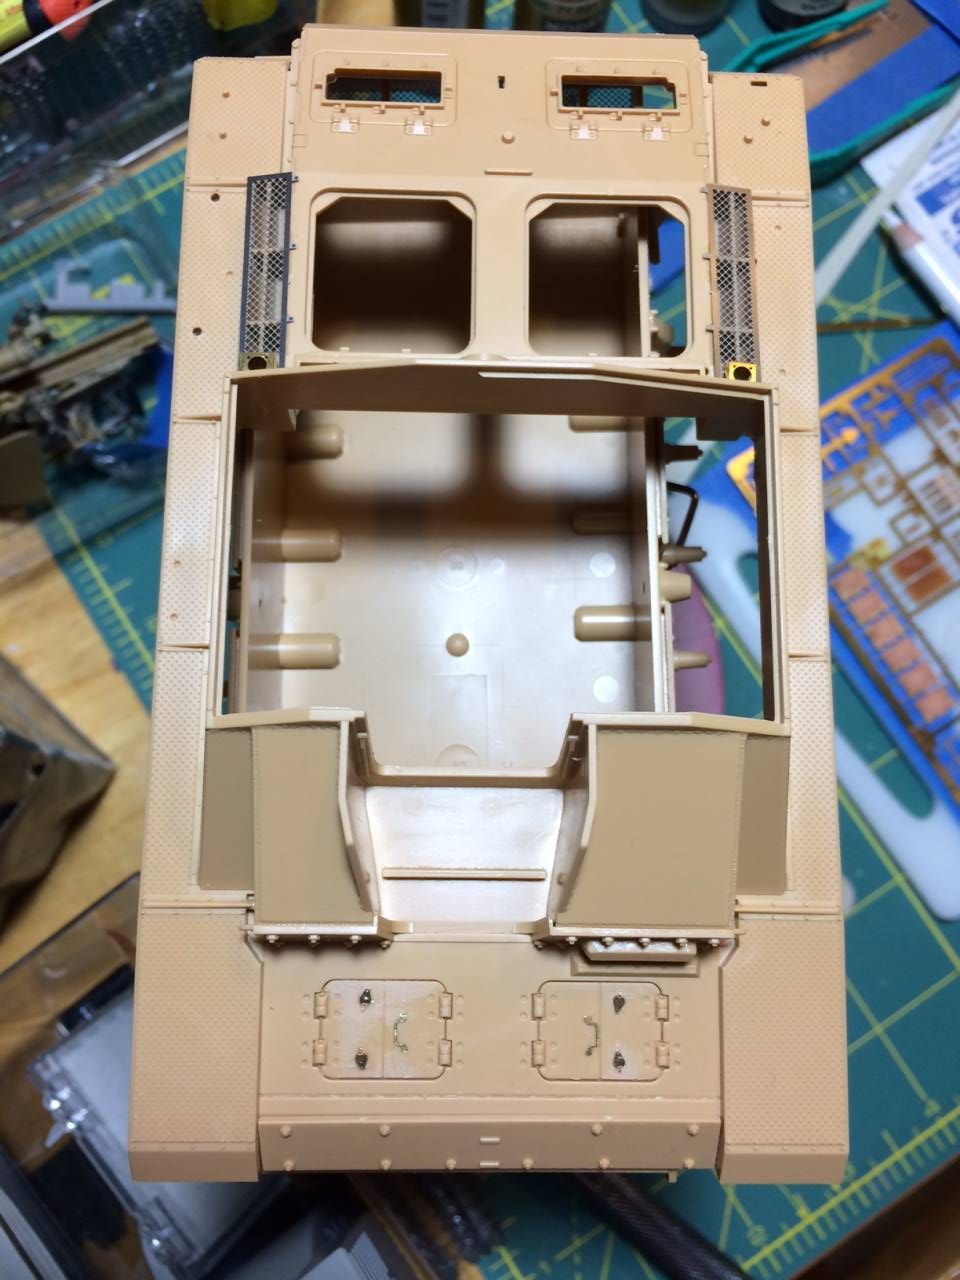
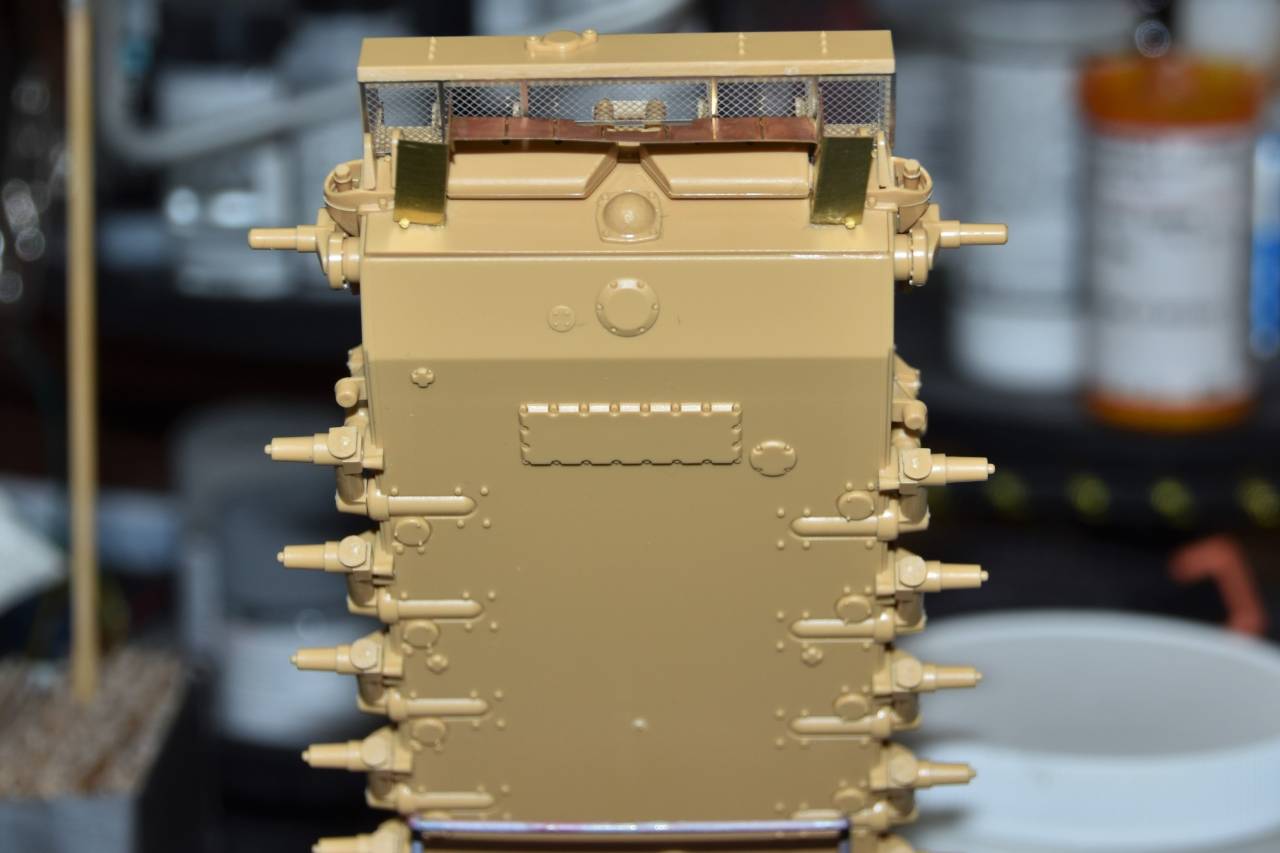
And work on the rear.
Does Tamiya putty work for attaching photo-etch?
CMOT
 Editor-in-Chief
England - South West, United Kingdom
Joined: May 14, 2006
KitMaker: 10,954 posts
Armorama: 8,571 posts
Posted: Saturday, October 14, 2017 - 03:39 PM UTC
Nice work Richard and I look forward to you next additions to the blog.
#464
British Columbia, Canada
Joined: December 02, 2016
KitMaker: 267 posts
Armorama: 196 posts
Posted: Saturday, October 14, 2017 - 09:21 PM UTC
Quoted Text
Nice work Richard and I look forward to you next additions to the blog.
Thank you. Is it possible to rename this and turn it into a blog? I was thinking about how new I am to photo etch and maybe naming it a beginners guide to photo etch?
#362
California, United States
Joined: December 01, 2013
KitMaker: 1,661 posts
Armorama: 1,202 posts
Posted: Saturday, October 14, 2017 - 10:06 PM UTC
Hi Richard - nice work!
Ok, here's my guess as to how to make the shape. First, the final part is supposed to look like a 3 dimensional "u"shape. So, the one end of the part, with the single mark running the length of what should be the "legs" of the "u" should remain - don't cut it - as it's likely a fold mark. Next - the two parallel scribe marks (along the longer, center part) should be cut. I think, the two obvious "u" shapes will form the outer walls of the "u", while the longer, piece will be bent to form the inner, flat part of the "u". There might even be more/additional scribe marks on the other side - so, the longer flat piece (in betwetween the two already "u" shaped piece) will be bent to establish the third element of what will become a 3 dimensional "u" shape.
Sorry for so many words! Converting a 3-d concept to words isn't easy!
Regarding the CA - I use BSI Super Gold odorless (turns out I'm allergic to the smell!) Medium gap filling CA (10-25 second dry). I also use a fine tip adapter to the bottle. This combo has served me very well - it's pretty forgiving and doesn't flood the part with glue!! Yes - it's pretty expensive, but each bottle will work for several builds - worth it in my opinion -
Hope this is of some use -
Nick
#464
British Columbia, Canada
Joined: December 02, 2016
KitMaker: 267 posts
Armorama: 196 posts
Posted: Saturday, October 14, 2017 - 11:19 PM UTC
Quoted Text
Hi Richard - nice work!
Ok, here's my guess as to how to make the shape. First, the final part is supposed to look like a 3 dimensional "u"shape. So, the one end of the part, with the single mark running the length of what should be the "legs" of the "u" should remain - don't cut it - as it's likely a fold mark. Next - the two parallel scribe marks (along the longer, center part) should be cut. I think, the two obvious "u" shapes will form the outer walls of the "u", while the longer, piece will be bent to form the inner, flat part of the "u". There might even be more/additional scribe marks on the other side - so, the longer flat piece (in betwetween the two already "u" shaped piece) will be bent to establish the third element of what will become a 3 dimensional "u" shape.
Sorry for so many words! Converting a 3-d concept to words isn't easy!
Regarding the CA - I use BSI Super Gold odorless (turns out I'm allergic to the smell!) Medium gap filling CA (10-25 second dry). I also use a fine tip adapter to the bottle. This combo has served me very well - it's pretty forgiving and doesn't flood the part with glue!! Yes - it's pretty expensive, but each bottle will work for several builds - worth it in my opinion -
Hope this is of some use -
Nick
Thank you. Any advise is welcome, and appreciated.
I have tried CA HPD Insta-cure and their Maxi-Cure (almost gel like) and the gel type is working the best. Spilled a lot of the Insta-Cure. The one that has worked the best is the Maxi-Cure. I do not want to say anything negative about the product as I think it is more user error.
Tried white glue (Elmers) with mild success and also tried Future.
My next step is to replace the front fenders, I think I cut off to much.
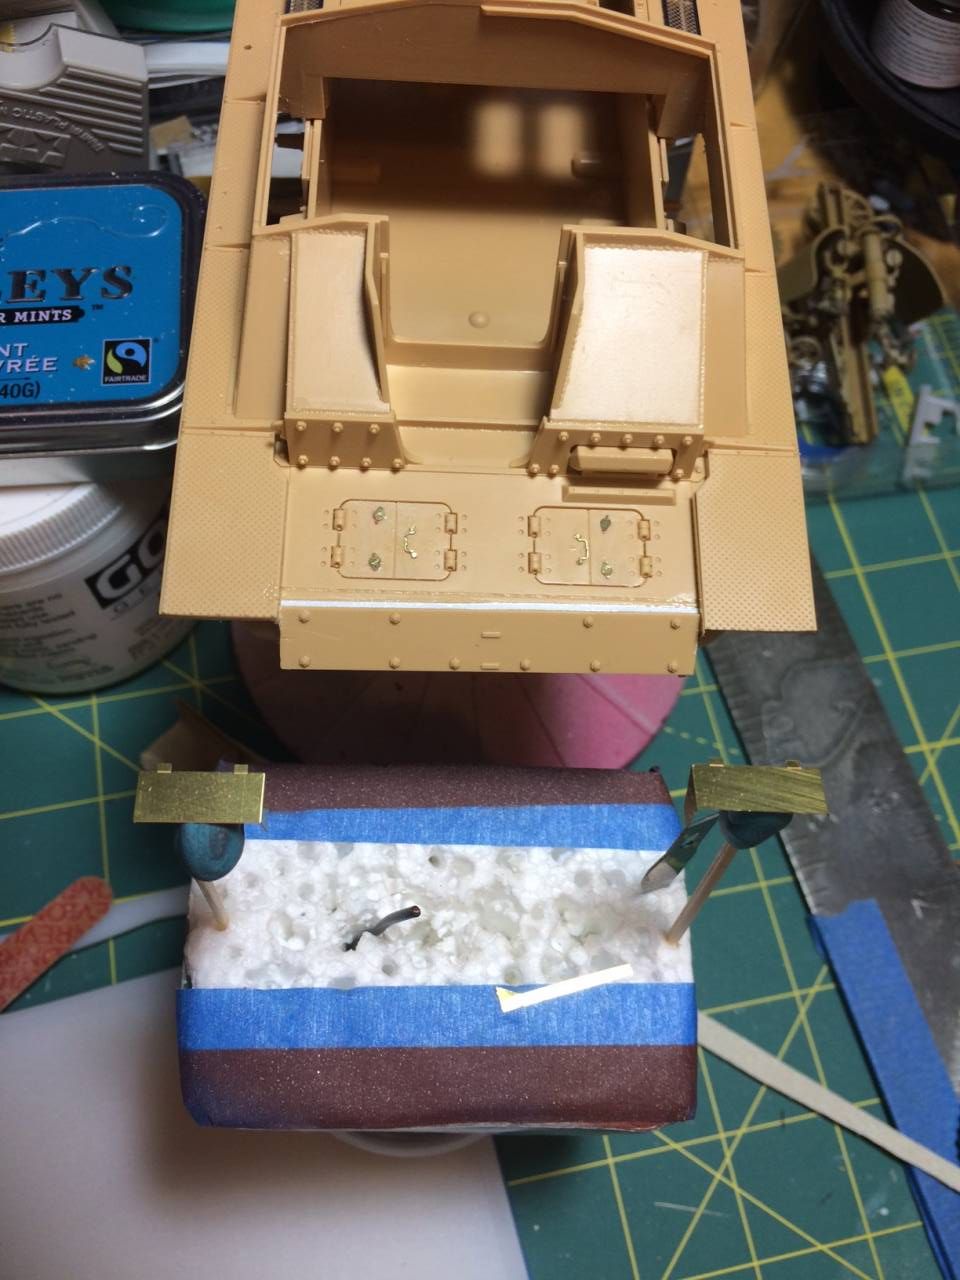
The white styrene was my attempt at making weld marks. Not sure how this will fit as the dry fit looks weird in the front right now.
CMOT
Editor-in-Chief England - South West, United Kingdom
Joined: May 14, 2006
KitMaker: 10,954 posts
Armorama: 8,571 posts
Posted: Sunday, October 15, 2017 - 02:33 AM UTC
New Jersey, United States
Joined: February 02, 2008
KitMaker: 1,388 posts
Armorama: 1,325 posts
Posted: Sunday, October 15, 2017 - 03:24 AM UTC
I would like to make a few suggestions that might help you with your PE experience.
1. Get Wilder's "Dealing with Photo Etch DVD." It is very helpful
2. Get a pair of flat nosed jewelers pliers. I use them for 98% of my bending and they work great every time. Great for holding parts to remove burs as well.
https://www.amazon.com/Baby-Wubbers-Flat-Jewelers-Pliers/dp/B003Y07V6O/ref=sr_1_fkmr1_1?ie=UTF8&qid=1508106037&sr=8-1-fkmr1&keywords=wubbers+flat+jawed+pliers 3. A Tamiya Diamond file works great for cleaning up parts
https://www.amazon.com/Tamiya-74066-Diamond-Photo-Etched/dp/B000E7ONQQ/ref=sr_1_3?s=arts-crafts&ie=UTF8&qid=1508106089&sr=8-3&keywords=tamiya+file 4. Cut parts off the fret on a piece of hard plastic. I use one of those clear spacer discs that you used to get with those blank CD spools
4. SOLDER parts! Much easier and stronger than using super glue.
5. Make a photocopy of your PE phret and print it out on paper. This way, you can test bending the pieces without risking damaging the parts
6. When you need a bending tool, you need a bending tool. I like this one:
http://thesmallshop.com/index.php?main_page=product_info&cPath=2&products_id=10 Modelling is not just a hobby, it's an addiction.
North Carolina, United States
Joined: September 16, 2004
KitMaker: 1,281 posts
Armorama: 1,222 posts
Posted: Sunday, October 15, 2017 - 03:58 AM UTC
Also if you are able to get a hold of the most recent issue of the AMPS Boresight it has as a great tutorial on PE by Mike Roof. It's a two part article with Pt2 to follow in the next issue.
California, United States
Joined: June 23, 2017
KitMaker: 195 posts
Armorama: 179 posts
Posted: Sunday, October 15, 2017 - 03:59 AM UTC
Quoted Text
5. Make a photocopy of your PE phret and print it out on paper. This way, you can test bending the pieces without risking damaging the parts
What a great idea, thanks for mentioning that.
What do you mean we don't have a Plan B?
#464
British Columbia, Canada
Joined: December 02, 2016
KitMaker: 267 posts
Armorama: 196 posts
Posted: Sunday, October 15, 2017 - 06:17 AM UTC
Thanks for the information. I put that exact bending tool on my want list. I have one like the Bug and like it, but the size is an issue. Got the pliers and diamond file, both are getting a lot of mileage. Going to try the photo copy of the photo-etch.
Washington, United States
Joined: August 09, 2002
KitMaker: 1,742 posts
Armorama: 1,658 posts
Posted: Sunday, October 15, 2017 - 07:43 AM UTC
I'm impressed. You seem to be tackling most of the issues involved with PE on your first go round. On future projects you will need a longer PE bender. I have one that's about 5 inches long so I can fold a fender length bend. Not all PE is better than the plastic part it is to replace. Some PE is flat where the actual part is not. Some manufacturers just add parts to increase the parts count so check to see which is better, the PE piece or the plastic part. You will find there are certain manufacturers you keep returning to because of their quality. I like Voyager, Aber and Lion Roar.
With a little practice you will know which bend to do first and last. You seem to be catching on quickly.

Msgt Retired USMC
M48/ M60A1/ M1A1
Semper Fi!
#464
British Columbia, Canada
Joined: December 02, 2016
KitMaker: 267 posts
Armorama: 196 posts
Posted: Monday, October 16, 2017 - 12:34 AM UTC
Thanks for all the responses.
If you have any tips, please feel free to post them.
This has been very interesting and a real learning experience.
Still struggling with the glue, pretty sure it is my fault, but the CA is tough to work with. The quick setting stuff seems to dry right away and the Gel leaves residue, could work for weld marks?
The other part is it either holds, well, or poorly. Going over everything I do before I glue the piece on and thought maybe I am not cleaning the part properly, or I am transferring sanding dust when I am handling the part? Not sure.
I agree that you should look at the photo-etch part and compare it to the kit part, there are benefits to both and the photo-etch does like depth unless it is bent or shaped, though zimmerit is the exception.
Just getting parts ready for the next day of building. The Tamiya kit is good, and the Stug III Eduard Stugg III early pack fits well with this Stug, it should just leave a couple of pieces off like the close combat weapon.
The biggest challenge, as a new user to photo etch, was understanding which part of the build the photo etch would be applied and the actually working with it. Thankfully there are a lot of good resources out there, but little to no mention of the planning of the work and how to meld it in with the build.
Arkansas, United States
Joined: June 29, 2009
KitMaker: 11,610 posts
Armorama: 7,843 posts
Posted: Monday, October 16, 2017 - 01:05 AM UTC
Richard: I find soldering etch together works much better than ca. If you want to go this route, I find leaving the main piece of etch attached to the fret is a great way to achieve stability. Just make sure you use plenty of flux. Speaking of; I apply flux over the entire assembly and remove it, at the planned joint using a microbrush(you can find these as "micro dental brushes" on Amazon). The difficult part is removing the chrome plating from the Eduard etch. You can do this, with your file. I understand that this is a lot to take in, but well worth the result. Oh, I should mention that I use a torch, rather than a soldering iron. And, I use solder paster, rather than solder wire.
Ideals are peaceful. History is violent.
#464
British Columbia, Canada
Joined: December 02, 2016
KitMaker: 267 posts
Armorama: 196 posts
Posted: Monday, October 16, 2017 - 01:24 AM UTC
Quoted Text
Richard: I find soldering etch together works much better than ca. If you want to go this route, I find leaving the main piece of etch attached to the fret is a great way to achieve stability. Just make sure you use plenty of flux. Speaking of; I apply flux over the entire assembly and remove it, at the planned joint using a microbrush(you can find these as "micro dental brushes" on Amazon). The difficult part is removing the chrome plating from the Eduard etch. You can do this, with your file. I understand that this is a lot to take in, but well worth the result. Oh, I should mention that I use a torch, rather than a soldering iron. And, I use solder paster, rather than solder wire.
I have been looking at soldering, Paul BudziK, did a video on soldering.
https://www.youtube.com/watch?v=iBji-Oz3J7E Which I found useful, but I think some of it went over my head. I cannot find the supplies he talks about. I will look into the paster and see if we have any around, must have. Finding Flux is a real PITA, and of course that was the one thing I forgot to look for at my hobbyshop..


