


Hosted by Richard S.
Launchers Campaign

Namabiiru

#399

Joined: March 05, 2014
KitMaker: 2,888 posts
Armorama: 1,920 posts

Posted: Wednesday, September 19, 2018 - 11:32 PM UTC
Good luck getting all eight to come out level! I have a hard time getting just four tires to come out level. Heck! I once did a kettenkrad and I couldn't get ONE tire to come out level!
canismalus
#465

Joined: September 12, 2014
KitMaker: 398 posts
Armorama: 394 posts
Posted: Thursday, September 20, 2018 - 02:40 AM UTC
Agreed - good luck. From your pictures, though, Martin, it all looks pretty level and flat.
Jerry
Jerry

V2Phantom
Joined: December 26, 2008
KitMaker: 288 posts
Armorama: 92 posts
Posted: Monday, September 24, 2018 - 01:08 AM UTC
Martin
The chassis along with the tire holders looks impressive! Based on your photos, it does look like you aligned everything level. This is a great build so far!
have fun modeling
Mike
The chassis along with the tire holders looks impressive! Based on your photos, it does look like you aligned everything level. This is a great build so far!
have fun modeling
Mike

Martinvidas

Joined: February 13, 2011
KitMaker: 322 posts
Armorama: 300 posts

Posted: Monday, September 24, 2018 - 04:47 PM UTC
Thank to everyone for the kind worlds.
For now the model is frozen (trying to finish another one), so I'll back with this in the next 2-3 weeks.
Have a nice buildings
For now the model is frozen (trying to finish another one), so I'll back with this in the next 2-3 weeks.
Have a nice buildings

GulfWarrior
Joined: January 05, 2010
KitMaker: 1,051 posts
Armorama: 1,029 posts

Posted: Wednesday, September 26, 2018 - 02:25 PM UTC
The weekend I'm going to start painting the digital camo pattern for the tow vehicle for the Type 63 rocket launcher.

The rear seat is just dry fitted in the picture. I've got the front seats and steering wheel painted but I'm not putting the interior in until after the exterior painting is done. I'm already wishing I would have left the shifters off. I hope I don't break them off while masking.
Oh, and I've got a question. I got a smudge of cement on the rear glass on the top. It's Testor's plastic cement. How can I remove it without screwing up the window or the paint?
The rear seat is just dry fitted in the picture. I've got the front seats and steering wheel painted but I'm not putting the interior in until after the exterior painting is done. I'm already wishing I would have left the shifters off.
I hope I don't break them off while masking.Oh, and I've got a question. I got a smudge of cement on the rear glass on the top. It's Testor's plastic cement. How can I remove it without screwing up the window or the paint?

Namabiiru
#399
Joined: March 05, 2014
KitMaker: 2,888 posts
Armorama: 1,920 posts
Posted: Wednesday, September 26, 2018 - 11:14 PM UTC
Richard,
A coat of Future might fix that, but I'd be more inclined to just replace the window with a homebrew one. Can you show us a picture?
A coat of Future might fix that, but I'd be more inclined to just replace the window with a homebrew one. Can you show us a picture?
GulfWarrior
Joined: January 05, 2010
KitMaker: 1,051 posts
Armorama: 1,029 posts
Posted: Thursday, September 27, 2018 - 01:08 PM UTC
Quoted Text
Richard,
A coat of Future might fix that, but I'd be more inclined to just replace the window with a homebrew one. Can you show us a picture?
Sure! I already figure I'm going to have to mask it off and repaint the rear panel...


zontar
Joined: August 27, 2006
KitMaker: 1,646 posts
Armorama: 1,557 posts
Posted: Thursday, September 27, 2018 - 01:31 PM UTC
Richard S: is it a soft top, or a shaped hard top? I ask because if it is a soft top, the smudge kind of makes it look like an old decayed soft plastic window, like you might see on a really old Jeep soft top. Of course, it might not be as convincing in real life. Might be able to sand it out, then coat in Future/Pledge, (test on a scrap) or replace with a piece cut from blister packaging.
-Zon
-Zon
GulfWarrior
Joined: January 05, 2010
KitMaker: 1,051 posts
Armorama: 1,029 posts
Posted: Thursday, September 27, 2018 - 01:36 PM UTC
It's a soft top. I'm going to paint the body in that digital camo that the Chinese like on their parade vehicles. 
petbat

Joined: August 06, 2005
KitMaker: 3,353 posts
Armorama: 3,121 posts
Posted: Thursday, September 27, 2018 - 02:57 PM UTC
Try sanding it first, then with very fine emery paper polish it. Then you are likely to still see scratches, so use an abrasive polish on a Q-tip (I think you guys call it that) to take most of that out. Abrasive polish could be toothpaste (not the gel kind I think) or automotive cut and polish compound. Then a coat or two of Future.
The alternative is to cut it out and replace it with clear sheet - like the windows in boxes so you can see inside, etc.
The alternative is to cut it out and replace it with clear sheet - like the windows in boxes so you can see inside, etc.

Namabiiru
#399
Joined: March 05, 2014
KitMaker: 2,888 posts
Armorama: 1,920 posts
Posted: Thursday, September 27, 2018 - 11:39 PM UTC
One other option would to remove the window and after the rest of the top has been painted block the window with a piece of wax paper or parchment taped in place. Then create a new window from something like Testors Clear Part Glue. that stuff dries crystal clear, and you'll get enough texture that it should come out looking like a flexible, soft window.
GulfWarrior
Joined: January 05, 2010
KitMaker: 1,051 posts
Armorama: 1,029 posts
Posted: Friday, September 28, 2018 - 01:35 AM UTC
Thanks guys! I'll see if one of those ideas will work. 
V2Phantom
Joined: December 26, 2008
KitMaker: 288 posts
Armorama: 92 posts
Posted: Friday, September 28, 2018 - 01:37 AM UTC
Working my way to the ground, here's the completed turret minus the missile box. It is now ready for its primer coat. I did cut off the thick styrene rod and drilled out the base for the antenna as I'll substitute a more in-scale wire for the kit part.


Have fun modeling!
Mike
Have fun modeling!
Mike
petbat
Joined: August 06, 2005
KitMaker: 3,353 posts
Armorama: 3,121 posts
Posted: Friday, September 28, 2018 - 08:21 AM UTC
That shape kind of reminds me of a Star Trek Federation spacecraft, Mike.
Looks like you had some clean up 'fun' on it too. Looking good.
Looks like you had some clean up 'fun' on it too. Looking good.
Namabiiru
#399
Joined: March 05, 2014
KitMaker: 2,888 posts
Armorama: 1,920 posts
Posted: Friday, September 28, 2018 - 08:47 AM UTC
Calling this one done.
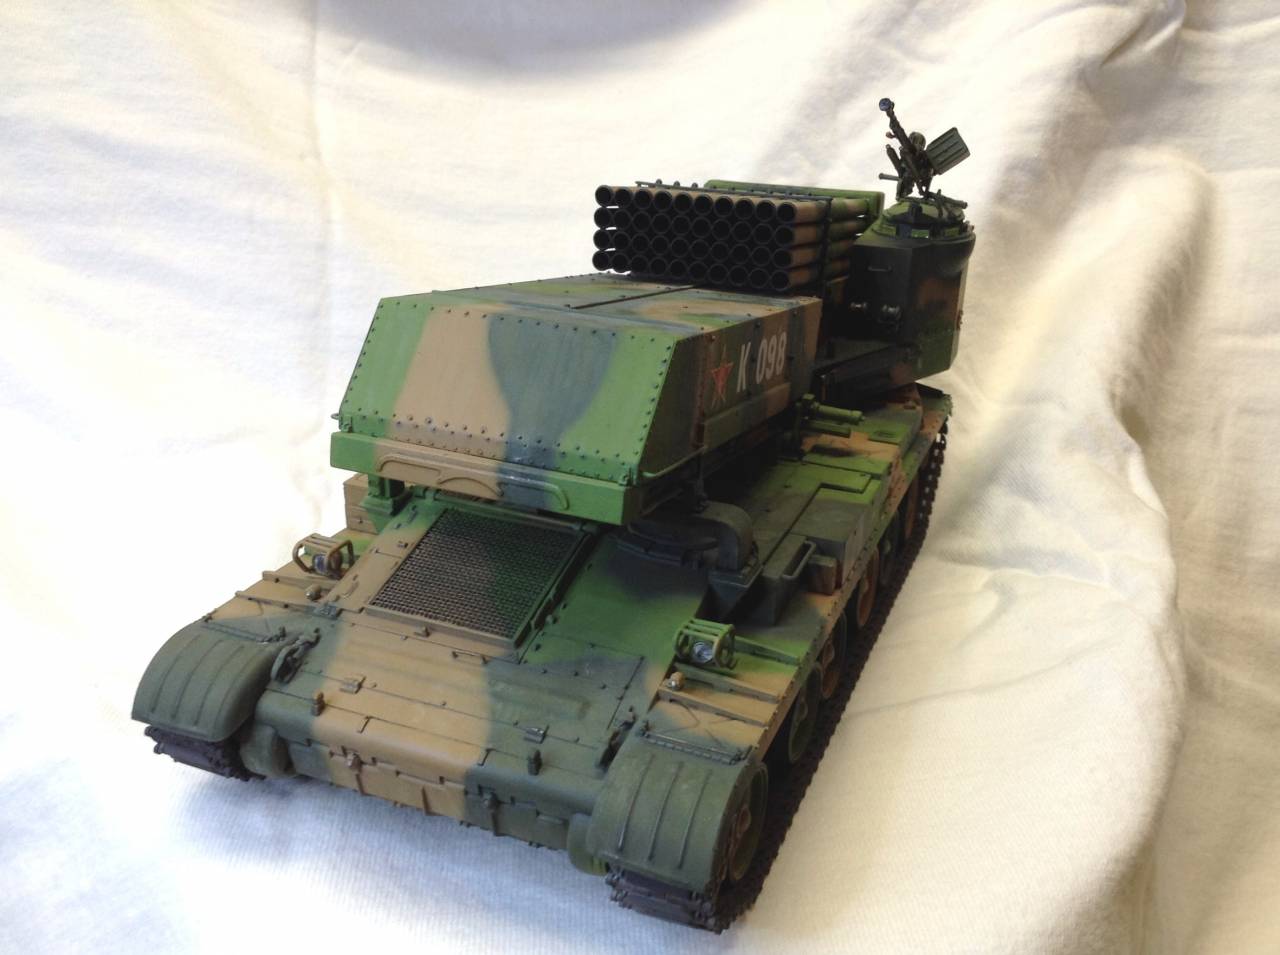
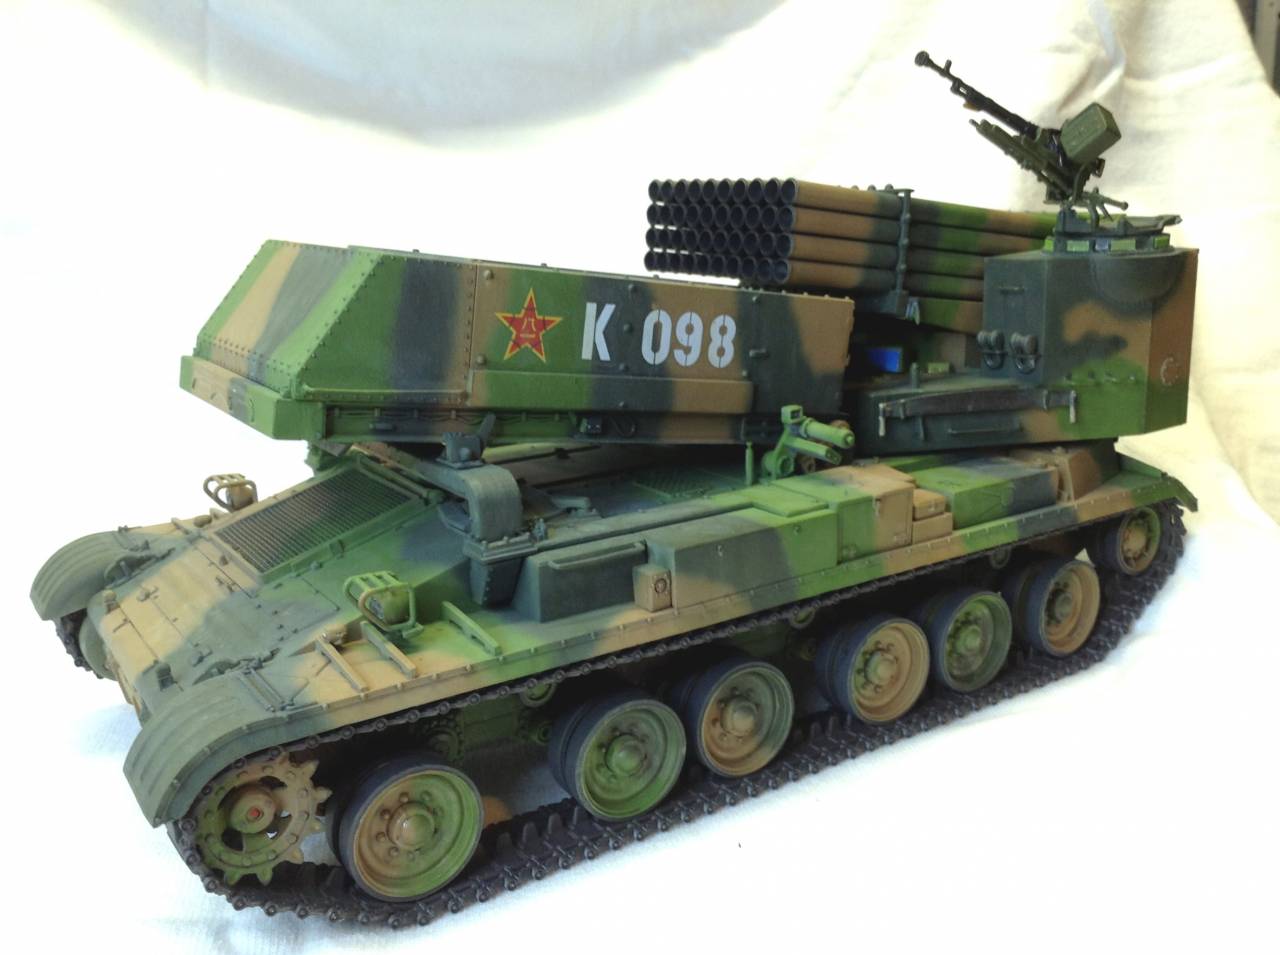

You'll have to forgive the extremely primitive photo setup (Not to mention the extremely primitive modeling skills!). Do we have a campaign gallery yet?
Good luck everyone with your WIPs!
You'll have to forgive the extremely primitive photo setup (Not to mention the extremely primitive modeling skills!). Do we have a campaign gallery yet?
Good luck everyone with your WIPs!
d6mst0
#453
Joined: August 28, 2016
KitMaker: 1,925 posts
Armorama: 601 posts

Posted: Friday, September 28, 2018 - 01:33 PM UTC
Namabiiru,
Nice.
Nice.
zontar
Joined: August 27, 2006
KitMaker: 1,646 posts
Armorama: 1,557 posts
Posted: Friday, September 28, 2018 - 02:33 PM UTC
Mark C: congrats on finishing and nicely done. An interesting vehicle for sure.
Happy Modeling,
-Zon
Happy Modeling,
-Zon
GulfWarrior
Joined: January 05, 2010
KitMaker: 1,051 posts
Armorama: 1,029 posts
Posted: Friday, September 28, 2018 - 02:35 PM UTC
Wow! Very good job, Mark! Better than I did on mine way back when!
I'm hoping to put down the base color on the BJ-212 jeep for my Type 63 rocket launcher this weekend.

I'm hoping to put down the base color on the BJ-212 jeep for my Type 63 rocket launcher this weekend.

27-1025
Joined: September 16, 2004
KitMaker: 1,281 posts
Armorama: 1,222 posts
Posted: Saturday, September 29, 2018 - 04:22 AM UTC
Lots of resin and lots of work. Right out of the box all the large pieces needed a dunk in boiling water - lots of warping. I'll be looking for replacement wheels as the ones in the kit are rather poor. Haven't thoroughly surveyed the bags of smaller bits yet. Hopefully they won't be too bad.

Namabiiru
#399
Joined: March 05, 2014
KitMaker: 2,888 posts
Armorama: 1,920 posts
Posted: Saturday, September 29, 2018 - 08:36 AM UTC
Mark, Zon, Richard;
Thanks for the kind words, Gents!
Thanks for the kind words, Gents!
petbat
Joined: August 06, 2005
KitMaker: 3,353 posts
Armorama: 3,121 posts
Posted: Saturday, September 29, 2018 - 07:55 PM UTC
Excellent finish Mark. Well done overall. I really like it.
A bit of work their Chris!
A bit of work their Chris!
27-1025
Joined: September 16, 2004
KitMaker: 1,281 posts
Armorama: 1,222 posts
Posted: Sunday, September 30, 2018 - 09:09 AM UTC
Should have listened to that little voice in my head. Basically flushed $70.00. 50% of this kit is unusable. Parts broken, short shot, mold shifted or massively flashed over Hoping that my parts stash can salvage this project. Lesson learned, won't make this mistake again.


Skybow Bigshot 1 1/2 ton truck, Italeri 2 1/2 Ton truck and Italeri WC54 Ambulance parts.

Hoping that my parts stash can salvage this project. Lesson learned, won't make this mistake again.Skybow Bigshot 1 1/2 ton truck, Italeri 2 1/2 Ton truck and Italeri WC54 Ambulance parts.
V2Phantom
Joined: December 26, 2008
KitMaker: 288 posts
Armorama: 92 posts
Posted: Tuesday, October 02, 2018 - 01:14 AM UTC
Mark C.
Your build looks great! I really like the overall camo that you did. I was not familiar with this launcher but I may need to now add one to my collection. Well done!
Have fun modeling
Mike
Your build looks great! I really like the overall camo that you did. I was not familiar with this launcher but I may need to now add one to my collection. Well done!
Have fun modeling
Mike
27-1025
Joined: September 16, 2004
KitMaker: 1,281 posts
Armorama: 1,222 posts
Posted: Tuesday, October 02, 2018 - 02:40 AM UTC
Quoted Text
Calling this one done.
You'll have to forgive the extremely primitive photo setup (Not to mention the extremely primitive modeling skills!). Do we have a campaign gallery yet?
Good luck everyone with your WIPs!
Great job. Like the camouflage painting and overall finish.
Namabiiru
#399
Joined: March 05, 2014
KitMaker: 2,888 posts
Armorama: 1,920 posts
Posted: Tuesday, October 02, 2018 - 05:33 AM UTC
Thanks, Mike and Chris!
 |

WEB HOSTING BY


Copyright ©2021 Armorama and Kitmaker Network, a subsidiary of Silver Star Enterprises
All Rights Reserved. Please read our Conditions of Use and Privacy Policy.
All Rights Reserved. Please read our Conditions of Use and Privacy Policy.