_GOTOBOTTOM
Armor/AFV: IDF [Israeli Defense Forces]
Armor and AFVs of the IDF army from 1947-today.
Hosted by Darren Baker
Meng Merkava MK4 w/Trophy defense system
Selogon
Visit this Community
Hong Kong S.A.R. / 繁體
Joined: July 13, 2017
KitMaker: 20 posts
Armorama: 20 posts
Posted: Friday, February 16, 2018 - 06:38 PM UTC
Hello all, I've been hanging around these forums for a while, and thought I'd share a bit for once
So here are some details of the Meng Merkava 4, that I got myself.
My skills are pretty average, so all is out of the box, and rattle can and paintbrushes.

First a few picture details :


Assembly guide can be busy at times :


Pics of sprues and parts :


Overall pretty good, but some parts have seams, ejection marks... :


Assembly starts in next post
GTDeath13
Visit this Community
Attica, Greece / Ελλάδα
Joined: June 12, 2015
KitMaker: 921 posts
Armorama: 919 posts
Posted: Friday, February 16, 2018 - 06:43 PM UTC
I will be watching your build since I am really interested in this.

Good luck and happy modelling!!!
Selogon
Visit this Community
Hong Kong S.A.R. / 繁體
Joined: July 13, 2017
KitMaker: 20 posts
Armorama: 20 posts
Posted: Friday, February 16, 2018 - 06:48 PM UTC
OK, so here we begin to put things together... From the bottom of the hull, let's not get crazy ! (I sometimes begin with the turret for a change)

It's 3 pieces, going together pretty well.


Now, one thing that's not great :


Should there be such a gap? Pictures of the real thing I found online don't have the right angle to tell. (honnestly, it is not really noticeable from the "normal" viewing angle on the model) ;


Care with those. They are either not deep enough, or not wide enough in diameter to perfectly accomodate the pins of the parts going on them. Also, sausage fingers beware when putting those in place :


That's it for today. Will try to get going a bit tomorrow! Let me know any comment or question you may have !

Thanks for looking.
Selogon
Visit this Community
Hong Kong S.A.R. / 繁體
Joined: July 13, 2017
KitMaker: 20 posts
Armorama: 20 posts
Posted: Friday, February 16, 2018 - 06:50 PM UTC

Quoted Text

I will be watching your build since I am really interested in this.

Good luck and happy modelling!!!


Will do, I'll try to be regular in my updates ^^
flugwuzzi
Visit this Community
Lower Austria, Austria
Joined: November 02, 2007
KitMaker: 633 posts
Armorama: 599 posts
Posted: Saturday, February 17, 2018 - 02:54 AM UTC
Great start Romain,
keep up the good work!

have fun
Walter
Selogon
Visit this Community
Hong Kong S.A.R. / 繁體
Joined: July 13, 2017
KitMaker: 20 posts
Armorama: 20 posts
Posted: Saturday, February 17, 2018 - 01:29 PM UTC
Hi all,
here is an update. Not sure I'll do everything since I notice that someone else has a detailed build also for this model...
But well, maybe those two will compliment each other. I can see already that I can confirm a manufacture defect in the coil springs.

So here goes :

Those holes for return rollers are very shallow... Makes alignement not too easy, although all that will be hidden by the side skirts :


Coil springs are... springy :


... But also have defects. Same part numbers etc. Just cut off the extra tabs and it's all good :


And all the suspension system is there :


It's workable but since i'll leave it all level, i'll probably just glue all that in place so the tracks are easier to work.


Nagmakava
Visit this Community
England - East Anglia, United Kingdom
Joined: October 18, 2012
KitMaker: 116 posts
Armorama: 110 posts
Posted: Saturday, February 17, 2018 - 07:02 PM UTC
Great work - almost finished mine now and I haven't noticed any more errors except the ones you have mentioned.

Mine had a gap at the back too but some acrylic filler and a wipe with a damp Q-tip soon fixed it.
Selogon
Visit this Community
Hong Kong S.A.R. / 繁體
Joined: July 13, 2017
KitMaker: 20 posts
Armorama: 20 posts
Posted: Saturday, February 17, 2018 - 07:39 PM UTC
Cool, thanks for chiming in
Yeah, it's going together pretty well.
I try to point out all little things just for the sake of going into details haha
Petition2God
Visit this Community
Colorado, United States
Joined: February 06, 2002
KitMaker: 1,526 posts
Armorama: 1,294 posts
Posted: Monday, February 19, 2018 - 04:59 AM UTC
How do this kit's machine guns and their mounts look? I know that they were weak points of the Academy kit.

Regards,
James
Selogon
Visit this Community
Hong Kong S.A.R. / 繁體
Joined: July 13, 2017
KitMaker: 20 posts
Armorama: 20 posts
Posted: Monday, February 19, 2018 - 03:46 PM UTC

Quoted Text

How do this kit's machine guns and their mounts look? I know that they were weak points of the Academy kit.

Regards,
James


Hi, I'm not there yet.
But I'll make pictures of what's on the sprues once I get better light, so you can be the judge
I have not made the Academy kit.
Sleepwalker71
Visit this Community
Singapore / 新加坡
Joined: August 30, 2012
KitMaker: 265 posts
Armorama: 186 posts
Posted: Monday, February 19, 2018 - 05:18 PM UTC
Springs are terrific. Looking at how it is done by Trumpy with their Rooikat, I'm crying now ;-)
Nagmakava
Visit this Community
England - East Anglia, United Kingdom
Joined: October 18, 2012
KitMaker: 116 posts
Armorama: 110 posts
Posted: Tuesday, February 20, 2018 - 12:03 AM UTC

Quoted Text

How do this kit's machine guns and their mounts look? I know that they were weak points of the Academy kit.

Regards,
James


Hope Romain won't mind me answering this but the guns do look very nice when made. The detail on the commanders MG is excellent. I did add a resin .50 cal ammo bag and an etch metal .50 ammo box holder on mine but there's nothing wrong with the kit ones, I just fancied adding them. I will post some photos.
Selogon
Visit this Community
Hong Kong S.A.R. / 繁體
Joined: July 13, 2017
KitMaker: 20 posts
Armorama: 20 posts
Posted: Tuesday, February 20, 2018 - 04:23 AM UTC

Quoted Text


Quoted Text

How do this kit's machine guns and their mounts look? I know that they were weak points of the Academy kit.

Regards,
James


Hope Romain won't mind me answering this but the guns do look very nice when made. The detail on the commanders MG is excellent. I did add a resin .50 cal ammo bag and an etch metal .50 ammo box holder on mine but there's nothing wrong with the kit ones, I just fancied adding them. I will post some photos.


Sure, answer away
As I said, I am not there yet on my build! If you have pics of the finished, assembled parts, that's even better
tanknick22
Visit this Community
United States
Joined: February 19, 2009
KitMaker: 1,139 posts
Armorama: 1,100 posts
Posted: Tuesday, February 20, 2018 - 05:01 AM UTC

Quoted Text


Quoted Text


Quoted Text

How do this kit's machine guns and their mounts look? I know that they were weak points of the Academy kit.

Regards,
James


Hope Romain won't mind me answering this but the guns do look very nice when made. The detail on the commanders MG is excellent. I did add a resin .50 cal ammo bag and an etch metal .50 ammo box holder on mine but there's nothing wrong with the kit ones, I just fancied adding them. I will post some photos.


Sure, answer away
As I said, I am not there yet on my build! If you have pics of the finished, assembled parts, that's even better


How do the tracks go together?

Selogon
Visit this Community
Hong Kong S.A.R. / 繁體
Joined: July 13, 2017
KitMaker: 20 posts
Armorama: 20 posts
Posted: Tuesday, February 20, 2018 - 01:37 PM UTC
[quote][quote]
Quoted Text


Quoted Text

............

Sure, answer away
As I said, I am not there yet on my build! If you have pics of the finished, assembled parts, that's even better


How do the tracks go together?


Hi, so here are some close ups. I have not yet actually assembled, but you can see.
So they are in two halves, which are not too hard to cut from the sprue, but they do have some flash. there is one annoying little excess that goes in a line on the bottom of one of the lines, which will demand a bit of clean up. Red line on the picture :


Selogon
Visit this Community
Hong Kong S.A.R. / 繁體
Joined: July 13, 2017
KitMaker: 20 posts
Armorama: 20 posts
Posted: Tuesday, February 20, 2018 - 01:43 PM UTC
And I had some time to get going.
Basckets at the back are assembled (they need care, but they do look good once made!) :


And the belly armor + some tow hooks + those kind of horns in the front.

The attachements for the belly armour had me a little apprehensive, but turns out the thing does not actually hang from them (they did look fidly to my eyes). The armor sits on the bottom of the hull. The thing feels quite heavy when all put together, I think it will be a heavy kit :


Close up of the photo-hetch parts.
I like parts 2-3-4, you could gratte your cheese on those!
The exhaust grill is fragile, but was no prob :


Talking exhaust, I feel this is a case of a little over-engineering. Goes well together with tweezers and care :


Thanks for looking !
Some more next week, I think ^^


tanknick22
Visit this Community
United States
Joined: February 19, 2009
KitMaker: 1,139 posts
Armorama: 1,100 posts
Posted: Tuesday, February 20, 2018 - 03:55 PM UTC

Quoted Text

And I had some time to get going.
Basckets at the back are assembled (they need care, but they do look good once made!) :


And the belly armor + some tow hooks + those kind of horns in the front.

The attachements for the belly armour had me a little apprehensive, but turns out the thing does not actually hang from them (they did look fidly to my eyes). The armor sits on the bottom of the hull. The thing feels quite heavy when all put together, I think it will be a heavy kit :


Close up of the photo-hetch parts.
I like parts 2-3-4, you could gratte your cheese on those!
The exhaust grill is fragile, but was no prob :


Talking exhaust, I feel this is a case of a little over-engineering. Goes well together with tweezers and care :


Thanks for looking !
Some more next week, I think ^^


I wonder if the tracks from Academy's Merkava IV will fit it?
the more I look at your build the more i want Meng's
Merkava IV
glock17c
Visit this Community
Jerusalem, Israel
Joined: May 16, 2007
KitMaker: 133 posts
Armorama: 130 posts
Posted: Wednesday, February 21, 2018 - 06:10 PM UTC
Romain,
The gap in the back sloap is correct.
I do not know how to upload a photo here.
m2joe4
Visit this Community
Alabama, United States
Joined: August 31, 2016
KitMaker: 2 posts
Armorama: 2 posts
Posted: Wednesday, February 21, 2018 - 08:43 PM UTC
Romain,

Thank you for this build - looking forward to more pics detailing your progress.

It looks like Meng have made some key engineering changes in the area of the engine cover and engine vent; I'm building their Mk. 3D now, and there was significant warping in the engine cover and the vent area that would have been prevented by the current design. But it is still a great kit.

I want this Mk. 4!!!

JH
GTDeath13
Visit this Community
Attica, Greece / Ελλάδα
Joined: June 12, 2015
KitMaker: 921 posts
Armorama: 919 posts
Posted: Thursday, February 22, 2018 - 12:05 AM UTC

Quoted Text

Romain,
The gap in the back sloap is correct.
I do not know how to upload a photo here.


Perhaps I can help...


Very nice work thus far... And your presentation is a great help...
JSSVIII
Visit this Community
Massachusetts, United States
Joined: March 28, 2007
KitMaker: 1,169 posts
Armorama: 1,067 posts
Posted: Thursday, February 22, 2018 - 05:15 AM UTC
Nice work Romain, you are doing a great job of pointing out the pitfalls in this kit as well. your comments are very easy to follow, thank you!
GTDeath13
Visit this Community
Attica, Greece / Ελλάδα
Joined: June 12, 2015
KitMaker: 921 posts
Armorama: 919 posts
Posted: Thursday, February 22, 2018 - 04:03 PM UTC
Mr Mass sent me this photo to post:

Selogon
Visit this Community
Hong Kong S.A.R. / 繁體
Joined: July 13, 2017
KitMaker: 20 posts
Armorama: 20 posts
Posted: Tuesday, February 27, 2018 - 04:37 AM UTC
Wow thanks guys for the encouragement and the extra info!
Looks like Meng has done a good job here for the moment then
Will go on today
Selogon
Visit this Community
Hong Kong S.A.R. / 繁體
Joined: July 13, 2017
KitMaker: 20 posts
Armorama: 20 posts
Posted: Wednesday, February 28, 2018 - 02:12 PM UTC
Hi guys, back with some progress.
So the upper hull is complete :


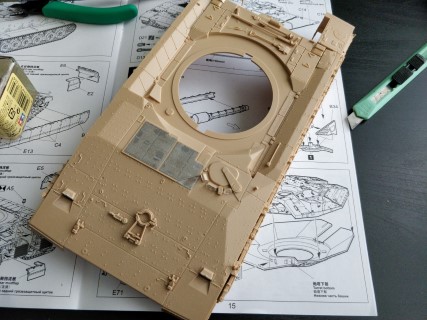
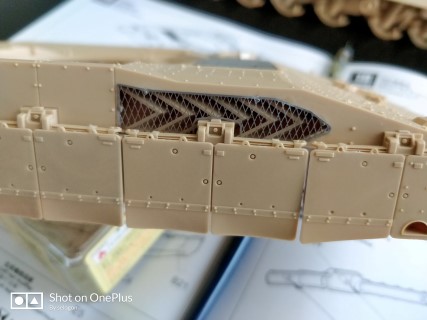
Now details of the side skirts. As you can see, they are a bit wild (the other side is more even).
I'd like your opinion, should I correct the alignement or does it look OK as is ? I mean those must get banged up all the time on the real thing, and that would add a little character. But maybe that's too much ? :


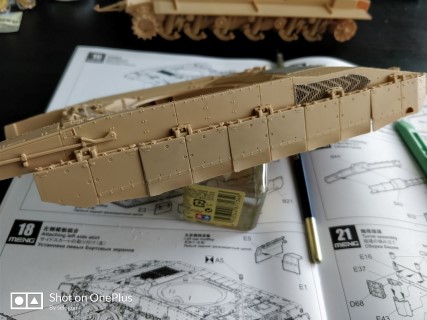
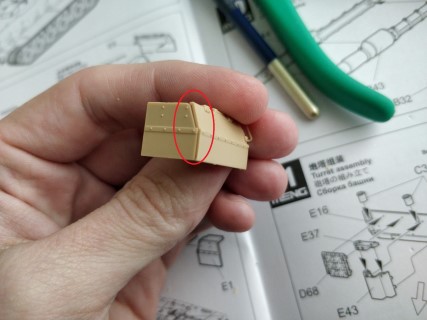
And the back mudguards, with the first of what looks like a bad fit :


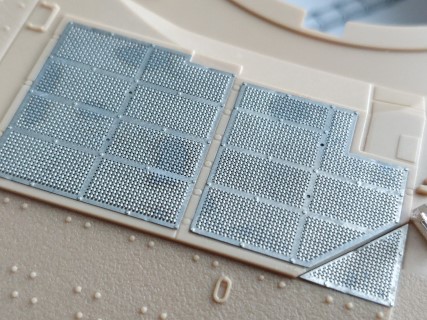
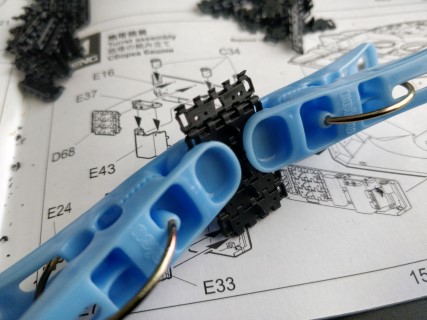
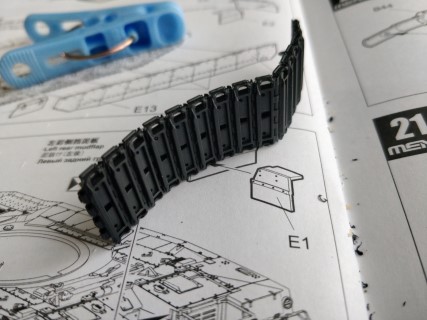
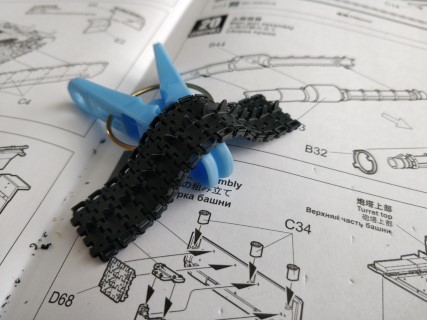
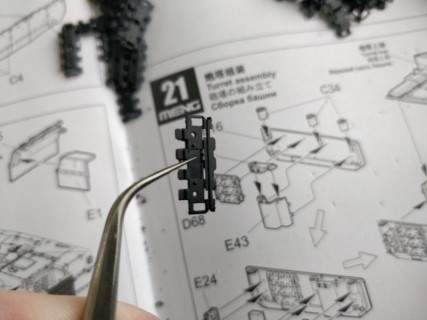
And for all the track lovers out there, here is a little run. So they are in two halves, which means we need very little glue to keep them workable. here I use those blue hanging snips to "creep up" the length and make sure the last link is bonding strongly. Not too necessary really, but it's a small mercy for the tender finger tips :


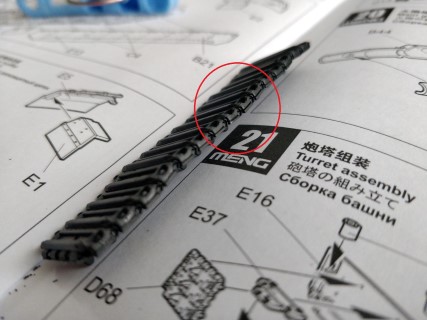
A few duds (not going to clean that up since I'll do only the length of tracks that will be visible) :


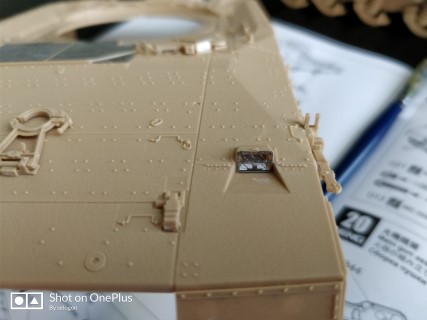
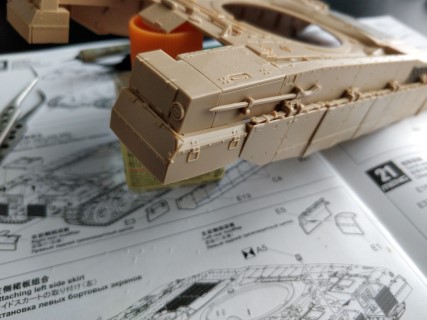
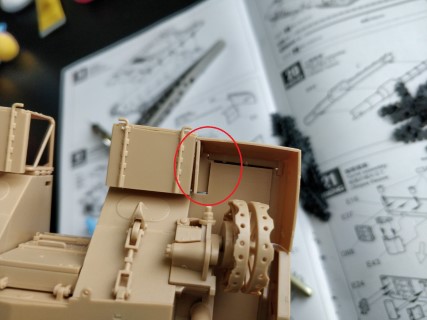
And finally a little fit issue, easy to correct when matting the upper and lower hull (I leave unglued until painting and tracks are in place)


I think that's it. I appologize that the pictures seem smaller, but there was something wrong when uploading, had to reduce them a lot. Will do better next time.
bison126
Visit this Community
Correze, France
Joined: June 10, 2004
KitMaker: 5,329 posts
Armorama: 5,204 posts
Posted: Wednesday, February 28, 2018 - 03:39 PM UTC
The skirts are OK to me. I'd just align them a bit more where the gap is really noticeable but not like if they were fresh from factory. The rubber flaps are really good looking.

Olivier
 _GOTOTOP