Under New Management 2018
Sofiya, Bulgaria
Joined: November 26, 2017
KitMaker: 393 posts
Armorama: 369 posts
Posted: Thursday, January 03, 2019 - 06:37 AM UTC
Hello everyone!
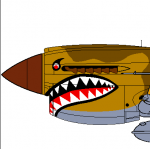
After more than a month I'm at this stage with my project.
There remains the decals and make the weathering of the model.
Here are some photos of my work progress.


Happy New Year at All and Success.
Kalin
Queensland, Australia
Joined: August 06, 2005
KitMaker: 3,353 posts
Armorama: 3,121 posts
Posted: Thursday, January 03, 2019 - 02:32 PM UTC
Welcome aboard Shell Look forward to that one.
Kalin, fantastic work there. Love the canopy

On the Bench:
Dust, styrene scraps, paint splotches and tears.
Georgia, United States
Joined: July 26, 2013
KitMaker: 2,272 posts
Armorama: 1,860 posts
Posted: Friday, January 04, 2019 - 08:48 PM UTC
Pretty much ready to start painting; just need to decide how to tackle trying to recreate a Lend-Lease Stuart captured by the Germans on the Eastern Front, possibly in the Caucasus. The pic I posted leads me to believe the tank is mostly dark yellow, with splotches of likely green and brown shades, but I am still wondering if they might have just sprayed the yellow on the tank's original color so as to show the green underneath in order to conserve paint? Or if they reapplied a green color after totally repainting the Stuart? Make sense?
Wheels are all prepped for spraying, and will be applied after I can get some work done on the chassis area behind them, since that is obviously harder when they are in the way.
This is actually my first Allied armor build since the late 1970's (likely a Bandai 1/48 kit) and ironically is being built as an Axis vehicle.

I had to return to teaching after the holiday break on Wednesday, and had dental work that same afternoon, so I haven't had much bench time but fortunately this being a Tamiya kit the building part is not a worry.
On the Campaign Trail:
Tank Destroyer 2020
Uusimaa, Finland
Joined: October 01, 2016
KitMaker: 514 posts
Armorama: 171 posts
Posted: Saturday, January 05, 2019 - 06:32 AM UTC
And ready for painting:

Four weeks to do three color camo, which leaves one week per color, and one for decals, weathering and tracks. Will be ready in time unless some kind of disaster pops up.
Queensland, Australia
Joined: August 06, 2005
KitMaker: 3,353 posts
Armorama: 3,121 posts
Posted: Saturday, January 05, 2019 - 09:43 AM UTC
Quoted Text
Will be ready in time unless some kind of disaster pops up.
Don't tempt fate like that Pasi.

On the Bench:
Dust, styrene scraps, paint splotches and tears.
Queensland, Australia
Joined: August 06, 2005
KitMaker: 3,353 posts
Armorama: 3,121 posts
Posted: Monday, January 07, 2019 - 08:25 PM UTC
Time to show my Progress. Main construction completed. Wheels, idler sprocket and tracks all come apart for painting. The mesh for the exhaust is also being left off for painting.
In the reference pic, the tools have long since vanished, so the clamps will be empty. I used Aber as I make them workable so I can paint the tools separately. Probably could have used Dragons here in hindsight.
Most of the interior is done, just a few touch ups and some additional stowage for the British troopers.


Ready for primer and painting now.
On the Bench:
Dust, styrene scraps, paint splotches and tears.
Klaus-Adler
 Campaigns Administrator
Scotland, United Kingdom
Joined: June 08, 2015
KitMaker: 1,505 posts
Armorama: 840 posts
Posted: Monday, January 14, 2019 - 11:02 PM UTC
United Kingdom
Joined: September 17, 2012
KitMaker: 462 posts
Armorama: 417 posts
Posted: Thursday, January 17, 2019 - 01:36 AM UTC
Peter, Klaus, well done! both kits look awesome!
Cheers
Matthew
Queensland, Australia
Joined: August 06, 2005
KitMaker: 3,353 posts
Armorama: 3,121 posts
Posted: Thursday, January 17, 2019 - 07:19 PM UTC
Very nice indeed David. I hope you had fun. Thanks for joining in.
Well I have paint and decals down and grabbing a few minutes to start weathering before SWMBO comes home. Will post pics over the weekend.
On the Bench:
Dust, styrene scraps, paint splotches and tears.
Uusimaa, Finland
Joined: October 01, 2016
KitMaker: 514 posts
Armorama: 171 posts
Posted: Saturday, January 19, 2019 - 05:19 AM UTC
Painting instructions for three colour camoflage were lacking (no top view, no right side), so did all green scheme instead:

Weathering, painting details, tracks and tools and then it's done.
Sofiya, Bulgaria
Joined: November 26, 2017
KitMaker: 393 posts
Armorama: 369 posts
Posted: Saturday, January 19, 2019 - 05:39 AM UTC
Västra Götaland, Sweden
Joined: May 29, 2018
KitMaker: 397 posts
Armorama: 388 posts
Posted: Saturday, January 19, 2019 - 06:18 AM UTC
Congratulations Kalin. Looks much beter after weathering.

Queensland, Australia
Joined: August 06, 2005
KitMaker: 3,353 posts
Armorama: 3,121 posts
Posted: Saturday, January 19, 2019 - 09:06 AM UTC
Really just chickened out on doing the camo didn't you Pasi?


Seriously though, it is looking great. You are on the home stretch now.
Kalin, great finish on Max. The weathering really looks the part of what you would expect in the Western Desert. It has been fun to watch this one.
On the Bench:
Dust, styrene scraps, paint splotches and tears.
Sofiya, Bulgaria
Joined: November 26, 2017
KitMaker: 393 posts
Armorama: 369 posts
Posted: Sunday, January 20, 2019 - 12:26 AM UTC
Bogi, Peter, thank you! I tried to make my models look good.
Kalin
Uusimaa, Finland
Joined: October 01, 2016
KitMaker: 514 posts
Armorama: 171 posts
Posted: Sunday, January 20, 2019 - 02:16 AM UTC
Quoted Text
Really just chickened out on doing the camo didn't you Pasi?
Won't admit that
It definitely is a lot quicker paintjob.
Quoted Text
Seriously though, it is looking great. You are on the home stretch now.
Thanks, and should be done in week or so.

#298
Hong Kong S.A.R. / 繁體
Joined: August 08, 2002
KitMaker: 1,182 posts
Armorama: 665 posts
Posted: Tuesday, January 22, 2019 - 07:10 PM UTC
Queensland, Australia
Joined: August 06, 2005
KitMaker: 3,353 posts
Armorama: 3,121 posts
Posted: Wednesday, January 23, 2019 - 09:12 AM UTC
On the Bench:
Dust, styrene scraps, paint splotches and tears.
United Kingdom
Joined: September 17, 2012
KitMaker: 462 posts
Armorama: 417 posts
Posted: Wednesday, January 23, 2019 - 08:03 PM UTC
@Lapman. How is the RPM kit? It looks like a nice clean build.
Uusimaa, Finland
Joined: October 01, 2016
KitMaker: 514 posts
Armorama: 171 posts
Posted: Saturday, January 26, 2019 - 01:46 AM UTC
Almost done:

Queensland, Australia
Joined: August 06, 2005
KitMaker: 3,353 posts
Armorama: 3,121 posts
Posted: Saturday, January 26, 2019 - 08:39 AM UTC
Well down the 'track' there Pasi
Okay, I'm calling this one finished for the build even though I just noticed the front retaining bar for the spare tracks is AWOL. A quick look for it has turned up nothing so a scratchbuilt replacement will need to be made and painted

I deviated from Dragon's painting colours as their call is for what is supposed to be light mud and dark green, where I believe the green should be black. Whilst both green and black disruptive colours were used, I believe the reference pic to show it far darker than the green. Also, Dragons rondel decal is concentric-ish circles of white, blue, white and red. The outer circle was usually yellow on the vehicle rondels at the time and I believe the reference pic also shows a clear difference between the two, so yellow was hand painted over the decal. The red centre should also be larger - contemplating doing that.
The actual vehicle - look at the colour on the rear fender hence the choice of black. The upper surface is quite dusty in other pics, so I think that tones down the black. That is my call anyway
:


On the Bench:
Dust, styrene scraps, paint splotches and tears.
Queensland, Australia
Joined: August 06, 2005
KitMaker: 3,353 posts
Armorama: 3,121 posts
Posted: Saturday, January 26, 2019 - 08:43 AM UTC
On the Bench:
Dust, styrene scraps, paint splotches and tears.
Sofiya, Bulgaria
Joined: November 26, 2017
KitMaker: 393 posts
Armorama: 369 posts
Posted: Saturday, January 26, 2019 - 09:24 AM UTC
Peter, I'm impressed. Visually is one to one with the real Panzerjaeger. Congratulations on working on the model.
Kalin

Västra Götaland, Sweden
Joined: May 29, 2018
KitMaker: 397 posts
Armorama: 388 posts
Posted: Saturday, January 26, 2019 - 10:01 AM UTC
Peter, nice model indeed.
Georgia, United States
Joined: July 26, 2013
KitMaker: 2,272 posts
Armorama: 1,860 posts
Posted: Saturday, January 26, 2019 - 05:16 PM UTC
So, my M3 is a theoretical unit captured on the Eastern Front in the latter half of 1943. I chose it mostly because it blends with my existing builds and usually I see DAK versions of this tank. Balkenkreuz are the only markings she will get. I just have to paint the tools and fiddly bits, finalize the tracks, and apply the last weathering layer.

On the Campaign Trail:
Tank Destroyer 2020
Uusimaa, Finland
Joined: October 01, 2016
KitMaker: 514 posts
Armorama: 171 posts
Posted: Sunday, January 27, 2019 - 02:42 AM UTC
And done:

Two more photos are in the
gallery Thanks for very interesting campaign. It's fun to see well known tanks in unusual scheme and markings.