#490
Sofiya, Bulgaria
Joined: September 22, 2016
KitMaker: 1,432 posts
Armorama: 1,390 posts
Posted: Wednesday, April 11, 2018 - 03:59 PM UTC
Thanks John!
Enlisted.

Queensland, Australia
Joined: August 06, 2005
KitMaker: 3,353 posts
Armorama: 3,121 posts
Posted: Thursday, April 12, 2018 - 02:13 AM UTC
On the Bench:
Dust, styrene scraps, paint splotches and tears.
RobinNilsson
 TOS Moderator
Stockholm, Sweden
Joined: November 29, 2006
KitMaker: 6,693 posts
Armorama: 5,562 posts
Posted: Thursday, April 12, 2018 - 02:37 AM UTC
I had never realised that I was a sucker for challenges ...
Maybe I should change my callsign to Suckerberg ...
;)
In memory of Al Superczynski:
"Build what YOU want, the way YOU want to....
and the critics will flame you every time"
Queensland, Australia
Joined: August 06, 2005
KitMaker: 3,353 posts
Armorama: 3,121 posts
Posted: Thursday, April 12, 2018 - 08:24 AM UTC
Quoted Text
I had never realised that I was a sucker for challenges ...
Maybe I should change my callsign to Suckerberg ...
;)
Mark Suckerberg.....??

Change the name of these threads from Group builds to Facebuild??
On the Bench:
Dust, styrene scraps, paint splotches and tears.
RobinNilsson
TOS Moderator Stockholm, Sweden
Joined: November 29, 2006
KitMaker: 6,693 posts
Armorama: 5,562 posts
Posted: Thursday, April 12, 2018 - 12:29 PM UTC
Quoted Text
Quoted Text
I had never realised that I was a sucker for challenges ...
Maybe I should change my callsign to Suckerberg ...
;)
Mark Suckerberg.....??
Change the name of these threads from Group builds to Facebuild??
I asked Google about that spelling and the result surprised me

In memory of Al Superczynski:
"Build what YOU want, the way YOU want to....
and the critics will flame you every time"
#490
Sofiya, Bulgaria
Joined: September 22, 2016
KitMaker: 1,432 posts
Armorama: 1,390 posts
Posted: Tuesday, April 17, 2018 - 02:01 PM UTC
Did a try on a Campaign ribbon.
It contains the name of the campaign(RESIN II) as if molded in resin and the year(2018) as part number on the casting block.
Something like:

Do you like it?
Queensland, Australia
Joined: August 06, 2005
KitMaker: 3,353 posts
Armorama: 3,121 posts
Posted: Tuesday, April 17, 2018 - 02:37 PM UTC
Quoted Text
Did a try on a Campaign ribbon.
It contains the name of the campaign(RESIN II) as if molded in resin and the year(2018) as part number on the casting block.
Do you like it?
It is a nice layout but ribbons have to be 50 x 20 pixels, so this is too big at 92 x 46
This is what it would look like at the correct size and format

or with a black background

On the Bench:
Dust, styrene scraps, paint splotches and tears.
#490
Sofiya, Bulgaria
Joined: September 22, 2016
KitMaker: 1,432 posts
Armorama: 1,390 posts
Posted: Tuesday, April 17, 2018 - 03:08 PM UTC
Thanks Peter!
Black background looks OK.
Let's see will there be other opinions,
RobinNilsson
TOS Moderator Stockholm, Sweden
Joined: November 29, 2006
KitMaker: 6,693 posts
Armorama: 5,562 posts
Posted: Tuesday, April 17, 2018 - 03:14 PM UTC
I prefer the black background.
I would like to suggest small notches in the casting block under the letters in RESIN. Similar to the gap between RESIN and II but only half as wide. I hope this would emphasize the letters a little.
/ Robin
In memory of Al Superczynski:
"Build what YOU want, the way YOU want to....
and the critics will flame you every time"
#490
Sofiya, Bulgaria
Joined: September 22, 2016
KitMaker: 1,432 posts
Armorama: 1,390 posts
Posted: Tuesday, April 17, 2018 - 04:22 PM UTC
Like this,Robin?

I've also increased the height of the letters.
RobinNilsson
TOS Moderator Stockholm, Sweden
Joined: November 29, 2006
KitMaker: 6,693 posts
Armorama: 5,562 posts
Posted: Tuesday, April 17, 2018 - 04:26 PM UTC
Better

Maybe the notches could be one row of pixels deeper ...
/ Robin
In memory of Al Superczynski:
"Build what YOU want, the way YOU want to....
and the critics will flame you every time"
Western Australia, Australia
Joined: March 21, 2016
KitMaker: 247 posts
Armorama: 126 posts
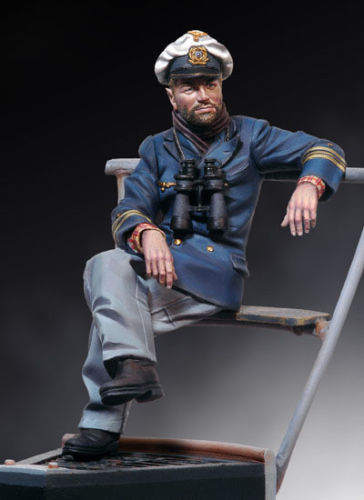
Posted: Thursday, April 19, 2018 - 08:15 AM UTC
Hi all
I have this on order for the campaign.
#490
Sofiya, Bulgaria
Joined: September 22, 2016
KitMaker: 1,432 posts
Armorama: 1,390 posts
Posted: Thursday, April 19, 2018 - 08:30 AM UTC
The relaxed Kaleun is a welcomed entry, Linus!
Queensland, Australia
Joined: August 06, 2005
KitMaker: 3,353 posts
Armorama: 3,121 posts
Posted: Friday, April 20, 2018 - 01:41 AM UTC
Are going to strip it back and repaint it Linus?

Looks like a nice figure. I love the relaxed pose. Something very different from the usual standing figures. I'll look forward to seeing your version completed.
On the Bench:
Dust, styrene scraps, paint splotches and tears.
Western Australia, Australia
Joined: March 21, 2016
KitMaker: 247 posts
Armorama: 126 posts
Posted: Sunday, April 22, 2018 - 04:41 AM UTC
He He...I can only hope mine will look 1/10 as good as that photo when I have finished!
#490
Sofiya, Bulgaria
Joined: September 22, 2016
KitMaker: 1,432 posts
Armorama: 1,390 posts
Posted: Monday, May 21, 2018 - 06:11 PM UTC
Criel Model Trattrice Pesante Breda 32?
Plus Model Steyr 640?
Or Customfactory ZIL-130 without cargo bay(part of SKP-9MV build)?
That is the question...

RobinNilsson
TOS Moderator Stockholm, Sweden
Joined: November 29, 2006
KitMaker: 6,693 posts
Armorama: 5,562 posts
Posted: Monday, May 21, 2018 - 07:24 PM UTC
Quoted Text
Criel Model Trattrice Pesante Breda 32?
Plus Model Steyr 640?
Or Customfactory ZIL-130 without cargo bay(part of SKP-9MV build)?
That is the question...
Steyr 640!
It would be interesting to see how you solve the shape issues with the front (engine hood)
/ Robin
In memory of Al Superczynski:
"Build what YOU want, the way YOU want to....
and the critics will flame you every time"
Queensland, Australia
Joined: August 06, 2005
KitMaker: 3,353 posts
Armorama: 3,121 posts
Posted: Tuesday, May 22, 2018 - 09:23 AM UTC
Quoted Text
Steyr 640!
It would be interesting to see how you solve the shape issues with the front (engine hood)
/ Robin
With Angel's scratch building skills, probably not all that much of an issue - he'll probably rebuild most of the kit anyway!
On the Bench:
Dust, styrene scraps, paint splotches and tears.
RobinNilsson
TOS Moderator Stockholm, Sweden
Joined: November 29, 2006
KitMaker: 6,693 posts
Armorama: 5,562 posts
Posted: Tuesday, May 22, 2018 - 01:48 PM UTC
Quoted Text
Quoted Text
Steyr 640!
It would be interesting to see how you solve the shape issues with the front (engine hood)
/ Robin
With Angel's scratch building skills, probably not all that much of an issue - he'll probably rebuild most of the kit anyway!
Exactly

I just wanted to watch and learn to make it easier for myself
Those kits are not in my stash yet, so unless Hobbyboss or Bronco makes them in styrene I may need to get a resin kit.
/ Robin
In memory of Al Superczynski:
"Build what YOU want, the way YOU want to....
and the critics will flame you every time"
#490
Sofiya, Bulgaria
Joined: September 22, 2016
KitMaker: 1,432 posts
Armorama: 1,390 posts
Posted: Tuesday, May 22, 2018 - 02:17 PM UTC
Frankly speaking-I am not aware of the problem Robin mentioned.
I'll ask Kalin to allow me to take a look at the Steyr 640 he has in his stash.
If I find a problem-I'll look for a feasible solution.
Thanks for your kind words!

RobinNilsson
TOS Moderator Stockholm, Sweden
Joined: November 29, 2006
KitMaker: 6,693 posts
Armorama: 5,562 posts
Posted: Tuesday, May 22, 2018 - 04:54 PM UTC
Model:

Real thing:


I think the slope of the top of the hood from the windshield forward to the radiator cap is too steep in the model.
The top of the hood on the 1:1 Steyr 640 was almost horizontal.
The vertical below the windshield is very low in 1:1 and a lot higher in the model. The whole hood is too low which means that the front grille and radiator are also too low.
Rebuild the whole hood and grilles? Keep the fenders and the windshield and redo the rest?
/ Robin
In memory of Al Superczynski:
"Build what YOU want, the way YOU want to....
and the critics will flame you every time"
#490
Sofiya, Bulgaria
Joined: September 22, 2016
KitMaker: 1,432 posts
Armorama: 1,390 posts
Posted: Tuesday, May 22, 2018 - 05:36 PM UTC
I see, Robin-thanks for pointing these discrepancies out.
I'll have a Plus Model's Steyr 640 in my hands Friday evening and will check how the parts in question look in reality.
Further-there is a Steyr 640 preserved in a military base in Lovech(I happen to work 30 km. away from it).While it is not easy to get access there-June 1st is coming, so the base might be open for the public.If so-I'll be there to see the original.
Then I'll see what can be done.
So-Steyr 640 will be my first choice(no chance for rebuilding entire kit is to be missed).But...
I still feel like Breda 32.
And the ZIL-130 conversion.
Maybe I'll try to have all 3 builds finished within this campaign.
And-of course- all in Bulgarian livery.
#490
Sofiya, Bulgaria
Joined: September 22, 2016
KitMaker: 1,432 posts
Armorama: 1,390 posts
Posted: Thursday, May 24, 2018 - 11:38 PM UTC
I took measurements from the Steyr 640 kit.It is true that the bonet is not straight with regard to windshield's pane-I measured an angle of 86.4 degree.
The vehicle in Lovech is Steyr 440 but I will not be able to visit it before Sep. 1st(next open-to-public date)...
I have a picture of this Steyr 440, that shows a steep bonnet:

I'll look at the other refference pictures of Steyr 640 I have.
Queensland, Australia
Joined: August 06, 2005
KitMaker: 3,353 posts
Armorama: 3,121 posts
Posted: Friday, May 25, 2018 - 03:54 AM UTC
Interesting Robin.
It also looks like the fenders are wrong too. Note the space between the tyre and fender on the images and compare to the kit. Then look at the bar that runs to the top of the fender is about 1/3rd from the top in the real thing, but 2/5th's down on the model due to the too low hood. The bar appears to be higher than the seat in the cab in your second pic, but well below on the model. All indicating the fenders are undersize too.
The grills on the engine bay sides extend almost all the way to the fire wall on the kit, but stop well short in the pics....
Then the top of the tyre on the spare wheel seems to be in line with the top of the fender in the pic, which is the same in the model.... yet if you run a line through the rims of the grounded wheels, the bolts on the spare are in line with the hub centres in the kit, but it is much higher in the pics indicating it seems incorrectly placed, if it were higher it would align with a higher hood and taller fender
Then the central hub on the wheels seems undersized being roughly 1/3 of the hight of the rim in the pic and around 1/4 of the height on the kit....


On the Bench:
Dust, styrene scraps, paint splotches and tears.
#490
Sofiya, Bulgaria
Joined: September 22, 2016
KitMaker: 1,432 posts
Armorama: 1,390 posts
Posted: Sunday, May 27, 2018 - 06:12 PM UTC
Looks like you are also right,Peter.
That resin kit is one of only 2 options for building the vehicle.The other is a vacuum-formed conversion, that needs Tamiya's Krupp Protze as a base...accuracy-wise pretty questionable proposal.
Maybe someday some plastic company will kit the Steyr... but I cannot wait that long.
I'll go for it and I'll undertake whatever surgery is necessary (and feasible) to make it look right.