Klaus-Adler
 Campaigns Administrator
Scotland, United Kingdom
Joined: June 08, 2015
KitMaker: 1,505 posts
Armorama: 840 posts
Posted: Friday, January 18, 2019 - 04:37 AM UTC
well a little more progress has been made this morning and i have now moved on to step 6 which is on the next page of the instruction sheet and is not visible here.
i have added parts A17 which you can see in the picture but since i am doing the desertized version i may have added those by mistake. i should be able to remove them reasonably easily though.

MichaelSatin
Campaigns Administrator Colorado, United States
Joined: January 19, 2008
KitMaker: 3,909 posts
Armorama: 510 posts
Posted: Saturday, January 19, 2019 - 11:47 AM UTC
Some progress on the Dragon Magach 2:

Running gear installed (aside from wheels, of course) and turret basket built. I'm not sure why the person who designed that turret basket hates modelers so much, but I beat him! Not without serious heartburn, of course.
Michael

On the bench:
Sorta depends on your definition of "on the bench"...
Klaus-Adler
Campaigns Administrator Scotland, United Kingdom
Joined: June 08, 2015
KitMaker: 1,505 posts
Armorama: 840 posts
Posted: Sunday, January 20, 2019 - 01:58 AM UTC
i've just added the wheels although they can be removed for painting purposes later on as well as the rear hull section minus the track links again so that they can be painted separately

Croatia Hrvatska
Joined: December 11, 2015
KitMaker: 101 posts
Armorama: 95 posts
Posted: Sunday, January 20, 2019 - 07:57 AM UTC
Klaus-Adler
Campaigns Administrator Scotland, United Kingdom
Joined: June 08, 2015
KitMaker: 1,505 posts
Armorama: 840 posts
Posted: Tuesday, January 22, 2019 - 11:52 PM UTC
well i have attached the upper and lower hulls of the challenger tank and i have also prepped the side skirts but i will leave those off for now to make it easier to paint the model.

Queensland, Australia
Joined: August 06, 2005
KitMaker: 3,353 posts
Armorama: 3,121 posts
Posted: Wednesday, January 23, 2019 - 09:08 AM UTC
David and Michael. Looking good guys.
Michael, I hear you on the engineering. Maybe they should start building their creations... that will make them re-think their design flaws.
Igor, very slick indeed. It turned out fantastic my friend.
On the Bench:
Dust, styrene scraps, paint splotches and tears.
Croatia Hrvatska
Joined: December 11, 2015
KitMaker: 101 posts
Armorama: 95 posts
Posted: Saturday, January 26, 2019 - 09:44 PM UTC
Thank you for good comments.
Since I am modern AFV fan this campaign is motivating for me.
I have started work on Tiger Model AMX 30 B2 which is nice kit.

MichaelSatin
Campaigns Administrator Colorado, United States
Joined: January 19, 2008
KitMaker: 3,909 posts
Armorama: 510 posts
Posted: Sunday, January 27, 2019 - 02:25 AM UTC
Great work continues here!
A question for you all. I don't have a lot of armor experience and could use a little guidance. I'm about to start installing the clear periscopes. What color do you suggest I paint the backs of them before I paint the hull color? I know the first layer of paint is what will show through the clear face, so what should I use? Black?
Thanks for your help!
Michael
On the bench:
Sorta depends on your definition of "on the bench"...

#135
California, United States
Joined: August 05, 2007
KitMaker: 1,501 posts
Armorama: 1,485 posts
Posted: Sunday, January 27, 2019 - 08:29 AM UTC
@MichaelSatin -Michael,
I paint the back of the periscope with Tamiya clear green (very light coat). Then I place Bare Metal foil over the dried paint and trim it so it only fits on the back of the periscope. Then mask off the front clear lens and paint the periscope black. You could then paint this as per the vehicles color depending on your reference(s).
You could use silver paint in place of the Bare Metal foil. Im getting ready to do my tank hull periscopes and will post pictures of this process if you like?
Hope this helps you,
~ Eddy

If you absolutely must have a city completely destroyed overnight . . . call the MARINES
Currently on the bench:
1:12 Bandia Star Wars K-2SO
1:35 Takom T-54B Late
Washington, United States
Joined: March 29, 2017
KitMaker: 157 posts
Armorama: 122 posts
Posted: Sunday, January 27, 2019 - 09:59 AM UTC
MichaelSatin
Campaigns Administrator Colorado, United States
Joined: January 19, 2008
KitMaker: 3,909 posts
Armorama: 510 posts
Posted: Sunday, January 27, 2019 - 11:23 AM UTC
Quoted Text
@MichaelSatin -Michael,
I paint the back of the periscope with Tamiya clear green (very light coat). Then I place Bare Metal foil over the dried paint and trim it so it only fits on the back of the periscope. Then mask off the front clear lens and paint the periscope black. You could then paint this as per the vehicles color depending on your reference(s).
You could use silver paint in place of the Bare Metal foil. Im getting ready to do my tank hull periscopes and will post pictures of this process if you like?
Hope this helps you,
~ Eddy
Thanks Eddy! That sounds like a good plan and I'll give it a try, though probably with silver paint.
Michael
On the bench:
Sorta depends on your definition of "on the bench"...
Wojewodztwo Slaskie, Poland
Joined: October 21, 2003
KitMaker: 529 posts
Armorama: 500 posts
Posted: Monday, January 28, 2019 - 09:54 AM UTC
#491
Missouri, United States
Joined: April 06, 2016
KitMaker: 602 posts
Armorama: 191 posts
Posted: Monday, January 28, 2019 - 03:32 PM UTC
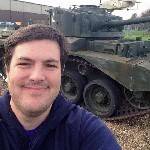
I am calling this one done. I am happy with the result from not a great kit.
I may go back and add some crew at some point in the distant future.
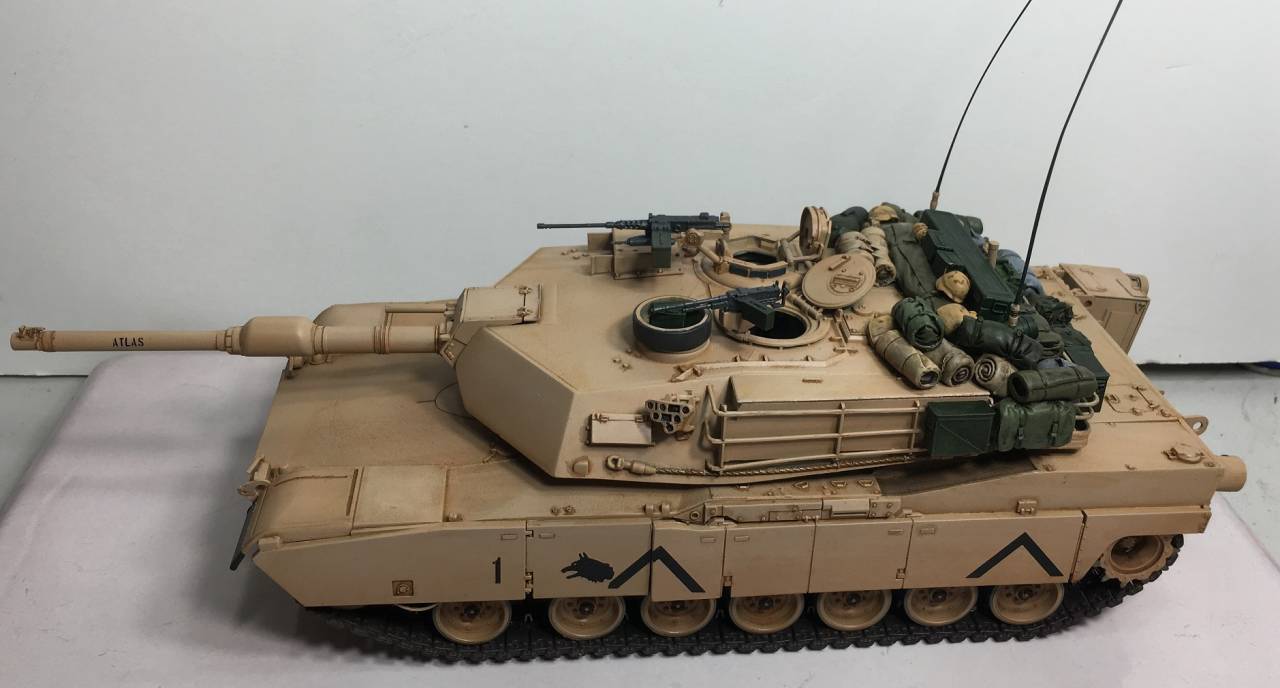
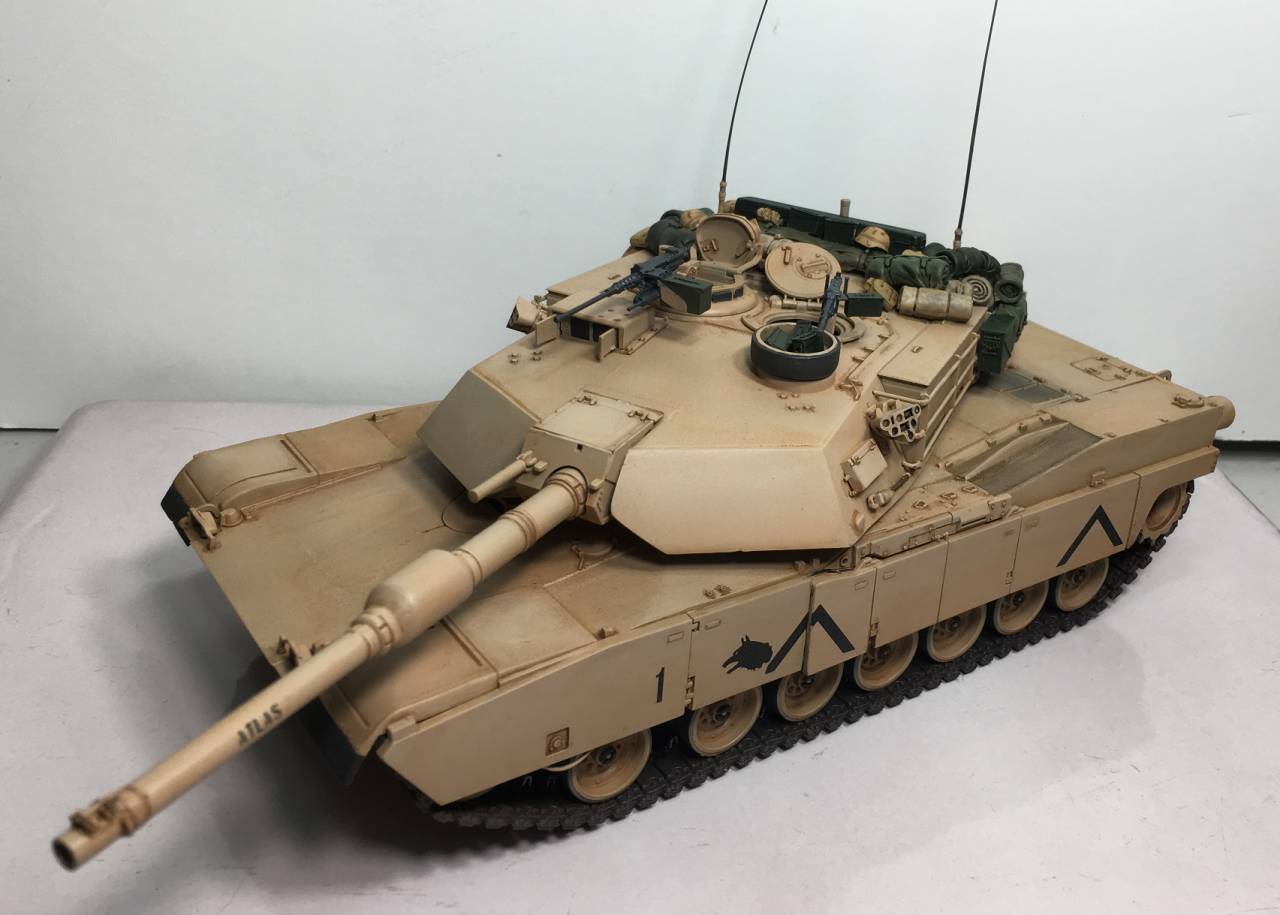
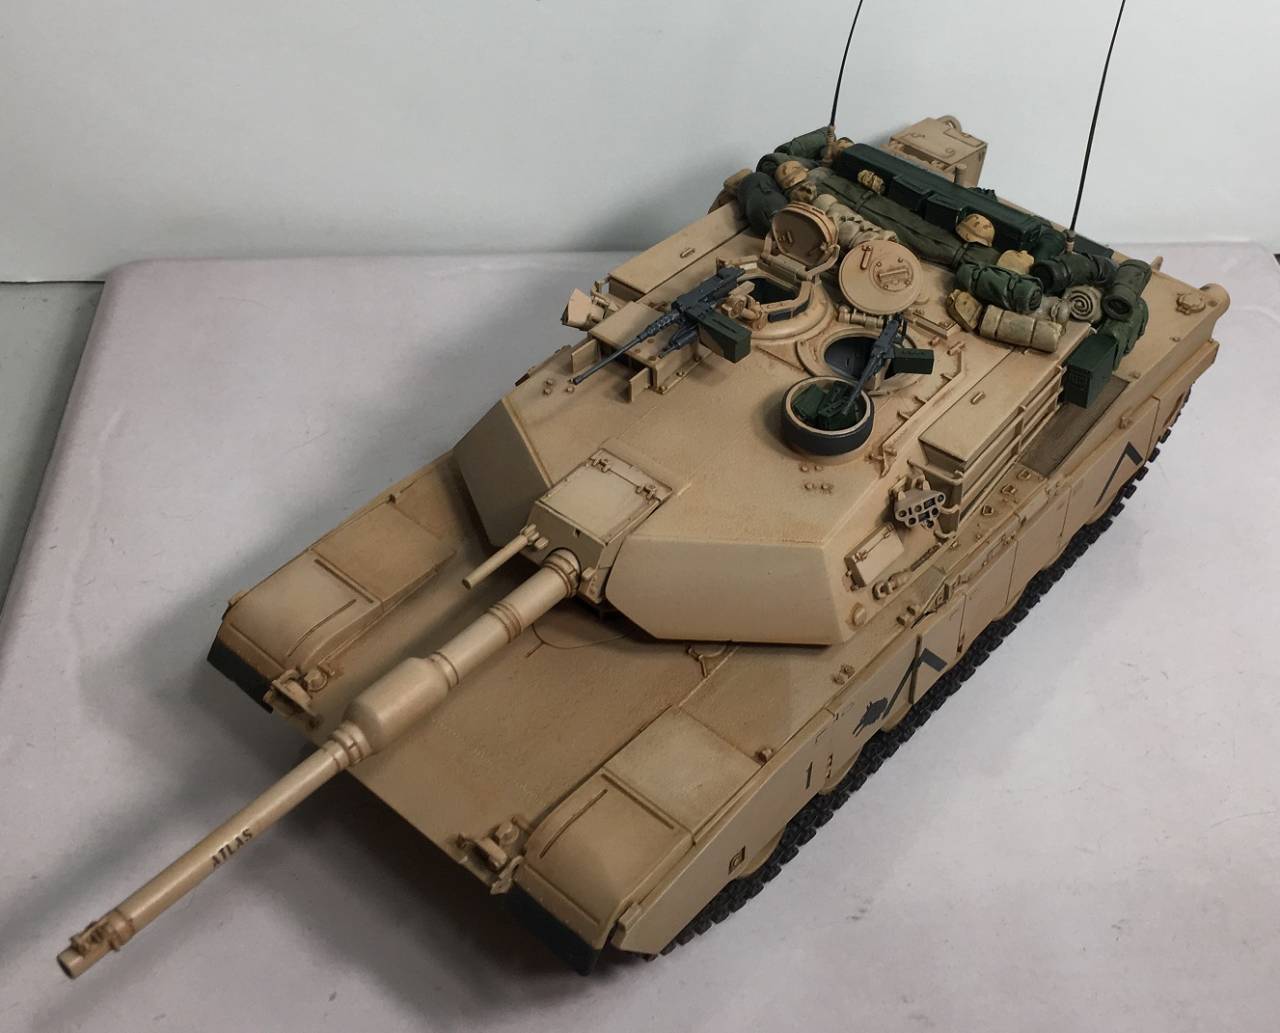
Thank you for a great campaign and for a reason to have built this

Currently working on: Multiple Campaigns :P
Washington, United States
Joined: March 29, 2017
KitMaker: 157 posts
Armorama: 122 posts
Posted: Monday, January 28, 2019 - 04:25 PM UTC
McRunty - Nice work on that old Dragon Abrams. I built an older pop of that kit about 17 years ago. I remember having to completely scratch build the turret basket because the kit parts were so badly molded.
#491
Missouri, United States
Joined: April 06, 2016
KitMaker: 602 posts
Armorama: 191 posts
Posted: Monday, January 28, 2019 - 04:39 PM UTC
Quoted Text
I remember having to completely scratch build the turret basket because the kit parts were so badly molded.
Thank you!
There is a reason why there is so much stowage mounted...
Currently working on: Multiple Campaigns :P
Klaus-Adler
Campaigns Administrator Scotland, United Kingdom
Joined: June 08, 2015
KitMaker: 1,505 posts
Armorama: 840 posts
Posted: Wednesday, January 30, 2019 - 12:13 AM UTC
Finally managed to put some more time in on this one and i have started work on the turret and have reached step 19. I think there are only 24 steps int eh building process so the end is in sight.
today i have worked on some of the storage bins and the diddly smoke dischargers. i still have to add the plastic mess to the front storage compartment but i am thinking about after market PE for this as i haven't had much experience in cutting this type of mess but what i have had didn't go well.
I have also completed the main gun barrel but this is not in the picture, i have opted to keep the original as i am not sure if there is an after market version and this only needed a little work to bring it up to spec.

Lisboa, Portugal
Joined: March 04, 2008
KitMaker: 5,386 posts
Armorama: 4,727 posts
Posted: Wednesday, January 30, 2019 - 03:27 AM UTC
Quoted Text
Thanks Eddy! That sounds like a good plan and I'll give it a try, though probably with silver paint.
Michael
Michael, depending on the clear colours available, I paint the periscopes either silver or a very shiny aluminium and them apply the clear colours.
Give it a try first on some clear parts from the spare box.

Active Builds: 0
Active Campaigns: 0
Lisboa, Portugal
Joined: March 04, 2008
KitMaker: 5,386 posts
Armorama: 4,727 posts
Posted: Wednesday, January 30, 2019 - 03:29 AM UTC
Terrific job Pawel and Igor.
Your MBT's look great !!
Let's now see how Michael's Magach and Ken's T-54 will turn up!
Active Builds: 0
Active Campaigns: 0
Queensland, Australia
Joined: August 06, 2005
KitMaker: 3,353 posts
Armorama: 3,121 posts
Posted: Wednesday, January 30, 2019 - 07:23 AM UTC
Ken, the detail in the internal painting looks fantastic. A pity to button her up.
Pawel and Rory. Great builds guys. Two very different finishes but equally well done. Thanks for joining guys.
On the Bench:
Dust, styrene scraps, paint splotches and tears.
Croatia Hrvatska
Joined: December 11, 2015
KitMaker: 101 posts
Armorama: 95 posts
Posted: Tuesday, February 05, 2019 - 07:10 PM UTC
It's almost done. Only tracks remain.

Pennsylvania, United States
Joined: March 02, 2002
KitMaker: 902 posts
Armorama: 628 posts
Posted: Friday, February 08, 2019 - 07:00 AM UTC
Jumping in here a little late. The work in here is fantastic. I hope I can keep up.

This Space For Rent.
Member of IPMS - Baltimore
Queensland, Australia
Joined: August 06, 2005
KitMaker: 3,353 posts
Armorama: 3,121 posts
Posted: Friday, February 08, 2019 - 09:36 AM UTC
Looks great Igor. All the add on bits give it real character.
Welcome aboard Scott. Several of us are yet to start, so you are by no means late at all
On the Bench:
Dust, styrene scraps, paint splotches and tears.
Wales, United Kingdom
Joined: May 07, 2013
KitMaker: 242 posts
Armorama: 234 posts
Posted: Tuesday, February 12, 2019 - 08:43 AM UTC
So, starting pic for my entry:

which I want to do as a NVA vehicle, so apparently pretty much correct OOB.
In the meantime, I have prepared my painting trial Esci T-72ish

I textured the turret a little with sprue dissolved in cellulose thinners

and primed


Queensland, Australia
Joined: August 06, 2005
KitMaker: 3,353 posts
Armorama: 3,121 posts
Posted: Wednesday, February 13, 2019 - 08:09 AM UTC
Texture looks great Richard.
On the Bench:
Dust, styrene scraps, paint splotches and tears.
California, United States
Joined: December 06, 2004
KitMaker: 3,694 posts
Armorama: 2,693 posts
Posted: Monday, February 18, 2019 - 10:24 PM UTC
Working a bit on the K1A1. I opened up the holes for one of the turret stowage boxes and discovered the spacing isn't right. I have decided not to open the other holes and just remove the tabs that go into the holes and glue them in the right place. Just as well as I also have to make bottoms for them all. I guess Trumpeter was trying to save plastic in those days.