England - South West, United Kingdom
Joined: October 17, 2017
KitMaker: 944 posts
Armorama: 928 posts
Posted: Saturday, February 15, 2020 - 05:40 AM UTC
Hi Ryan,
Thanks, and more than happy to stand you a pint if you ever get over here,

.
You're certainly being a tad more ambitious than me with regards the number of 'cobbles' you're featuring on your base.
The number of tiles you've cut and installed in an hour is impressive, you've certainly achieved more than I did in a similar period. It's really starting to come together and looking good...I'm looking forward to seeing this progress.
Are your 'cobbles' 'card' or 'plastic', what is the base made of, and what adhesive are you using to stick the 'cobbles' down with?
Cheers,

,
G
An optimist is a pessimist without all the facts.
Noord-Holland, Netherlands
Joined: October 25, 2002
KitMaker: 1,757 posts
Armorama: 914 posts
Posted: Saturday, February 15, 2020 - 05:48 AM UTC
Your scene is coming together quite nicely... 👍
Ex- PFC Erwin Leetink, RNLA
Napoleon Bonaparte:
"A soldier will fight long and hard for a bit of colored ribbon."
England - South West, United Kingdom
Joined: October 17, 2017
KitMaker: 944 posts
Armorama: 928 posts
Posted: Saturday, February 15, 2020 - 05:58 AM UTC
Hi Erwin,
Thanks for your 'thumbs-up', much appreciated,
.
How progresses your 'Op Glad IJs - On Thin Ice' project, not seen any recent images?
Cheers,
,
G
An optimist is a pessimist without all the facts.
Pennsylvania, United States
Joined: April 10, 2011
KitMaker: 7,941 posts
Armorama: 7,934 posts
Posted: Saturday, February 15, 2020 - 06:16 AM UTC
Nice progress for sure. Still lovin that Crommy
Noord-Holland, Netherlands
Joined: October 25, 2002
KitMaker: 1,757 posts
Armorama: 914 posts
Posted: Saturday, February 15, 2020 - 06:27 AM UTC
Quoted Text
Hi Erwin,
Thanks for your 'thumbs-up', much appreciated, .
How progresses your 'Op Glad IJs - On Thin Ice' project, not seen any recent images?
Cheers, ,
I received the wrong ordered parts last week (actually the ones ordered in November!), so I can continue, but since I had to wait, I started with another kit (1:32 Zoukei-Mura Mustang P-51D), which I entered in a group build over on Britmodeller. So, when that's finished, I will return to my icy diorama.
G

I received the wrong ordered parts last week (actually the ones ordered in November!), so I can continue, but since I had to wait, I started with another kit (1:32 Zoukei-Mura Mustang P-51D), which I entered in a group build over on Britmodeller. So, when that's finished, I will return to my icy diorama.
Ex- PFC Erwin Leetink, RNLA
Napoleon Bonaparte:
"A soldier will fight long and hard for a bit of colored ribbon."
North Carolina, United States
Joined: April 29, 2014
KitMaker: 1,112 posts
Armorama: 886 posts
Posted: Saturday, February 15, 2020 - 07:58 AM UTC
Quoted Text
Hi Ryan,
Thanks, and more than happy to stand you a pint if you ever get over here, .
You're certainly being a tad more ambitious than me with regards the number of 'cobbles' you're featuring on your base.
The number of tiles you've cut and installed in an hour is impressive, you've certainly achieved more than I did in a similar period. It's really starting to come together and looking good...I'm looking forward to seeing this progress.
Are your 'cobbles' 'card' or 'plastic', what is the base made of, and what adhesive are you using to stick the 'cobbles' down with?
Cheers, ,
G
I missed your wall update when I was posting, it is turning out very well. Makes me want to build a cork wall just for building fun.
My cobblestone area is about the same size as yours, little less then a 3x5, just slightly bigger than the 1/35 Jeep. I am using nothing fancy, evergreen sheet .30 (.75 mm) and strips .015 x .125 (0.38mm x 3.2mm) number 116, glued with Tamiya extra thin cement. I just set a row of stones and dab the corners with glue. Then wick between the stones after a few seconds. I might super glue it all later as I plan to sand and take a small wire brush to the top to show wear. I will post the rest in the Shep Paine thread as to not distract from your wonderful build.
England - South West, United Kingdom
Joined: October 17, 2017
KitMaker: 944 posts
Armorama: 928 posts
Posted: Sunday, February 16, 2020 - 09:26 PM UTC
Hi Jerry,
Thank you for the positive feedback, much appreciated,
.
Cheers,
,
G
An optimist is a pessimist without all the facts.
England - South West, United Kingdom
Joined: October 17, 2017
KitMaker: 944 posts
Armorama: 928 posts
Posted: Sunday, February 16, 2020 - 09:30 PM UTC
Hi Erwin,
Frustrating to hear about your wrong order, must be very annoying,

. I look forward to you getting back on the ice asap,
.
Cheers,
,
G
An optimist is a pessimist without all the facts.
England - South West, United Kingdom
Joined: October 17, 2017
KitMaker: 944 posts
Armorama: 928 posts
Posted: Sunday, February 16, 2020 - 09:41 PM UTC
Hi Ryan,
Although it's a tad long winded, it's quite therapeutic cutting and glueing the cork...sad or what,

?
I'm surprised, your area of 'cobbles', in isolation, looks greater than mine, but you're right, they are roughly the same size (3"x6").
The thing I like about using card tiles is that I can use white glue, gives me time to play around with positioning...I'm not good with superglue, tend to stick to it, rather than things with it,

.
Not a problem you posting images here, but I will bimble off over to the Shep Paine thread and check out your build,
.
Cheers,
,
G
An optimist is a pessimist without all the facts.
England - South West, United Kingdom
Joined: October 17, 2017
KitMaker: 944 posts
Armorama: 928 posts
Posted: Sunday, February 16, 2020 - 09:54 PM UTC
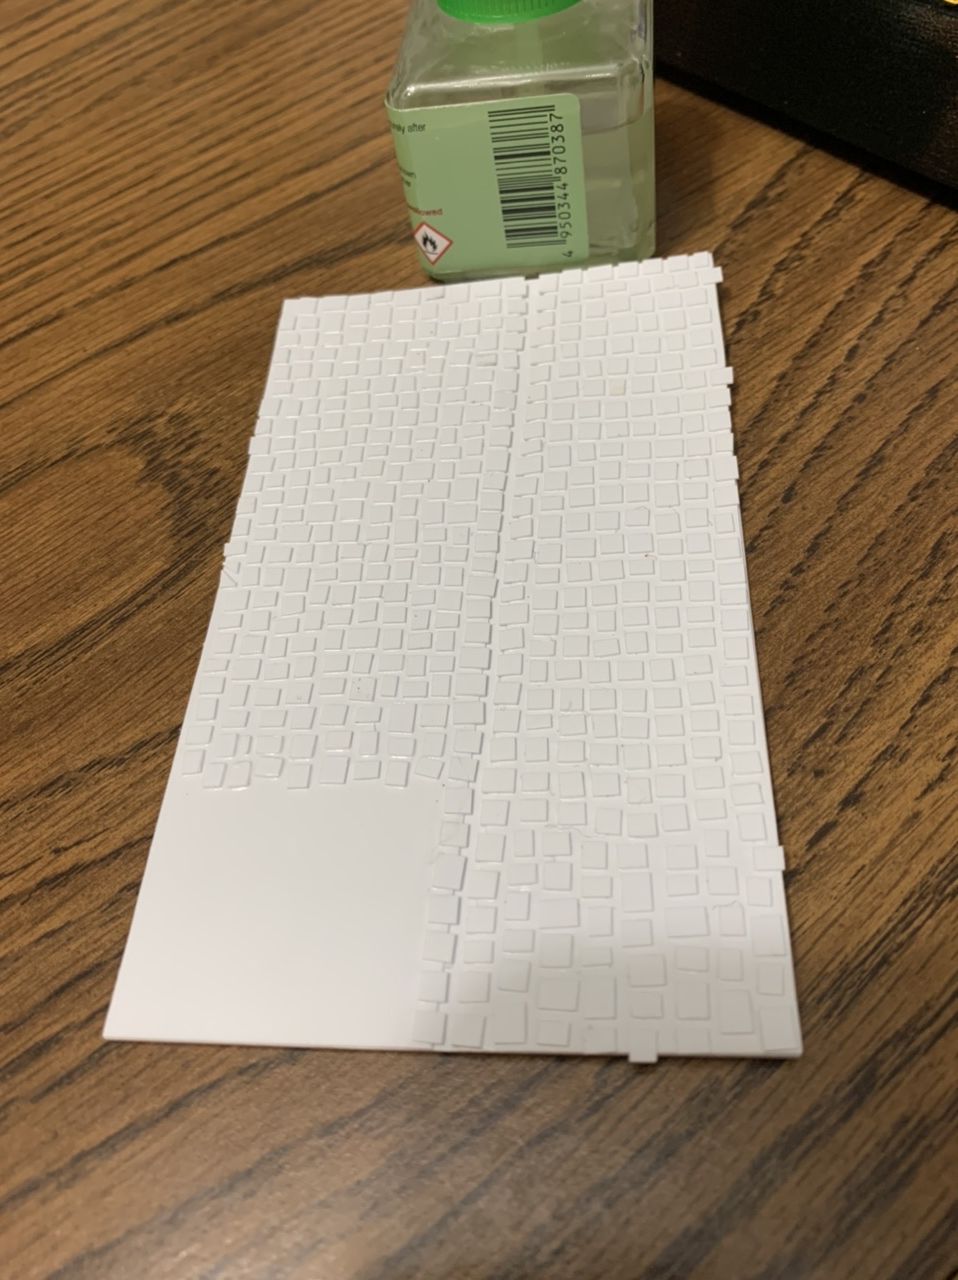
Hi all,
These arrived today (see image below),
.

Unfortunately, they're a tad too late for this build as I've only got about 7 tiles to cut and debris to add to the damaged area at the end of the wall (see images below).


Below are some images of the two runs of wall positioned roughly in-situ.


I still have to 'grout' between the 'stones', add some type of coping to the top of the wall, then it'll be build the gate and paint.
Does anyone know, or have a view on whether a rough 'French' farmyard stone wall would have supporting buttresses over the sort of length I'm trying to represent? Any feedback would be greatly appreciated,
.
Cheers,
,
G
An optimist is a pessimist without all the facts.
North Carolina, United States
Joined: April 29, 2014
KitMaker: 1,112 posts
Armorama: 886 posts
Posted: Monday, February 17, 2020 - 12:55 AM UTC
Quoted Text
Hi Ryan,
Although it's a tad long winded, it's quite therapeutic cutting and glueing the cork...sad or what, ?
I'm surprised, your area of 'cobbles', in isolation, looks greater than mine, but you're right, they are roughly the same size (3"x6").
The thing I like about using card tiles is that I can use white glue, gives me time to play around with positioning...I'm not good with superglue, tend to stick to it, rather than things with it, .
Not a problem you posting images here, but I will bimble off over to the Shep Paine thread and check out your build, .
Cheers, ,
G
I had fun chopping up strips and when I finished the strip I wanted to cut more. I have 1/3 of the other side done so another session or two to complete. The superglue will be used when I am done to help with abuse I am planning for the stones. Don't need the little buggers flying off. The extra thin works well enough to set the stones. I lay out the row and touch the secured tile above and let capillary action do the rest. I only have to readjust a time or two.
That was fast for the tools. I do hope you enjoy them for the later cork stones and other plastic projects I am sure are coming.
I like how the wall is turning out.
England - South West, United Kingdom
Joined: October 17, 2017
KitMaker: 944 posts
Armorama: 928 posts
Posted: Monday, February 17, 2020 - 03:44 AM UTC
Hi Ryan,
Good point about the tiles pinging-off, how much abuse are you planning,
?
Yes, I have to say how impressed I was with the fast delivery, if memory serves I seem to recall it saying that the supplier was new to Amazon, so was a tad wary...but all is good,
.
I'll pop over to the Shep Paine thread from time-to-time to see how you're progressing.
Cheers,
,
G
An optimist is a pessimist without all the facts.
England - South West, United Kingdom
Joined: October 17, 2017
KitMaker: 944 posts
Armorama: 928 posts
Posted: Monday, February 17, 2020 - 03:57 AM UTC
Hi all,
A tad more progress today, firstly I finished off cladding the damaged wall section (see image below).

Secondly, I have managed to 'grout' the wall with the door aperture (see images below).


Once the 'grout' has dried out properly I'll give it a scrub down with an old tooth brush, so as to remove any loose material.
Cheers,
,
G
An optimist is a pessimist without all the facts.
North Carolina, United States
Joined: April 29, 2014
KitMaker: 1,112 posts
Armorama: 886 posts
Posted: Monday, February 17, 2020 - 06:08 AM UTC
I plan to hit it with a steel wire brush. In the cork video he used one also.

I will post later this week in the Shep thread, I have to finished the project by the end of the month. So we are in the home stretch.
North Carolina, United States
Joined: April 29, 2014
KitMaker: 1,112 posts
Armorama: 886 posts
Posted: Tuesday, February 18, 2020 - 01:12 AM UTC
Ok, a quick update as I am almost done. For small stones it will take 5 strips or 1/2 the package to make a 3"x 5" area. Above is 4 strips worth of stones chopped up.
England - South West, United Kingdom
Joined: October 17, 2017
KitMaker: 944 posts
Armorama: 928 posts
Posted: Wednesday, February 19, 2020 - 03:51 AM UTC
Hi Ryan,
Snap! This arrived today (see image below), so on my next build I can also hit the tiles hard...and not in the boozy sense,

.

Your 'cobbled' street is starting to come together really well,
. What will you use to 'grout' between them?
Cheers,
,
G
An optimist is a pessimist without all the facts.
England - South West, United Kingdom
Joined: October 17, 2017
KitMaker: 944 posts
Armorama: 928 posts
Posted: Wednesday, February 19, 2020 - 04:04 AM UTC
Hi all,
A bit more progress, I have now 'grouted' both walls (see images below). I have also added some coping stones, and have shoved them roughly in to position on the base.


The 'grout' is still wet, it'll need brushing down to get rid of the excess material. I'll also need to redo some of the gaps between stones where too much 'grout' has accumulated, and blend in where the two sections of wall meet. Also need to paint the wall at some point.
Below are a few images of the Cromwell located roughly in position


Cheers,
,
G
An optimist is a pessimist without all the facts.
North Carolina, United States
Joined: April 29, 2014
KitMaker: 1,112 posts
Armorama: 886 posts
Posted: Wednesday, February 19, 2020 - 03:40 PM UTC
Great timing.
I keep going back and forth on running super glue as the grout and roughing up the stone or using your technique with glue soaked tissue.
England - South West, United Kingdom
Joined: October 17, 2017
KitMaker: 944 posts
Armorama: 928 posts
Posted: Friday, February 21, 2020 - 01:47 AM UTC
Hi Ryan,
I think that the one drawback of my method is that it's likely to hide any roughening-up of the 'cobbles' that you are intending to do...that's a guess though, I've not tried it myself,
.
Looking forward to seeing how your build works out,
.
Cheers,
,
G
An optimist is a pessimist without all the facts.
England - South West, United Kingdom
Joined: October 17, 2017
KitMaker: 944 posts
Armorama: 928 posts
Posted: Friday, February 21, 2020 - 01:57 AM UTC
Hi all,
I've put a dark base colour on the walls and have started to fix them in position, including building up the ground to the base of the wall and the edge of the base.
Started to also add debris to the ground below the damaged elements of the wall (see images below).


The walls, when finished, will be a much lighter greyish colour...least that's the intention,
.
Cheers,
,
G
An optimist is a pessimist without all the facts.
North Carolina, United States
Joined: April 29, 2014
KitMaker: 1,112 posts
Armorama: 886 posts
Posted: Friday, February 21, 2020 - 02:27 AM UTC
You are correct, it would hide the effort. I think I was mixing ideas. Do need to get on with whatever I am going to do as I have to be done by Tuesday night. Tick tock for me.
England - South West, United Kingdom
Joined: October 17, 2017
KitMaker: 944 posts
Armorama: 928 posts
Posted: Friday, February 21, 2020 - 04:25 AM UTC
Hi all,
Starting to add some lighter colour to the wall (see images below). I'll keep adding paler layers until I'm happy with the overall appearance and then will add some washes to represent rain and moss stains.


Please feel free to make recommendations, suggestions or general comments as you see fit,
.
Cheers,
,
G
An optimist is a pessimist without all the facts.
England - South West, United Kingdom
Joined: October 17, 2017
KitMaker: 944 posts
Armorama: 928 posts
Posted: Friday, February 21, 2020 - 04:27 AM UTC
Hi Ryan,
You obviously like a challenge leaving things to this late stage,
. Let me guess what you'll be doing this weekend,
.
Good luck, and cheers,
,
G
An optimist is a pessimist without all the facts.
New South Wales, Australia
Joined: May 04, 2016
KitMaker: 1,476 posts
Armorama: 1,463 posts
Posted: Friday, February 21, 2020 - 11:20 PM UTC
Very, very cool grouting/walls, and great perspectives too which the layout lends itself to. So you didnt go for the Eurotool
is there a Brexitool? Hah no need to answer that, it would take 3 years to arrive and probably wont work when you get it boom tish

North Carolina, United States
Joined: April 29, 2014
KitMaker: 1,112 posts
Armorama: 886 posts
Posted: Friday, February 21, 2020 - 11:41 PM UTC
The short deadline allows me cut through the analysis paralysis that I suffer from and get on with the task at hand. I have finished cutting and gluing all the stones. Didn't think about having to paint them all.
@Tim, with no dog in the fight that was funny.