_GOTOBOTTOM
AFV Painting & Weathering
Answers to questions about the right paint scheme or tips for the right effect.
Syrian T-72 Camouflage
Spearhead01
Visit this Community
Norrbotten, Sweden
Joined: August 27, 2019
KitMaker: 79 posts
Armorama: 77 posts
Posted: Wednesday, January 01, 2020 - 04:06 AM UTC
First: A Happy New Year to all of You!

I´ve started to build a Syrian T-72, inspired by this photo. I´m probably way in over my head trying to convert a Tamiya T-72 but I´ll give it a try. At least I´ll learn something from the build.

I bought the Ammo Mig Smart Kit "Modern Syrian Camouflage" with three colours. But I can not find anything about syrian tank camouflage pattern. Where/Are the pattern standardized? Or randomly painted by the crew? Tried Google...

Does anyone have any idea?

Thanks in advance!
Regards Freddy

marcb
Visit this Community
Overijssel, Netherlands
Joined: March 25, 2006
KitMaker: 1,244 posts
Armorama: 1,226 posts
Posted: Wednesday, January 01, 2020 - 04:21 AM UTC
Most Syrian vehicles are either in sand & green or overall sand.


Looks like it was used with an paint gun. I'd say maybey at unit level, following a rough guideline.
Spearhead01
Visit this Community
Norrbotten, Sweden
Joined: August 27, 2019
KitMaker: 79 posts
Armorama: 77 posts
Posted: Wednesday, January 01, 2020 - 04:58 AM UTC
Found a bunch of reference photos but nothing about the pattern, so it might be painted at unit level. The smart kit I bought from Ammo Mig indicate a three color pattern?

Scarred
Visit this Community
Washington, United States
Joined: March 11, 2016
KitMaker: 1,792 posts
Armorama: 1,186 posts
Posted: Wednesday, January 01, 2020 - 06:34 AM UTC
Here's a site with lotsa picts of Syrian armor in action.

http://sturgeonshouse.ipbhost.com/topic/754-syrian-tanks-at-war-some-pictures-and-words-between-them/
griffontech
Visit this Community
Canada
Joined: November 21, 2007
KitMaker: 237 posts
Armorama: 231 posts
Posted: Wednesday, January 01, 2020 - 09:03 AM UTC
If you look closely at some of the posted pics you can see the reddish brown underneath the dust layers.
vettejack
Visit this Community
Florida, United States
Joined: November 23, 2012
KitMaker: 1,277 posts
Armorama: 1,254 posts
Posted: Thursday, January 02, 2020 - 10:18 PM UTC
This pic shows inexhaustible possibilities when combining camo schemes.


Of all the captured vehicles brought back to the U.S. on missions I participated in (Aberdeen, OPFOR), a huge percentage of them were of Middle East origin. Every tank transported had damage beyond compare, which at times had me wondering how did they even continue to operate. Panels, fuel tanks, optics, fenders, alternative weaponry, trash thrown about, debris from buildings still present, camo origins undetermined, etc., made the modeling canvas for these abused vehicles...endless.
Spearhead01
Visit this Community
Norrbotten, Sweden
Joined: August 27, 2019
KitMaker: 79 posts
Armorama: 77 posts
Posted: Sunday, January 05, 2020 - 06:45 AM UTC
Thanks Guys! I´ll just give it a random pattern then. The tank on the reference picture is so dusty that you can't actually see the pattern anyway...
panzerbob01
Visit this Community
Louisiana, United States
Joined: March 06, 2010
KitMaker: 3,128 posts
Armorama: 2,959 posts
Posted: Saturday, January 11, 2020 - 04:27 AM UTC
Fred;

Just a punt from the side-lines: You appear to have a LOT of freedom in so far as "Syrian camo patterns" is concerned - the pics certainly show a HUGE variation between vehicles, and some appear to capture combinations of sprayed-on soft-edge and areas of hard-edged (hand-painted?) coloration. So, aside from some constraints around what colors may be used, looks to me like you could fruitfully pick any one or 2 pics and model your primary camo scheme off whatever you can discern from same.

Not a whole lot different from much of WWII German camo in regards pattern options!

The key take-away, to me, from the many photos posted and oodles available on the 'web and 'net is that these Syrian tanks "always" look mighty messy and trashy and are extremely dusty. This will be the look to try and develop - the camo becomes really a mottled base-coat which will be heavily buried in dirt, dust, and trash / stuff.

Folks trying to model these very dusty tanks should, I think, pay careful attention to the fact that the dust and dirt really collects in the various grooves and such - so a "dust-colored wash" would be a good route to get that sort of fill-in on details. I would follow that with dark pin-washing to refresh and delineate some detail bits, and follow up that with some heavy chalk or pigment dusting to get the huge dirty overall look.

The chip and wear fans should also spend time studying and ingesting the photos to develop a solid visual model of how these more-modern-but-extremely-used vehicles exhibit wear and tear. There is a LOT of wear to be seen, but it doesn't usually look like brutally-chipped-away paint and rusted spots. A lot appears to be more subtle and a lot of staining and gradient wear...

PS: Each time Syrian tanks get into these threads, I finger a couple of kits in my stash and get thoughtful... They are mighty interesting subjects for those looking at battered and crapped-out Russian AFV builds. The subjects are also extremely rich in potential unique detailing opportunities, and appear quite daunting if one really wants to present the full picture in a build! I look forward to seeing what you do with your build!

Cheers! Bob
Spearhead01
Visit this Community
Norrbotten, Sweden
Joined: August 27, 2019
KitMaker: 79 posts
Armorama: 77 posts
Posted: Saturday, January 11, 2020 - 08:44 AM UTC
Thanks Bob! Alot of good points! As I wrote, I´m way in over my head.

Of course the Tamiya kit is not very detailed and it turned out not to be a "solid" hull. I´m still waiting for two figures and I´m gonna try and make sandbags from surgical gloves and tack-it. Also gonna adjust the crew hatch and add a tow wire. Bricks and debris will also be added. But at least I have learned alot from doing this build since I usually build OOB and maybe using some after market kits.

But this is the progress so far


Regards Fred

TopSmith
Visit this Community
Washington, United States
Joined: August 09, 2002
KitMaker: 1,742 posts
Armorama: 1,658 posts
Posted: Sunday, January 12, 2020 - 05:56 AM UTC
I like!
panzerbob01
Visit this Community
Louisiana, United States
Joined: March 06, 2010
KitMaker: 3,128 posts
Armorama: 2,959 posts
Posted: Sunday, January 12, 2020 - 10:40 AM UTC
Freddy;

Looks to me like you are capturing some of that Syrian messy-look ambiance quite well!

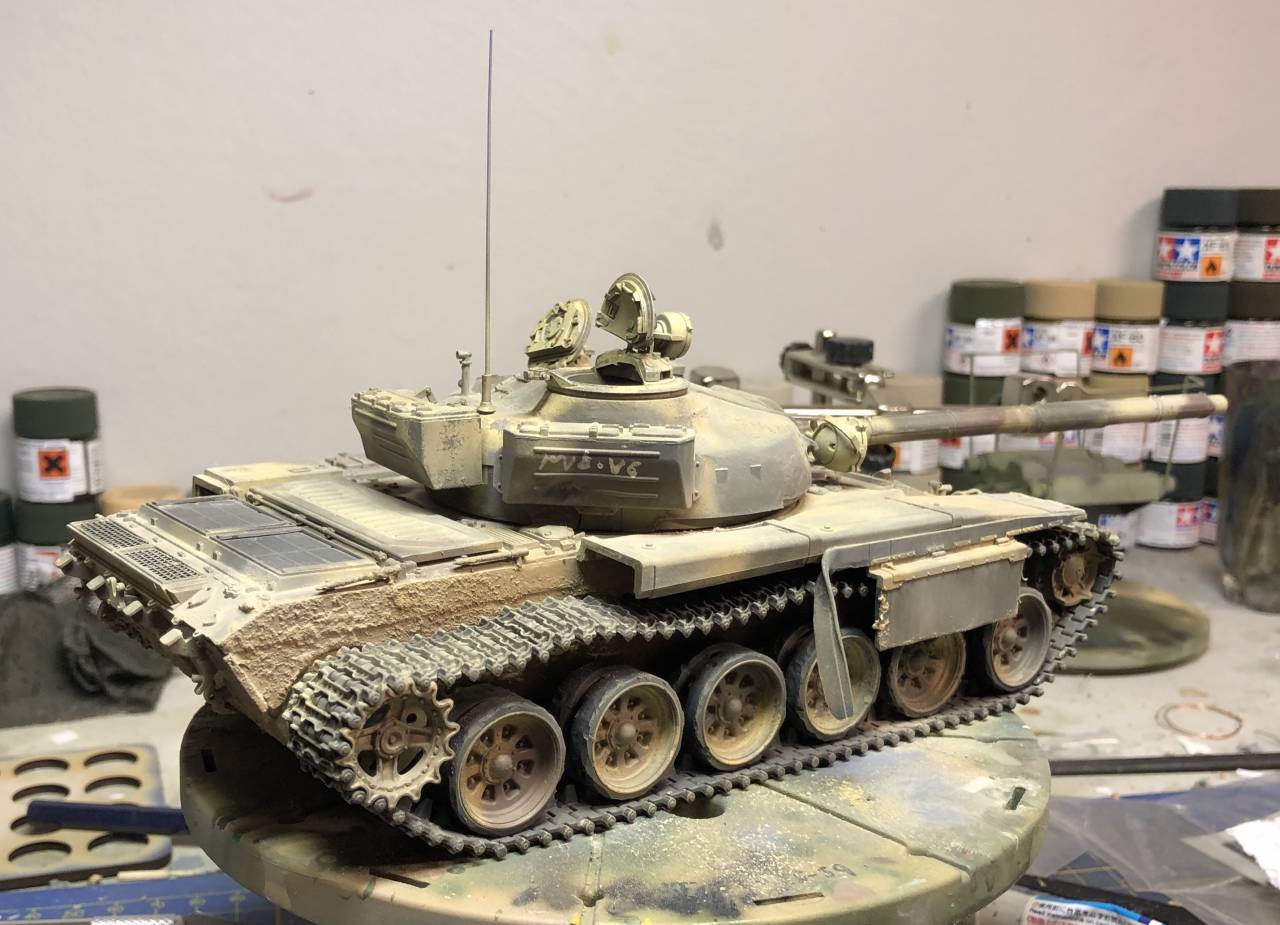
I will, however, point out a BIG ERROR that you really need to fix...

There's a technical detail that cannot be over-looked when damaging the mud-guard / fender bits on these T-72 (also T-54/55, T-64, T-80, and T-90 types) builds: The fender is a sheet-metal shelf or platform on top of which are mounted various boxes and, on the right-hand side of all these tanks, a set of fuel-cells or tanks. So... where you have cut away the fender, you need to construct something to represent the torn-away sheet-metal fender, AND you need to create an end to your fuel-tank.

I suggest taking a spin through the many photos of these messed-up tanks and focus in on the many torn-up fenders and work up a vision as to what those look like.

There is nothing wrong with depicting a missing fuel-cell or fender-box - photos show all sorts of awesomely messed-up tanks in Syria - but the depicted damage wants to capture the structural reality for best look!

I think that you have an opportunity to create some great damage effects on those fenders... Maybe add on a bent-up piece of styrene sheet or wine-bottle "foil" to extend the ripped-off fender a bit rearward, and add a mangled bracket and / or a clearly-delineated torn-away bracket site on the hull-side, and build a dented (even with a hole in it!???) end-cap for that exposed fuel tank (sculpted putty would work for this)... Maybe with a broken-off fuel-line or fitting... Some sort of fix, even a tangled-up, torn tarp or such covering over and hiding the fender and tank end, is called for to give your build its best presentation of "ripped up". The current fender end looks, alas, like the end of a plastic kit fender on an otherwise really nice build!

These messed-up "Syrian" tanks present an awesome wealth of damage for us modelers to create - Lots of opportunity. But needless to say, creating that damage can be quite challenging. Still, YOU have embarked on doing a damaged tank and that challenge is on your plate! Pull it off even "OK" and you will be thrilled at how it looks!

Cheers! Bob
Spearhead01
Visit this Community
Norrbotten, Sweden
Joined: August 27, 2019
KitMaker: 79 posts
Armorama: 77 posts
Posted: Monday, January 13, 2020 - 02:28 AM UTC
Thanks Bob! That is very relevant feedback and some good tips. The build is still in progress, as stated in prevouis post, so there are alot of possibilities

One problem with the Tamiya kit is that the fender and boxes/fueltanks is one solid piece calling for a reconstruction of the fender to show that kind of details. Skills that I do not possess, unfortunatly. Compared to various Trumpeter kits where the fender and boxes etc come in single pieces. But on the other hand, the Tamiya kit was cheap and it is nice to move out of the "comfort zone"

But your point is still very much valid, it looks like a "cut of piece of plastic"!
So I´ll try to make an end on the fueltank and hide the end with debris, tarps, sandbags etc. since I´m adding this to the whole model anyway.
TopSmith
Visit this Community
Washington, United States
Joined: August 09, 2002
KitMaker: 1,742 posts
Armorama: 1,658 posts
Posted: Tuesday, January 14, 2020 - 02:30 PM UTC
I agree with Bob on the finder/box issue. However, the weathering is looking great. How did you do get spattered mud on the hull side?
 _GOTOTOP