California, United States
Joined: February 24, 2006
KitMaker: 205 posts
Armorama: 200 posts
Posted: Sunday, September 02, 2007 - 09:49 AM UTC
Here's the pics of my kit:

Now on to research what paints I need.
Don

The deadliest weapon in the world is a Marine and his rifle.
Gen. John "Black Jack" Pershing, U.S. Army
Commander of American Forces in World War I
Istanbul, Turkey / Türkçe
Joined: December 16, 2004
KitMaker: 1,163 posts
Armorama: 842 posts
Posted: Sunday, September 02, 2007 - 10:09 AM UTC
Quoted Text
Anyhow... my green green primer just ran out as i was spraying the churchill.  Looks like a perfect excuse to go down to the hobby store (*and to pick up at least 2 kits while im at it)
Oh no! Do not follow the path of the Dark Side!

Don, a fellow modeler friend of mine built one of those, I think he liked it. For the white chalked writings on the sides, he used a white colored pencil, maybe you could try the same, it looks exactly like chalk in scale. You will need a decent olive drab, but since there are so many in the market and they are all different, I have no idea which will work. Glad you joined!
Proud Supporter of Armorama Campaigns
California, United States
Joined: February 24, 2006
KitMaker: 205 posts
Armorama: 200 posts
Posted: Sunday, September 02, 2007 - 04:57 PM UTC
Emre,
Actually I'm trying to find pics of one of the camuoflage M4A3's with the 4th Tank Bn on Iwo Jima. Doris, or Comet depends on which one I can find the most info on.
Don
The deadliest weapon in the world is a Marine and his rifle.
Gen. John "Black Jack" Pershing, U.S. Army
Commander of American Forces in World War I
California, United States
Joined: February 24, 2006
KitMaker: 205 posts
Armorama: 200 posts
Posted: Saturday, September 08, 2007 - 10:33 PM UTC
Guys,
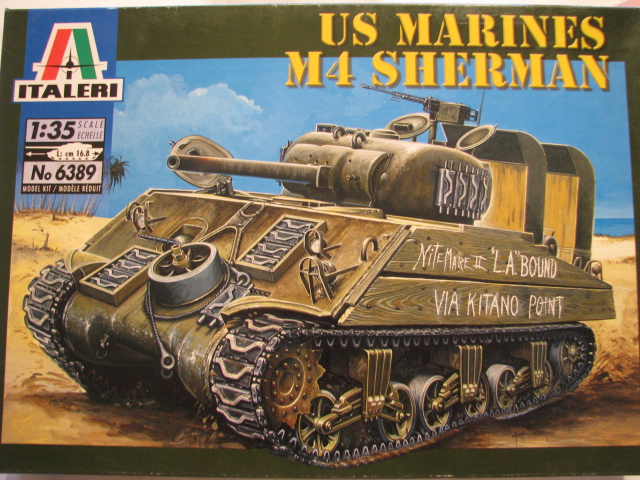
Just to let you know I am moving ahead building the M4A3 which will be a POA CWS 75 H1. However the only one I can find reference for is a tank called "COED". COED is in overall OD but, I'm still looking for a camouflaged one.
Wish me luck,
Don
The deadliest weapon in the world is a Marine and his rifle.
Gen. John "Black Jack" Pershing, U.S. Army
Commander of American Forces in World War I
Västra Götaland, Sweden
Joined: September 25, 2006
KitMaker: 321 posts
Armorama: 273 posts
Posted: Sunday, September 09, 2007 - 04:42 AM UTC
Quoted Text
Guys,
Just to let you know I am moving ahead building the M4A3 which will be a POA CWS 75 H1. However the only one I can find reference for is a tank called "COED". COED is in overall OD but, I'm still looking for a camouflaged one.
Wish me luck,
Don
Don, im sending some of my luck your way
After my little trip to the hobby store i managed to come home whit 3 very interesting kits but not the one item i actually had planned to get...... Hubrol's Olive Green Spray Paint.

It was either, wait for about a month for the shop to get it in stock, or try squesing the last drops of paint out of the can.
Sufficient to say i managed to squese the last drops out it. But the fuel wagon didnt quite manage to get a full coat.
Anyhow......it´s time for some washes! pics will be up soon.
How´s the work progressing for the rest of you guys?
Keep it up
Christian
California, United States
Joined: February 24, 2006
KitMaker: 205 posts
Armorama: 200 posts
Posted: Sunday, September 09, 2007 - 09:30 AM UTC
Gents,
Here is my progress so far:

This one is my test fit of the wood armor. I think it was from Tank Workshop, and it is too short when compared to photos. I am making an extra board to go on the bottom to fix this.

Don
The deadliest weapon in the world is a Marine and his rifle.
Gen. John "Black Jack" Pershing, U.S. Army
Commander of American Forces in World War I
spongya
 Associate Editor
Budapest, Hungary
Joined: February 01, 2005
KitMaker: 2,365 posts
Armorama: 1,709 posts
Posted: Sunday, September 09, 2007 - 04:23 PM UTC
Update: I lost one of the drive sprockets for the Stuart. Stupid Tamiya policaps. It must have fallen off somewhere, and I can't find the thing...
Please visit me at my blog: https://butterfingeredmodelbuilder.wordpress.com/
California, United States
Joined: February 24, 2006
KitMaker: 205 posts
Armorama: 200 posts
Posted: Monday, September 10, 2007 - 06:42 AM UTC
Guys,
Here is my POA CWS 75 H1 so far. I've had to redo the wood side armor yet one more time.

Don
The deadliest weapon in the world is a Marine and his rifle.
Gen. John "Black Jack" Pershing, U.S. Army
Commander of American Forces in World War I
California, United States
Joined: February 24, 2006
KitMaker: 205 posts
Armorama: 200 posts
Posted: Monday, September 10, 2007 - 06:06 PM UTC
Gents,
here's the hull ready for paint. Now on to the turret.


The deadliest weapon in the world is a Marine and his rifle.
Gen. John "Black Jack" Pershing, U.S. Army
Commander of American Forces in World War I

#041
Kobenhavn, Denmark
Joined: July 20, 2006
KitMaker: 10,069 posts
Armorama: 4,677 posts
Posted: Tuesday, September 11, 2007 - 06:53 PM UTC
Looks great, Don. The mesh on the hatches and the wood armour looks very good and realistic.
I am really looking forward to see more
Campaign'oholic - 252+ campaigns completed
California, United States
Joined: February 24, 2006
KitMaker: 205 posts
Armorama: 200 posts
Posted: Friday, September 14, 2007 - 03:22 PM UTC
I finally got the turret together. I tried something I normally wouldn't have bother with, I added the cheek armor on the right side of the turret. Of course after the spare tracks were put in plac you can't hardly see it. I still have some sanding to do before painting but here is my update.
Don


The deadliest weapon in the world is a Marine and his rifle.
Gen. John "Black Jack" Pershing, U.S. Army
Commander of American Forces in World War I
California, United States
Joined: February 24, 2006
KitMaker: 205 posts
Armorama: 200 posts
Posted: Tuesday, September 25, 2007 - 01:49 PM UTC
I had a real scare with the Tamiya Flat Base, I thought it was like dull coat and I frosted my tank. However I was able to repair and save the paint. Here are some pics of my progress.


I finally settled on this tank, 44 CRISPY. Because it had the camouflage on it but it was also a command tank (note two antennas). I've been working from 2 photos and a color print from HardCorps Models. There is also a large box on the right rear, I have no idea what it is, but it was on the real tank.
Don

The deadliest weapon in the world is a Marine and his rifle.
Gen. John "Black Jack" Pershing, U.S. Army
Commander of American Forces in World War I
Zimbabwe
Joined: July 03, 2007
KitMaker: 3,529 posts
Armorama: 588 posts
Posted: Wednesday, September 26, 2007 - 01:36 AM UTC
I need to get my OT-26 started. Its just sitting in my stash waiting to be built. But I just can't seem to get started.
On a different note, good job so far everyone.

#041
Kobenhavn, Denmark
Joined: July 20, 2006
KitMaker: 10,069 posts
Armorama: 4,677 posts
Posted: Wednesday, September 26, 2007 - 06:37 PM UTC
Looks great, Don. This tank looks very original and is really something different from all the overall OD vehicles.
Thanks for sharing
Campaign'oholic - 252+ campaigns completed
Istanbul, Turkey / Türkçe
Joined: December 16, 2004
KitMaker: 1,163 posts
Armorama: 842 posts
Posted: Thursday, September 27, 2007 - 09:19 AM UTC
Don, that's a real cool, out of the ordinary Sherman, congrats!
I hope you didn't use the "Flat Base" directly out of its bottle. Tamiya's idea is that you mix the Flat Base with their Clear Coat (X-22) and after a proportion you get satin coat. If you add more flat base, you get a flat coat. Too much, and either it frosts or you get a winterwash
I also think you should weather the inner middle portion of the tracks, they look black and scream "We have been skipped!".
Sorry everyone, I have just started my MBA program this week and school takes a little more time than I expected. Soon as I get things in order, I will post my own progress. Till then, keep up the good work!
Proud Supporter of Armorama Campaigns
California, United States
Joined: February 24, 2006
KitMaker: 205 posts
Armorama: 200 posts
Posted: Thursday, September 27, 2007 - 04:14 PM UTC
Quoted Text
I hope you didn't use the "Flat Base" directly out of its bottle. Tamiya's idea is that you mix the Flat Base with their Clear Coat (X-22) and after a proportion you get satin coat. If you add more flat base, you get a flat coat. Too much, and either it frosts or you get a winterwash
I also think you should weather the inner middle portion of the tracks, they look black and scream "We have been skipped!".
Sorry everyone, I have just started my MBA program this week and school takes a little more time than I expected. Soon as I get things in order, I will post my own progress. Till then, keep up the good work!
Yes I used Tamiya Flat Base with thinner straight on to the model. Luckily, I did figure out how to get rid of it with some help from some people in the painting group. I haven't weathered it yet, that's why the track doesn't look right. The whole idea behind trying the acrylic clear was so that I can use oils to pin wash, another first for me. Then dry brush, then maybe pastels to blend it all. Plus I still have bolts to put on the bogies, sand bags to make, the krystal klear in the cupola vision ports, etc., etc., etc..... You see, I'm still far from done, but I'm getting there.
Don
The deadliest weapon in the world is a Marine and his rifle.
Gen. John "Black Jack" Pershing, U.S. Army
Commander of American Forces in World War I
Västra Götaland, Sweden
Joined: September 25, 2006
KitMaker: 321 posts
Armorama: 273 posts
Posted: Sunday, September 30, 2007 - 08:48 AM UTC
Great job whit the tank, Gunny. Love the look of it!
I have had alot to do the last two weeks, thinking of quiting my job ( i cant stand another night shift) and for the first time workin on two tanks at one ( Churchill Crocodile and a Tiger)
Ohh gosh

Hopefully i´ll be able to put the tiger aside and get on whit the job at hand on the churchill.
P.S
Don...would you share your sandbag-building skills whit a fellow modeller in need? I´ve had a couple of goes at it but to no avail. Who could have thought that shaping a slab of greenstuff could be so hard!?
D.S
/
Christian
California, United States
Joined: February 24, 2006
KitMaker: 205 posts
Armorama: 200 posts
Posted: Sunday, September 30, 2007 - 09:48 AM UTC
Quoted Text
P.S- Don...would you share your sandbag-building skills whit a fellow modeller in need? I´ve had a couple of goes at it but to no avail. Who could have thought that shaping a slab of greenstuff could be so hard!?
Christian,
First see if you like my sand bags;

If you like these then I can post some pics. They are made with milliput.
Don
The deadliest weapon in the world is a Marine and his rifle.
Gen. John "Black Jack" Pershing, U.S. Army
Commander of American Forces in World War I
California, United States
Joined: February 24, 2006
KitMaker: 205 posts
Armorama: 200 posts
Posted: Sunday, September 30, 2007 - 09:57 AM UTC
Gents,
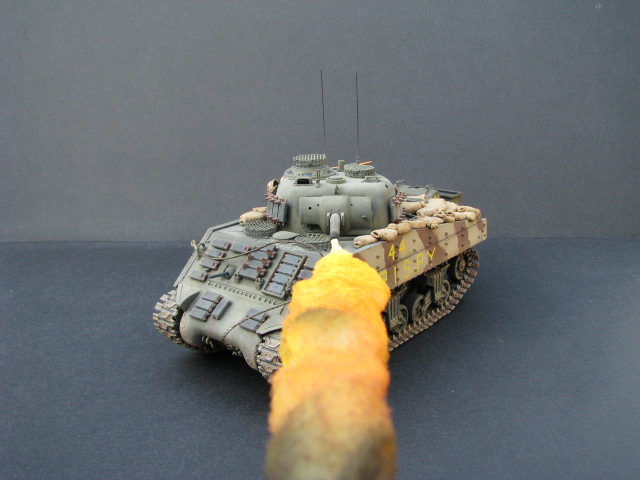
Almost done, I am still waiting on the bolts for the bogies. But that won't stop me. I took these photos before I realized that I hadn't put the Krystal Klear in the commanders vision ports and the plexiglass gunner's periscope in, OOPS!! Oh well, thought I'd have some fun with it, how do you like the FLAME?
[
Don
The deadliest weapon in the world is a Marine and his rifle.
Gen. John "Black Jack" Pershing, U.S. Army
Commander of American Forces in World War I
Florida, United States
Joined: August 09, 2006
KitMaker: 1,008 posts
Armorama: 847 posts
Posted: Monday, October 01, 2007 - 01:45 AM UTC
Thought I'd better do an update.

Sorry a little blurry. Having to adapt a lot of parts and such but is starting to come out.
Bob
PS Don Great looking flame there. I'll look up your build info want to see haw you did it!
Västra Götaland, Sweden
Joined: September 25, 2006
KitMaker: 321 posts
Armorama: 273 posts
Posted: Monday, October 01, 2007 - 01:56 AM UTC
Quoted Text
Christian,
First see if you like my sand bags;
If you like these then I can post some pics. They are made with milliput.
Don
I love ´em Don. Would be ace if you could post some pics on how to make them. I use "Greenstuff" from Games-Workshop ( Citadel)
California, United States
Joined: February 24, 2006
KitMaker: 205 posts
Armorama: 200 posts
Posted: Monday, October 01, 2007 - 11:22 AM UTC
Christian,
I wrote a how-to article for the sand bags with pictures. Submitted it here on Armorama, then I figured out how to see all of the feature articles on this site. There is another article on making sand bags with Milliput. He shapes his differently, a square vise my triangle. But his method of texturing and adding seams is good. You should read both and study references. The reason I make mine triangle is that sand bags have to be tied at one end. I add a small ball of milliput to the end and press it on. Then I use a xacto knife to make a slot in the end by working back and forth. After this the bag is not as triangle as it started. Then place it and press the sand bag to form it to the surface.
https://armorama.kitmaker.net//features/116 This is his article, I wish I would have found this before I did mine, I would like to try his texture method.
Don
The deadliest weapon in the world is a Marine and his rifle.
Gen. John "Black Jack" Pershing, U.S. Army
Commander of American Forces in World War I
#041
Kobenhavn, Denmark
Joined: July 20, 2006
KitMaker: 10,069 posts
Armorama: 4,677 posts
Posted: Monday, October 01, 2007 - 06:47 PM UTC
Don, what a great looking Shermie. The flame is very well done and looks quite convincing
Campaign'oholic - 252+ campaigns completed
California, United States
Joined: February 24, 2006
KitMaker: 205 posts
Armorama: 200 posts
Posted: Tuesday, October 02, 2007 - 01:22 PM UTC
Ok Guys, My Flame tank is done! Now where do I put the pics.

BURN, BABY BURN!!!!
Don

The deadliest weapon in the world is a Marine and his rifle.
Gen. John "Black Jack" Pershing, U.S. Army
Commander of American Forces in World War I
California, United States
Joined: February 24, 2006
KitMaker: 205 posts
Armorama: 200 posts
Posted: Tuesday, October 02, 2007 - 02:13 PM UTC
Hey Guys,
After I deleted all my workshop pics to make room for the finish tank pics I found the Campaign floder. I posted some more pics there.
Semper Fi,
Don "Gunny" Franklin
The deadliest weapon in the world is a Marine and his rifle.
Gen. John "Black Jack" Pershing, U.S. Army
Commander of American Forces in World War I