Introduction
During WWII the harsh environment of the North African desert pushed both men and material to the breaking point and a reliable truck was often the difference between life and death. It didnt really matter where the truck came from; if it was reliable it became a godsend. With that in mind it is easy to see why so many captured trucks became prized possessions of armies on both sides of the conflict.
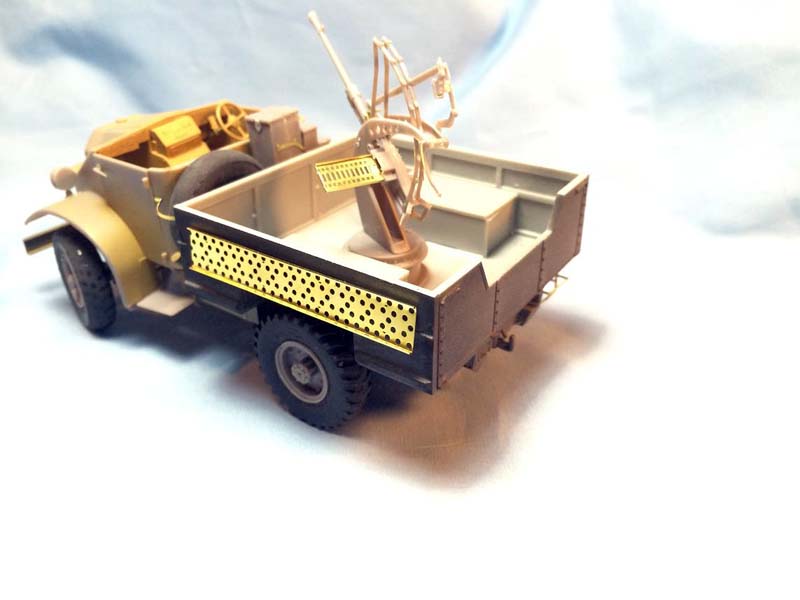
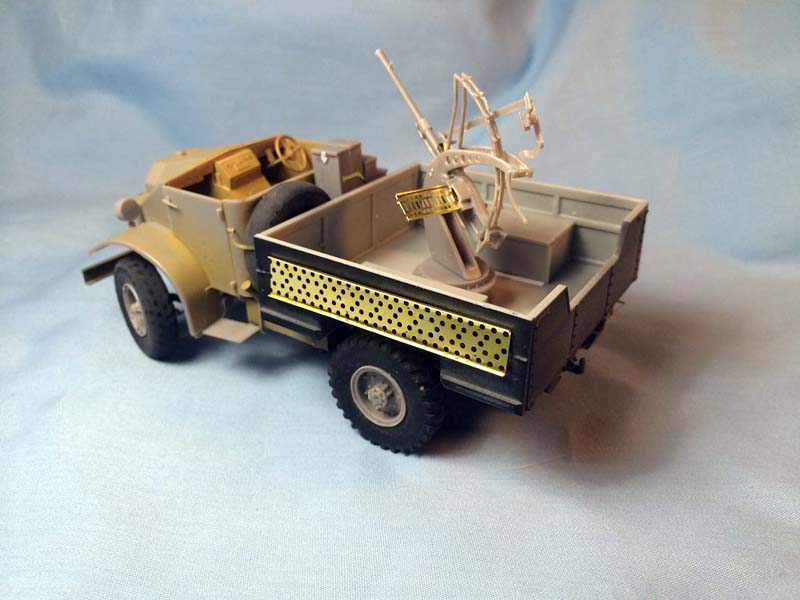
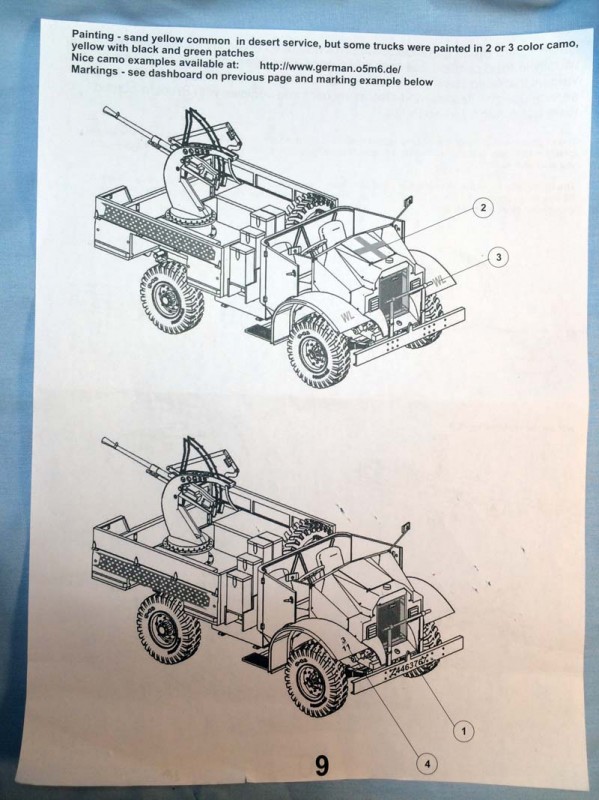
The Canadian Military Pattern (CMP) trucks were particularly prized for their rugged construction and easy adaptability. Numbers of these hardy vehicles were captured by Axis forces and used in a variety of roles. The Italians often mounted the 20mm Breda model 35 or 39 on the back of these trucks and used them as mobile weapons platforms. In a further bit of irony a number of these Breda armed CMP trucks were recaptured and then in turn used by Allied troops.
The Kit
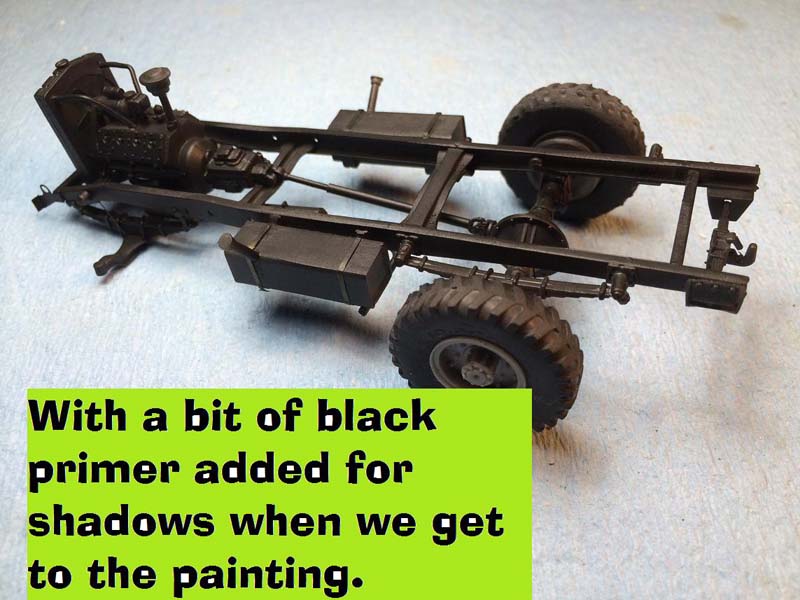
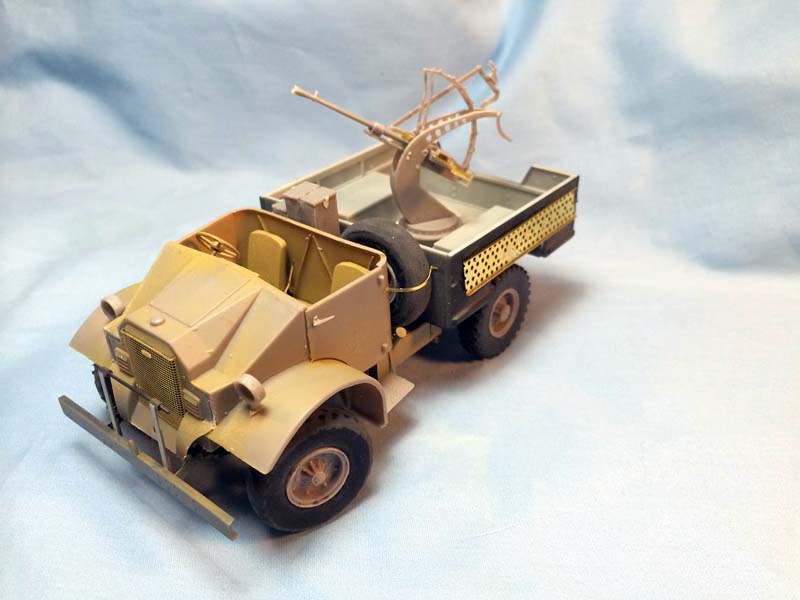
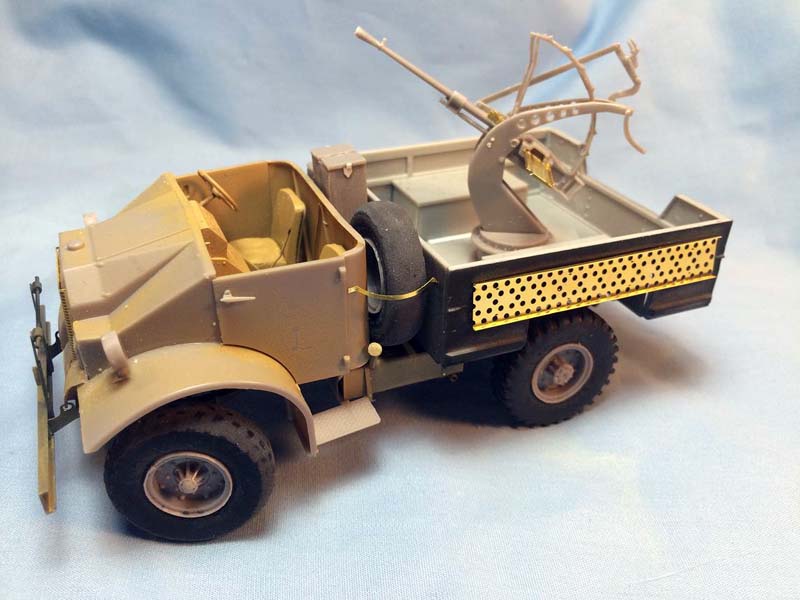
Mirror Models of Ireland has taken their earlier release of the CMP F15 Ford truck, kit #35105 and combined it with kit #35300 of the Italian Breda 20mm model 39 to create a new kit #35107, the CMP F15 Italian Service Gun Truck with the mounted gun in the trucks bed. I bargained with Jim and was given this kit to review with the caveat that it end up as a build review; well I stared into his eyes to long and before I knew what I was doing I had agreed. I know I am probably short on in progress photos not to mention talent or references so allow me to apologize up front. Also, I did not complete the kit before I wrote this in the sense that at it is not yet painted outside of a base coat inside the cab and up under the frame which I felt might be tricky if I tried to do it all after it the kit was finished. I felt like I wanted to get this published rather than wait another couple of weeks before I had it painted and weathered to at least shelf quality. Lets see what we have here!
Contents
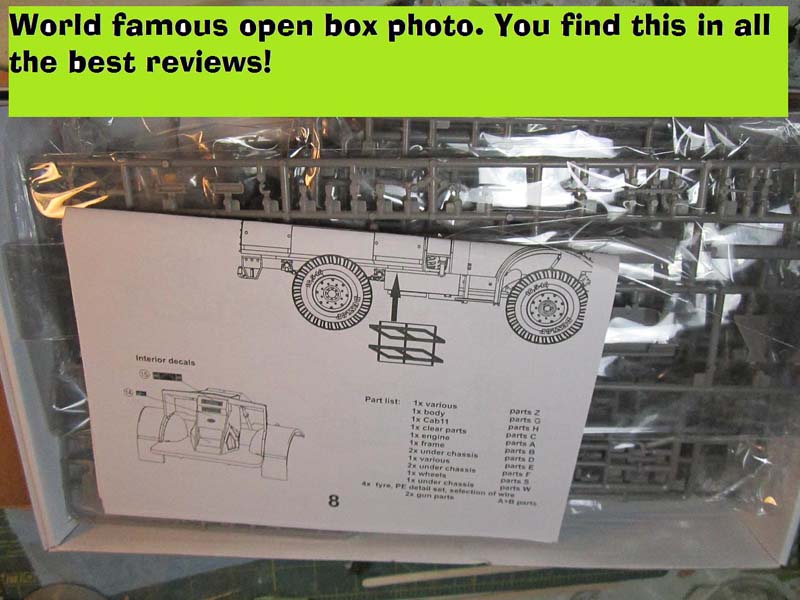
Inside a standard slip top box you will find the following;
- 14 sprues of light gray
- 1 sprue for the headlight lenses
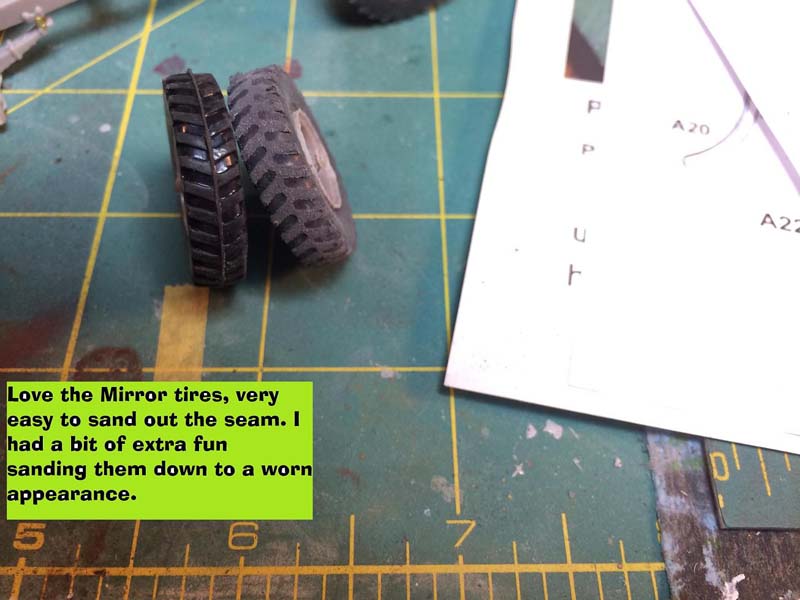
- 5 rubber tires
- One good sized sheet of PE details
- One small decal sheet
- Two lengths of copper wire
- A set of instructions that consist of 6 sheets of paper printed on both sides
The build
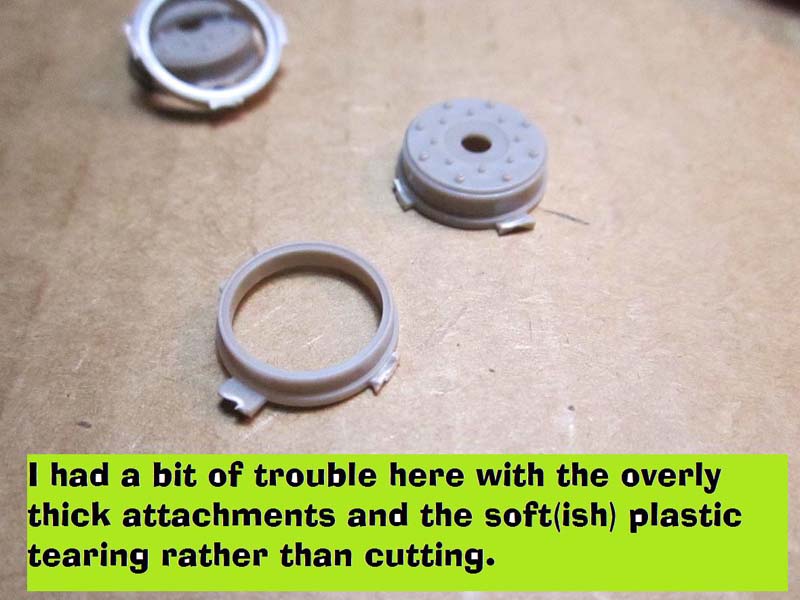
A quick peek at the sprues revealed exactly what the manufacturer noted in the instructions; the gates on many pieces are a good bit larger than normal. According to
Mirror Models it is to help eliminate ejector marks and to ensure true to scale thickness, but it does make removal a bit of an issue at times. Unfortunately, not all of the ejector marks were eliminated; some still show up in annoying places that are a bit hard to cleanup.
The instructions have you first construct a number of sub assemblies that you will need later in the build. I kind of liked the idea as it allowed you to gain a bit of understanding of how the sprues were laid out and what you were getting into with the kit. And what you are getting into is a kit that will need a bit of care to make everything all come together like it should. I have built a
Mirror Models kit before so I had an inkling of how things would be and they were much the same as my first experience.
Before I had finished the subassemblies I discovered that many (most?) of the mating surfaces for this kit were woefully undersized at times making it seem more like a vac formed kit with a series of butt joints between parts as any pins or cut-outs often disappeared in the cleanup process. Not to say that it is beyond the pale just be sure you understand that going in.
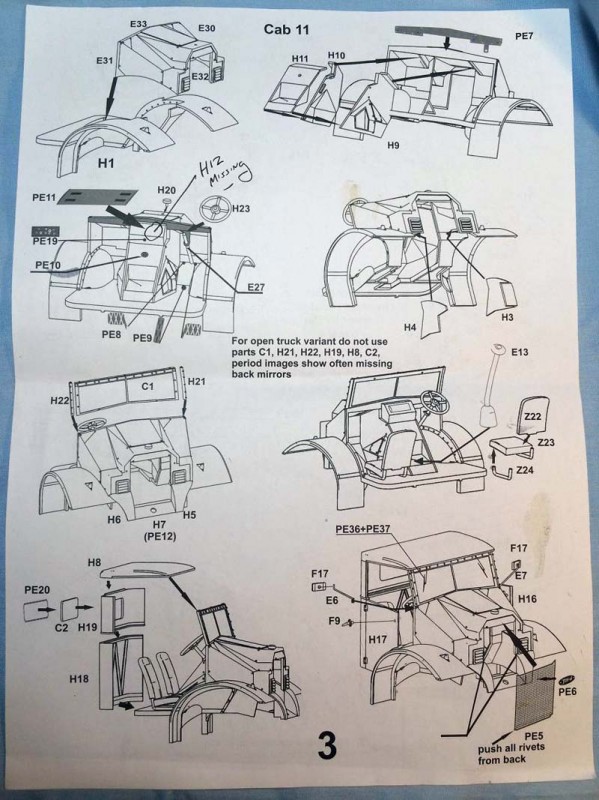
Also, the instructions proved to be something of a combination of CAD drawings with parts now attached and simply noted or with sometimes vague stick here arrows that were only marginally useful.
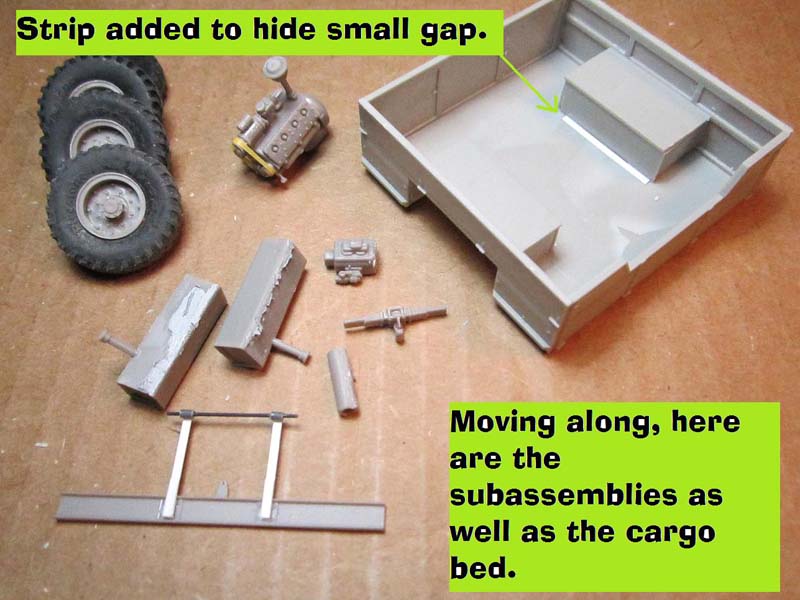
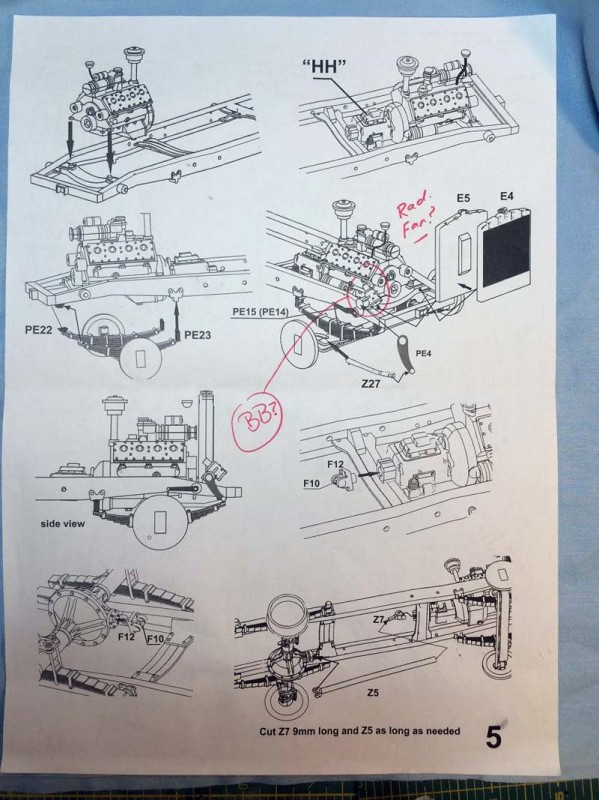
The subassemblies include the engine, a little gem to be sure, muffler, front and rear bumper assemblies, gas tanks, and storage boxes. Be careful with these assemblies and allow me to pass on a couple of suggestions. First, the muffler and exhaust pipe assembly. I found that the final length of the exhaust pipe Z25 did not work as well as the slightly longer unused part Z26. Z26 extends the exhaust to the edge of the gas tank while Z25 leaves it a bit short. Dont know if it is just a small error in the instructions or what but Z26 is definitely a better option here. Also, the subassembly for the engine; part A10 the oil pan piece needed about a 1/16 of an inch or so shaved off in order for the engine to fit comfortably onto the frame. Another small and easy fix that the instructions forgot is the radiator cooling fan, it is included in a nice PE piece, PE 18, but the instructions never call for it to be added, so dont forget to add it after you make the fan belt out of a strip of tape. Minor fixes all but much easier at the front end rather than the back end.
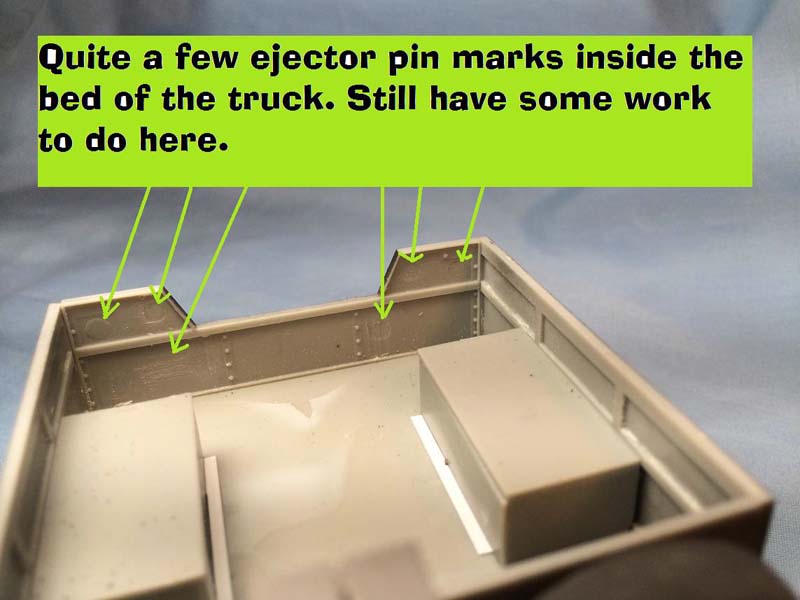
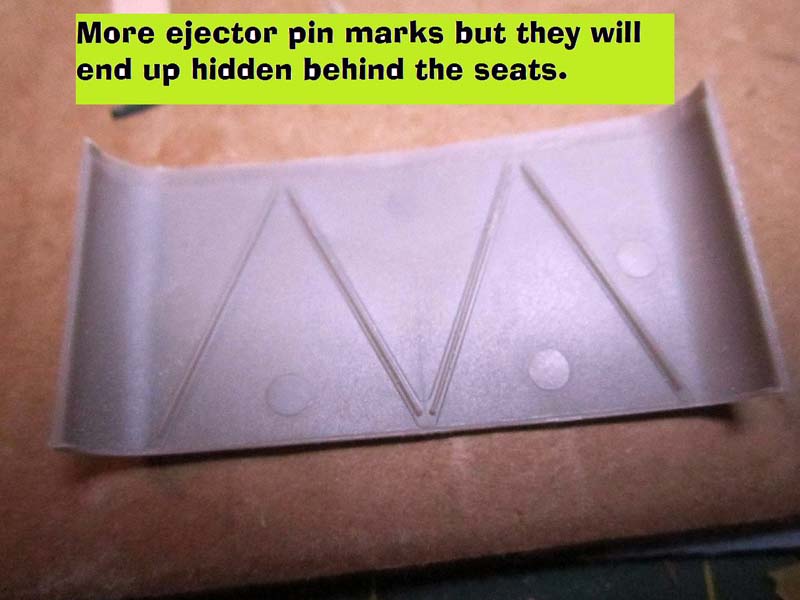
Following the subassemblies you really have three areas for the truck not including the gun; the cargo bed area, the cab, and the frame. As far as the bed goes it is the easiest of the three to build. I know they tried to eliminate ejector pin marks but here is where you will find that it is a real problem area. Lots and lots of ejector pin marks to occupy your time of the next little while. Whatever your favorite trick to eliminate them is, have at it, because you have many to deal with. Other than that unfortunate news the remainder of the cargo bed is an easy assembly that fits well. The instructions call out for lengths of the thin .3mm copper wire to be added as one long hinge pin but I would use some stretched sprue or Plastastruct rod instead.
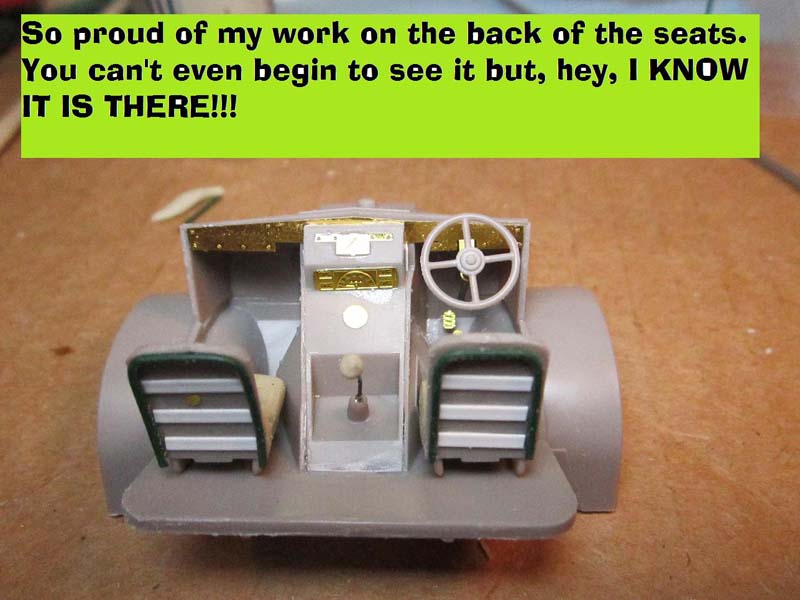
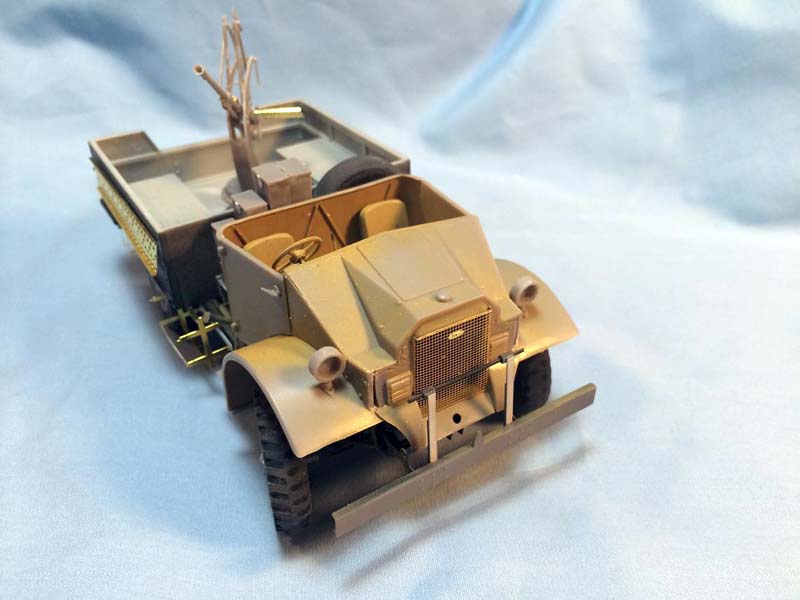
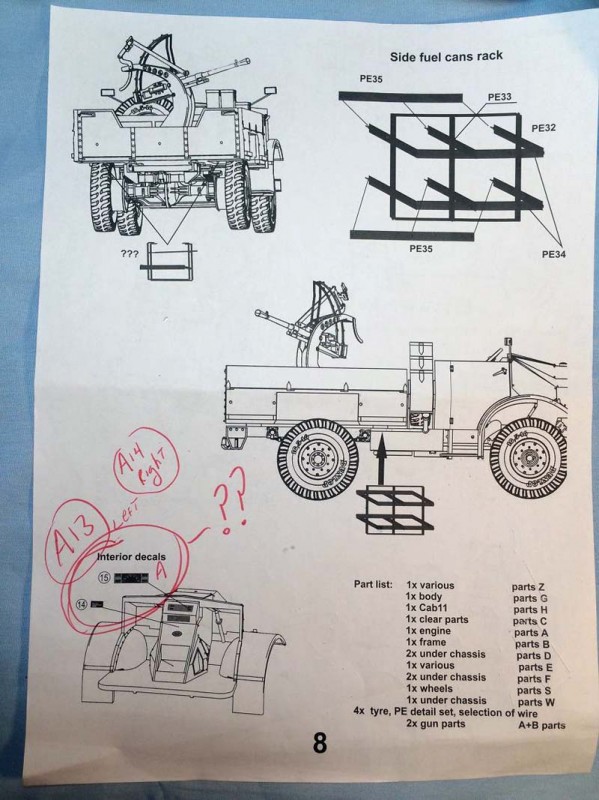
The cab is the #11 style alligator cab. The kit provides the full enclosed cab but as I was building the Italian gun truck version I omitted the cab roof and windscreen along with their attendant pieces. Be careful that you dont sand away your mating surfaces in cleanup, it happened to me with the front of the grill, part E32. The fit otherwise is decent despite the complicated angles and joins that Ford built into the cab. The instructions also forget to call out part H12, the upper piece of the middle console between the drivers pedal well and the passengers foot well. The CAD drawing shows it but it is never called out as to when to add it, you will find it an easy fix. The only thing I added to the cab was padding for the seats from two part epoxy and a new shifter because I launched the original while squeezing it a bit too tightly during cleanup never to be found again. The dash is dressed up with a PE instrument panel and placard as well as a couple of decals that are not included in the kit. Yes, the decal instrumentation and placard that are called out in the instructions as decal 14 and 15 were somehow omitted from the actual decal sheet.
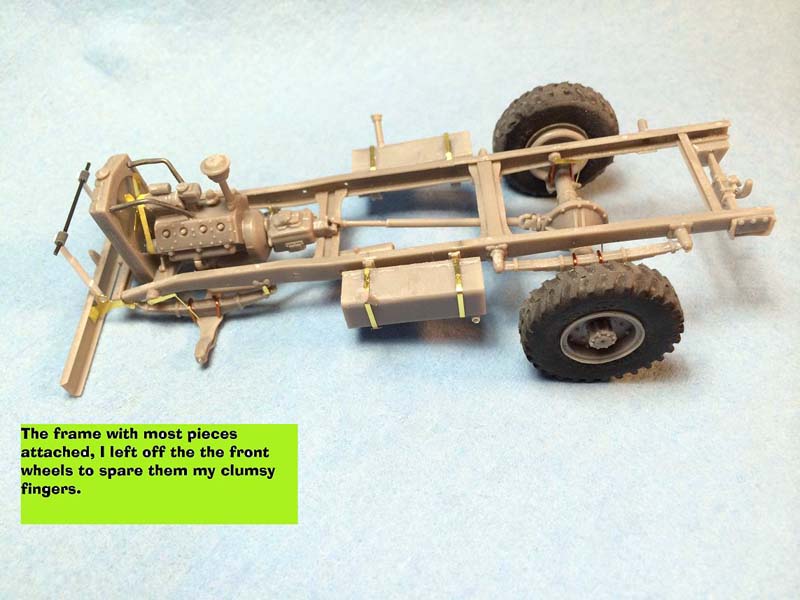
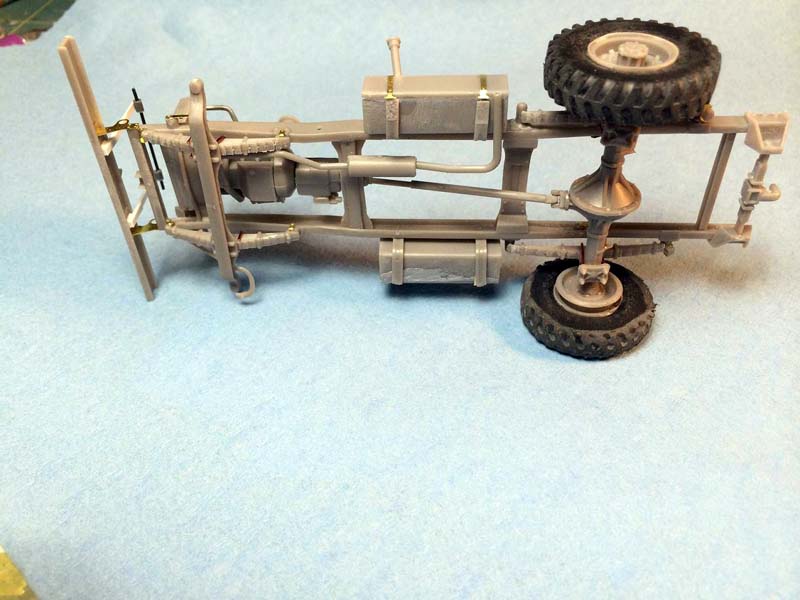
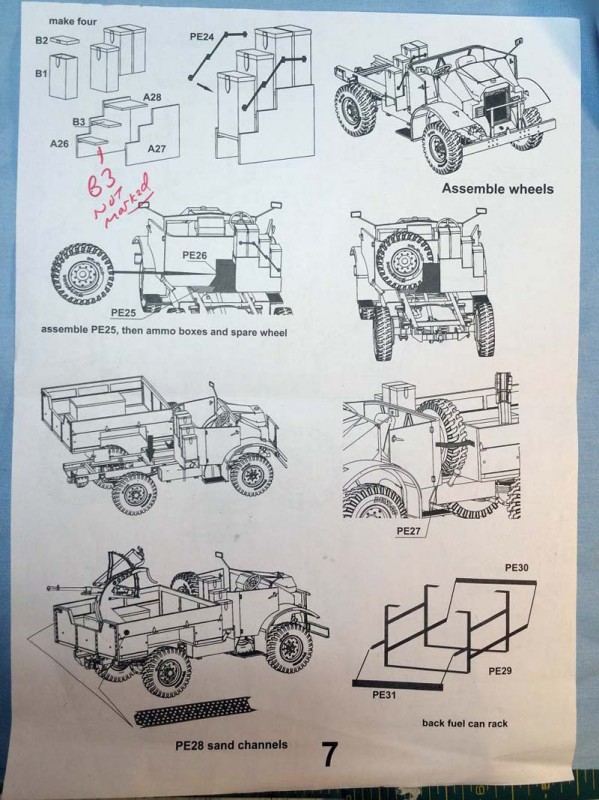
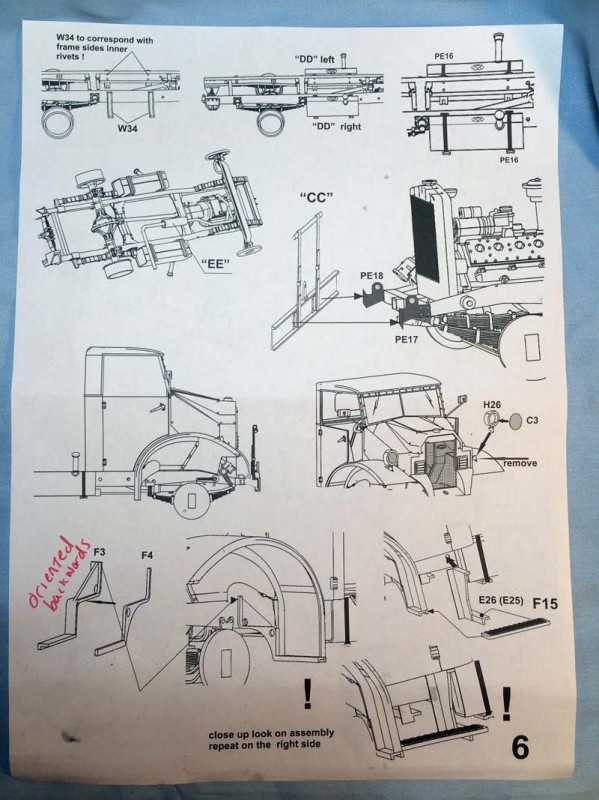
The suspension and the frame is built up with nearly every piece molded as a separate part, oh joy. Its not that I have any particular aversion to frames; it is that I dont understand the fascination with building up the frame with cross members, rails, and gussets. Why not just make it one molding already SQUARE so the modeler doesnt have to fuss or worry much over keeping it all plumb? Anyway, the frame; not to many issues, be aware that part D6, the four bolt/shackle attachments for the leaf spring to the frame have gussets that are a part of the piece and not an attachment to the sprue. I was a bit aggressive in cleanup and lost some of the detail; dont fall into the same trap. I added the rear towing shackle cross piece, sub assembly AA (instructions have it added at the very end) and the front cross piece B3 first, which helped to add some strength to the build-up of the frame and I believe it aided in reducing any twist in the frame as well. The U bolts that attach the front and rear axle to the springs are provided for with the thicker .5mm copper wire which I used but in retrospect I should have opted for a softer more malleable lead wire; you may also want to go that route unless you have one of those nifty grab handler tools (I dont) that make perfect copies. I thought it would have been nice if Mirror had at least provided a template for the U bolts, it would not have taken much effort to include one. I will say that the frame did square up nicely and that the suspension was also easy to keep plumb, I managed to keep all four wheels touching the ground which for me is quite an accomplishment, so thank you
Mirror Models!
Those three assemblies will bring you to the light at the end of the tunnel. Dont let that fool you as there is always more tunnel ahead, you still have a ways to go before she can claim her rightful piece of shelf real estate.
You still need to drop the engine and transmission into the frame and add the radiator, drive shaft, steering box, Pitman arm, etc. Another area to be aware, subassembly BB, the steering box is never called out for to attach to the frame, when the CAD drawing for the radiator is introduced it is just all of the sudden there. Unfortunately, it doesnt work like that, you will have to glue it on, it will not magically attach itself, the next CAD drawing gives a good indication of where it should be located in relationship to the radiator and frame. The drive shaft is an odd affair, made of two pieces that butt join together stability is not its strong suit. If I had it to do over again I think I would cut part Z7 as indicated (9mm) then drill out the long end of the shaft (Z5) and slip Z7 into Z5 and allow them to adjust accordingly after attaching to the U joints at the transmission and differential, only then would I run a spot of glue into the join and of course allow it plenty of time to dry.
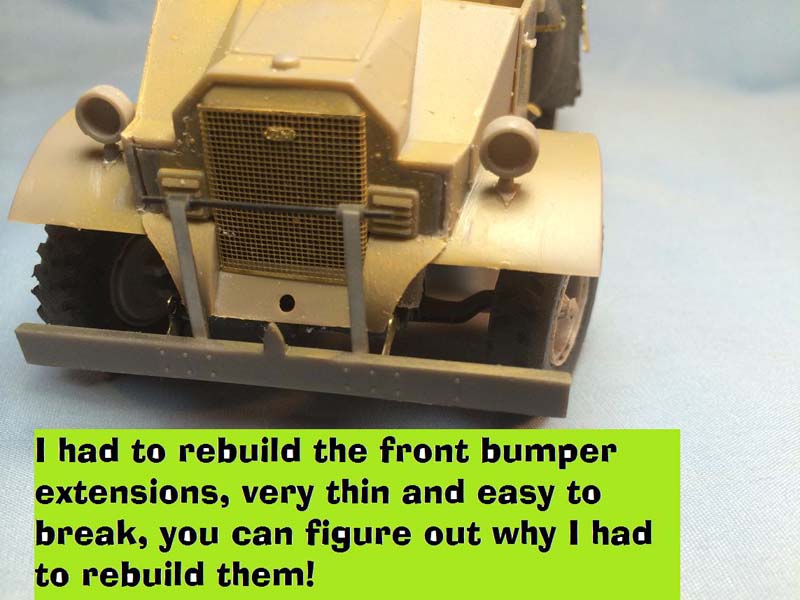
You will still need to add the fuel tanks and brackets. There is some very nice PE detailing on the tanks in the form of straps and inspection caps. The long side of the bracket should attach to the frame. I am not really sure if there is a long side, it may have been more a case of me getting to aggressive again in the cleanup process. Whatever the reason I had several fails in my attempt to get it right. It was the albatross around my neck. Not even, to far apart, to close together, one long one short, you name it, I did and then I repeated them all over it seemed before I got them reasonably correct. I am sure you wont have the same issues that plagued me; at least I hope not, my only advice is go slow, measure twice, cut once. Dont forget to attach the cab somewhere in here, again it just shows up about half way down the page as attached to the frame. You do have a few things to handle with the cab; headlights and the running boards.
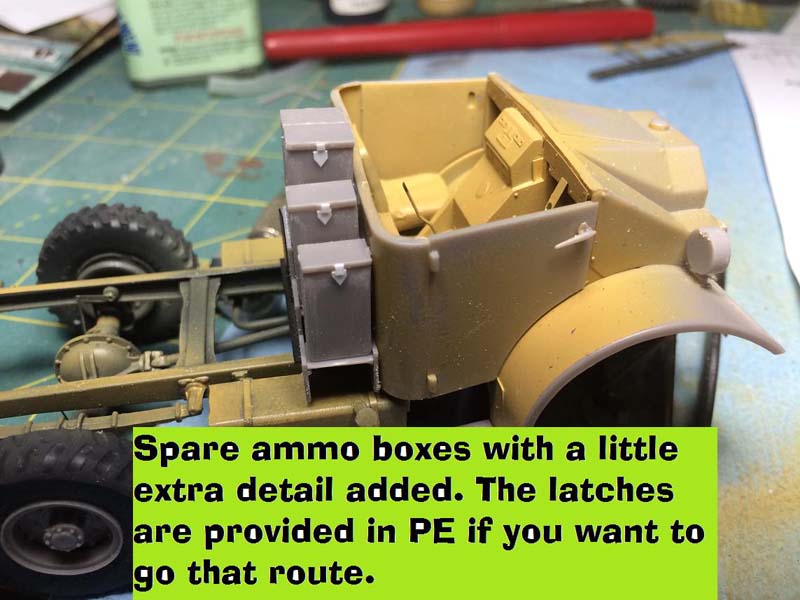
The running boards take a bit of fiddling to get the proper sit. The brackets seemed to be oriented inside out in the Cad drawing from what you actually get. Not hard to figure out but just the same be aware. I had to trim a bit on the rearmost bracket to get a good fit and to keep the running board reasonably level. After this the only left for the basic truck is the ammo storage bins behind the driver and the spare tire and holder. The spare tyre holder is a nice piece of PE that sits on a piece of PE tread plate, all very well done. The ammo bins are a bit basic, but so is the real deal. I dressed mine up with some strip styrene, but you could also use the included PE latches. Fold up the gas/water can holders, attach, add some wheels and sand channels and your truck is finished.
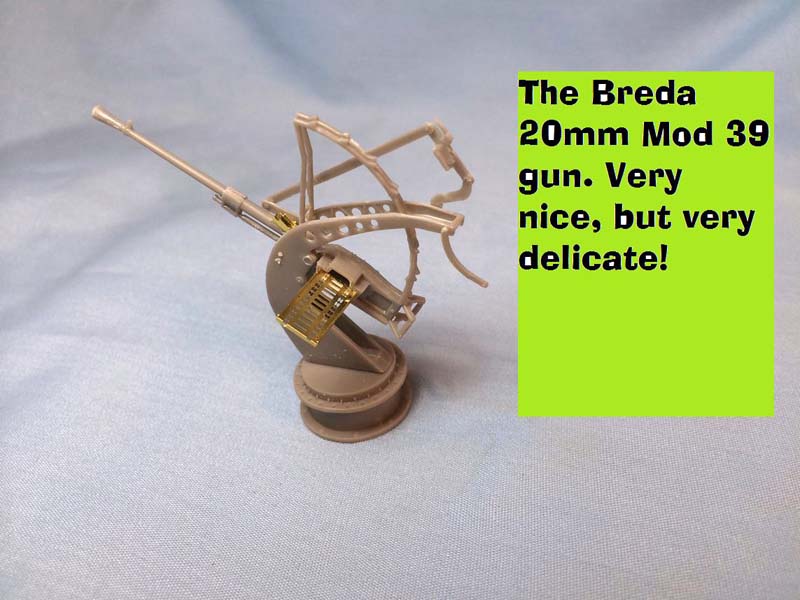
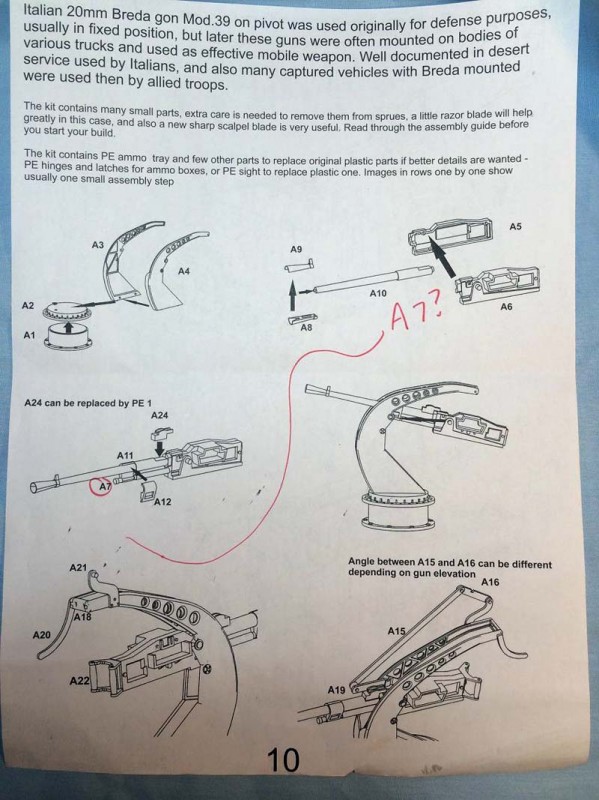
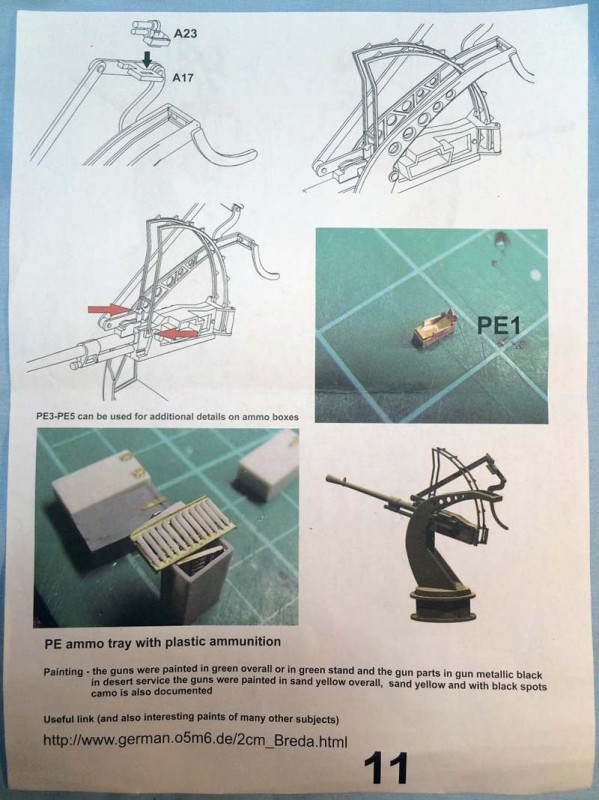
The final area of construction is the 20mm Breda gun. The kit provides two complete guns complete with mounts, all pretty cool. Let me say that one more time, you get two complete guns in the kit, worth noting. The parts are generally well done, thin, and a bit fiddly to work with. The muzzle is a horizontally split affair that is perhaps not the best solution but with a bit of patience and a good set of files works. As on many things
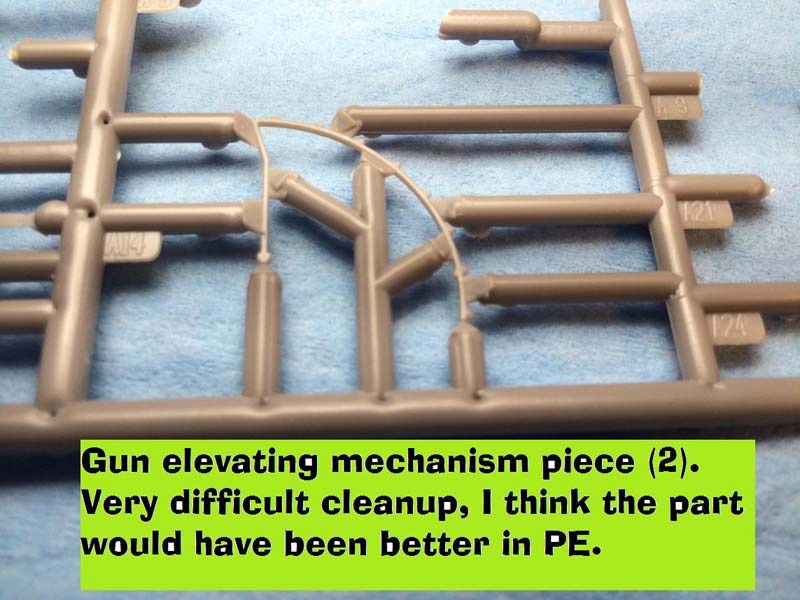
Mirror Models my example did not quite fit into the gun trunnions, but everything was already glued up, you might want to check the fit and open the trunnions a bit if yours is like mine was. The recuperator was problematic being so finely molded and attached with such thick sprues; mine broke in the cleanup process, an issue that is not uncommon with Mirror kits. The two toothed arcs that I suppose are part of the guns elevation system are a real headache, very thin with ten very thick sprue attachments, I cut the piece out of the sprue still attached to the runners and spent a goodly bit of time slowly cutting away the sprue until only the piece was left. Kind of like a sculptor who chips away what is not needed until only a statue remains Of all the parts in the kit, these two large prominent pieces should have probably been done in PE, if anyone does an aftermarket set I hope they take heed.
Final Thoughts
Not really a kit for a newbie; but if you have a few under your belt along with a good razor saw you should be okay. I really enjoyed building the kit; it was not always an easy process, at times more than a bit challenging, but in the end a satisfying experience. I can forgive the instructional errors, failure to call out parts, imprecise locations, etc. as I understand that
Mirror Models is a very small company that is trying hard to get unusual subjects into modelers hands. The overly thick attachment sprues and ejector pin marks as well can be dealt with although I wish that more of the extremely thin parts had been done in PE. The decals are bit of an issue, if you are going to call out the decals for the instrument panel you really need to include them, no real excuse for this kind of an omission. My best advice for anyone chomping at the bit for this kit is to take it easy and dont rush anything. Even the removal of parts from the sprues should be given an extra bit of patience to insure that you dont remove something crucial.


Comments