AFV Painting & Weathering
Answers to questions about the right paint scheme or tips for the right effect.
How to paint tank treads?
rebelsoldier
Visit this Community
Arizona, United States
Joined: June 30, 2004
KitMaker: 1,336 posts
Armorama: 757 posts
Posted: Wednesday, November 24, 2010 - 08:18 AM UTC
hoorah gang!

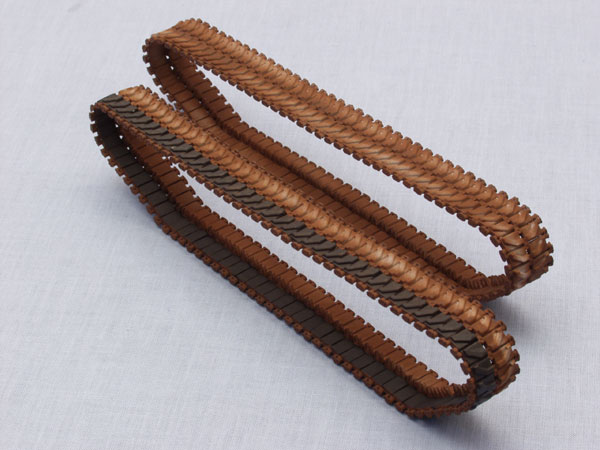
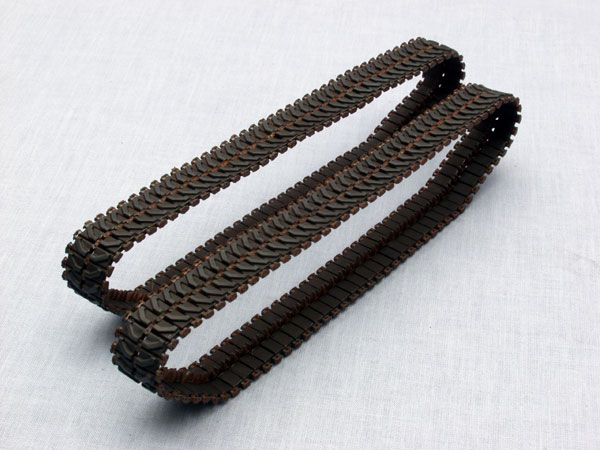
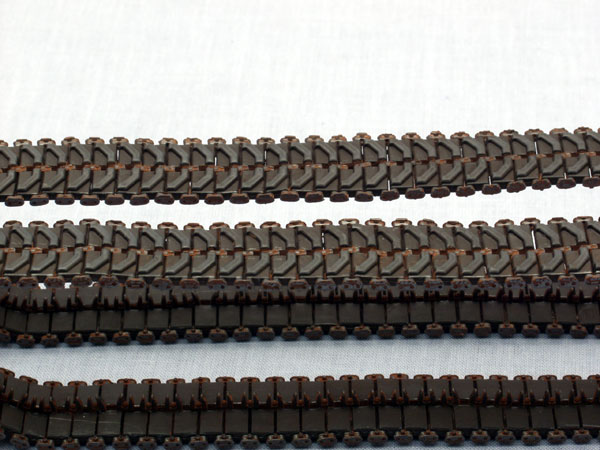
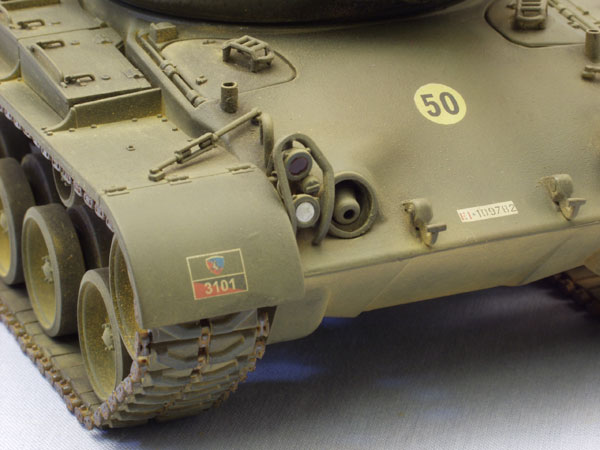
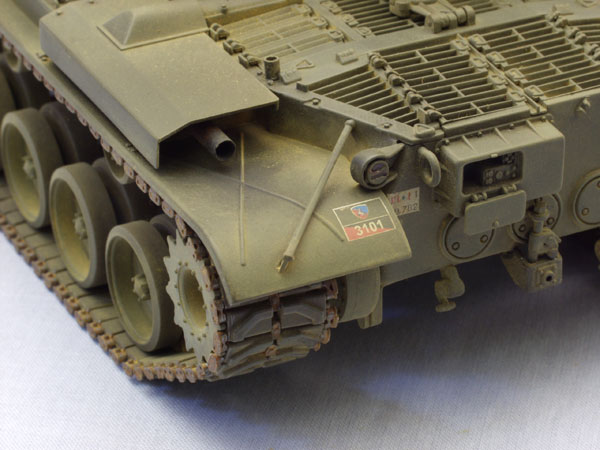
ok i am going to take the plunge on a set of m-60a1 tracks, plastic type. as i have no cam at the moment i'll just describe what i have so far and what i plan to do and open for tips and pointers to improve this set.

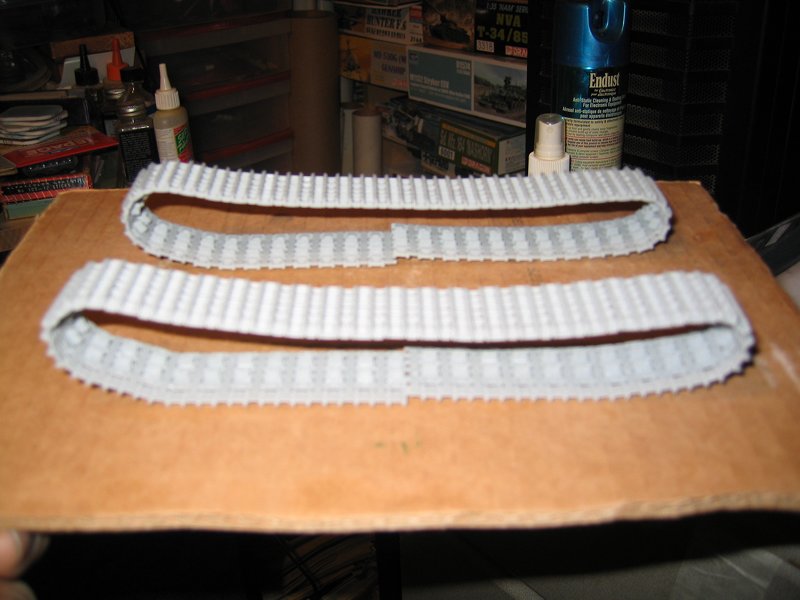
first of was a wash and dry of tracks. the tracks are already together, a factory job. i primed the tracks with rust body primer out of a spray can. this covered all the needed highlight areas and some of the lined areas around pads have some black from original color, and let dry for three days as i worked on other aspects of the tank.

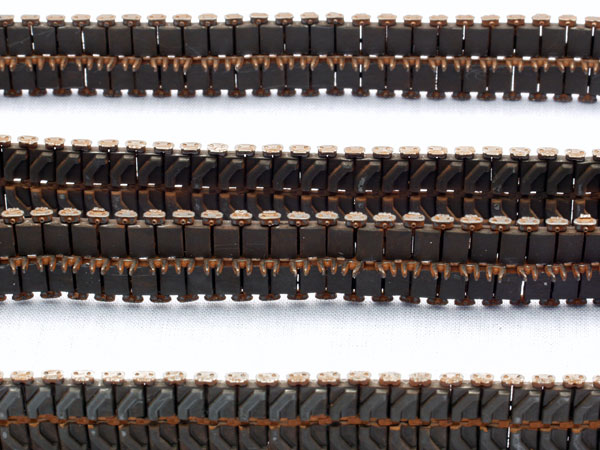
now i will brush on the pad colors and do the worn areas with flat silver or flat gunmetal gray, depends on what the worn areas look best with. the teeth will be dry brushed as well as some of the other metal areas, then set aside to dry, and if done will seal with a dullcote and let dry over night.

tips? questions? commands to improve or destroy[ lol ]?

reb
Oddball007
Visit this Community
Queensland, Australia
Joined: July 17, 2009
KitMaker: 76 posts
Armorama: 70 posts
Posted: Wednesday, November 24, 2010 - 04:42 PM UTC
Cheers Lads for the step by step how to found it very informative.
rebelsoldier
Visit this Community
Arizona, United States
Joined: June 30, 2004
KitMaker: 1,336 posts
Armorama: 757 posts
Posted: Monday, November 29, 2010 - 07:38 AM UTC
yo spongya!

Hey, although the topic seems to be dead, I have a question about vinyl tracks.
I just installed one on a tank, and did not "train" it previously. (I didn't know I had to.)
Anyway, I'd like to create some realistic "sag", you know to show the tracks lay against the wheels.
Also how do you hide the point where the tracks are joined?

i create the sag on mine by stretching them before i put them together, and if you like you can ca glue them to return rollers, all depends on how you want them to be seen.

as for hiding the track joint, i usually put that portion under a roadwheel and it gets extra dust or mud if its still visible, or you can pput them on top of return rollers.

as for training tracks, i put the tracks on the tank. then i wet the outside edges of the idler wheel, return rollers and the drive sprocket and roadwheels. as the upper hull isn't on yet, its easy to lasy a piece of typing paper on the wet portions. i take it off and draw a line following the wet imprint, this is my template now. i usually use a 1x4 " piece of wood to draw the outline on. then i cut that out and cut a line down the center of the top, ends, and bottom. this way after i make two of them, i can assemble and train the track as well as use it for painting on the track.

hope this helps.

reb
Mark_W
Visit this Community
Virginia, United States
Joined: December 27, 2009
KitMaker: 29 posts
Armorama: 27 posts
Posted: Monday, January 31, 2011 - 09:53 AM UTC
One thing I haven't figured out with the pastel powders is how do you keep them in place when the tracks flex as you put them on the vehicle? In the first few posts, those tracks look perfect--off the vehicle. I'm not seeing how you get a flexible track on without scattering carefully placed powder everywhere...
fificat
Visit this Community
California, United States
Joined: January 10, 2011
KitMaker: 135 posts
Armorama: 109 posts
Posted: Tuesday, February 08, 2011 - 07:18 AM UTC
This may make everybody go "Oh no!!", but I am so new that when you talk of drybrushing, I go what? What is dry brushing, and how do you do it? Seems to me you are talking about wet paints being "drybrushed".
fificat
Visit this Community
California, United States
Joined: January 10, 2011
KitMaker: 135 posts
Armorama: 109 posts
Posted: Wednesday, February 09, 2011 - 05:16 PM UTC
Never mind to my last post. I Googled it and found videos of how to do it. Tried it on a Sherman I am making, and like the effect. Will be doing this on my treads soon.
Joel_W
Staff MemberAssociate Editor
AUTOMODELER
Visit this Community
New York, United States
Joined: December 04, 2010
KitMaker: 11,666 posts
Armorama: 1,143 posts
Posted: Monday, May 30, 2011 - 04:29 PM UTC
Wow !! What a great how to do post on painting both American and German armor tracks. I've only build one tank as I've been a aircraft modeler who came over to the dark side recently. And painting tracks was the most difficult thing I had to do. They looked OK at best. Will be trying out these methods on my my M4A1 DV build for the soon to start All American Tracks Campaign.
Krieg-Hammer
Visit this Community
Scotland, United Kingdom
Joined: May 17, 2011
KitMaker: 106 posts
Armorama: 92 posts
Posted: Sunday, June 05, 2011 - 09:53 AM UTC
Ok....... My tracks are already glued in place and primed. Not clued up yet in building them 'offline' so went down this approach. Painting them flat black may be a bit tedious, but anything else you folk could recommend?

THanks
Mark_W
Visit this Community
Virginia, United States
Joined: December 27, 2009
KitMaker: 29 posts
Armorama: 27 posts
Posted: Sunday, June 05, 2011 - 12:10 PM UTC
A lot depends on the track type. Are they all metal, or do they have rubber shoes? What color primer are they in now? Is the rest of the vehicle painted?
Krieg-Hammer
Visit this Community
Scotland, United Kingdom
Joined: May 17, 2011
KitMaker: 106 posts
Armorama: 92 posts
Posted: Sunday, June 05, 2011 - 09:32 PM UTC
If you click on my below blog in my signature, you'll see the tiger I am building. It is currently all primed by halfords Grey Primer for plastics. Please leave feedback.
Mark_W
Visit this Community
Virginia, United States
Joined: December 27, 2009
KitMaker: 29 posts
Armorama: 27 posts
Posted: Tuesday, June 07, 2011 - 01:01 AM UTC
After looking at your blog, I don't see how you will get everything painted with the tracks in place. The layered road wheels and the interior of the track will be a nightmare. The only viable solution I see its to find the last visible part of the tracks and take them apart. I can go into some tips on how to use mineral spirits to help of you need it.

This its beyond what color to paint things, you will have a devil of a time getting this to work. Judging from how good a job you you did on the engine, I don't think you'll be happy with any painting solution under the current circumstances.
Krieg-Hammer
Visit this Community
Scotland, United Kingdom
Joined: May 17, 2011
KitMaker: 106 posts
Armorama: 92 posts
Posted: Tuesday, June 07, 2011 - 06:18 AM UTC

Quoted Text

After looking at your blog, I don't see how you will get everything painted with the tracks in place. The layered road wheels and the interior of the track will be a nightmare. The only viable solution I see its to find the last visible part of the tracks and take them apart. I can go into some tips on how to use mineral spirits to help of you need it.

This its beyond what color to paint things, you will have a devil of a time getting this to work. Judging from how good a job you you did on the engine, I don't think you'll be happy with any painting solution under the current circumstances.


This is my first ever attempt at 1:35 scale armour. After doing a couple of 1:72 scale tanks and painting the tracks first, it got very messy glueing together as the glue attacked the paint. So thought I'd try just glueing everything on then painting. I'm not sure how I would build the tracks separately, paint then apply them to the vehicle. I guess it's something for the next build i could look at. Perhaps there are videos on YouTube? I'm thinking i may have to do a bit of masking when painting the tracks. I have left the outer wheels off for now.
Mark_W
Visit this Community
Virginia, United States
Joined: December 27, 2009
KitMaker: 29 posts
Armorama: 27 posts
Posted: Tuesday, June 07, 2011 - 08:19 AM UTC
The best I could offer is in this scale, wheels and running gear are generally painted off the vehicle as much as possible. This is where the mass of bamboo skewers, alligator clips, and foam blocks come in handy. Painting rubber rims on road wheels before they go on is the only practical way to avoid a straight jacket.

The other thing, and I can see where you were dealing with this in 1/72 scale, is you have much more area to work with. A potential solution would be to build up the track links in segments as you are no doubt familiar with, but leave one or two ends open so you can flex the finished track over the wheels. With careful planning, you can make sure the "breaks" are either completely or at least partially hidden by the wheels, fenders, etc. And since there is sop much more surface area, a quick hit with a solvent type glue would make it permanent. And shine from the glue could be touched up easily with a flat or matte clear coat.
Krieg-Hammer
Visit this Community
Scotland, United Kingdom
Joined: May 17, 2011
KitMaker: 106 posts
Armorama: 92 posts
Posted: Tuesday, June 07, 2011 - 10:20 AM UTC

Quoted Text

The best I could offer is in this scale, wheels and running gear are generally painted off the vehicle as much as possible. This is where the mass of bamboo skewers, alligator clips, and foam blocks come in handy. Painting rubber rims on road wheels before they go on is the only practical way to avoid a straight jacket.

The other thing, and I can see where you were dealing with this in 1/72 scale, is you have much more area to work with. A potential solution would be to build up the track links in segments as you are no doubt familiar with, but leave one or two ends open so you can flex the finished track over the wheels. With careful planning, you can make sure the "breaks" are either completely or at least partially hidden by the wheels, fenders, etc. And since there is sop much more surface area, a quick hit with a solvent type glue would make it permanent. And shine from the glue could be touched up easily with a flat or matte clear coat.


I think that's the only thing I can do really, and it appears to be a skill in itself for armour building. The problem I see is when sprockets have to be aligned to the hull with parts of the track glued on the sprocket ends themselves.
horsetank
Visit this Community
Florida, United States
Joined: January 19, 2011
KitMaker: 113 posts
Armorama: 37 posts
Posted: Thursday, September 01, 2011 - 07:33 AM UTC
Awesome tip
Whiskey_1
Visit this Community
Zuid-Holland, Netherlands
Joined: November 22, 2008
KitMaker: 279 posts
Armorama: 272 posts
Posted: Sunday, February 12, 2012 - 12:37 AM UTC
Was wondering if any of you guys had experience with painting tank tracks using vallejo and if so, which colors do you use?
ShaunDoe
Visit this Community
British Columbia, Canada
Joined: March 13, 2012
KitMaker: 7 posts
Armorama: 6 posts
Posted: Monday, March 12, 2012 - 05:48 PM UTC
First time poster here and I've only been in the modeling game for about a year now so my talent is very limited. I wanted to try using some more realistic methods to build my models and starting from the treads up seems. A good enough way to do so. I have a tamiya m1a2 I am working on and have so far base coated the treads flat black and will then over coat in the metallic grey/flat black mixture mentioned earlier. My big question is: to do a wash of rust on these treads, should I first seal them with future to protect the base coats from a paint/thinner wash mix? Or can I just wash over my existing paint. I was worried that I would rub off my base coat with out sealing first but I am also nervouse that sealing and further paint layers might make the treads more rigid and thus less pliable for later fitting. Any help would be great thanks
Airtake
Visit this Community
Alvsborgs, Sweden
Joined: August 29, 2012
KitMaker: 20 posts
Armorama: 19 posts
Posted: Sunday, November 25, 2012 - 11:07 AM UTC
Thanks all og you for a wery helpful thread
Tiger_213
Visit this Community
California, United States
Joined: August 10, 2012
KitMaker: 1,510 posts
Armorama: 1,443 posts
Posted: Sunday, November 25, 2012 - 12:38 PM UTC
Amazing how a thread nearly nine years old has popped-up and is still current and useful.
Marlowe
Visit this Community
Ontario, Canada
Joined: June 12, 2005
KitMaker: 289 posts
Armorama: 286 posts
Posted: Sunday, February 24, 2013 - 10:29 AM UTC
Simplest method is to spray paint or airbrush the tracks a dark brown, ie, burnt umber, rub vigourously with graphite shavings and then go over chevrons or surface areas with a steel coloured artist's pencil. After that, just use pigments/washes for any dirt or dust weathering you want in the recesses.
mogdude
Visit this Community
United States
Joined: June 18, 2012
KitMaker: 459 posts
Armorama: 195 posts
Posted: Wednesday, April 03, 2013 - 12:24 AM UTC
use a different process from Gunnie. First of all I prime them with the Tamiya gray primer that in my view helps in creating a more consistent base for the other paint. Then I spray them with Model Master Rust (enamel), then if rubber is involved i spray the relevant parts with Model Master Rubber (enamel)

Really like way you have these painted ,I have a question do you mask off the non rubber areas to spray or are you using a brush for the rubber pads ?
mogdude
Visit this Community
United States
Joined: June 18, 2012
KitMaker: 459 posts
Armorama: 195 posts
Posted: Wednesday, April 03, 2013 - 12:29 AM UTC

Quoted Text

I use a different process from Gunnie. First of all I prime them with the Tamiya gray primer that in my view helps in creating a more consistent base for the other paint. Then I spray them with Model Master Rust (enamel), then if rubber is involved i spray the relevant parts with Model Master Rubber (enamel)


After that I drybrush with several silver/aluminium/chrome silver tones the parts where the attrition reveals the bare metal and with light gray the rubber parts (all enamels) and the finish them with pastels or pigments (the pigments I use are bought art crafts stores and with a few bucks I've got a lifetime stock in various colours)


Ciao


Great stuff Fabio ,I have a question how do you paint the rubber area ,Mask it off and spray or use a brush
mat
Visit this Community
Limburg, Netherlands
Joined: November 18, 2003
KitMaker: 894 posts
Armorama: 643 posts
Posted: Monday, April 22, 2013 - 04:34 AM UTC
I was wondering:

If I build tracks of the type which has single links but they have to be glued together (so they are not moveable. How does it work witht the sprocket. If I glue them first together they will not fit over the sprocket. Which means I have to paint and weather individual loose links and then glue them around the sprocket. This tends to get messy...Anyone has better ideas?
Dragon164
#226
Visit this Community
British Columbia, Canada
Joined: February 20, 2012
KitMaker: 1,909 posts
Armorama: 1,066 posts
Posted: Monday, April 22, 2013 - 11:01 AM UTC
Mat,
Even when glued they are still somewhat flexible, here is a pic of the tracks for my King Tiger.

Cheers Rob.
retiredyank
Visit this Community
Arkansas, United States
Joined: June 29, 2009
KitMaker: 11,610 posts
Armorama: 7,843 posts
Posted: Monday, April 22, 2013 - 08:30 PM UTC
You almost have me convinced to start using the vinyl/rubber tracks. For years, I have avoided these like the plague. This has to do with obtaining the correct sag and joining them together. I think I will order a set of flexible tracks for my Shilka and see how that goes.