England - South East, United Kingdom
Joined: March 07, 2012
KitMaker: 164 posts
Armorama: 163 posts
Posted: Wednesday, April 10, 2013 - 08:48 PM UTC
hi guys,
Everybody's builds are looking fantastic. It has been Great fun watching them.
Luca

United States
Joined: October 08, 2012
KitMaker: 10 posts
Armorama: 9 posts
Posted: Sunday, April 14, 2013 - 03:41 PM UTC
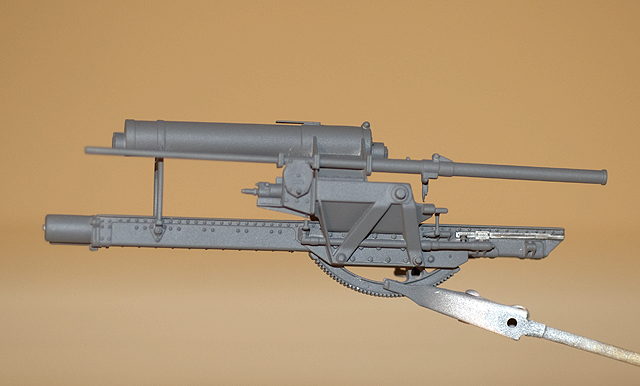
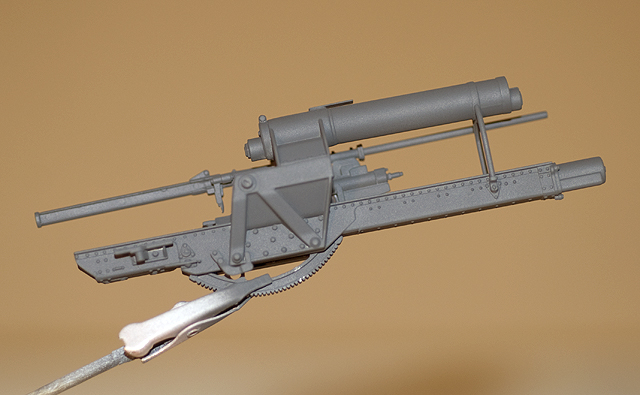
I have taken a break from my Sturer Emil project and have begun assembling the AFV Club Flak 18. I see a few already posted that seem to be nearing completion. What can I say, I am a slow builder.
Anyway, here are a few shots of my work in progress....
and
and
Bayern, Germany
Joined: January 17, 2006
KitMaker: 673 posts
Armorama: 116 posts
Posted: Sunday, April 14, 2013 - 07:09 PM UTC
Hi Mark, very clean work. How did you like dealing with the ejector pins on the inside of the parts?
Ernest

United States
Joined: October 08, 2012
KitMaker: 10 posts
Armorama: 9 posts
Posted: Sunday, April 14, 2013 - 11:27 PM UTC
Hi Ernest,
Having already moved on to the upper carriage, I have done a fair bit of filling and sanding. I actually used a razor saw to remove the prominent knockout pins. I was surprised at the numerous sink marks, although I doubt you can see them once the parts are assembled. Unfortunately, I lost some surface details (bolt heads in upper corner) during clean up that will have to be replaced. I was also kind of surprised at the crummy fit of the breach block, but a file and some filler seem to have resolved that.
Overall, I am impressed with the details of this kit. I built the Pak 40 a couple of years ago and the 18 has the same feel to it...
More soon.
Arkansas, United States
Joined: June 29, 2009
KitMaker: 11,610 posts
Armorama: 7,843 posts
Posted: Monday, April 15, 2013 - 06:25 AM UTC
Here's the KT, as I received it.

[/URL]

[/URL]

[/URL]
Ideals are peaceful. History is violent.
Arkansas, United States
Joined: June 29, 2009
KitMaker: 11,610 posts
Armorama: 7,843 posts
Posted: Monday, April 15, 2013 - 09:28 AM UTC
Was the Henschel KT with zimmerit ever painted in ambush camo? I'm referring to both the dot and splinter camo.
Ideals are peaceful. History is violent.
Arkansas, United States
Joined: June 29, 2009
KitMaker: 11,610 posts
Armorama: 7,843 posts
Posted: Monday, April 15, 2013 - 11:08 AM UTC
Would a primed, unfinished (i.e. the tracks not being on) KT be allowed? Just picked up some zinc chromate and had a great idea. A KT that had not yet been able to make it out of the factory.
Ideals are peaceful. History is violent.
Bayern, Germany
Joined: January 17, 2006
KitMaker: 673 posts
Armorama: 116 posts
Posted: Monday, April 15, 2013 - 05:39 PM UTC
Hi Mark, I too have been surprised at the amount of sink marks in the kit. Easy to fix in most cases, but time consuming. The gun looks pretty good when complete. I have also built the Pak 40, and found it to be an excellent kit. I am working on the crew right now. I have not yet painted the Sonderanhänger 201 parts with their desert overcoat of paint. I bought Great Roads North's desert emplacement base to try out and there is not enough room for the Sonderanhängern. On the one hande I really want to give the base a try; on the other hand I have put a lot of work into building and painting the Sonderahänger 201 parts. Decisions, decisions!!
Ernest
Quoted Text
Hi Ernest,
Having already moved on to the upper carriage, I have done a fair bit of filling and sanding. I actually used a razor saw to remove the prominent knockout pins. I was surprised at the numerous sink marks, although I doubt you can see them once the parts are assembled. Unfortunately, I lost some surface details (bolt heads in upper corner) during clean up that will have to be replaced. I was also kind of surprised at the crummy fit of the breach block, but a file and some filler seem to have resolved that.
Overall, I am impressed with the details of this kit. I built the Pak 40 a couple of years ago and the 18 has the same feel to it...
More soon.
United States
Joined: October 08, 2012
KitMaker: 10 posts
Armorama: 9 posts
Posted: Thursday, April 18, 2013 - 02:25 AM UTC
Ernest,
I am hopeful that you can answer a couple of questions. In step 11, I find the illustrations a bit confusing. I am planning to build in the transport mode and although the instructions show the removal of a pin (end of B-10), it is not clear to me why, or if this is supposed to represent them removing the sights for travel mode. None of the later images show the sights "not in use".
Also, the step 11 illustration shows part D-23 being cut and the parts being split between D-28 and B-12. How did you handle that?
When assembling B-10, B-11, B-12 and G-4, I found that at least for the moment, this can be glued in a way that it pivots. This should help alignment issues later on.
Mark
Vermont, United States
Joined: July 21, 2002
KitMaker: 3,569 posts
Armorama: 2,070 posts
Posted: Thursday, April 18, 2013 - 03:51 AM UTC
I'm in with some Sheunentor warnings too.
In step 12

you are supposed to attach Part C6,
but in step 15,

You're supposed to cut away the outer mounting point (and half of part C6???) if you want the gun in firing position (and really.. who doesn't??)
None of my online or text references show which direction C6 is supposed to face when in firing position, I'm guessing forwards or down onto the grab handle underneath.
For what it is worth, skip adding all the fiddly bits to the legs and get the spades on FIRST. I would have broken ALL of them off fiddling with the spades.
Also drill the locator points for parts C 7 grabhandles and the curved C8-9 a little more deeply than molded.

If you can keep your head when all about you are losing theirs,
perhaps you've misunderstood the situation.
United States
Joined: October 08, 2012
KitMaker: 10 posts
Armorama: 9 posts
Posted: Thursday, April 18, 2013 - 04:00 AM UTC
Mike,
I think that missing part is laying next to the staple in your first picture!
Mark
Arkansas, United States
Joined: June 29, 2009
KitMaker: 11,610 posts
Armorama: 7,843 posts
Posted: Thursday, April 18, 2013 - 04:34 AM UTC
Quoted Text
Would a primed, unfinished (i.e. the tracks not being on) KT be allowed? Just picked up some zinc chromate and had a great idea. A KT that had not yet been able to make it out of the factory.
Anybody?
Ideals are peaceful. History is violent.
England - South East, United Kingdom
Joined: March 07, 2012
KitMaker: 164 posts
Armorama: 163 posts
Posted: Thursday, April 18, 2013 - 06:33 AM UTC
Quoted Text
Quoted Text
Would a primed, unfinished (i.e. the tracks not being on) KT be allowed? Just picked up some zinc chromate and had a great idea. A KT that had not yet been able to make it out of the factory.
Anybody?
hi matt,
I suppose that would be fine unless anybody has any objections?
luca
Bayern, Germany
Joined: January 17, 2006
KitMaker: 673 posts
Armorama: 116 posts
Posted: Sunday, April 21, 2013 - 07:01 PM UTC
Hi Mark, sorry for the late reply but I was hiking this past weekend and did get online until today. Your are correct that cutting off the pin for part B10 represents the sights being removed for transportation.
I did not cut part D23 in half, but I am building my gun to represent one in operation. I need to check my references at home later today to see if I can find a good photo showing that area of the gun without the sight attached so I can give you a good answer as to what that area lookks like without the sights.
Sincerely,
Ernest
Quoted Text
Ernest,
I am hopeful that you can answer a couple of questions. In step 11, I find the illustrations a bit confusing. I am planning to build in the transport mode and although the instructions show the removal of a pin (end of B-10), it is not clear to me why, or if this is supposed to represent them removing the sights for travel mode. None of the later images show the sights "not in use".
Also, the step 11 illustration shows part D-23 being cut and the parts being split between D-28 and B-12. How did you handle that?
When assembling B-10, B-11, B-12 and G-4, I found that at least for the moment, this can be glued in a way that it pivots. This should help alignment issues later on.
Mark
Bayern, Germany
Joined: January 17, 2006
KitMaker: 673 posts
Armorama: 116 posts
Posted: Monday, April 22, 2013 - 06:10 AM UTC
Hi Matt, I think your idea is a good one. I don't see why anyone would have objections to your recommendation.
Ernest
Quoted Text
Quoted Text
Would a primed, unfinished (i.e. the tracks not being on) KT be allowed? Just picked up some zinc chromate and had a great idea. A KT that had not yet been able to make it out of the factory.
Anybody?
Bayern, Germany
Joined: January 17, 2006
KitMaker: 673 posts
Armorama: 116 posts
Posted: Monday, April 22, 2013 - 06:58 AM UTC
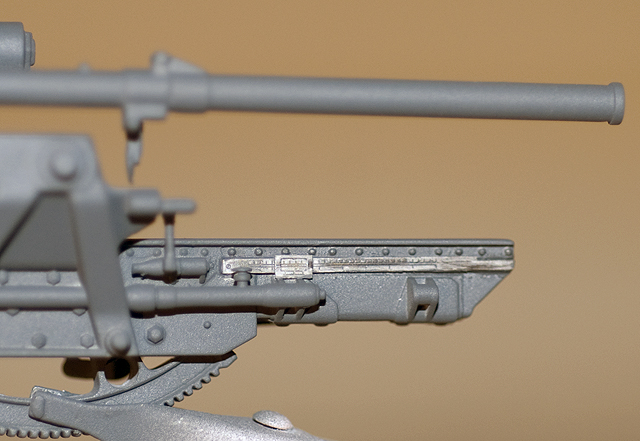
Hi Mark, I checked my reference photos. From the photos it appears that the following parts D23-D29 will not be installed if displaying the gun in transport mode. I have attached two photos, one a good close up of a Flak 18. You can clearly see that the kit parts I note above are not installed.
I hope this information was helpful!
Ernest


Quoted Text
Ernest,
I am hopeful that you can answer a couple of questions. In step 11, I find the illustrations a bit confusing. I am planning to build in the transport mode and although the instructions show the removal of a pin (end of B-10), it is not clear to me why, or if this is supposed to represent them removing the sights for travel mode. None of the later images show the sights "not in use".
Also, the step 11 illustration shows part D-23 being cut and the parts being split between D-28 and B-12. How did you handle that?
When assembling B-10, B-11, B-12 and G-4, I found that at least for the moment, this can be glued in a way that it pivots. This should help alignment issues later on.
Mark
Bayern, Germany
Joined: January 17, 2006
KitMaker: 673 posts
Armorama: 116 posts
Posted: Monday, April 22, 2013 - 07:09 AM UTC
I have made a bit of progress with the build. The crew figures are assembled and primed. It was a challenge making sure no seams were showing at the arm/chest joints of the two shirtless guys. The facial expressions are very good. Hopefully I will be able to do them justice when I paint them.
I also finished chipping of one of the Sonderanhanger 201s.
Enjoy the photos,
Ernest


United States
Joined: October 08, 2012
KitMaker: 10 posts
Armorama: 9 posts
Posted: Monday, April 22, 2013 - 08:01 AM UTC
Hi Ernest,
Those are excellent photos! Clear as could be!!! Thank you. I have three books and none shows that detail.
Looks like they need to fix the 1:1 display as the gun seems to be in shooting mode. :-)
Mark
United States
Joined: October 08, 2012
KitMaker: 10 posts
Armorama: 9 posts
Posted: Monday, April 22, 2013 - 08:03 AM UTC
Now I have to go back and cut them off.... Oh well.
Arkansas, United States
Joined: June 29, 2009
KitMaker: 11,610 posts
Armorama: 7,843 posts
Posted: Monday, April 22, 2013 - 08:11 AM UTC
Ernest: Beautiful work, on the figures. The chipping is what I like to see; well used.
Ideals are peaceful. History is violent.
Bayern, Germany
Joined: January 17, 2006
KitMaker: 673 posts
Armorama: 116 posts
Posted: Monday, April 22, 2013 - 05:42 PM UTC
Mark: Bummer that I did not get the information to you sooner. I'm sure you will be able to make the correction with minimal trouble. By the way, what time frame and setting are you planning on displaying your 8,8 in?
Matt: Thank you for the kind words. I normally do very minimal chipping, as I think it is an effect that is somewhat overdone on a lot of today's models. The early Afrika Korps vehicles and guns are an exception though, as there is plentiful photos that show a great deal of wear and chipping. To be honest I was trying to show worn paint more then chipped paint, but was not able to bring the effect off very well. Mike Rinaldi used lacquer thinner to simulate the effect very well, but I did not have the courage to try that technique. Hopefully the figures will turn out well when I paint them, always something of a crap shoot for me.
Ernest
Arkansas, United States
Joined: June 29, 2009
KitMaker: 11,610 posts
Armorama: 7,843 posts
Posted: Tuesday, April 23, 2013 - 05:48 PM UTC
Ideals are peaceful. History is violent.
Ontario, Canada
Joined: March 25, 2010
KitMaker: 514 posts
Armorama: 261 posts
Posted: Wednesday, April 24, 2013 - 03:16 AM UTC
I do not see why Matt could not enter his partially started kit. We are here to encourage people to build. As for the Camo on early Tiger II as I know there is nothing stating which camo is more accurate. Do it and have fun. AS I know the tanks came from factory with main colour on them and it was up to the unit to finish off the paint scheme.
Arkansas, United States
Joined: June 29, 2009
KitMaker: 11,610 posts
Armorama: 7,843 posts
Posted: Wednesday, April 24, 2013 - 10:05 AM UTC
Quoted Text
I do not see why Matt could not enter his partially started kit. We are here to encourage people to build. As for the Camo on early Tiger II as I know there is nothing stating which camo is more accurate. Do it and have fun. AS I know the tanks came from factory with main colour on them and it was up to the unit to finish off the paint scheme.
The kit was not started. I just hadn't posted any of my progress, until now.
Would the zimmeret have been primed? I know that it was factory applied, but have seen no photos of one with zimmeret.
Ideals are peaceful. History is violent.
Manitoba, Canada
Joined: September 04, 2007
KitMaker: 193 posts
Armorama: 132 posts
Posted: Wednesday, April 24, 2013 - 02:59 PM UTC
An update on my progress

Construction complete and paint on. The tracks have been attached and weathered - may still add some mud/ grass yet. I have yet to attach the exhaust or the extra track links on the turret. Also have to add the coax and hull MGs


Still glossy at this point, but that should change once I start weathering it.