Armor/AFV: Canadian Armor
Discuss all types of Canadian Armor of all eras.
Hosted by Darren Baker
Leopard 2 A6 M CAN with upgrade
Dragon164
#226
Visit this Community
British Columbia, Canada
Joined: February 20, 2012
KitMaker: 1,909 posts
Armorama: 1,066 posts
Posted: Sunday, October 07, 2012 - 10:51 PM UTC
I had a quick look through one of my folders and found this:

Hope it helps.

Cheers Rob.
bosscat
Visit this Community
Marne, France
Joined: April 19, 2012
KitMaker: 119 posts
Armorama: 116 posts
Posted: Sunday, October 07, 2012 - 11:22 PM UTC
yes, thx, it'll be help me. It'll be funny to paint that camo...
bosscat
Visit this Community
Marne, France
Joined: April 19, 2012
KitMaker: 119 posts
Armorama: 116 posts
Posted: Sunday, October 14, 2012 - 09:20 AM UTC
I worked on the panoramic camera. I stuck a sticker from AFV club to represent the anti-reflection glass of the camera. I'm pretty amazed by the effect. I tried to show you a picture of it but it is not easy with artificial light. I tried tomorrow with sun light.


bosscat
Visit this Community
Marne, France
Joined: April 19, 2012
KitMaker: 119 posts
Armorama: 116 posts
Posted: Tuesday, February 04, 2014 - 08:23 AM UTC
Could someone tell me what is the black U-shaped pipe at rear of the hull?


recceboy
Visit this Community
Alberta, Canada
Joined: July 20, 2006
KitMaker: 706 posts
Armorama: 665 posts
Posted: Tuesday, February 04, 2014 - 03:22 PM UTC
Should be the "slave cable" used for jump starting another Leopard.

Anthony
Removed by original poster on 02/05/14 - 11:58:10 (GMT).
bosscat
Visit this Community
Marne, France
Joined: April 19, 2012
KitMaker: 119 posts
Armorama: 116 posts
Posted: Tuesday, February 04, 2014 - 11:56 PM UTC
sorry, my englsih is too poor and google traduction ins'nt my friend. I don't understand what you said exactly.I understand that it'a a cable used to start the engine with another leopard. Is it that?
sauceman
Visit this Community
Ontario, Canada
Joined: September 28, 2006
KitMaker: 2,672 posts
Armorama: 2,475 posts
Posted: Wednesday, February 05, 2014 - 02:03 AM UTC

Quoted Text

sorry, my englsih is too poor and google traduction ins'nt my friend. I don't understand what you said exactly.I understand that it'a a cable used to start the engine with another leopard. Is it that?


Yes that's exactly what it is for.


cheers
bosscat
Visit this Community
Marne, France
Joined: April 19, 2012
KitMaker: 119 posts
Armorama: 116 posts
Posted: Wednesday, February 05, 2014 - 07:44 AM UTC

ok, this is a cable to connect the electric batteries 2 leopards, not a hose for fuel
bosscat
Visit this Community
Marne, France
Joined: April 19, 2012
KitMaker: 119 posts
Armorama: 116 posts
Posted: Saturday, February 08, 2014 - 10:33 PM UTC
Here's the progress of my Leo!

I mounted all the wheels of the beast and the armored plate Under the hull.


I also mounted the kind of tripod with petty cash. Everything is welded .


Finally, I mounted the barrel with brass parts , aluminum barrel and the small resin part (Mirror?) at the end of the barrel . Everything is the Voyager Model kit .
Rings are welded at their junction . So they rotate freely around the barrel. It was long to do ...


jet
Visit this Community
Alberta, Canada
Joined: December 30, 2002
KitMaker: 306 posts
Armorama: 295 posts
Posted: Sunday, February 09, 2014 - 06:10 AM UTC
Great to find this blog it will come in handy for my own project. Here is a walk around from a recent visit to Namao that I have posted on my site, maybe of some use?
http://www.armourworkshop.ca/gallery/album.php?album_id=324

bosscat
Visit this Community
Marne, France
Joined: April 19, 2012
KitMaker: 119 posts
Armorama: 116 posts
Posted: Monday, February 10, 2014 - 09:24 AM UTC
thx, i'll watch it!
Beobachtungsbereich
Visit this Community
New Brunswick, Canada
Joined: August 26, 2012
KitMaker: 19 posts
Armorama: 19 posts
Posted: Monday, February 10, 2014 - 04:15 PM UTC
Nice build!

The U shaped black object is the fuel transfer hose.

The slave cable is stowed in one of the right side hull stowage bins.

Regards
recceboy
Visit this Community
Alberta, Canada
Joined: July 20, 2006
KitMaker: 706 posts
Armorama: 665 posts
Posted: Monday, February 10, 2014 - 04:19 PM UTC
Frank got it right, was having a brain drain after looking after my 2 very sick girls.........

Nice build so far keep us posted.

Anthony
bosscat
Visit this Community
Marne, France
Joined: April 19, 2012
KitMaker: 119 posts
Armorama: 116 posts
Posted: Tuesday, February 11, 2014 - 10:22 AM UTC
thx a lot guys!!

bosscat
Visit this Community
Marne, France
Joined: April 19, 2012
KitMaker: 119 posts
Armorama: 116 posts
Posted: Tuesday, May 19, 2020 - 10:49 PM UTC
Hi all!!!!

I'm back after all these years. For all this time, I have devoted myself exclusively to RC auto modeling, my old club has built a large room to ride all year ... They should not have ... After having finished my nephew's abrams , I had disappeared from the forum and I had put away the models. But the COVID and the lockdown made me fall back into the bath !!! I had completely dropped the models, even consulting the forums. I could see that it had changed at the community level. Many things have also changed. MIG and others have developed a lot of paint gear, tools etc ... I'm not talking about brands of models!
For the recovery, I mounted (almost finished, I'm waiting for stuff ...) a late dragon tiger (6253), do not look, I did not do a topic. I will make a small one for the end.
So much for the inventory. So here I am back with the leo. I rummaged in what I had stored at the time and I lost elements .... I can no longer find the wheels and other parts of the Tamiya kit ... A can of paint Unused MIG is gone, all dry. I had to use it and poorly closed ... Ditto for some filters, empty tamiya glue etc ... I had to recommend lots of things to start with a kit. Not wanting to redo the same model even if the subject is the same, I bought the Border Moldel kit. From what I've seen, the kit looks pretty good, a brand new apparently.
I think of recovering certain parts which I had done before. Ditto for the PE.
As you can see, I bought products to do it, I took full AK to stay consistent. Plus, no compatibility issues. So there is a NATO specific paint set, a NATO weathering set (juice, filter and traces of runoff), textured dry mud, ditto enamel. Finally, masking putty for the camo. A lot of products will be usable for other things. It will complement the products I have in stock and which are still in good condition.
To use all this, I will train with the incomplete tamiya kit.
I will post the start of the building in the afternoon (it's noon in France)!


Congratulations to all your achievements that I went through quickly, I have not yet really looked and I will not comment on all the topics !! You give me lots of ideas!!

PS: my english has not improved over the years as you can see ...
bosscat
Visit this Community
Marne, France
Joined: April 19, 2012
KitMaker: 119 posts
Armorama: 116 posts
Posted: Wednesday, May 20, 2020 - 10:25 PM UTC
I started buidling the new leo. I am looking at what I can use from photo-cutting and resin conversion kits. By comparing, I realize that the quality of the parts of the border model kit is superior to a lot of resin part ... Ditto for PE parts. The difference in thickness or detail of certain parts makes PE a little superfluous or even useless. What is more, the kits are originally made for the tamiya kit. I realized that I will have to adapt in particular the armor plate under the hull. But the resin part as slipped, there's a gap... I replace molded handle by brass parts. In the photos, you will note the quality of the molding. On that of the side, no part is added for the moment, the part is like that direct from the box. I've cutted the rear mud gards but I dont' know if I'll put the brasse parts or If i'll put them. For rear plate, I've only put the little part in the middle. There others small parts, I'll put them when the leo'll be finished.


panamadan
Visit this Community
Minnesota, United States
Joined: July 20, 2004
KitMaker: 1,513 posts
Armorama: 1,449 posts
Posted: Thursday, May 21, 2020 - 12:00 AM UTC
Nice restart!
Dan
bosscat
Visit this Community
Marne, France
Joined: April 19, 2012
KitMaker: 119 posts
Armorama: 116 posts
Posted: Thursday, May 21, 2020 - 06:39 AM UTC
THX a lot Dan!
bosscat
Visit this Community
Marne, France
Joined: April 19, 2012
KitMaker: 119 posts
Armorama: 116 posts
Posted: Friday, May 22, 2020 - 12:23 AM UTC
I've modified the PE air conditioning units and the storage box specific to the Canadian Leopard. At the time, I used fine sandpaper to simulate the anti-slip. Not very realistic ... When assembling my Abrams, I used rough coat from Citadel. I had a hard time peeling off the paper, it was falling apart and the cyano had soaked the paper ... Then I masked the parts not to be covered with tape and micro mask. In addition, I could see that I did not do the handle properly, bad consultation of my doc at the time ... I had made a fixed vertical handle usually present on the tank hulls. But there, it's an articulated handle ... I did it with a piece of guitar string
I am generally satisfied with the result.

Before and after change!


Comments are welcome.
LeoCmdr
Visit this Community
Alberta, Canada
Joined: January 19, 2005
KitMaker: 4,085 posts
Armorama: 3,917 posts
Posted: Friday, May 22, 2020 - 02:56 AM UTC
Terrific to see your build going again. Keep up the detailing!
bosscat
Visit this Community
Marne, France
Joined: April 19, 2012
KitMaker: 119 posts
Armorama: 116 posts
Posted: Friday, May 29, 2020 - 12:05 AM UTC
Work of this week!

I have practically finished assembling the hull. Some parts will be assembled at the end when I no longer have to manipulate the model. Especially small PE parts.


I also made the cannon, I think I cleaned it all up properly. We'll see if I have any changes to make after the primer.


I mounted all the road wheels. I aged the rubber bandages.


I also finished the tracks.


blacksad
Visit this Community
Quebec, Canada
Joined: September 07, 2009
KitMaker: 198 posts
Armorama: 192 posts
Posted: Friday, May 29, 2020 - 03:03 AM UTC
Interesting build. I have everything to make a canadian version and started the hull on the tamiya kit. I want to do the exact same thing you are doing with border model's kit so I'll stay tuned to see if everything fits ok with the resin parts. Bon courage !
bosscat
Visit this Community
Marne, France
Joined: April 19, 2012
KitMaker: 119 posts
Armorama: 116 posts
Posted: Friday, May 29, 2020 - 09:09 PM UTC
Little advance of the evening!

I mounted the 2 hatches. As I assemble the model, I confirm that the quality of the molding of the modern models (at least this one) makes that the PE becomes less and less useful. Or that I wouldn't be able to mount it well enough compared to plastic parts. So, as you can see, there aren't many. Example with the part of the part circled in red. Normally, I have the cross-shaped piece with 3 branches to put under the opening steering wheel. I might have a better rendering of this part, but I will not succeed in reproducing the nuts as well as the part you can see ... Suddenly, I would have a less good overall rendering I think. A well-made wash should also greatly reduce the lack of relief that the PE piece would have made.


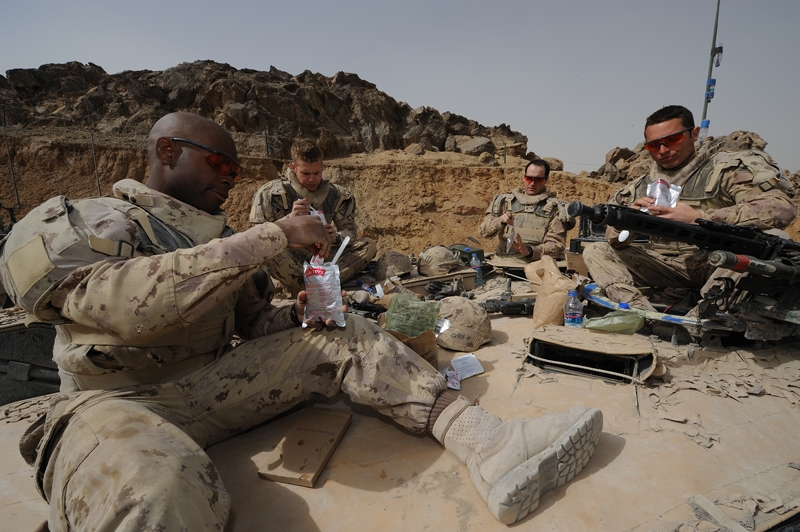
I also mounted the panoramic camera. Same thinking as before. I find the assembly I had made with the Tamiya piece and PE less convincing than the Border Model cam. More detailed, more precise than what I had managed to do ... The small parts which return in front of the glazed part is practically as fine as the PE. And I will eventually be able to thin it by sanding it ... To make the anti-reflection treatment, I got AFV club stickers which give good results. Despite everything, what I had done previously on the Tamiya cam, I found it too present. Not easy to take a picture, normally it's more or less pink / blue / yellow like I did in one of the photos I made at the time. So, I painted the inside of the cam in black and put the sticker on the bottom. Well, I should have also put it on the lower part but I'm not going to reopen it for that ... The fact of having put it at the bottom makes the result less flashy and we only see it under certain angles. In some cases, we see that it is black as in real. Curiously, Bordel Model did not try to reproduce the plate engraved on the back of the support of the cam ... So I added the small piece in PE. The assembly of the parts is super precise, I did not retouch anything. You have to make blank montages to understand how they go with each other.

Overall, I am more satisfied with the result than what I had done on the old camera. What do you think?


->> TOM: oh, un cousin québécois!! je te réponds ici mais si tu veux, tu peux venir sur le site francophone Maquette Garden, ce sera plus pratique pour plus de détails. Néanmoins, comme je le dis, les pièces du kit sont globalement meilleures que les mièces en PE et même en résine. Je sélectionne donc au cas par cas les pièces qui me semblent meilleures.

https://maquette-garden.forumactif.com/t21681-leopard-2-a6-can-afghanistan
bosscat
Visit this Community
Marne, France
Joined: April 19, 2012
KitMaker: 119 posts
Armorama: 116 posts
Posted: Sunday, May 31, 2020 - 09:20 PM UTC
I have advanced the turret well with all the big parts and some small ones. I assembled sub-assemblies which I will fix later before weathering. I am less likely to damage them and it will be more practical to paint. The turret is super long, on the scale one meter more than that of an Abrams: I'm not telling you when there will be the slats !!!
I did not tell you but I will not realize the anti-slip. When I look at the photos I have, the relief is not very pronounced, much less than a Merkava. The Citadel rough coat I have will be too coarse. I would have tested the Ammo product I have for the Merkava I just bought, but I think it will be the same.

points 1, 2 and 3:
The front armor is well detailed and fits very well despite very complex angles. Part 1 is articulated. There are 2 parts 2, lower and upper. They join very well without problem. The part 3 which comes to close everything fits very well. No gap, just a bit of glue and it does the job. Quite surprised at the quality of all of this when we do the first blank mounting:

mark 4. I scratchbuilded, the resin piece was badly molded and I couldn't see how to make up for it. I know there are nuts on the plastic card part but I don't have a photo showing it correctly. Never mind.

reference 5:

I replaced the handles by part with brass

reference 6:

Rather than putting the piece in PE which seems very painful to realize, I took the piece of the kit which was already very correct. I refined the U-shaped piece forming the tunnel and it does the job.

reference 7:

I cut the cap of the coax and put it in its place to store it. So I was able to drill the coax tube.

I'm stuffing my smoke throwers and baskets.