_GOTOBOTTOM
Armor/AFV
For discussions on tanks, artillery, jeeps, etc.
FEATURE
Hasegawa Sherman in Op. Ripper
firstcircle
Visit this Community
England - South East, United Kingdom
Joined: November 19, 2008
KitMaker: 2,249 posts
Armorama: 2,007 posts
Posted: Saturday, September 22, 2012 - 12:27 PM UTC
Tim Reynaga super details Hasegawa’s old M4A3E8 Sherman and readies it for battle near the Han River, Korea, in March 1951 - and it’s all in 1/72 scale… or is it? You’ll have to read on…


Link to Item

If you have comments or questions please post them here.

Thanks!
SgtRam
Staff MemberContributing Writer
AEROSCALE
#197
Visit this Community
Ontario, Canada
Joined: March 06, 2011
KitMaker: 3,971 posts
Armorama: 2,859 posts
Posted: Saturday, September 22, 2012 - 12:48 PM UTC
Wow, very impressive, when I first saw it I found it hard to beleive it was braille scale. Very nice work, thanks for sharing.
BBD468
Visit this Community
Texas, United States
Joined: March 08, 2010
KitMaker: 2,465 posts
Armorama: 2,383 posts
Posted: Saturday, September 22, 2012 - 01:55 PM UTC
That is just TOO COOL!!! I love it. Well done!
majjanelson
Visit this Community
South Carolina, United States
Joined: December 14, 2006
KitMaker: 1,355 posts
Armorama: 979 posts
Posted: Saturday, September 22, 2012 - 04:46 PM UTC
Very nice, Tim!

Why did you remove the .50 cal M2 MG? It looked pretty good in the b&w images.

Tiger_213
Visit this Community
California, United States
Joined: August 10, 2012
KitMaker: 1,510 posts
Armorama: 1,443 posts
Posted: Saturday, September 22, 2012 - 09:27 PM UTC
Amazing detail and such clean lines for something so small! Plus your backgrounds on the first page are just awesome.
PantherF
Visit this Community
Indiana, United States
Joined: June 10, 2005
KitMaker: 6,188 posts
Armorama: 5,960 posts
Posted: Sunday, September 23, 2012 - 12:58 AM UTC
Very nice work Tim. I'm impressed with all the detailed work and corrections performed on this smaller scale which brings it up to par with most larger kits.

Thanks SO MUCH for showing us how it's done!


~ Jeff
TimReynaga
Staff MemberAssociate Editor
MODEL SHIPWRIGHTS
Visit this Community
California, United States
Joined: May 03, 2006
KitMaker: 2,500 posts
Armorama: 297 posts
Posted: Sunday, September 23, 2012 - 01:56 AM UTC

Quoted Text

Very nice, Tim!

Why did you remove the .50 cal M2 MG? It looked pretty good in the b&w images.


Thanks, guys, I appreciate all your kind comments. In answer to your question, Jeff, I originally built the tank with the .50 cal MG on the turret, but when I went back to open up the hatches and add the crew I found that the big MG interfered with the gunner figure. Couldn't figure out a way to position it or him so it didn't block his face, so I took it off.

It was a bit vexing to remove it since I had put a good deal of work into the thing (drilling vent holes in the sleeve, hollowing out the muzzle, wire and plastic details, etc.), but it won't go to waste; I'll reuse it on a Vietnam-era M48A3 Patton build I plan to do eventually.

TimReynaga
Staff MemberAssociate Editor
MODEL SHIPWRIGHTS
Visit this Community
California, United States
Joined: May 03, 2006
KitMaker: 2,500 posts
Armorama: 297 posts
Posted: Wednesday, January 09, 2013 - 03:44 AM UTC
0
Quoted Text


on 2012-09-23 14:34, ericadeane wrote:
Great paint job there Tim. Fun to look over pics of your completed model. May I make two suggestions?

1) the spotlight atop the turret has its lens too far forward. The cylinder to which you attached the (MV?) lens is actually a shroud. The glass, on the real thing, would have been about 4 inches inset from the end of the shroud. The cylinder was to focus the spotlight beam.

2) the item on the glacis below and to the left of the left headlight was a siren and not something that would require another MV lens.

Hope these help.


Doh!
Hi Roy,
Thanks for the heads-up. It is annoying that I got those details wrong, but I do appreciate your advice. (I had wondered why there were TWO headlights on the left side...!) Guess next time I'll do my research a little more carefully.
By the way, it was kind of you to point these oversights out to me in a personal message, but I wouldn't mind at all if you reposted this on the forum. No sense anyone else repeating my dumb mistakes!

regards,
Tim

--------------------------------------------------------------------------------
TimReynaga
Staff MemberAssociate Editor
MODEL SHIPWRIGHTS
Visit this Community
California, United States
Joined: May 03, 2006
KitMaker: 2,500 posts
Armorama: 297 posts
Posted: Wednesday, January 09, 2013 - 03:46 AM UTC
(forgot to post ericadeane message to which I responded)!:

Great paint job there Tim. Fun to look over pics of your completed model. May I make two suggestions?

1) the spotlight atop the turret has its lens too far forward. The cylinder to which you attached the (MV?) lens is actually a shroud. The glass, on the real thing, would have been about 4 inches inset from the end of the shroud. The cylinder was to focus the spotlight beam.

2) the item on the glacis below and to the left of the left headlight was a siren and not something that would require another MV lens.

Hope these help.
JPTRR
Staff MemberManaging Editor
RAILROAD MODELING
#051
Visit this Community
Tennessee, United States
Joined: December 21, 2002
KitMaker: 7,772 posts
Armorama: 2,447 posts
Posted: Monday, August 19, 2013 - 12:40 PM UTC
Tim,

Quoted Text

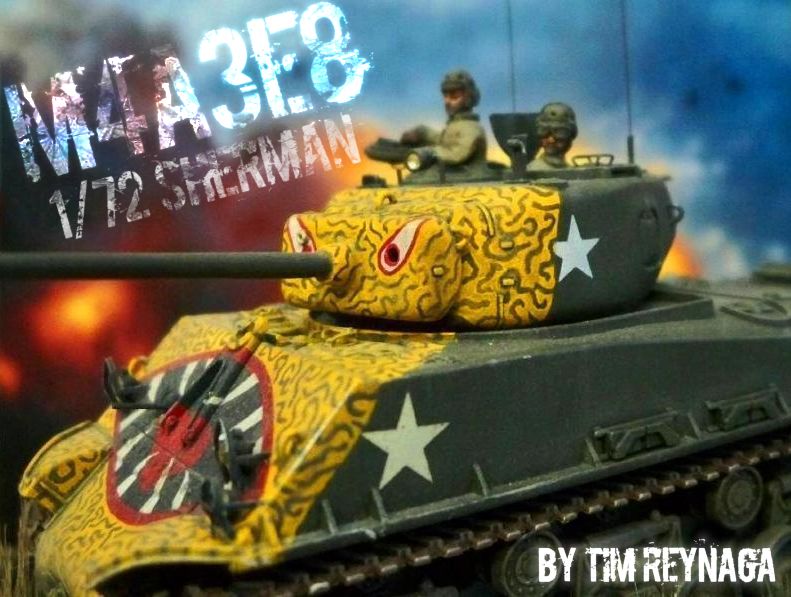
... are willing to do some extra work, Hasegawa’s venerable kit can be built into a good looking little Sherman.


You certainly proved that!
1stjaeger
Visit this Community
Wien, Austria
Joined: May 20, 2011
KitMaker: 1,744 posts
Armorama: 1,727 posts
Posted: Wednesday, June 18, 2014 - 07:49 PM UTC
Just found this over your profile....absolutely stunning Sir!!!! Congrats on a tiny beauty!! Cheers Romain
Motives
Visit this Community
Stockholm, Sweden
Joined: October 15, 2013
KitMaker: 444 posts
Armorama: 428 posts
Posted: Wednesday, June 18, 2014 - 08:19 PM UTC
oh wow, very nice! That paint job is really cool, especially in this scale
 _GOTOTOP