

It will be a week or two for me until I finish the current project and then I can start the Dragon 250/9 for this campaign. I'm looking foward to it.
Later.
Campaigns
Where Armorama group builds can be discussed, organized, and updates posted.
Where Armorama group builds can be discussed, organized, and updates posted.
Hosted by Darren Baker, Richard S.
Rapid Reconnaissance Campaign
ElCapitan

Joined: May 14, 2007
KitMaker: 219 posts
Armorama: 217 posts
Posted: Thursday, May 02, 2013 - 06:14 AM UTC

steve-o
Joined: February 05, 2004
KitMaker: 545 posts
Armorama: 295 posts

Posted: Thursday, May 02, 2013 - 03:48 PM UTC
Yes! It's May!! Can't wait to start this guy. (if anyone has historical info on the units, I'd love to learn more abour Russian Recon)


Shuftie

Joined: September 05, 2012
KitMaker: 74 posts
Armorama: 42 posts

Posted: Thursday, May 02, 2013 - 08:03 PM UTC
Hi all
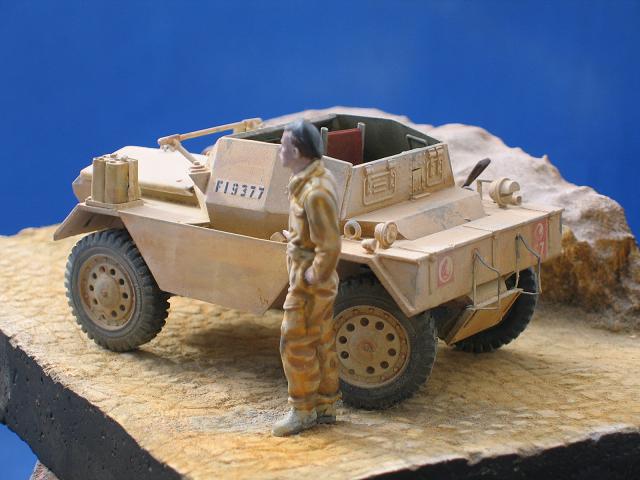
My progress on my Sd. Kfz 223.


My progress on my Sd. Kfz 223.


GregCloseCombat
Joined: June 30, 2008
KitMaker: 2,408 posts
Armorama: 2,394 posts

Posted: Friday, May 03, 2013 - 02:36 AM UTC
Stephen - nice build on the 223 


Nito74

Joined: March 04, 2008
KitMaker: 5,386 posts
Armorama: 4,727 posts
Posted: Friday, May 03, 2013 - 03:00 AM UTC
Stephen, the headlights are falling... pic 1..
Having build a Bronco 223 last year, I advice you to paint and add the frame antenna and wheels after building & painting the rest of the 223.
Having build a Bronco 223 last year, I advice you to paint and add the frame antenna and wheels after building & painting the rest of the 223.
Shuftie
Joined: September 05, 2012
KitMaker: 74 posts
Armorama: 42 posts
Posted: Friday, May 03, 2013 - 03:52 AM UTC
Quoted Text
Stephen, the headlights are falling... pic 1..
Having build a Bronco 223 last year, I advice you to paint and add the frame antenna and wheels after building & painting the rest of the 223.
Yes I only noticed the headlights after I posted the pic! It has been repaired now. Yep the wells and frame antenna are off, pending the painting.

FJHueso

#156

Joined: February 29, 2004
KitMaker: 119 posts
Armorama: 53 posts

Posted: Friday, May 03, 2013 - 05:54 AM UTC
Regards to all!
My objective for this campaign is tiny, bu stubborn: ACE's AML 60. Recently I completed its cousin, Panhard M3 VTT and it was quite a challenge!
I'll try to finish it before it finishes me...
Javier
My objective for this campaign is tiny, bu stubborn: ACE's AML 60. Recently I completed its cousin, Panhard M3 VTT and it was quite a challenge!
I'll try to finish it before it finishes me...
Javier
jkb_sprint

Joined: April 23, 2012
KitMaker: 402 posts
Armorama: 394 posts
Posted: Saturday, May 04, 2013 - 06:42 AM UTC
Hi, i'd like to ask if i can join with this reboxed AER Moldova relic.... It seems like a good chance to build it. 


steph2102

Joined: April 23, 2011
KitMaker: 735 posts
Armorama: 606 posts

Posted: Saturday, May 04, 2013 - 09:37 PM UTC
Hello, here is the kit I will do for the campaign.
steph

steph


exer

Joined: November 27, 2004
KitMaker: 6,048 posts
Armorama: 4,619 posts

Posted: Saturday, May 04, 2013 - 10:02 PM UTC
Okay I must be careful not to mix up my Steves Stephs and Stephens
The M72 is a nixce choice Steve-o I built it a while ago and it is a good kit even though it is very fiddly with tiny parts.
Fast progress Shuftie with the 223
Javier I look forward to seeing the AML 60 what contry will it represent?
John welcome with the BA 64
And Steph great choice with the Dingo
I detailed the old Tamiya Dingo for the old Reconnaissance Campaign

FJHueso
#156
Joined: February 29, 2004
KitMaker: 119 posts
Armorama: 53 posts
Posted: Saturday, May 04, 2013 - 10:46 PM UTC
Hello, Pat! It has the Spanish Marine Corps decals, so you can figure... But my experience with those from the M3 are lukewarm, at best, so I'll need to work them a little!
Regards!
Regards!
jkb_sprint
Joined: April 23, 2012
KitMaker: 402 posts
Armorama: 394 posts
Posted: Sunday, May 05, 2013 - 05:01 PM UTC
Thanks Pat. This one will be fun...... I haven't seen so much flash on a kit for years! On the other hand it's so cheap as a kit, that this simply doesn't matter. I'll make a repainted captured Ba 64 to make it a little more interesting.


erichvon

Joined: January 17, 2006
KitMaker: 1,694 posts
Armorama: 1,584 posts

Posted: Sunday, May 05, 2013 - 11:25 PM UTC
Cracked the box open on my LRDG chevy last night and made a start. I've not long finished one as a gun truck so am going to build this one as a radio truck. Need to get plenty of bits and bobs for it however. Black Dog stowage, Resicast radio, Lewis gun pintle mounts, Resicast Vickers. I've got another one in the post so I can share the bits between the two as they're going to be part of a large dio...lol. I'll stick some pics up once it starts taking shape :-)
goofmuilwijk

Joined: April 19, 2013
KitMaker: 179 posts
Armorama: 117 posts
Posted: Monday, May 06, 2013 - 05:50 AM UTC
Hi everybody
I thought i'd join a few campaigns.
The main idea being to get some smaller projects done within some sort of a deadline. Usually my plans, ambitions and ideas are beyond my modelling skils and attentionspan. And that means a lot of shoeboxes with half-finished models. So i'm joining a few campaigns with relatively small, quick builds, keeping it simple en actually finishing them
For this campaign i choose the Tamiya Universal Carrier (Forced Reconnaissance) kit. Not complicated, like most (older) Tamiya kits. The idea is to put the model in a small vignette, situated in the Netherlands.
The box:

The "i didn't jump the gun" picture:

The contents. A true multimedia kit with a piece of thread:

I thought i'd join a few campaigns.
The main idea being to get some smaller projects done within some sort of a deadline. Usually my plans, ambitions and ideas are beyond my modelling skils and attentionspan. And that means a lot of shoeboxes with half-finished models. So i'm joining a few campaigns with relatively small, quick builds, keeping it simple en actually finishing them
For this campaign i choose the Tamiya Universal Carrier (Forced Reconnaissance) kit. Not complicated, like most (older) Tamiya kits. The idea is to put the model in a small vignette, situated in the Netherlands.
The box:
The "i didn't jump the gun" picture:
The contents. A true multimedia kit with a piece of thread:
exer
Joined: November 27, 2004
KitMaker: 6,048 posts
Armorama: 4,619 posts
Posted: Monday, May 06, 2013 - 06:07 AM UTC
Welcome aboard Goof and Erich.
Just a note there's no need for the photos of the kits with todays date shown. It's not a requirement for the campaign. I trust you all
Just a note there's no need for the photos of the kits with todays date shown. It's not a requirement for the campaign. I trust you all
goofmuilwijk
Joined: April 19, 2013
KitMaker: 179 posts
Armorama: 117 posts
Posted: Tuesday, May 07, 2013 - 05:21 AM UTC
Hi Pat: "Trust, but verify" 
But you're right, the only one being cheated by bringing in a half-finished kit would be yourself.
On with the campaign...
So far, assembly is going quickly. After a few hours it's looking like a carrier allready. Fit is good, the only fiddly bit is the rear differential assembly. And the gunner's seat is best installed before fixing the sides as it's a rather small space to work in. But nothing problematic.
The wheels, tracks and front facade are still seperate in the pictures.


All in all a quite small vehicle. As my girlfriend commented "aw, it's cute!". And it is, to be honest
But you're right, the only one being cheated by bringing in a half-finished kit would be yourself.
On with the campaign...
So far, assembly is going quickly. After a few hours it's looking like a carrier allready. Fit is good, the only fiddly bit is the rear differential assembly. And the gunner's seat is best installed before fixing the sides as it's a rather small space to work in. But nothing problematic.
The wheels, tracks and front facade are still seperate in the pictures.
All in all a quite small vehicle. As my girlfriend commented "aw, it's cute!". And it is, to be honest
jkb_sprint
Joined: April 23, 2012
KitMaker: 402 posts
Armorama: 394 posts
Posted: Tuesday, May 07, 2013 - 11:41 PM UTC
Hi everyone.
Goof nice clean work on the carrier.
I started working on my Ba 64. After looking at the kit i thought of trying to make some improvements, (or someone could say i butchered the kit ). It's the first time i attempt doing anything like this.
So in the red circle is the first thing i did which was to scrap the side vision ports for the driver as they were almost 3mm thick! I made new ones and added the half round line that is from keeping waters away while driving. (Sorry i dont know the English term for that one).
In the yellow circle is the front port. That needed to get into a really strict diet. That one was about 5mm thick..... . It also had the wrong shape and left big gaps that had to be filled.
In the black circle, is the air intake. That was molded in a single piece with the top part of the hull and had no hole so i cut it off and added the parts that should be there visible.


The exhaust the kit provided can be seen on the pic blow and next to it the one i'm making.

At the next pic are the grills that are positioned in the lower frontal area of the hull. They were molded as a single piece and also gave the sides the wrong shape, since the sides dont have the shape of steps. The grills are inside the armor and not visible from the side. This was cut and will be replaced by seperate ones as soon as the two hull parts are glued together.

Still a whole lot of things need to be replaced or done from scratch because they are not provided in the kit. If anyone wonders why i take the trouble to make all that on this kit, it is a good chance to try and do something like that since it is a very cheap kit and the shape of the things required to be done isn't complex. Sorry if i gave you a headache.
Goof nice clean work on the carrier.
I started working on my Ba 64. After looking at the kit i thought of trying to make some improvements, (or someone could say i butchered the kit
). It's the first time i attempt doing anything like this. So in the red circle is the first thing i did which was to scrap the side vision ports for the driver as they were almost 3mm thick! I made new ones and added the half round line that is from keeping waters away while driving. (Sorry i dont know the English term for that one).
In the yellow circle is the front port. That needed to get into a really strict diet. That one was about 5mm thick.....
. It also had the wrong shape and left big gaps that had to be filled. In the black circle, is the air intake. That was molded in a single piece with the top part of the hull and had no hole so i cut it off and added the parts that should be there visible.
The exhaust the kit provided can be seen on the pic blow and next to it the one i'm making.
At the next pic are the grills that are positioned in the lower frontal area of the hull. They were molded as a single piece and also gave the sides the wrong shape, since the sides dont have the shape of steps. The grills are inside the armor and not visible from the side. This was cut and will be replaced by seperate ones as soon as the two hull parts are glued together.
Still a whole lot of things need to be replaced or done from scratch because they are not provided in the kit. If anyone wonders why i take the trouble to make all that on this kit, it is a good chance to try and do something like that since it is a very cheap kit and the shape of the things required to be done isn't complex. Sorry if i gave you a headache.
erichvon
Joined: January 17, 2006
KitMaker: 1,694 posts
Armorama: 1,584 posts
Posted: Wednesday, May 08, 2013 - 07:49 AM UTC
The thing I love about Tamiya kits is they fly together...lol

I decided to stick with the kit radio as you can't really see it anyway so that's saved me some cash


Think I'll do a bit more tonight. Waiting for my Black Dog stowage set to come through so I'll just stick to a basic buld for the time being
I decided to stick with the kit radio as you can't really see it anyway so that's saved me some cash
Think I'll do a bit more tonight. Waiting for my Black Dog stowage set to come through so I'll just stick to a basic buld for the time being
goofmuilwijk
Joined: April 19, 2013
KitMaker: 179 posts
Armorama: 117 posts
Posted: Wednesday, May 08, 2013 - 09:28 AM UTC
Thanks John. Nice work on the BA-64 you're doing there! Those old Russian kits can be fun as they have some very unusual subjects and are dirt cheap. But they do require a bit of work
Karl's right. Tamiya kits go together very well Nice work on the Chevy btw.
I made just a little bit of progress today, just some work on the back end and the inside of the front armor panel. I'll probably change the tarp rolled up on the back with something else. It looks like a lump of plastic to be honest. We'll see.


I'll start painting a few parts before going much further because otherwise i can't reach those later on. The inside of the driver compartement for instance. But also the bottom halve with the tracks as that is going to be covered with partial skirts.
Fitting the figures is something i usually do after the complete kit is assembled and painted. The driver compartement is cramped so getting the finished figures in would be difficult.

But the main problem with that approach is the fact that the driver has the steering collumn between his legs. Not uncommon really, a lot of driver-figures have that. But what is uncommon is that his feet are closed together. I can't squeeze him in later on. He has to be fitted before fitting the front armor.

Or i could of course cut off his lower legs. I may do that, since you can't see them anyway
Karl's right. Tamiya kits go together very well
Nice work on the Chevy btw.I made just a little bit of progress today, just some work on the back end and the inside of the front armor panel. I'll probably change the tarp rolled up on the back with something else. It looks like a lump of plastic to be honest. We'll see.
I'll start painting a few parts before going much further because otherwise i can't reach those later on. The inside of the driver compartement for instance. But also the bottom halve with the tracks as that is going to be covered with partial skirts.
Fitting the figures is something i usually do after the complete kit is assembled and painted. The driver compartement is cramped so getting the finished figures in would be difficult.
But the main problem with that approach is the fact that the driver has the steering collumn between his legs. Not uncommon really, a lot of driver-figures have that. But what is uncommon is that his feet are closed together. I can't squeeze him in later on. He has to be fitted before fitting the front armor.
Or i could of course cut off his lower legs. I may do that, since you can't see them anyway
erichvon
Joined: January 17, 2006
KitMaker: 1,694 posts
Armorama: 1,584 posts
Posted: Wednesday, May 08, 2013 - 09:38 AM UTC
Goof I had the same problem when I built a Bren Carrier a couple of years back so I painted the crew compartment and figures first so they fitted in nicely and that end of the carrier was finished then carried on with the rest of the build. Worked for me
goofmuilwijk
Joined: April 19, 2013
KitMaker: 179 posts
Armorama: 117 posts
Posted: Wednesday, May 08, 2013 - 08:38 PM UTC
Yep, that's more or less what i plan to do as well
exer
Joined: November 27, 2004
KitMaker: 6,048 posts
Armorama: 4,619 posts
Posted: Wednesday, May 08, 2013 - 09:00 PM UTC
Yes goof the fit is so good on that kit that you can paint the compartment and figures and then just slot in the two front pieces afterwards
ElCapitan
Joined: May 14, 2007
KitMaker: 219 posts
Armorama: 217 posts
Posted: Thursday, May 09, 2013 - 09:05 AM UTC
Ok, finally finished my last project so let the games begin!

vdejarnette
Joined: February 25, 2013
KitMaker: 209 posts
Armorama: 33 posts
Posted: Friday, May 10, 2013 - 01:46 AM UTC
You said any era right? How about this rapid reconnaissance vehicle that was the go-to for virtually every nationright through to the early 20th century and is still in use in some backwater places today?
I'm talking of course about...
the horse.

I've got this to contribute (as a slight change of pace) if someone wants to allow it. It is 1/12 scale so it fits that requirement also.

I'm talking of course about...
the horse.
I've got this to contribute (as a slight change of pace) if someone wants to allow it. It is 1/12 scale so it fits that requirement also.
jkb_sprint
Joined: April 23, 2012
KitMaker: 402 posts
Armorama: 394 posts
Posted: Sunday, May 12, 2013 - 03:28 AM UTC
Karl, your Tamiya looks very good! Nice work. I like the way the radio looks on the side.
Goof,thank you very much. Really nice job with your carrier. You got me interested in getting one. It's a vehicle with lots of potential. The kit looks good as well.
Kevin, nice project you got there. Waiting to see an update.
Got to get some things done on my Soviet kit. The exhaust parts are in place as well as the grills at the front. Still, lots of things have to be done, but i think i'm actually getting to a descent result.
 |

WEB HOSTING BY


Copyright ©2021 Armorama and Kitmaker Network, a subsidiary of Silver Star Enterprises
All Rights Reserved. Please read our Conditions of Use and Privacy Policy.
All Rights Reserved. Please read our Conditions of Use and Privacy Policy.