Bayern, Germany
Joined: January 17, 2006
KitMaker: 673 posts
Armorama: 116 posts
Posted: Sunday, February 07, 2016 - 12:28 AM UTC
Wisconsin, United States
Joined: July 30, 2013
KitMaker: 584 posts
Armorama: 525 posts
Posted: Sunday, February 07, 2016 - 03:18 AM UTC
great work so far guys, also some really great subjects!!!!
New York, United States
Joined: June 19, 2015
KitMaker: 74 posts
Armorama: 70 posts
Posted: Sunday, February 07, 2016 - 08:23 AM UTC
very nice cockpit indeed. I love modern tanks as well. everyone's stuff looks great.
Started on mine. First time working with photo etch and on like the second piece i little metal bit shoots offs and heads near my eyes. I freaked out and went to emergency care. Luckily nothing was in there they said but not i am in an additional 150 bucks towards this build.
Anyways here is some progress on mine. Wheels are assembled. front photo etch started and rear assembly is moving along.
The exhaust caps were real fiddly and i snapped a piece. a little bummed out but got to move on.


Bayern, Germany
Joined: January 17, 2006
KitMaker: 673 posts
Armorama: 116 posts
Posted: Sunday, February 07, 2016 - 10:21 PM UTC
Good start on the Tiger Stephen, the zim PE looks pretty good. I always wear glasses while I work with PE to avoid what almost happened to you. keep up the fine work on the Tiger!
Namabiiru
 Associate Editor
#399
Rhode Island, United States
Joined: March 05, 2014
KitMaker: 2,888 posts
Armorama: 1,920 posts
Posted: Sunday, February 07, 2016 - 11:38 PM UTC
Ordered my Matilda II from Evil-bay over the weekend along with some AM tracks. Have been wanting to do something in caunter scheme for ages so here's my chance!

Bayern, Germany
Joined: January 17, 2006
KitMaker: 673 posts
Armorama: 116 posts
Posted: Monday, February 08, 2016 - 12:21 PM UTC
Mark, the counter scheme looks really good. I built a Crusader a couple of years ago and really like how the scheme looks.
Quoted Text
Ordered my Matilda II from Evil-bay over the weekend along with some AM tracks. Have been wanting to do something in caunter scheme for ages so here's my chance!
New York, United States
Joined: June 19, 2015
KitMaker: 74 posts
Armorama: 70 posts
Posted: Monday, February 08, 2016 - 09:48 PM UTC
I have a question. It seems the tamiya instructions didnt have clear color callouts for somethings. Am i correct to assume the wheels should be the same color as the tanks main color and have black edges where it meets the tracks?
I am doing a either a italian or north african late tiger 1.
- Steve
Bayern, Germany
Joined: January 17, 2006
KitMaker: 673 posts
Armorama: 116 posts
Posted: Monday, February 08, 2016 - 11:32 PM UTC
Hi Stephen, you are correct. The Tiger I's had rubber rimmed road wheels until late in their production life. The road wheels were almost always painted the main color, in the case of a North African Tigers that would have been Desert Brown RAL 8020, with several of the tanks getting a camo pattern overspray of Olive Green RAL 7008 if assigned to Heavy Tank Battalion 501. The second Tiger battalion that fought in North Africa was Heavy Tank Battalion 504; its Tigers may have been painted Dark Yellow RAL 7028, but there is no firm evidence that was the case; several pictures of their tanks in North Africa show they were painted in the same scheme of the 501st.
There were 3 Tiger battalions deployed to Italy at various time during the fighting there. They were the 504th, which remained in Italy for the rest of the war after its part in North Africa. The 508th which fought there from late Jan 1944 to mid Feb 1945, and SS Heavy Panzer Battalion 101 saw action in northern Italy between mid Aug to mid Oct 1943. The Tigers of those units were painted a variety of camo schemes during there operational lives; but they all had Tigers painted in the "standard" Dark Yellow RAL 7028 base color with Olive Green RAL 7008 and Red Brown RAL 8017 at least through the Fall of 1944.
A much longer answer than you asked for, but there it is!
HTH,
Ernest
Quoted Text
I have a question. It seems the tamiya instructions didnt have clear color callouts for somethings. Am i correct to assume the wheels should be the same color as the tanks main color and have black edges where it meets the tracks?
I am doing a either a italian or north african late tiger 1.
- Steve
New York, United States
Joined: June 19, 2015
KitMaker: 74 posts
Armorama: 70 posts
Posted: Tuesday, February 09, 2016 - 02:28 AM UTC
thanks so much. that was a great answer and very informative.
I cant wait to get home and finish the zimmererit and final assembly.
- Steve
#275
Alberta, Canada
Joined: March 01, 2006
KitMaker: 174 posts
Armorama: 141 posts
Posted: Tuesday, February 09, 2016 - 02:42 AM UTC
Here is my start pic for this campaign. I spent the weekend at a hobby show and managed to get a good start on the Bi bis. Unfortunately it will now go the the back of the line behind a RN Seahawk, INJ submarine and a leopard C2.


Bayern, Germany
Joined: January 17, 2006
KitMaker: 673 posts
Armorama: 116 posts
Posted: Tuesday, February 09, 2016 - 12:57 PM UTC
Hi Steve, I was looking through the photos again this morning and saw that you are in fact building a late production Tiger - the ones that had all steel road wheels, with no rubber rim. I paid more attention to your question and statement about building a Tiger either in North Africa or Italy, and I should have reviewed your photos before I answered, I am sorry for the confusion. I also brain farted the fact that you are putting zimmerit on the Tiger.
Given those facts you won't be able to build a Tiger resembling one that fought in North Africa, though Italy is still possible. Again, I apologize for the confusion.
Ernest
Quoted Text
thanks so much. that was a great answer and very informative.
I cant wait to get home and finish the zimmererit and final assembly.
- Steve
Bayern, Germany
Joined: January 17, 2006
KitMaker: 673 posts
Armorama: 116 posts
Posted: Tuesday, February 09, 2016 - 12:58 PM UTC
Very nice start on the Char B Cam. I have been considering building this kit and will follow any comments you have about it closely.
New York, United States
Joined: June 19, 2015
KitMaker: 74 posts
Armorama: 70 posts
Posted: Tuesday, February 09, 2016 - 06:50 PM UTC
Well i decided on italy anyways. So on this one it should be painted the main color and no black band at all?
like this
- steve

image from airfix website
New York, United States
Joined: June 19, 2015
KitMaker: 74 posts
Armorama: 70 posts
Posted: Tuesday, February 09, 2016 - 06:52 PM UTC
Cool looking tank. Cant wait to see it finished.
- steve
Bayern, Germany
Joined: January 17, 2006
KitMaker: 673 posts
Armorama: 116 posts
Posted: Tuesday, February 09, 2016 - 06:57 PM UTC
Hi Steve, the picture is not showing up; however, the all steel road wheels have no black rim. You can paint them entirely the base color of the tank.
HTH,
Ernest
Quoted Text
Well i decided on italy anyways. So on this one it should be painted the main color and no black band at all?
like this
- steve
image from airfix website
Illinois, United States
Joined: November 20, 2012
KitMaker: 203 posts
Armorama: 198 posts
Posted: Thursday, February 11, 2016 - 09:45 AM UTC
Joining here with a CharB as well. Going to do this one pretty much straight outta the box + metal barrels and I'm thinking going for the French 1940 version rather than the German.

Washington, United States
Joined: April 06, 2015
KitMaker: 32 posts
Armorama: 19 posts
Posted: Thursday, February 11, 2016 - 10:24 AM UTC
I really like your work on the Zero, just an amazing start, very sharp and clean. I have the Tami Zero in my stash and will build it some day, but I'm not dumb enough to try it for this group build with yours out there. Very nice work. So I'm going to go with the Tamiya F-16CJ with a bit of a different take on the finish. Will start tomorrow as I keep an eye on the Zero build.
On the Bench: 1/32 Trumpeter SU-27
Bayern, Germany
Joined: January 17, 2006
KitMaker: 673 posts
Armorama: 116 posts
Posted: Thursday, February 11, 2016 - 12:25 PM UTC
Thank you for the kind comments Joe. You I think you will greatly enjoy building the Zero when you get to it. The fit thus far has been excellent and the engineering is well thought out. I look forward to seeing your F16CJ under construction.
Ernest
Quoted Text
I really like your work on the Zero, just an amazing start, very sharp and clean. I have the Tami Zero in my stash and will build it some day, but I'm not dumb enough to try it for this group build with yours out there. Very nice work. So I'm going to go with the Tamiya F-16CJ with a bit of a different take on the finish. Will start tomorrow as I keep an eye on the Zero build.
Namabiiru
Associate Editor #399
Rhode Island, United States
Joined: March 05, 2014
KitMaker: 2,888 posts
Armorama: 1,920 posts
Posted: Saturday, February 13, 2016 - 08:04 PM UTC
Here's my entry:
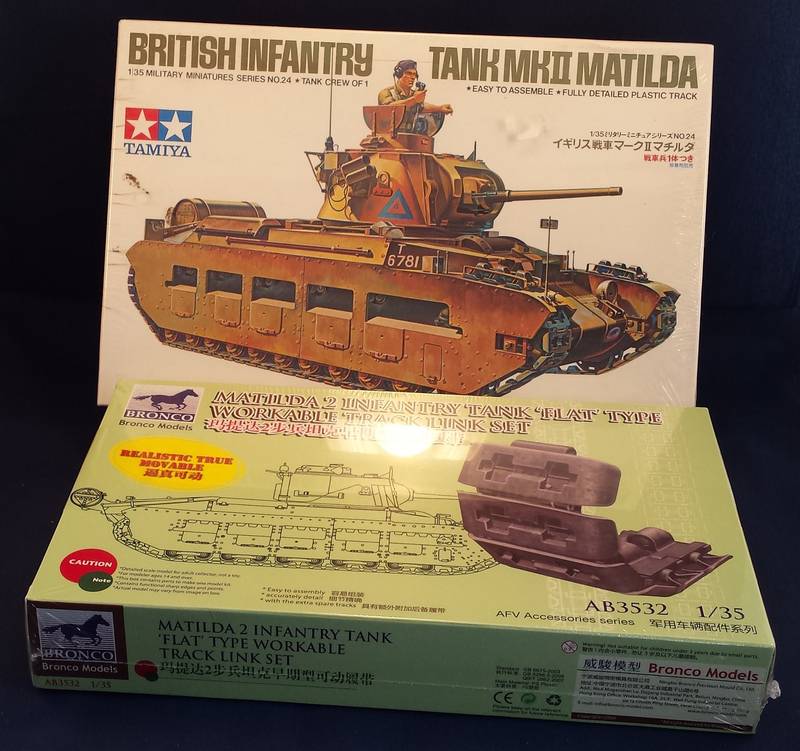
I think the box for the tracks may actually be bigger than the box for the tank!

Bayern, Germany
Joined: January 17, 2006
KitMaker: 673 posts
Armorama: 116 posts
Posted: Saturday, February 13, 2016 - 11:09 PM UTC
Mark, I think you will enjoy building the Matilda. I have the same kit in my stash and plan to get to it someday.
Progress on the Zero has been very good. Following are a few photos of the build. Not very interesting as I am at the stage of building subassemblies and doing general cleaning in preparation for painting.
Lower wing none of this will be seen when the upper wings and fuselage are mated.


Colorado, United States
Joined: December 25, 2004
KitMaker: 3,770 posts
Armorama: 2,263 posts
Posted: Sunday, February 14, 2016 - 05:44 AM UTC
I'm in with Tamiya's 3.7cm Anti-Tank Gun Pak 35/36 with RB Models Barrel and Eduard PE. This will go behind one of my smaller Prime Movers.
Box Art:

Kit and AM Contents:

The start:

Barrel carriage and breech.

Once the carriage is completely dry, I'll take my #11 blade and razor saw and remove the molded on barrel...you can see pretty much where the cut will be in the photo.
More to follow!
Mike

Bayern, Germany
Joined: January 17, 2006
KitMaker: 673 posts
Armorama: 116 posts
Posted: Sunday, February 14, 2016 - 02:13 PM UTC
That is a sweet little kit Mike. I built that one several years ago for a French Campaign diorama I did. It went together great. The metal barrel makes the kit look even better.
Ernest
Namabiiru
Associate Editor #399
Rhode Island, United States
Joined: March 05, 2014
KitMaker: 2,888 posts
Armorama: 1,920 posts
Posted: Sunday, February 14, 2016 - 05:18 PM UTC
I built one of those in my younger days, and it remains one of my favorites. I'm wondering how much of the original kit will be left by the time you get done with the AM stuff...
Namabiiru
Associate Editor #399
Rhode Island, United States
Joined: March 05, 2014
KitMaker: 2,888 posts
Armorama: 1,920 posts
Posted: Sunday, February 14, 2016 - 07:32 PM UTC
Got the Bronco tracks assembled and started on the suspension. What I immediately realized is the drive sprockets in the kit are too wide and have to be modified. In the photo below you can see how the unmodified sprocket on the right is wider than the original track and the Bronco tracks, whereas the modified sprocket on the left is a nice fit.
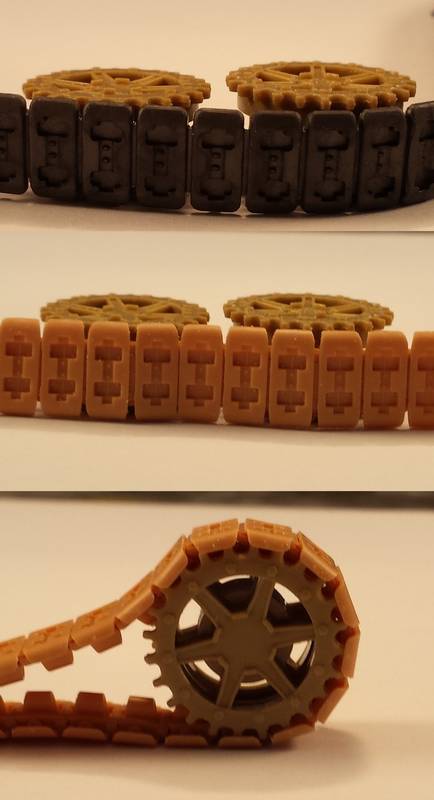
At the very bottom you can see the spacing of the sprocket teeth still does not seem quite right for the Bronco tracks. Not sure how I'm going to resolve that, but it may be that enough of the whole thing is hidden that it really won't matter much.
New York, United States
Joined: June 19, 2015
KitMaker: 74 posts
Armorama: 70 posts
Posted: Sunday, February 14, 2016 - 07:49 PM UTC
good work on finish the tracks. I am nearing the track stage on my Tiger 1 late. I am hoping the tracks go together simply.
I will get some pictures up tonight.
- steve