

Campaigns: Active Campaigns
Campaigns that are either in planning or underway should be grouped here.
Campaigns that are either in planning or underway should be grouped here.
Hosted by Richard S.
Memories of Matchbox
petbat

Joined: August 06, 2005
KitMaker: 3,353 posts
Armorama: 3,121 posts
Posted: Saturday, April 27, 2019 - 07:44 AM UTC
Hope to see progress soon. Are the tracks okay? They look like they may be twisted.


Braille

#135

Joined: August 05, 2007
KitMaker: 1,501 posts
Armorama: 1,485 posts

Posted: Saturday, April 27, 2019 - 01:59 PM UTC
Quoted Text
Hope to see progress soon. Are the tracks okay? They look like they may be twisted.
@petbat Peter,
Yes, the tracks are somewhat twisted but they are soft so they should not present a problem?
Already have the lower hull together and now working on the upper hull. I needed to take a break. Ill post some progress pictures as soon as I get the upper and lower hull together. The detail is very simple, but this gives me a change to add some missing detail and make a few corrections here and there without changing the overall look of the kit.
~ Eddy


phantom_phanatic309
#372

Joined: March 10, 2010
KitMaker: 2,568 posts
Armorama: 423 posts

Posted: Tuesday, April 30, 2019 - 09:57 AM UTC
Quoted Text
Two very different options. I had one of the SAAB 'Barrel' kits but never built it. Disappeared under mysterious circumstances (probably one of my brother's light fingered friends)
Have some good filler around for the Lynx. The fit on the underside leaves something to be desired. The fit of the cockpit to the frame is very good though. Nothing unusual for the era - Airfix and Frog had the same issues- The Frog more so. eerrrgggghhhh)
Theiving little $%*£! Hopefully you'll be able to replace it oneday.
And thanks for teh advice on the Lynx. Only one I've built so far is the Hobbyboss and found that one to be quite nice. I read somewhere that all three of the earlier kits, Matchbox, Frog and Airfix are based on early development aircraft and not accurate for service versions. Not that that has stopped Airfix selling it as such (they still hawk their Eurofighter as a Tyhoon). Fortunately they did a better job with the 1/48's. Pretty sure Matchbox give decals for an Army trials Lynx.
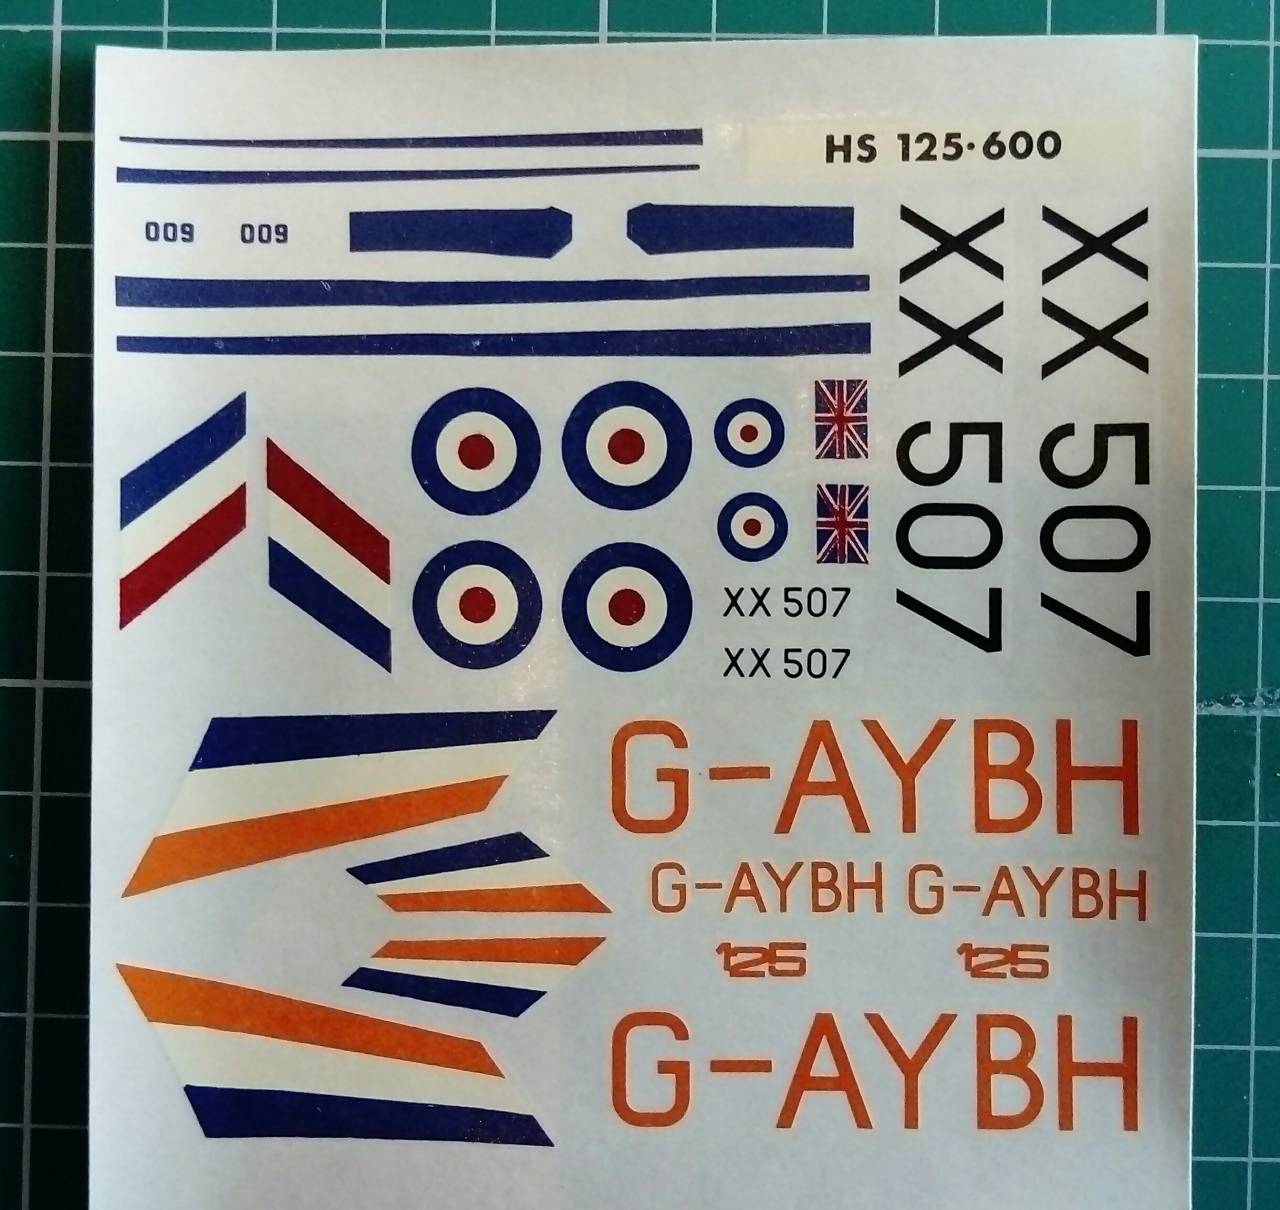
So looking at the 125's decals I noticed that they are a bit fuzzy and the stripes are wobbly. Not sure what happened at the printer that day! I can replace them easily enough from generic sets, but I do need to source a set of stripes.
So, I've decided to go ahead and build the Saab Tunnan. Looks to be a really nice little kit. And look at the price sticker - 49p!
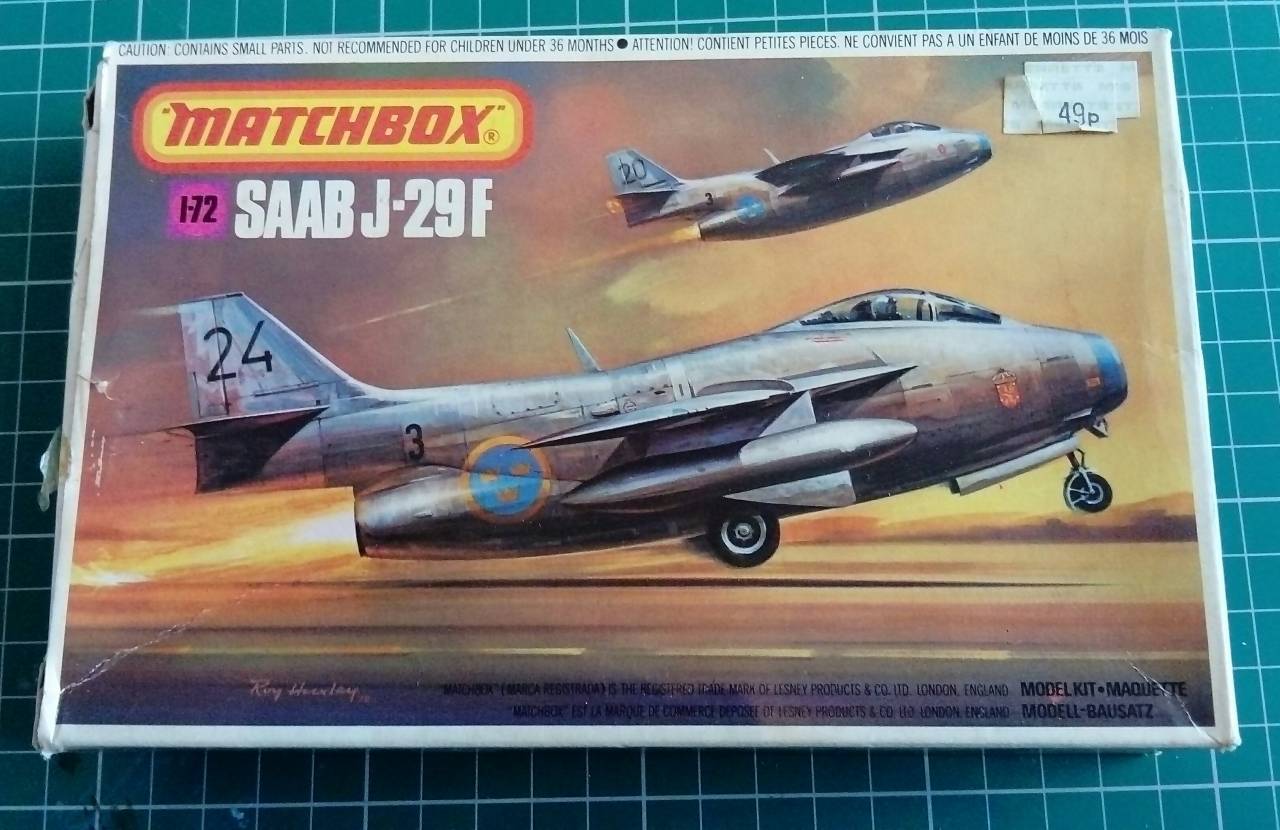

Should be a fun little build.

Robbd01
#323
Joined: February 13, 2013
KitMaker: 791 posts
Armorama: 344 posts

Posted: Tuesday, April 30, 2019 - 10:32 AM UTC
Woah,
I need to get off my dead ass and onto my dying feet and update where I am at in my quest to finish this campaign.
Cheers


I need to get off my dead ass and onto my dying feet and update where I am at in my quest to finish this campaign.
Cheers

petbat
Joined: August 06, 2005
KitMaker: 3,353 posts
Armorama: 3,121 posts
Posted: Tuesday, April 30, 2019 - 06:18 PM UTC
49p. Those were the days Stephen.
Yes, Robbie, your absence has been noted
Yes, Robbie, your absence has been noted

zedhol
Joined: December 01, 2009
KitMaker: 244 posts
Armorama: 160 posts
Posted: Wednesday, May 01, 2019 - 12:20 AM UTC
Quoted Text
I had given some thought to build the 125 myself but then saw that my kits decals were probably unusable. Will have to look out for that sheet.
Alas, I believe that decal sheet is made from Unobtanium and costs a fortune if you can find them. I am very wary to use them, but that is what they are for.
Now that I have the Sword UC-125 for conversion back to a 125-800 I can do the full history of the 125, so will use up all the set.
I have made some progress on my 125-600, will post pictures tonight.
phantom_phanatic309
#372
Joined: March 10, 2010
KitMaker: 2,568 posts
Armorama: 423 posts
Posted: Friday, May 03, 2019 - 03:01 AM UTC
Graham,
Airfix plans on re-issuing the Dominie this year so with luck Model Alliance will do likewise with their sheet. I think a lot of those were snapped up by everyone who had the old 125 in their stash, I haven't been able to find a sheet at any price!
luckily it's not difficult to replace with what I have in spares, but it would be nice to add a little colour.
Looking forward to seeing what you have planned for the collection.
zedhol
Joined: December 01, 2009
KitMaker: 244 posts
Armorama: 160 posts
Posted: Monday, May 06, 2019 - 01:48 AM UTC
Quoted Text
Graham,
Airfix plans on re-issuing the Dominie this year so with luck Model Alliance will do likewise with their sheet.
Not sure that Model Alliance exists anymore, though I do think that Airlife have a bunch of their old stuff.
Good to hear that Airfix will re-issue the Dominie. I need a couple more at least.
I will put some pictures up of my plans when I get some time.
phantom_phanatic309
#372
Joined: March 10, 2010
KitMaker: 2,568 posts
Armorama: 423 posts
Posted: Monday, May 06, 2019 - 06:26 AM UTC
You may be right. Thinking about it I haven't seen much from Model Alliance in recent years.
Hopefully someone has acquired the range. Airfix has the Dominie out for reissue as part of their classics range. While there are some real horrors making a comeback, there are a few good ones. I'll be grabbing one certainly.
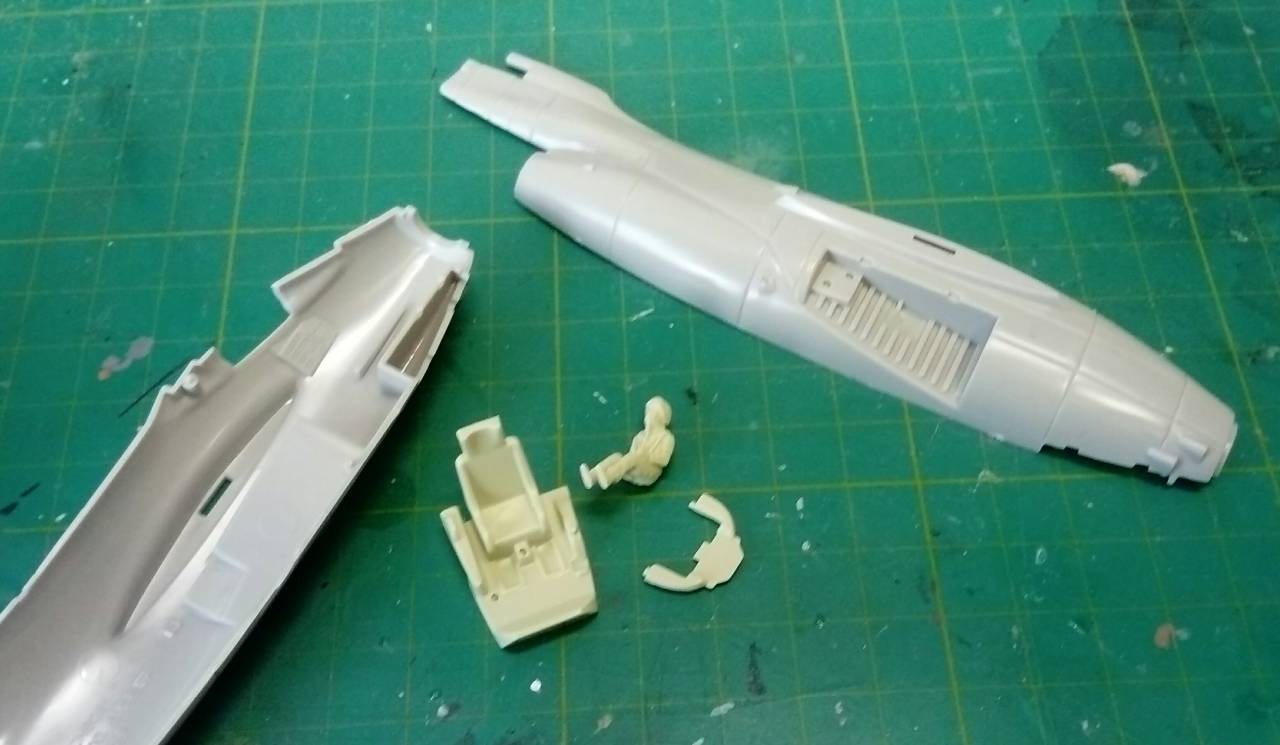
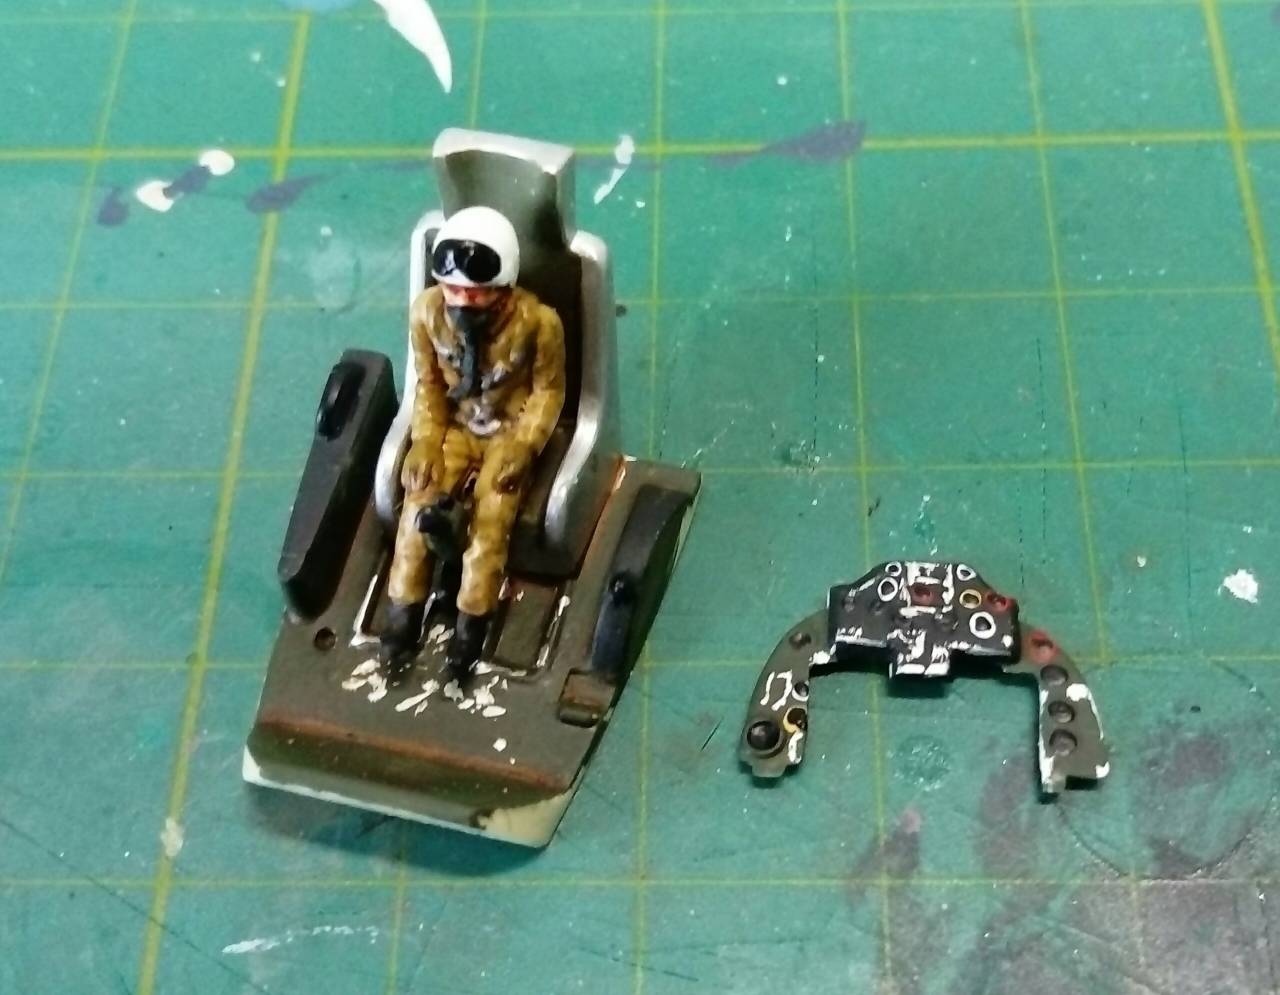
Made a quick start on the J29 today while working a couple of other projects. Just tidying up the cockpit and working out how to deal with the intake. As it is you can see straight into the cockpit through it! It's probably one of the nicest cockpits I've seen in a Matchbox. The instrument panel has all the dials molded on, the ejector seat looks like what it's meant to be and even a sidewall panel is present. A sharply detailed pilot rounds it off nicely.
After a weekend of mucking about regrouting the tiles in the bathroom, an afternoon of modelling was just what I needed this afternoon. Tonight I'm going to play some old games on the Amiga and it's back to work in the morning.
Hopefully someone has acquired the range. Airfix has the Dominie out for reissue as part of their classics range. While there are some real horrors making a comeback, there are a few good ones. I'll be grabbing one certainly.
Made a quick start on the J29 today while working a couple of other projects. Just tidying up the cockpit and working out how to deal with the intake. As it is you can see straight into the cockpit through it! It's probably one of the nicest cockpits I've seen in a Matchbox. The instrument panel has all the dials molded on, the ejector seat looks like what it's meant to be and even a sidewall panel is present. A sharply detailed pilot rounds it off nicely.
After a weekend of mucking about regrouting the tiles in the bathroom, an afternoon of modelling was just what I needed this afternoon. Tonight I'm going to play some old games on the Amiga and it's back to work in the morning.
Braille
#135
Joined: August 05, 2007
KitMaker: 1,501 posts
Armorama: 1,485 posts
Posted: Monday, May 06, 2019 - 06:35 PM UTC
Seeing a lot more building going on, thought it best to add my two cents!


I finally made some progress on this tiny kit. The upper and lower hull are not yet cemented together. Went ahead and added some of the extra armor to the hull and turret and storage box as seen on some later Fireflies I found on the internet. There is a lot of detail missing on these kits but Im not bothering with that, keeping the kit as Matchbox as possible without going overboard. I dont know anything about these vehicles but Im having fun.
~ Eddy
petbat
Joined: August 06, 2005
KitMaker: 3,353 posts
Armorama: 3,121 posts
Posted: Wednesday, May 08, 2019 - 10:37 PM UTC
Hi everyone. Sorry I have had no internet for a week..
Nice start Stephen. Maybe you can just roll some styrene stock into a tube and add a disc on the end. Painted very dark brown and you will likely not see anything. Another option is to add the 'cone' in the centre like on this kit:
https://hlj.com/1-72-scale-saab-j29a-b-tunnan-tgsta7201
scroll down to the 8th pic.
Nice to see some extra work being done Eddy. It sets this apart from others. You could go to town with detail, or do what you have done and add some interest without going crazy. I like it.
The Matchbox kit is based off an early Firefly, with sand shields and the 3 piece cast transmission. Most did not have the sand shields (either lost quickly or never had them).
petbat
Joined: August 06, 2005
KitMaker: 3,353 posts
Armorama: 3,121 posts
Posted: Wednesday, May 15, 2019 - 08:57 AM UTC
Hi Eddy
Just found this and thought of you:
From Airfix Magazine October 1974 edition!

Oh how our expectancy has evolved.....
Just found this and thought of you:
From Airfix Magazine October 1974 edition!
Oh how our expectancy has evolved.....
phantom_phanatic309
#372
Joined: March 10, 2010
KitMaker: 2,568 posts
Armorama: 423 posts
Posted: Sunday, May 19, 2019 - 07:00 AM UTC
Quoted Text
Hi everyone. Sorry I have had no internet for a week..
Nice start Stephen. Maybe you can just roll some styrene stock into a tube and add a disc on the end. Painted very dark brown and you will likely not see anything. Another option is to add the 'cone' in the centre like on this kit:
https://hlj.com/1-72-scale-saab-j29a-b-tunnan-tgsta7201
scroll down to the 8th pic.
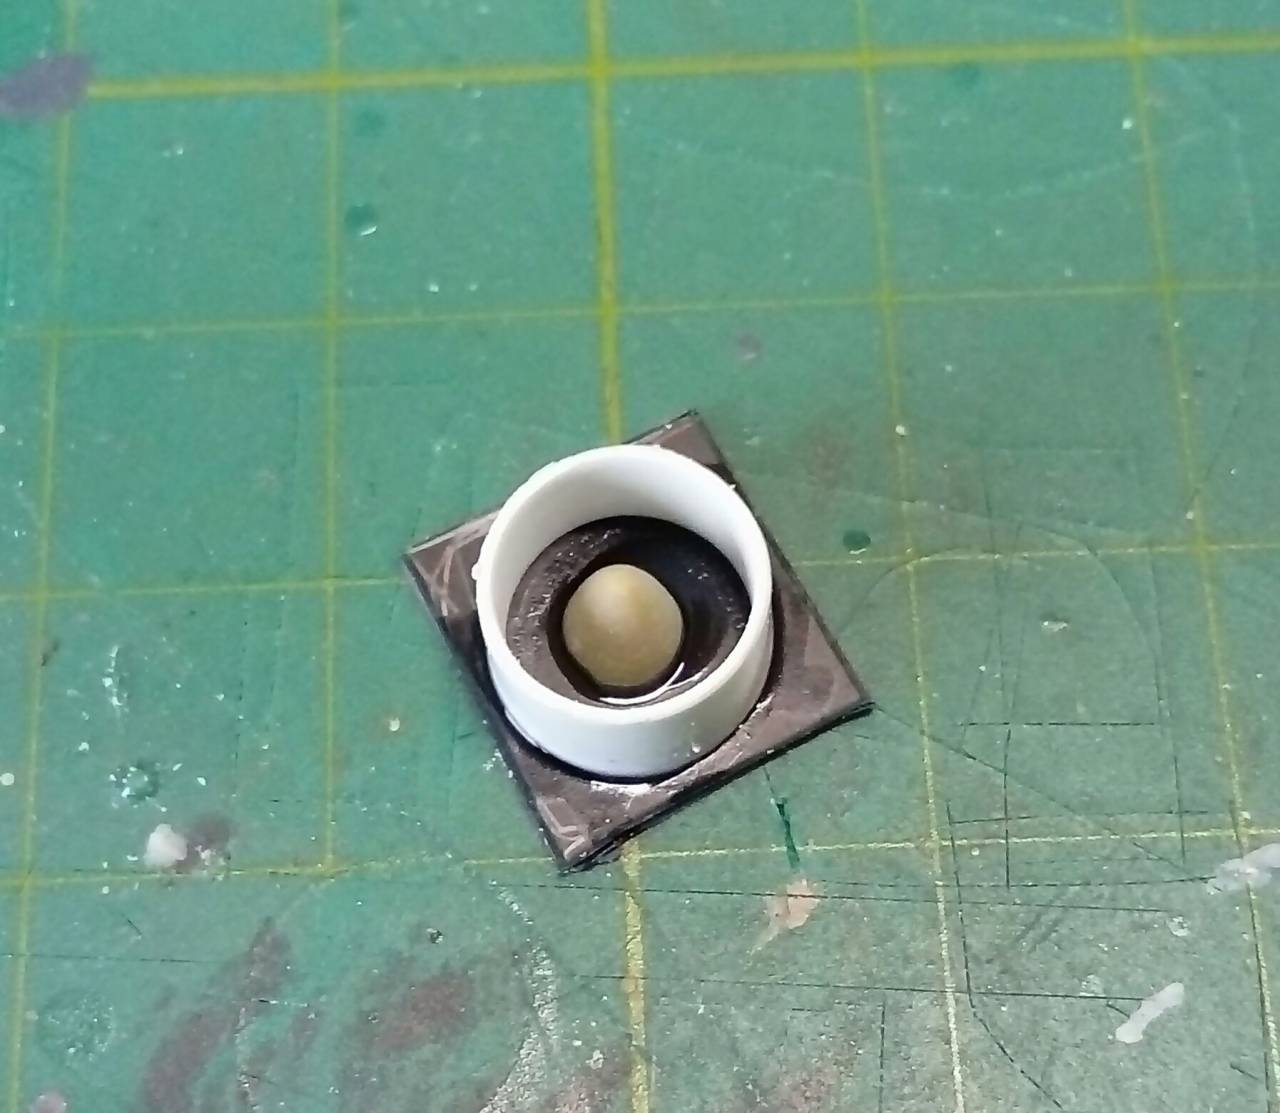
Great idea thanks!
I had a piece of tube the same diameter as the intake so cut a piece of that. I made the cone from a piece of sprue turned to shape in the chuck of my my drill. Should look ok when painted up.
Also finished up the cockpit. Rest of the build should just fall together.
petbat
Joined: August 06, 2005
KitMaker: 3,353 posts
Armorama: 3,121 posts
Posted: Sunday, May 19, 2019 - 08:02 PM UTC
Looking Good Stephen. I think that will do the job when painted.
I went to the annual swap meet here in Brisbane Australia yesterday. Scored this:

Think the decals might be unusable though:

I went to the annual swap meet here in Brisbane Australia yesterday. Scored this:
Think the decals might be unusable though:
Braille
#135
Joined: August 05, 2007
KitMaker: 1,501 posts
Armorama: 1,485 posts
Posted: Monday, May 20, 2019 - 10:16 AM UTC
@petbat - Peter,
Put the decals in a sandwich bag and tape them to a inside window with the decals facing the sun. Keep them there until the yellow and dark areas disappear. Then test one decal to see if it wont break up. If it does spray them with Micro Scale decal varnish and try again. Hope this helps you?
I did see your earlier post will reply on that one soon.
~ Eddy
zedhol
Joined: December 01, 2009
KitMaker: 244 posts
Armorama: 160 posts
Posted: Thursday, May 23, 2019 - 06:54 AM UTC
It has been a while since I posted but I have made some progress on the 125.
I have added a bit of a cockpit, filled panel lines and added landing light recesses in the wings. Since I took the following photos, I have filled the windows with my clear resin technique. Once dry I will be able to close up fuselage. There are a lot more improvements I could make but won't because of time.
I have added a bit of a cockpit, filled panel lines and added landing light recesses in the wings. Since I took the following photos, I have filled the windows with my clear resin technique. Once dry I will be able to close up fuselage. There are a lot more improvements I could make but won't because of time.
petbat
Joined: August 06, 2005
KitMaker: 3,353 posts
Armorama: 3,121 posts
Posted: Thursday, May 23, 2019 - 02:13 PM UTC
You tease me about the following pics, then don't post anything!
Braille
#135
Joined: August 05, 2007
KitMaker: 1,501 posts
Armorama: 1,485 posts
Posted: Thursday, May 30, 2019 - 04:12 AM UTC
Quoted Text
I have filled the windows with my clear resin technique.
@zedhol - Graham,
Please can you explain about your clear resin technique. It would be much appreciated.
~ Eddy
phantom_phanatic309
#372
Joined: March 10, 2010
KitMaker: 2,568 posts
Armorama: 423 posts
Posted: Thursday, May 30, 2019 - 10:16 AM UTC
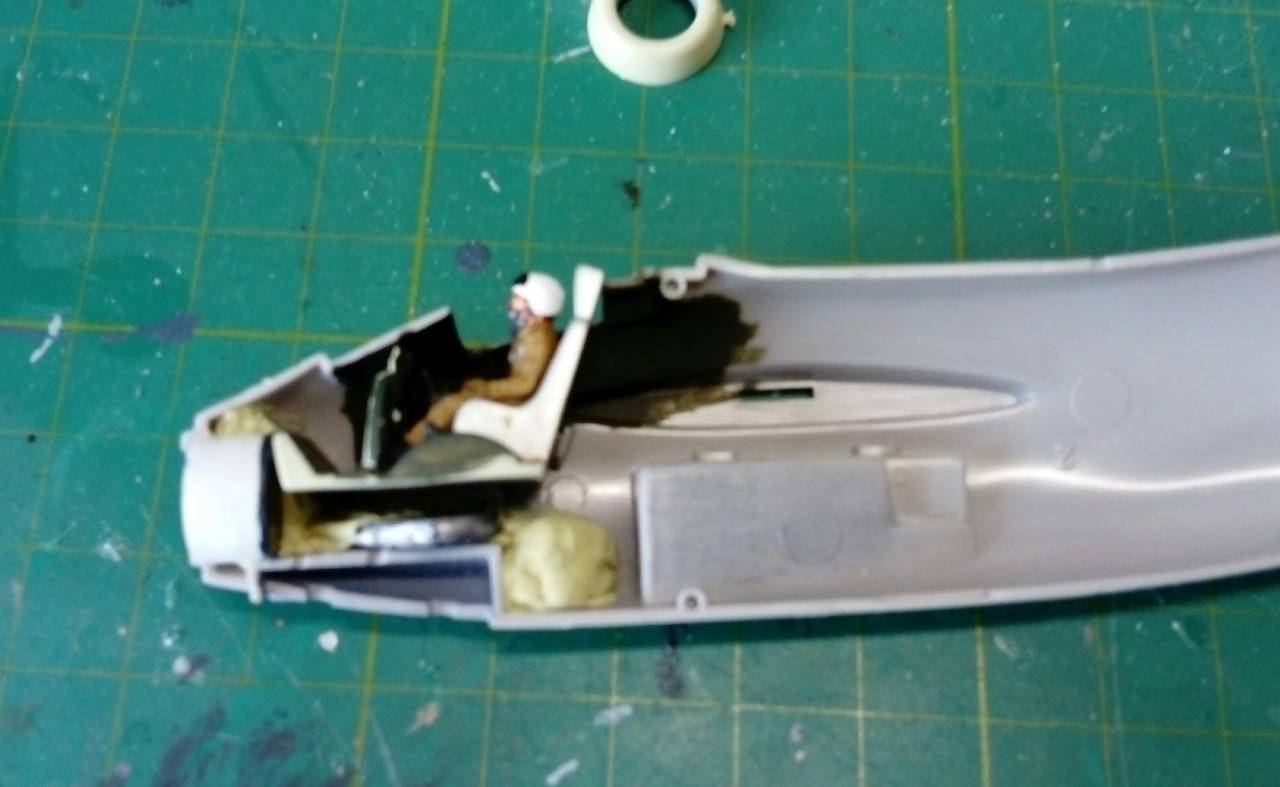
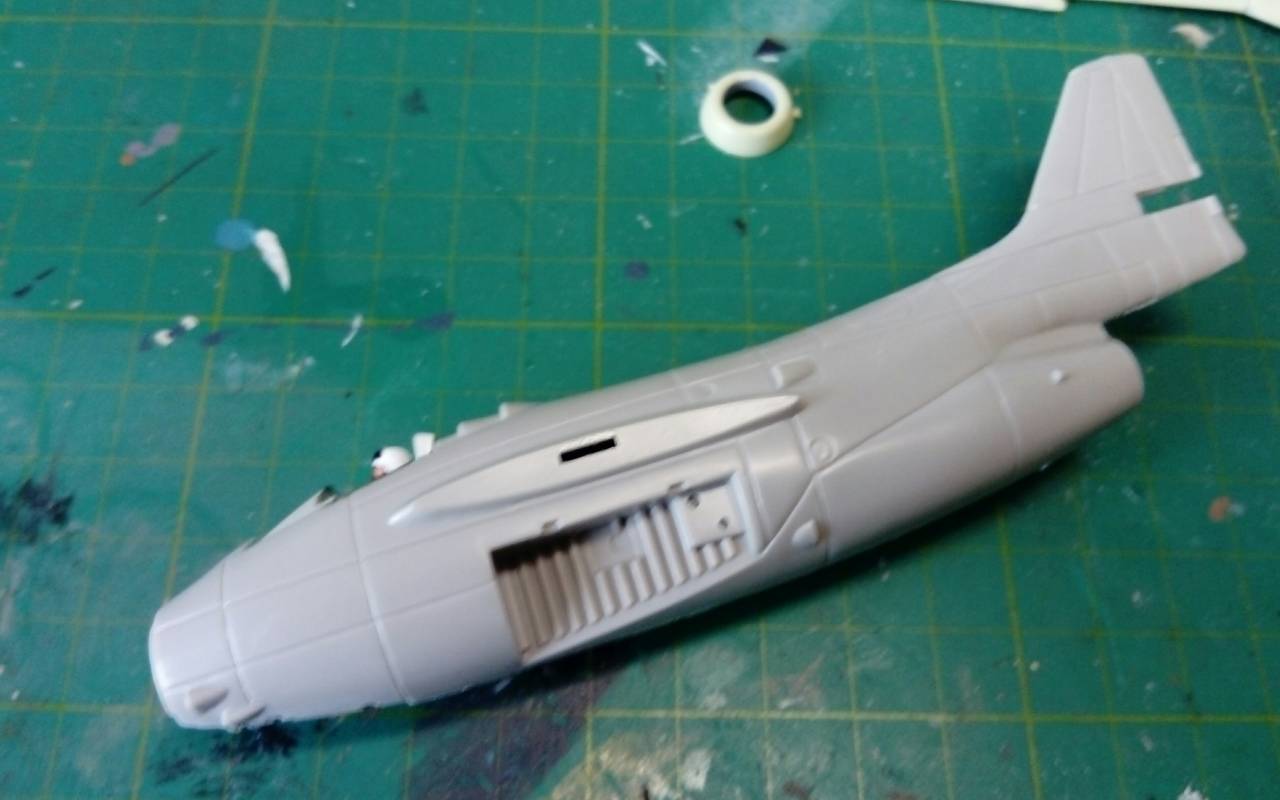
Little blury, but finished up the fuselage today. Fitted in the intake, cockpit and plenty of nose weight. All secured with milliput to make sure none of the weights come loose.

Antilles

Joined: March 22, 2015
KitMaker: 671 posts
Armorama: 45 posts
Posted: Friday, May 31, 2019 - 02:44 AM UTC
Eddy:
Nice improvement of Your Sherman.
Stephen:
Cool looking Tunnan. I once saw one of these planes in Austria!
Peter:
I have had the same problems with the decals in my kit of the Daimler. Most of the dirt could be removed with water. I just finished my Daimler. It it really a nice litte kit.


Oliver
Nice improvement of Your Sherman.
Stephen:
Cool looking Tunnan. I once saw one of these planes in Austria!
Peter:
I have had the same problems with the decals in my kit of the Daimler. Most of the dirt could be removed with water. I just finished my Daimler. It it really a nice litte kit.
Oliver
petbat
Joined: August 06, 2005
KitMaker: 3,353 posts
Armorama: 3,121 posts
Posted: Friday, May 31, 2019 - 09:25 AM UTC
The Tunnan is looking good Stephen. I have not built an aircraft in a very long time, I nearly forgot about weighting down tail sitters....
Oliver the Daimler is beautiful. You have done an excellent job bringing out the detail on this itty bitty vehicle. The pennant is a nice touch.
Well we are into the final month of the campaign guys, time to put the pedal to the metal. Me included.
Dropped the seat of the Citroen whilst painting and now need to do some repairs and repaint it before I can button it up and start the exterior painting. Will post pics when the repairs are done.
Happy modelling everyone
phantom_phanatic309
#372
Joined: March 10, 2010
KitMaker: 2,568 posts
Armorama: 423 posts
Posted: Saturday, June 01, 2019 - 08:56 AM UTC
On my last build, the Airfix Jet Provost, I didn't add enough and it dropped on its tail. I then spent ages chopping up lead into small pieces to get through the narrow gap for the nose wheel doors. Wasn't going to make that mistake again. Luckily the Tunnan has plenty of space. I used a squashed lead fishing weight and two ball bearings. Hopefully it will be stable and not tip back.
Braille
#135
Joined: August 05, 2007
KitMaker: 1,501 posts
Armorama: 1,485 posts
Posted: Monday, June 03, 2019 - 05:23 PM UTC
Here are some progress pictures of where Im at currently. Just cemented the upper and lower hull, still need to add the headlights, antennas on the turret and scratch build the sections that bolts the three piece cast transmission housing together and then it will be ready for painting and a little weathering.


@petbat Peter, I wasnt going to use the kit supplied bridge but after looking at the magazine article that you posted earlier I can see how well it looks after some simple painting, nice! The twisted tracks were not a problem as they are made of very soft material. They surprisingly can be cemented together with liquid cement and to the plastic wheels too.
@Antilles Oliver, Nicely done sir! I hope that my example will come out half as good as yours is when Im finished?
~ Eddy
petbat
Joined: August 06, 2005
KitMaker: 3,353 posts
Armorama: 3,121 posts
Posted: Monday, June 03, 2019 - 10:39 PM UTC
Coming along very Nicely Eddy. The scratch built parts are really adding to this build. And yes, you have to do the bridge - that is the joy of doing a Matchbox kit!

md72
#439
Joined: November 05, 2005
KitMaker: 4,950 posts
Armorama: 289 posts

Posted: Saturday, June 08, 2019 - 04:38 AM UTC
Well guys, sorry, less than a month to go and I haven't even opened the plastic bag of parts. I'm just going to have to drop this one and concentrate on other projects that are closer to completion. 

 |

WEB HOSTING BY


Copyright ©2021 Armorama and Kitmaker Network, a subsidiary of Silver Star Enterprises
All Rights Reserved. Please read our Conditions of Use and Privacy Policy.
All Rights Reserved. Please read our Conditions of Use and Privacy Policy.