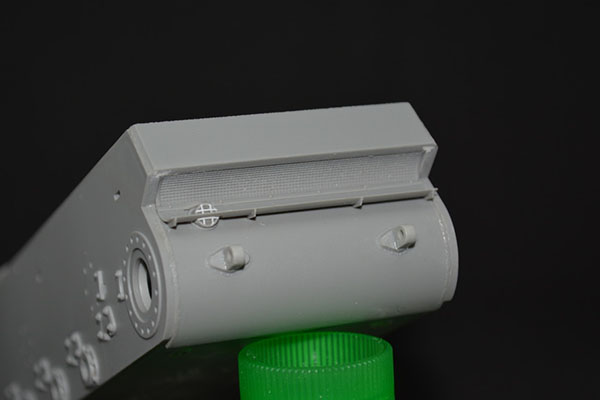
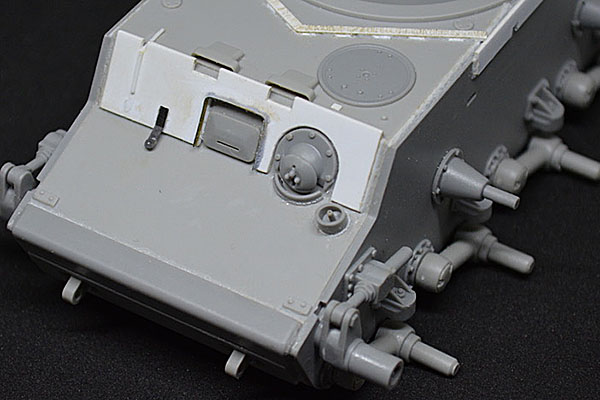
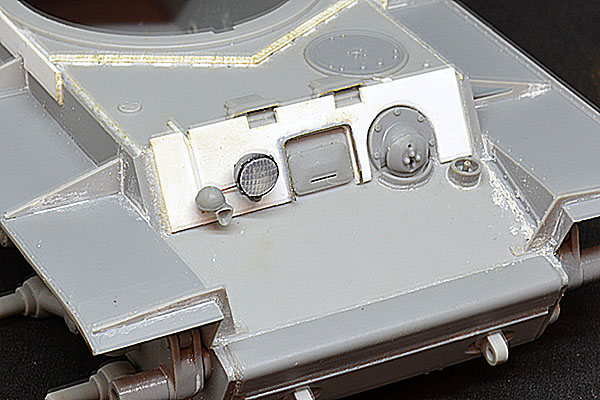
Armor/AFV
For discussions on tanks, artillery, jeeps, etc.
KV-1/KV-1S Hybrid
MrNeil
Visit this Community
New Jersey, United States
Joined: November 01, 2005
KitMaker: 266 posts
Armorama: 262 posts
Posted: Monday, June 24, 2019 - 01:39 PM UTC
The applique armor on the Parfino vehicle has prominent weld beads down each side. I added these from 20-thou styrene rod, softened with liquid cement and textured with the back of my putty knife.

The rain guard over the driver’s visor is visible in the photo of ‘Powerful’ and like the Parfino vehicle, it has extended sides all the way down to the glacis plate, similar to the design seen on KV-8 flamethrower tanks. At first I tried making the guard from thin styrene strip but after several failed attempts where the strip split as I tried to bend the corners, I used 10-thou brass strip instead, which bent far more easily.

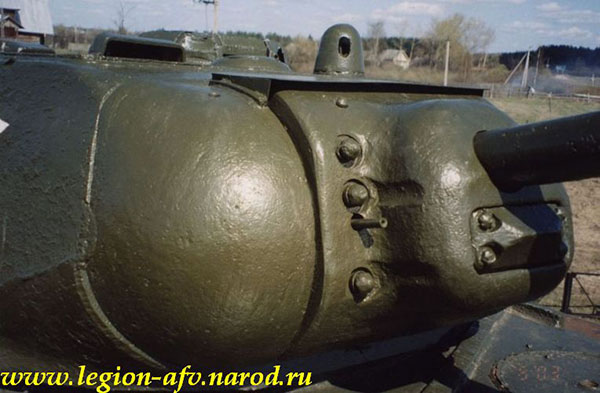
I also added the hull MG shield from the Model 1942 kit and the power conduit for the headlamp and horn from 20-thou rod, with the forward end drilled out so I could add cabling later. The mounting brackets for the headlamp and horn came from Eduard’s TP088 update set.


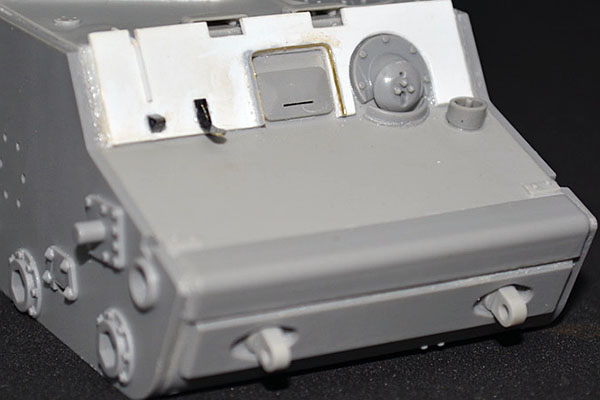
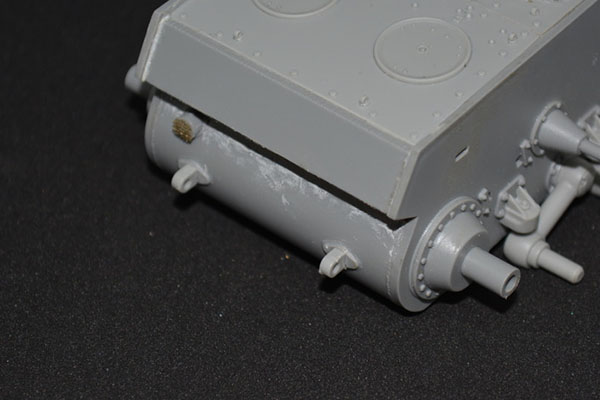
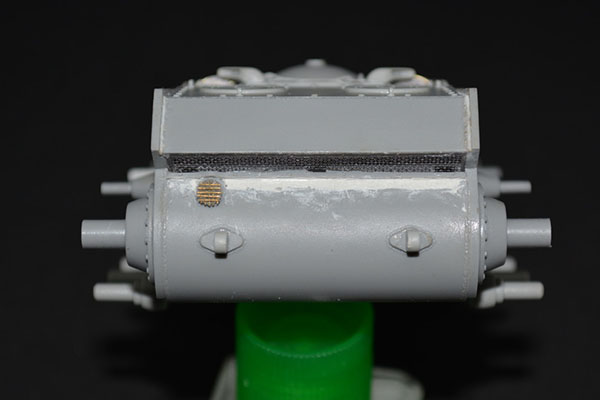
The grey around the edges of the brass strip is Mr Surfacer 1000 which I brushed on to show up any gaps or rough spots from the superglue that I used to attach the brass.

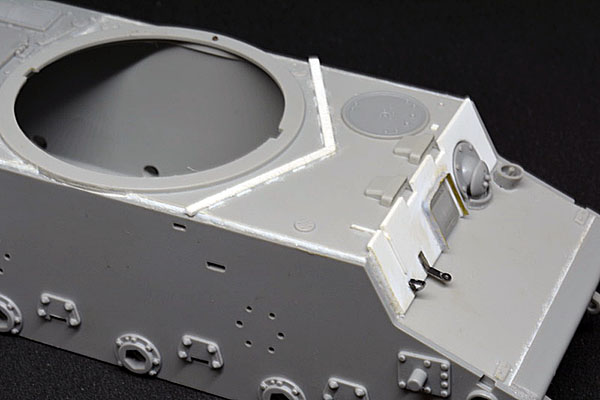
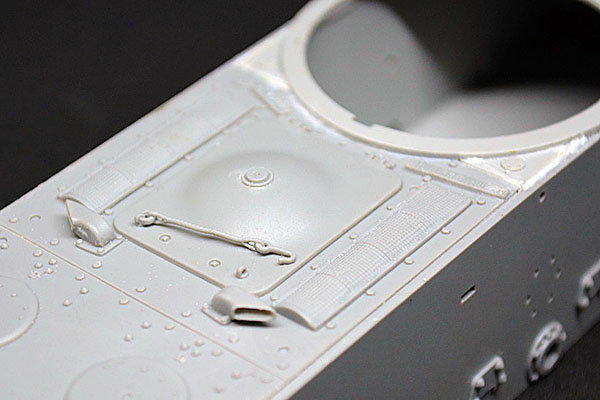
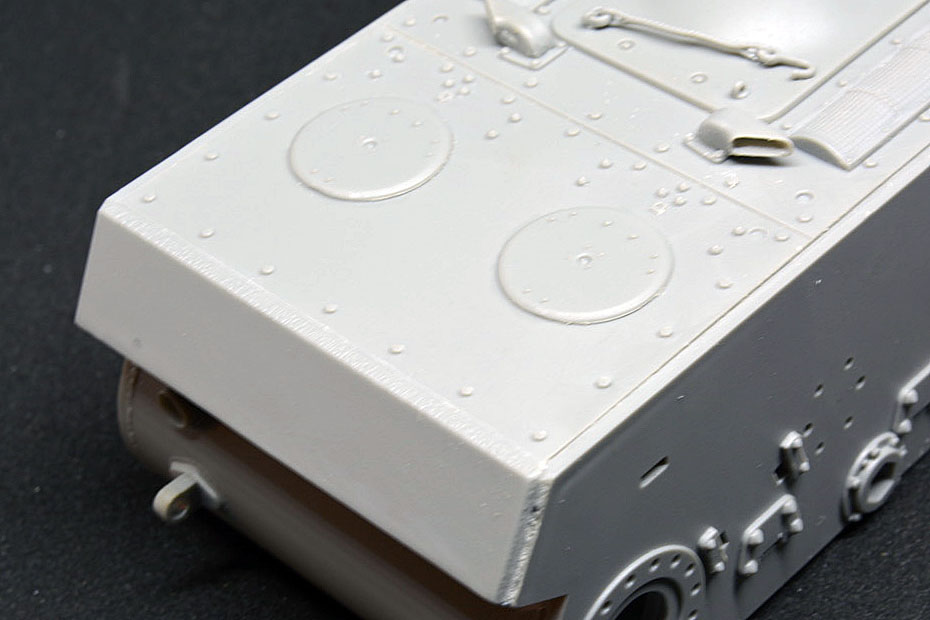
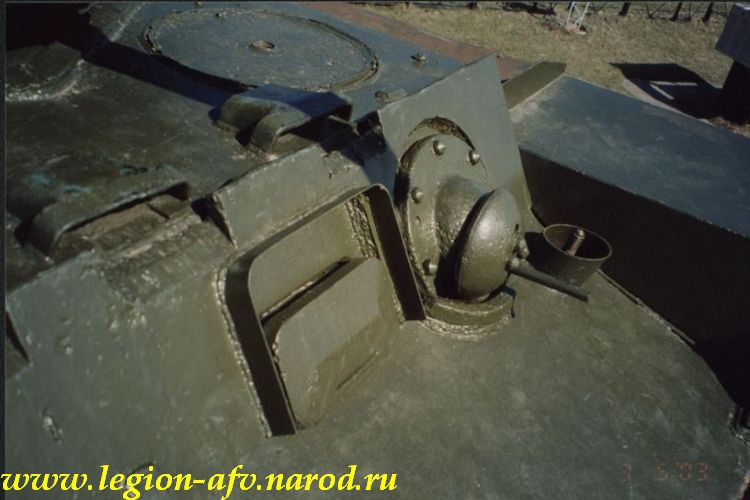
Continuing to work backwards onto the hull top, I added the driver’s periscopes using parts WH4 from the KV-1S kit, the hull hatch using part F9 from the Model 1942 kit, and the little rectangular bump stop forward of the hatch from a small piece of 10-thou styrene, since that component is missing from the KV-1S hull top.

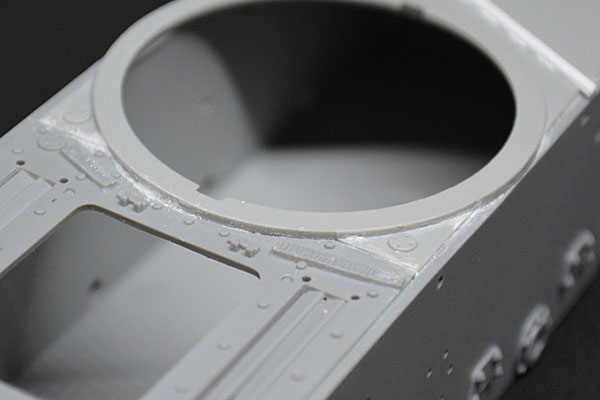
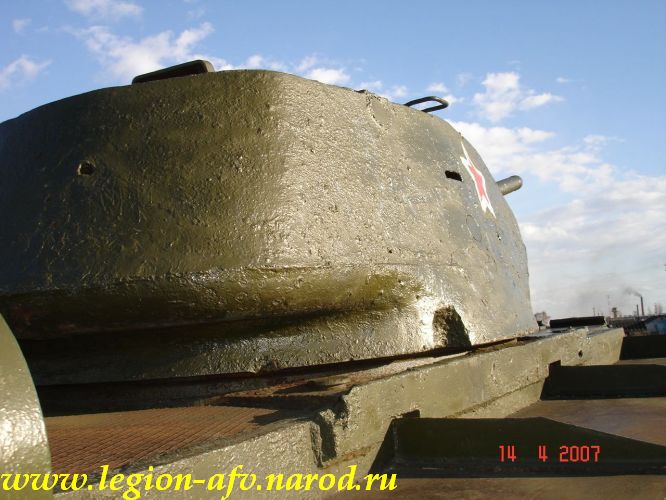
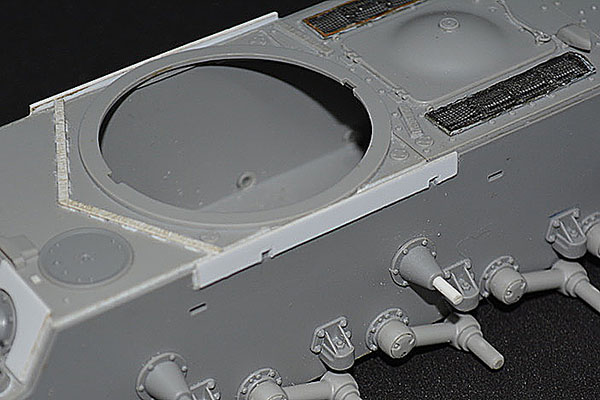
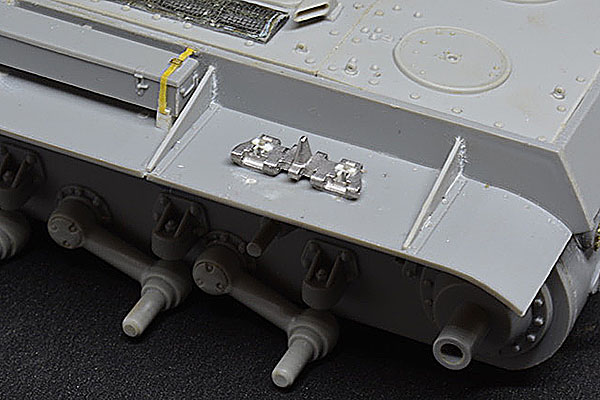
The Parfino vehicle has a chevron-shaped segment of armor on the hull top to protect the turret ring, which is supplied in the Model 1942 kit. Photos of the Parfino vehicle show the armor to be rather shallow compared to the part in the kit and, suspicious, I did a quick test fit of the turret. Sure enough, the tall armor prevented the turret from fully rotating.


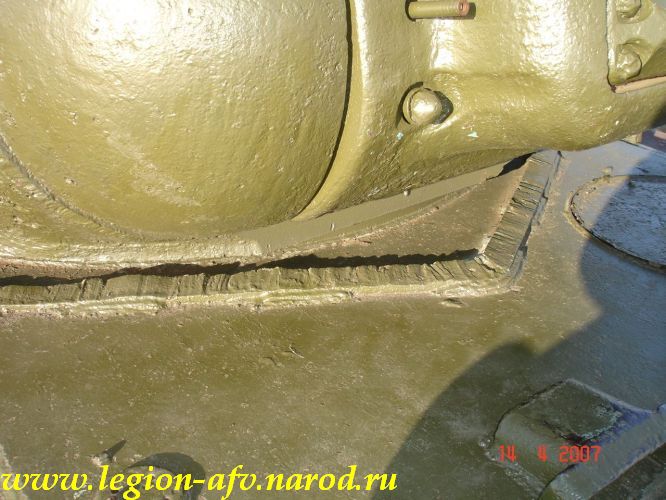
I started out trying to cut the kit part down but I wound up replacing it with 40-thou styrene strip cut to size using the kit part as a template. I added weld beads from 10-thou rod softened and textured as mentioned above, and scored the top of the armor with a hobby knife to represent torch cuts.
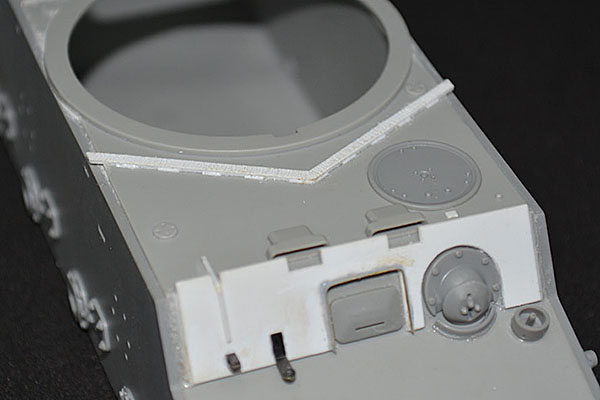
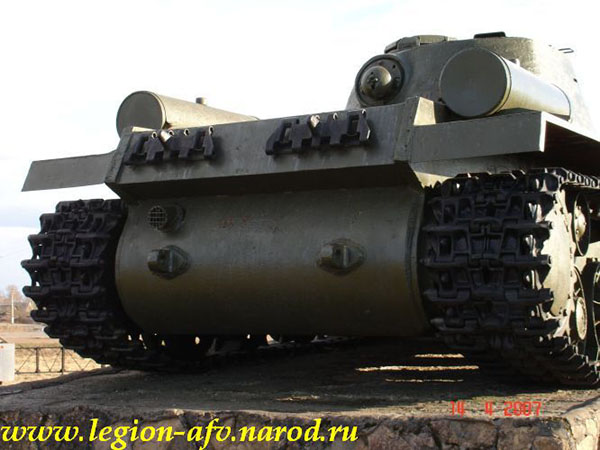
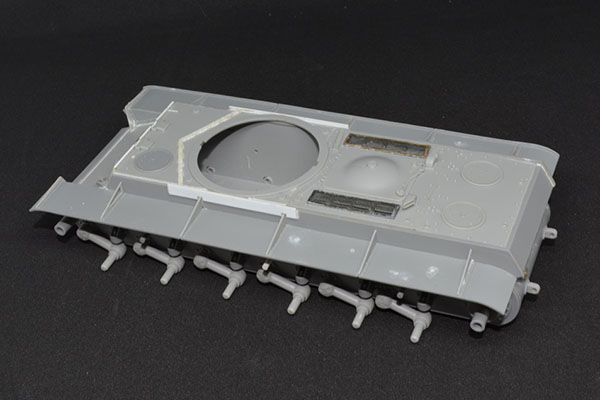


The Parfino vehicle’s engine deck is missing, replaced with heavy sheet metal, but most Model 1942 hulls had applique armor on the forward corners of the engine deck, and the Trumpeter kit provides this armor molded in-situ. Like the forward turret ring armor however, it’s too tall for the KV-1S turret to rotate so I cut it down to match the forward armor.

KurtLaughlin
Visit this Community
Pennsylvania, United States
Joined: January 18, 2003
KitMaker: 2,402 posts
Armorama: 2,377 posts
Posted: Monday, June 24, 2019 - 03:16 PM UTC

Quoted Text

Your hollowed out plastic frames with the Aber mesh came out pretty nice!


Yes they did, and it only took me about an hour to grind out screens, dress the edges with files, and make thelongitudinal supports. The Aber screens were a perfect fit for the kit frames..

KL
UniCue
Visit this Community
Finland
Joined: November 07, 2018
KitMaker: 8 posts
Armorama: 8 posts
Posted: Monday, June 24, 2019 - 06:27 PM UTC
Greetings from Finland!
This project is very interesting and I'll be following it closely as my long term plan is to build the whole KV family in 1/35 scale. Thanks Neil for sharing it to us!
rfbaer
Visit this Community
Texas, United States
Joined: June 12, 2007
KitMaker: 1,866 posts
Armorama: 1,696 posts
Posted: Tuesday, June 25, 2019 - 12:16 AM UTC
I've dug all the extra parts I have, plus one completed kit I never really got a thrill out of, so I'll be following along like.... well, insert your own phrase here.
KVs are nifty too, big square things that were almost as much a Mr Potatohead as Shermans, lots of possibilities.
MrNeil
Visit this Community
New Jersey, United States
Joined: November 01, 2005
KitMaker: 266 posts
Armorama: 262 posts
Posted: Monday, July 01, 2019 - 10:06 AM UTC
Time to get back into this build after a few days off for some surgery.

Most KV-1s exhibit prominent weld beads along the joints between the upper hull sides and the roof. These are missing in the Trumpeter kits, so I added them from 20-thou styrene rod, softened and textured as above. Note that the weld beads end at the joint between the forward hull top and the engine deck, since the engine deck was bolted, not welded in place.


The Trumpeter kits provide molded mesh for the radiator intake screens. My go-to replacement is Eduard’s TP088 set which, despite being labeled ‘early’ by the manufacturer, provides the correct pattern screens with the flattened forward end. However, Kurt Laughlin’s work with hollowing out the kit parts got me thinking, and I realized that I’ve never actually used the kit parts in a KV build. I therefore decided to use them as-is and see how they’d turn out with just careful painting. We’ll see how that turns out

The engine access hatch on most KVs at this time was the domed variant with the built-in inspection port for the cooling system overflow valve. This part is provided in the Model 1942 kit as part F23, though you need to open up the hole for the inspection port (part A18).

The lifting eye on the right-hand side of the hatch needs drilling out. I used a #75 drill bit.

On the retaining cable/hook that secures the hatch to the turret side grab handle when open, the looped ends of the cable are molded solid. I carefully hollowed them out with the tip of a #11 blade.


I used the kit exhausts, though I thinned out the edges a little with a sharp knife.

The photo of ‘Powerful’ does not show the engine deck or transmission cover plate, and the Parfino vehicle has both these plates replaced with sheet metal covers. I therefore made an assumption and used the transmission access hatches from the Model 1942 kit, reasoning that these would likely have been on the KV-1 Model 1942 hulls as delivered.


Moving on to the rear of the hull, I noticed that the rear overhang on the Parfino vehicle is attached between the hull sides, rather than protruding out beyond them as depicted in the Trumpeter kit. This is remarkable in that it would have required a shorter transmission compartment roof plate and other modifications such as a shorter screen beneath the overhang.


Trumpeter’s depiction is accurate since numerous photos of Model 1942 hulls show the overhang as they have engineered it in the kit. It’s possible of course, that the Parfino vehicle’s upper rear plate was replaced during ‘restoration’ of the vehicle. I decided to leave the kit parts as-is.
MrNeil
Visit this Community
New Jersey, United States
Joined: November 01, 2005
KitMaker: 266 posts
Armorama: 262 posts
Posted: Friday, July 05, 2019 - 01:26 AM UTC
I completed the rear hull by adding the mesh screen under the overhang, along with the exhaust deflector plate and tail light. Trumpeter gives you an etched brass part for the deflector plate but I chose to use the styrene part which is simpler and perfectly acceptable once the supports are thinned down a little.

The tail light on the Parfino vehicle has steel rods welded over it to act as a guard - five vertical and five horizontal. Even with the thinnest wire I had, five each way pretty much covered the opening, so I exercised a little modeler's license and used two in each direction, which was a pattern also seen on KV-1s.

The Parfino vehicle has the rear towing eyes welded to the hull, and they lack the little circular weld marks that cover the bolt holes on earlier variants. I sanded the marks away from the kit parts.

I also realized at this point that I’d used the narrower rear towing eyes from the Model 1942 kit, whereas I should have used the wider ones from the KV-1S kit (parts WA9). I replaced them.

MrNeil
Visit this Community
New Jersey, United States
Joined: November 01, 2005
KitMaker: 266 posts
Armorama: 262 posts
Posted: Tuesday, July 09, 2019 - 06:57 AM UTC
Now it was time to turn my attention to the suspension. Both kits provide the late style suspension swing arms, which I added to the hull sides along with the bump stops, sprocket and idler mounts.

Trumpeter’s instructions are vague about the orientation of the caps on the torsion bar ends of the swing arms. In my previous research, I’d always found them to be oriented as shown in the photo below:


However, the Parfino vehicle has them in all kinds of different orientations, and at least one photo of a fall 1942 production KV-1S shows the same. It’s possible that they were using 3-bolt caps with older 6-bolt fittings underneath, which would explain the greater variation in orientations.


Make sure to use the flat-faced end caps from the KV-1S kit (parts WA16). The Parfino vehicle has this type and it’s plausible that ‘Powerful’ did too.

Take care NOT to add the mud scrapers (parts A5 and A6) to the hull sides since you can’t get the sprockets on with these in place.

MaKrueger
Visit this Community
Colorado, United States
Joined: May 23, 2006
KitMaker: 60 posts
Armorama: 60 posts
Posted: Tuesday, July 09, 2019 - 10:28 AM UTC
What a cool project Neil. I love your attention to detail and thanks for taking the time to explain it all. Looking forward to more progress.

BK
MrNeil
Visit this Community
New Jersey, United States
Joined: November 01, 2005
KitMaker: 266 posts
Armorama: 262 posts
Posted: Friday, August 02, 2019 - 06:18 AM UTC
I bet you’ve been wondering what happened to me It took me a while to figure some things out with this build and when I did, it required some revisions.

The rear end of the hull has been bugging me. Why would a museum rebuild a vehicle in such an incorrect fashion, not to mention using (apparently) armor plate? It just didn’t make any sense – and then I had one of those ‘light globe above the head’ moments.


The transmission compartment roof plate on the KV-1S hull was somewhat shorter than that on the KV-1 Model 1942 hull. If the factory used a KV-1S roof plate, there would be a gap that would need to be filled, perhaps by modifying the upper rear hull plate and moving it forward. I did a little measuring and test fitting and sure enough, it was plausible – everything would line up with just the right amount of ‘inset’ for the rear plate.

I therefore set to work rebuilding the rear end. Thankfully my use of glue on the first try had been sparing enough that the rear deck and overhang came off without messing things up too much. I separated the upper rear plate from part xxx in the Model 1942 kit, added the KV-1S engine deck and transmission compartment roof plate, which required trimming away the locating tabs from the insides of the hull sides to get the right slope. I sanded the upper rear plate to reduce the width and glued it in place, then added the weld beads from 20-thou styrene rod, softened and textured in the usual way.


The styrene exhaust air grille would no longer fit correctly on the smaller aperture, and I decided a brass mesh grille would be easier to modify, so I used the part from Eduard set TP088.

I also realized that the Parfino vehicle does not have a rear exhaust air deflector, nor is there any evidence of one having been there, so I decided to remove the deflector from the model and fill the groove beneath it.


You’ll notice the new tail light guard. After I finished the original guard, I found the 6-thou brass wire I knew I had somewhere, so I went back and rebuilt it with the correct 5 vertical and horizontal bars.
MrNeil
Visit this Community
New Jersey, United States
Joined: November 01, 2005
KitMaker: 266 posts
Armorama: 262 posts
Posted: Saturday, August 03, 2019 - 09:45 AM UTC
Using the Eduard mesh part for the exhaust air grille led me to reconsider my previous decision to use Trumpeter’s styrene intake screens. I therefore went back and with a little cussing since it’s been a while since I’ve built a set, constructed the screens from the Eduard TP088 set and attached them.

I managed to break the retaining cable on the engine access hatch and send part of it into orbit, so I had to use the one from the KV-1S kit and hollow out the loops at each end.

MrNeil
Visit this Community
New Jersey, United States
Joined: November 01, 2005
KitMaker: 266 posts
Armorama: 262 posts
Posted: Sunday, August 04, 2019 - 11:51 AM UTC
On the Parfino vehicle, the applique armor on the upper hull sides is the same height as that typically seen on KV-1S hulls to avoid fouling the turret, but is longer, more like that seen on Model 1942 hulls.


I decided to make my own from 30-thou styrene, using photos of the Parfino vehicle as a guide, with the weld beads added from 20-thou rod in the usual way.


You'll notice the white center return roller axle. Somewhere in the handling I managed to break off and lose the original axle, so I drilled out the hub and added a length of 80-thou styrene rod to replace it.

I realized at this point that I’d forgotten to add the weld bead around the base of the antenna guard. I used 10-thou rod for this since photos of the Parfino vehicle show the weld was quite small.


You'll also notice the missing mount for the horn. That was also a handling casualty so I'll need to replace that too.
KurtLaughlin
Visit this Community
Pennsylvania, United States
Joined: January 18, 2003
KitMaker: 2,402 posts
Armorama: 2,377 posts
Posted: Monday, August 05, 2019 - 12:42 PM UTC

Quoted Text

The transmission compartment roof plate on the KV-1S hull was somewhat shorter than that on the KV-1 Model 1942 hull. If the factory used a KV-1S roof plate, there would be a gap that would need to be filled, perhaps by modifying the upper rear hull plate and moving it forward. I did a little measuring and test fitting and sure enough, it was plausible – everything would line up with just the right amount of ‘inset’ for the rear plate.


Weird. That would imply that they got the KV-1S deck plates before they started (or got far along) on building the hull. Otherwise, if the shorter deck plates were a late addition or substitution, one would think that they would make up the difference topside with a strip of plate. Certainly easier than cutting out an existing end plate and moving it forward 25mm or 50mm.

If the hull parts were unwelded attaching the end plate forward a bit would be sensible as that involves the same amount of welding and time as putting it in the normal position, plus you don't need that extra strip.

KL
MrNeil
Visit this Community
New Jersey, United States
Joined: November 01, 2005
KitMaker: 266 posts
Armorama: 262 posts
Posted: Tuesday, August 06, 2019 - 12:37 AM UTC

Quoted Text

If the hull parts were unwelded attaching the end plate forward a bit would be sensible as that involves the same amount of welding and time as putting it in the normal position, plus you don't need that extra strip.

KL


Kurt, that's my thinking. It's possible that the M.1942 hulls that Factory 200 had in inventory and used for these vehicles were incomplete. That's borne out by the presence of certain KV-1S features like the twin driver's periscopes. It's not a 100% certain thing, but it is plausible.
MaKrueger
Visit this Community
Colorado, United States
Joined: May 23, 2006
KitMaker: 60 posts
Armorama: 60 posts
Posted: Tuesday, August 06, 2019 - 08:41 AM UTC
Nice update! Good sleuthing.
MrNeil
Visit this Community
New Jersey, United States
Joined: November 01, 2005
KitMaker: 266 posts
Armorama: 262 posts
Posted: Saturday, August 10, 2019 - 09:02 AM UTC
Now it was time to move on to the fenders. Both kits provide suitable fenders with four attachment bolts for the brackets. I used the fenders from the KV-1 Model 1942 kit because KV-1Ss from the fall of 1942 typically show just the long narrow stowage box on the left-hand fender and a single track link on each.

The Model 1942 fenders have locating holes for the spare track links and stowage box. I filled these holes since I was going to replace the spare track links in the kit with the correct 608mm ones, and since the stowage box would be mounted on wooden blocks rather than directly on the fender.

Model 1942 hulls assembled in the summer of 1942, along with the earliest KV-1S hulls, typically show a mix of open and solid fender brackets, even on the same vehicle. The Parfino vehicle has had its fenders reconstructed from sheet metal so it’s no help. The photo of ‘Powerful’ doesn’t show the brackets so I used a little artistic license and used solid brackets except for a single open bracket.

MrNeil
Visit this Community
New Jersey, United States
Joined: November 01, 2005
KitMaker: 266 posts
Armorama: 262 posts
Posted: Tuesday, November 26, 2019 - 11:09 AM UTC
Thought you'd gotten rid of me, didn't you? No such luck, gentlemen. I took a break from this project to build AFV Club's Korean War Centurion for a review on another site. Nice kit by the way; you should all buy one...preferably two

Anyways, back to the KV-1/KV-1S hybrid. When I stepped away from the model, the hull was almost complete. The next step was to add the long rectangular toolbox to the left-hand fender. Trumpeter depicts the toolbox as sitting on the fender itself, whereas the box was actually mounted on wooden blocks which raised it so that its top was almost flush with the top edge of the hull side.

I added the mounting blocks from 80-thou styrene cut to shape, and their retaining brackets from thinner styrene with a slot carved in the upper edges for the retaining straps. The loops that hold the inner ends of the straps were bent up from 6-thou brass wire.

The retaining straps themselves are from Tamiya masking tape and the buckles came from a photo-etch set I had in the spares box. The buckles were a little thick so I filed them down slightly.

rfbaer
Visit this Community
Texas, United States
Joined: June 12, 2007
KitMaker: 1,866 posts
Armorama: 1,696 posts
Posted: Wednesday, November 27, 2019 - 09:15 AM UTC
Good to see it still working, I was stalled in my quest for scavenged parts, didn't know what to dig out of the spares boxes.
MrNeil
Visit this Community
New Jersey, United States
Joined: November 01, 2005
KitMaker: 266 posts
Armorama: 262 posts
Posted: Thursday, November 28, 2019 - 04:15 AM UTC
Next up, I added the spare tracks to the rear fenders. In the fall of 1942, the KV-1S had a single track link mounted in the center of the rear fender section on each side.

Trumpeter's spare track links depict the 700mm track, whereas the KV-1S initially used a 608mm track with distinctive 'triangular' ends, similar in appearance to Pz.III/IV tracks. These were soon replaced by 650mm track in the late fall of 1942, but the Parfino vehicle has the 608mm tracks and I wanted to show this type on the model.

Masterclub provides the 608mm track in their set MTL35030 KV-1s Early. I took two toothed links from that set and glued them to the fenders.

On the real vehicle, the spare track mounts are U-shaped brackets with the base welded to the fender, and a T-shaped bolt sandwiched between the upright sections, able to pivot freely. The track is placed over the brackets and held in place with a retaining plate and a bolt. I made the brackets from styrene strip with bolts from Grandt Line.

MrNeil
Visit this Community
New Jersey, United States
Joined: November 01, 2005
KitMaker: 266 posts
Armorama: 262 posts
Posted: Friday, November 29, 2019 - 08:02 AM UTC
Today's eye-crossing episode involved dealing with the horn and headlamp. I used the kit parts on Eduard mounting brackets.

I added power cables from some copper armature wire taken from a very dead electric motor I found abandoned on the roadside a while ago. Always keep your eyes open when walking your dogs


Prior to fixing the headlamp in place, I painted the reflector on the interior, added the clear lens and masked it carefully covering it with white glue.
TopSmith
Visit this Community
Washington, United States
Joined: August 09, 2002
KitMaker: 1,742 posts
Armorama: 1,658 posts
Posted: Sunday, December 01, 2019 - 03:14 AM UTC
This build is a good example of why good references are important for an accurate build. Good work!
MrNeil
Visit this Community
New Jersey, United States
Joined: November 01, 2005
KitMaker: 266 posts
Armorama: 262 posts
Posted: Sunday, December 01, 2019 - 06:18 AM UTC
Now we come to the running gear. There were a lot of changes with regard to KV road wheels in the fall of 1942. As part of the effort to lighten the vehicle, new cast road wheels with six spokes and ligtening holes, identified by the drawing number 33-65, were introduced and fitted to the initial batch of KV-1S vehicles. They were 35kg lighter than the previous 33-803 wheels, and saved 420kg from the tank's overall weight.

However, the 33-65 wheels were difficult to manufacture and production problems meant that some vehicles in August and September 1942 were fitted with the 33-803 wheels.

A new design with eight spokes and lightening holes, designated 833-16, was introduced in late August. This wheel was even lighter at 125kg, but numerous road wheel failures were reported in September. The 833-16 wheels lasted barely a month before they were replaced by the very similar 33-67 wheel in early November.

The KV-1/KV-1S hybrid vehicles were build in October and would likely have received 833-16 wheels at the factory. The Parfino vehicle has a mix of 833-16 and 33-67 wheels, though the 33-67s were probably fitted as replacements.


As you can see, the difference is very slight. The 33-67 wheels have the small reinforcing ribs set slightly inward from the corners of the triangular lightening holes, whereas the earlier 833-16 wheels have the ribs right on the corners.

As far as I can determine, no manufacturer currently does the 833-16 wheels in styrene or resin, but Trumpeter provides the 33-67 wheels in their KV-8S Welded Turret kit (01568). Once the wheels are covered in dirt and mud, there's very little to tell between the two types, so I decided to use those wheels. There are photos of KV-8S vehicles with 33-65 wheels which are available from Panzer Art, so I wasn't sacrificing a complete kit there.


I used the KV-1S sprockets, idlers and return rollers straight from the kit since they match those seen on the Parfino example.
Removed by original poster on 12/01/19 - 19:51:45 (GMT).
MrNeil
Visit this Community
New Jersey, United States
Joined: November 01, 2005
KitMaker: 266 posts
Armorama: 262 posts
Posted: Sunday, December 01, 2019 - 07:52 AM UTC

Quoted Text

This build is a good example of why good references are important for an accurate build. Good work!


Thanks Top! Got a ways to go yet.
MrNeil
Visit this Community
New Jersey, United States
Joined: November 01, 2005
KitMaker: 266 posts
Armorama: 262 posts
Posted: Monday, December 02, 2019 - 01:44 PM UTC
Now it was time to move on to the turret.

Trumpeter provides the KV-1 turret in left and right halves, which leaves a seam in the center of the roof immediately aft of the mantlet, and another seam down the rear of the turret. I filled these with putty and sanded them smooth.

The trunnion 'cheeks' either side of the mantlet do not fit the turret shell well, leaving a distinct step at the upper front corners. I could not find any photos of a turret that looked this way; all my references show a smooth contour between the main turret casting and the cheek castings, like that shown in the photo of the Parfino vehicle below.


I corrected the contours at each upper front corner by sanding and filling until I was satisfied with the result. This messed up the cast texture on the kit parts, but I planned to fix that later.

There were at least two different patterns for the casting seams on KV-1S turret. The Parfino vehicle displays a different pattern to that depicted in the Trumpeter kit. I carved away the casting seams on the turret shell and recreated them using styrene rod, sanded down and textured with liquid cement in a technique similar to that which I used for weld seams.

I carved away the bases for the lifting hooks since these were not fitted to KV-1S turrets until early 1943.

I also filled the holes for the handrails. While the KV-1S prototypes had handrails on the turrets, they were not fitted to production vehicles until December 1942.


I then recreated the cast texture on the turret by stippling Mr Surfacer 500 over the entire surface and lightly sanding it. No need to be too careful here since the castings on the real thing were very rough.

KurtLaughlin
Visit this Community
Pennsylvania, United States
Joined: January 18, 2003
KitMaker: 2,402 posts
Armorama: 2,377 posts
Posted: Tuesday, December 03, 2019 - 02:43 PM UTC

Quoted Text

Now we come to the running gear.


You lost me here Neil. You say Trumpeter's KV-8S has the 33-68 wheel, but you don't mention that in the preceding text. Is that a typo for 33-65 or 33-67?

Also, in your photo of the three wheels, can you please list the part numbers of the wheels from left to right?

Thx,
KL