

Armor/AFV
For discussions on tanks, artillery, jeeps, etc.
For discussions on tanks, artillery, jeeps, etc.
Hosted by Darren Baker, Mario Matijasic
KV-1/KV-1S Hybrid

MrNeil

Joined: November 01, 2005
KitMaker: 266 posts
Armorama: 262 posts
Posted: Tuesday, February 11, 2020 - 11:55 PM UTC
Thanks for the compliments guys. Glad you're enjoying the build. Many thanks Boris for the pics. I hadn't seen that page before.

Borris

Joined: October 03, 2019
KitMaker: 2 posts
Armorama: 2 posts
Posted: Wednesday, February 12, 2020 - 01:17 AM UTC
Glad to help.
KV is one of my favorite tanks.
Another nice photoset with good photos of turret of KV-1S. Note to casting number on the turret.
https://warspot.ru/9725-kv-1s-iz-bolot-volhovskogo-fronta
KV is one of my favorite tanks.
Another nice photoset with good photos of turret of KV-1S. Note to casting number on the turret.
https://warspot.ru/9725-kv-1s-iz-bolot-volhovskogo-fronta
MrNeil
Joined: November 01, 2005
KitMaker: 266 posts
Armorama: 262 posts
Posted: Wednesday, February 12, 2020 - 10:48 AM UTC
Matt, my initial intent was to do just what you suggested...combine parts from multiple kits with some aftermarket parts, and produce an accurate model of the hybrid. However, the more I looked at pictures of the Parfino vehicle...and the more discussions I had over on the KV group on Facebook...the more problems I found with the Trumpeter kits, particularly the turret. So AMS set in, and the scratchbuilding started 
Boris, the casting number indicates a December 1942 turret, number 582 in the series, which is consistent with the presence of handrails but the absence of lifting hooks. The handrails reappeared (they were on the prototype but not the early production vehicles) in early December, but the lifting hooks didn't appear until March 1943.
Boris, the casting number indicates a December 1942 turret, number 582 in the series, which is consistent with the presence of handrails but the absence of lifting hooks. The handrails reappeared (they were on the prototype but not the early production vehicles) in early December, but the lifting hooks didn't appear until March 1943.
MrNeil
Joined: November 01, 2005
KitMaker: 266 posts
Armorama: 262 posts
Posted: Saturday, February 15, 2020 - 12:29 PM UTC
The final missing detail that I added was the travel limiter or 'bump stop' under the rear-facing turret machine gun, which was presumably there to stop the crew from hitting their own engine deck. While a round would have likely skipped off the armor, it was possible that it might hit the radiator intake mesh and deflect downwards into the radiator itself.

Now...I think ...the model is ready for paint.
Now...I think
...the model is ready for paint.MrNeil
Joined: November 01, 2005
KitMaker: 266 posts
Armorama: 262 posts
Posted: Sunday, February 16, 2020 - 09:47 AM UTC
Paint time
I gave the entire model a coat of Vallejo's grey primer, then hit the undersurfaces, everything below the fenders, along with the crevices and the edges of every panel and hatch with Vallejo Black Green.
I then went to work with AK Interactive's 4BO Russian Green Special Modulation set, starting with the Dark Base, then the Base, Highlight and Shine, keeping the Highlight and Shine only to the top of the turret.
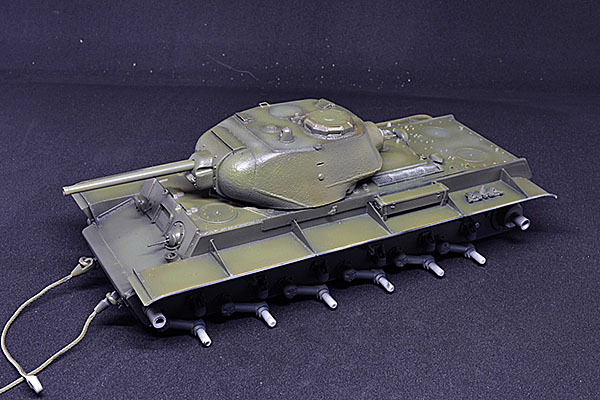
I didn't clean the airbrush between colors with this approach, just added small amounts of the next lighter color to gradually lighten the tone, building up highlights and depth at the same time.
Everything below the mid-point of the turret sides will soon get a coat of whitewash, so there's no point in going all out with modulation on the hull.
I gave the entire model a coat of Vallejo's grey primer, then hit the undersurfaces, everything below the fenders, along with the crevices and the edges of every panel and hatch with Vallejo Black Green.
I then went to work with AK Interactive's 4BO Russian Green Special Modulation set, starting with the Dark Base, then the Base, Highlight and Shine, keeping the Highlight and Shine only to the top of the turret.
I didn't clean the airbrush between colors with this approach, just added small amounts of the next lighter color to gradually lighten the tone, building up highlights and depth at the same time.
Everything below the mid-point of the turret sides will soon get a coat of whitewash, so there's no point in going all out with modulation on the hull.

pgb3476
Joined: March 11, 2007
KitMaker: 977 posts
Armorama: 976 posts

Posted: Sunday, February 16, 2020 - 11:09 AM UTC
Looking great so far.
MrNeil
Joined: November 01, 2005
KitMaker: 266 posts
Armorama: 262 posts
Posted: Monday, February 17, 2020 - 01:10 PM UTC
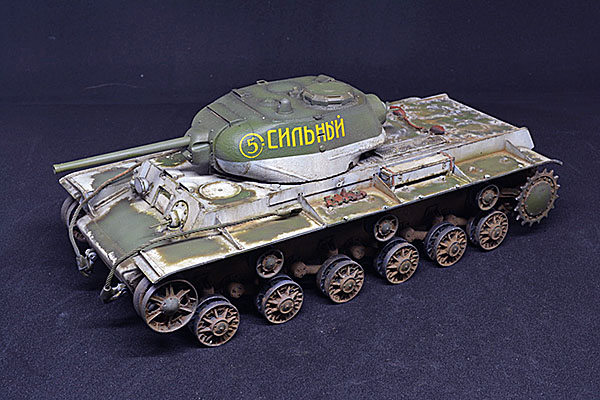
Next up, I added the decals to each side of the turret using Armo's KV Family Part 2 set (35409) which includes markings for 'Strong'.
Armo's instructions depict the markings as lower and further rearward on the turret side than indicated in the photo I posted at the start of this thread. I went with the position in the photo.
I've had this decal set for at least ten years, but the decals released from the backing sheet with absolutely no problems. The carrier film is extremely thin and must be handled with great care, but I got the markings into place without any serious drama.
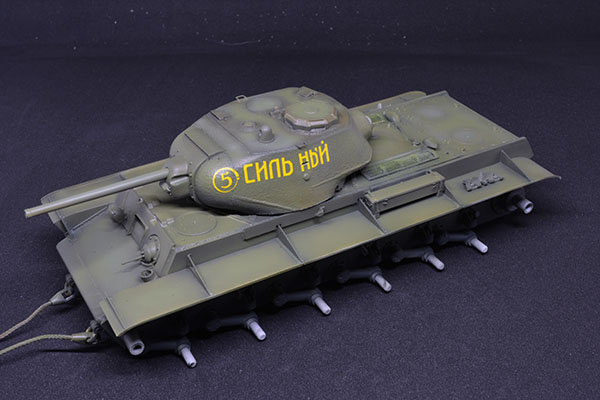
After allowing the decals to set, I carefully cut away the carrier film over the vision ports using a sharp #11 blade, and hit the decals with Gunze Sangyo's Mr Mark Softer.
After allowing everything to dry thoroughly, I sealed the markings in place with AK Ultra Matte Varnish, diluted 50/50 with isopropyl alcohol. If you've never used AK Ultra Matte, do yourself a favor and try it. You can airbrush it as I did, or add a couple drops to your paint to flatten the finish right out.
Armo's instructions depict the markings as lower and further rearward on the turret side than indicated in the photo I posted at the start of this thread. I went with the position in the photo.
I've had this decal set for at least ten years, but the decals released from the backing sheet with absolutely no problems. The carrier film is extremely thin and must be handled with great care, but I got the markings into place without any serious drama.
After allowing the decals to set, I carefully cut away the carrier film over the vision ports using a sharp #11 blade, and hit the decals with Gunze Sangyo's Mr Mark Softer.
After allowing everything to dry thoroughly, I sealed the markings in place with AK Ultra Matte Varnish, diluted 50/50 with isopropyl alcohol. If you've never used AK Ultra Matte, do yourself a favor and try it. You can airbrush it as I did, or add a couple drops to your paint to flatten the finish right out.
bill_c
Joined: January 09, 2008
KitMaker: 10,553 posts
Armorama: 8,109 posts
Posted: Tuesday, February 18, 2020 - 03:47 AM UTC
Superior work from a master modeler. Thanks, Neil, for sharing, this will make a super feature when finished. 
MrNeil
Joined: November 01, 2005
KitMaker: 266 posts
Armorama: 262 posts
Posted: Wednesday, February 19, 2020 - 01:44 AM UTC
The more observant of you might have noticed the larger gap in the middle of the word СИЛЬНЫЙ on the left side of the turret. If you did, you're more observant than I was, since I didn't realize the decal had separated and I'd moved the forward section too far forward, until after it was set and I'd sealed it with varnish.
Basically, I screwed up I have a replacement set of decals on the way from Poland so I can fix the problem. More on that when the decals arrive.
In the meantime, I'll get to work on the snow camo, mud and crud for the hull and running gear.
Basically, I screwed up
I have a replacement set of decals on the way from Poland so I can fix the problem. More on that when the decals arrive.In the meantime, I'll get to work on the snow camo, mud and crud for the hull and running gear.
Lada_Niva

Joined: October 06, 2019
KitMaker: 177 posts
Armorama: 97 posts
Posted: Wednesday, February 19, 2020 - 04:09 AM UTC
I have red the first page off this post.
And I must say, that you are using some highly advanced techniques.
At least to my modelling experiences.
Nice to see that you are so knowledgeable about your subject.
Where do you get all that information from?
And how did you master such advanced and technical skills?
I'm interested. But don't have enough time to read the whole post thrue.
Have a good day.
MrNeil
Joined: November 01, 2005
KitMaker: 266 posts
Armorama: 262 posts
Posted: Thursday, February 20, 2020 - 03:40 AM UTC
I've learned quite a lot about the KV series over the years, much of it from research in 2006 thru 2010 when I wrote my first book on the subject, 'KV Technical History and Variants' published by AirConnection. Since then I've kept adding to the research and putting it on my website www.4bogreen.com.
I also learned a lot more recently about the KV-1S from the Facebook group 'Kliment Voroshilov. KV series of tanks Appreciation Society' and from Peter Samsonov's blogs here.
As for techniques, I've been building models for over 40 years and I like to experiment with new techniques and ways to solve problems in my projects. Not all of those experiments work, but if someting fails, I try something else and practice until I get it right. There are lots of great modelers here, at clubs, at conventions etc., to learn from and share ideas.
MrNeil
Joined: November 01, 2005
KitMaker: 266 posts
Armorama: 262 posts
Posted: Thursday, February 27, 2020 - 11:21 AM UTC
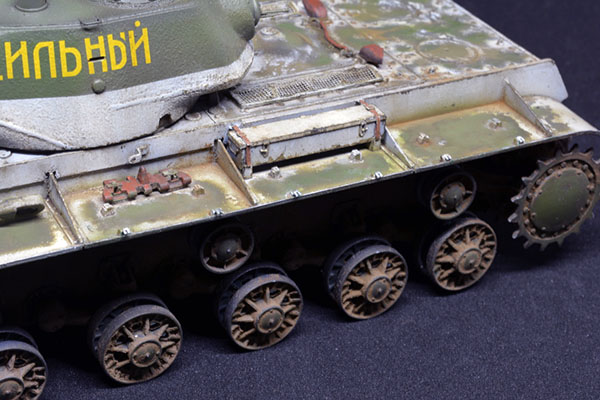
Continuing with the model after an enforced absence due to a business trip, I went to work on the lower hull and running gear to add some winter mud and crud.
I used Vallejo's Raw Umber Pigment fixed in place with their pigment binder. This was simply what I had to hand, so you can use anybody else's pigments and binder, or make up your own mud mix from your favorite source.
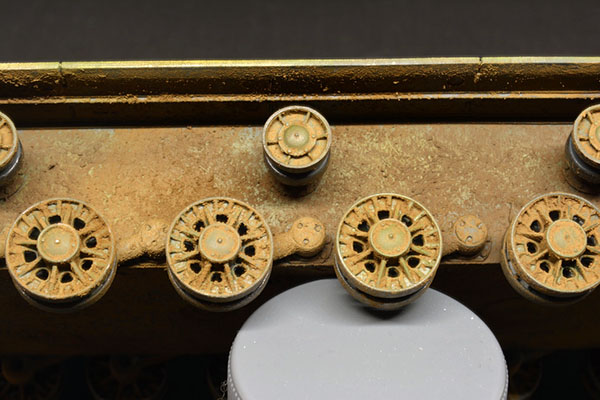
I'll probably add some different shades to break up the monotone, and a little snow too, once I get the tracks on, but this will do for now.
I used Vallejo's Raw Umber Pigment fixed in place with their pigment binder. This was simply what I had to hand, so you can use anybody else's pigments and binder, or make up your own mud mix from your favorite source.
I'll probably add some different shades to break up the monotone, and a little snow too, once I get the tracks on, but this will do for now.
MrNeil
Joined: November 01, 2005
KitMaker: 266 posts
Armorama: 262 posts
Posted: Monday, March 02, 2020 - 11:54 AM UTC
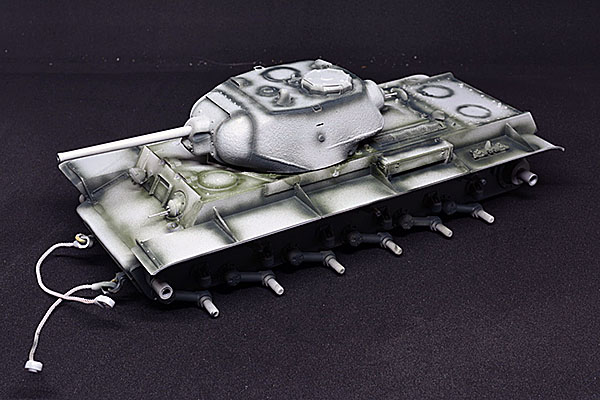
Now it was time to get to work with the snow camouflage. My usual technique here is to base coat with white and then add chips and scratches. I've found I get better control that way, rather than trying build up the white camo gradually.
I airbrushed several thin patchy coats of Vallejo Model Air White over the entire upper hull and fenders, and the lower front and rear hull.
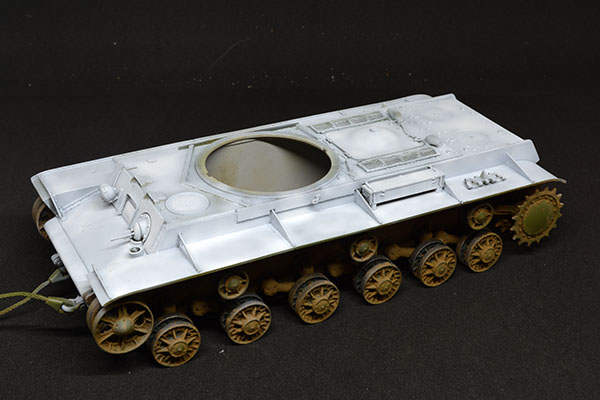
Next will come a bunch of drybrushing along edges and areas of high wear, and creating scratches and chips with a scourer pad dipped in green paint. I plan to use the photograph of the original vehicle as a guide to do the hull front, and then use artistic license to provide a similar amount of wear and tear on the rest of the hull and turret.
Watch this space...
I airbrushed several thin patchy coats of Vallejo Model Air White over the entire upper hull and fenders, and the lower front and rear hull.
Next will come a bunch of drybrushing along edges and areas of high wear, and creating scratches and chips with a scourer pad dipped in green paint. I plan to use the photograph of the original vehicle as a guide to do the hull front, and then use artistic license to provide a similar amount of wear and tear on the rest of the hull and turret.
Watch this space...
MrNeil
Joined: November 01, 2005
KitMaker: 266 posts
Armorama: 262 posts
Posted: Sunday, March 08, 2020 - 12:04 PM UTC
Now it was time to start adding wear and tear. For the horizontal surfaces where the crew and tank-riding infantry would put some serious strain on the snow camo, I decided to add wear just like on the original.
I had already sealed the green with a coat of matt varnish prior to applying the white camo, so I now went back with a damp Q-tip and began rubbing at the white on areas like the glacis plate, fenders, engine deck and forward hull top near the hatch, which would have gotten some heavy foot traffic. I also dug out a fiberglass brush which I've had for years but never found a use for, until now, and wore at the white with that too, until I got an effect I liked.
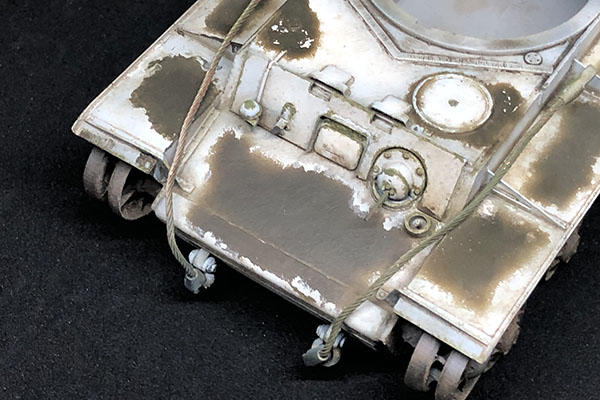
I added some additional wear along edges and vertical surfaces by dry brushing with dark green.
The process isn't yet complete, but I'll give it a day or two and then go back and add some more effects until I'm satisfied with how it looks.
I had already sealed the green with a coat of matt varnish prior to applying the white camo, so I now went back with a damp Q-tip and began rubbing at the white on areas like the glacis plate, fenders, engine deck and forward hull top near the hatch, which would have gotten some heavy foot traffic. I also dug out a fiberglass brush which I've had for years but never found a use for, until now, and wore at the white with that too, until I got an effect I liked.
I added some additional wear along edges and vertical surfaces by dry brushing with dark green.
The process isn't yet complete, but I'll give it a day or two and then go back and add some more effects until I'm satisfied with how it looks.
MrNeil
Joined: November 01, 2005
KitMaker: 266 posts
Armorama: 262 posts
Posted: Friday, March 13, 2020 - 10:37 AM UTC
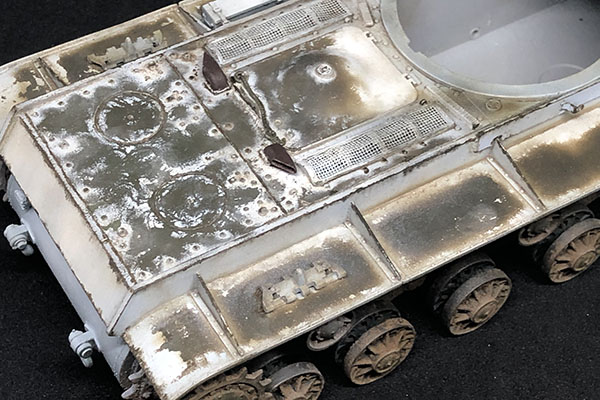
I used a variety of raw umber oil washes, pin washes, dry brushing with dark green, and small amounts of raw umber pigments to gradually build up dirt, wear and grime on the hull and turret.


It's more of an art than a science at this point. I just kept messing with various combinations of effects until I was happy with the result. The trick is knowing when to stop
It's more of an art than a science at this point. I just kept messing with various combinations of effects until I was happy with the result. The trick is knowing when to stop

phil2015
Joined: July 27, 2015
KitMaker: 502 posts
Armorama: 325 posts
Posted: Sunday, March 29, 2020 - 07:21 AM UTC
This is a great thread! I've learned so much from watching your build.
I'm curious about the screen beneath the overhang. I posted a question about this in the build review for the Bronco KV-85 which I'm also building right now. I don't have good reference material, so am relying on pictures of real vehicles online and builds of plastic kits. It looks like most of the KVs I've looked at, have the screen as attached to the back of the overhang but then curving down to meet the top of the curved metal exhaust shield. But I notice on the photos Borris posted that there is no screen, just a piece of metal covering the overhang. On that vehicle was that done just because it's now a display vehicle? Are those screens usually curved, or do they go straight across?
Thanks,
Phil

Petro
Joined: November 02, 2003
KitMaker: 984 posts
Armorama: 846 posts
Posted: Sunday, March 29, 2020 - 11:25 AM UTC
I have noticed that too Phil, with the bent mesh in the rear.
I have been wathcing this thread for the start, just finally commenting.
This thread has been an inspiration for lots of us.
I have been wathcing this thread for the start, just finally commenting.
This thread has been an inspiration for lots of us.
MrNeil
Joined: November 01, 2005
KitMaker: 266 posts
Armorama: 262 posts
Posted: Saturday, April 18, 2020 - 11:57 AM UTC
After another hiatus from this build to do a Takom King Tiger review for the AMPS website, I'm coming back to it. Apologies for not noticing and replying sooner to the comments about the rear hull overhang and the screen.
The mesh screen under the overhang was fitted to all production KVs. This opening was the outlet for the cooling air that circulated through the engine and transmission compartments, so it makes no sense that would it be plated over. You do see that on a few museum examples, but of course they're not in running condition.
The mesh screen under the overhang was fitted to all production KVs. This opening was the outlet for the cooling air that circulated through the engine and transmission compartments, so it makes no sense that would it be plated over. You do see that on a few museum examples, but of course they're not in running condition.
MrNeil
Joined: November 01, 2005
KitMaker: 266 posts
Armorama: 262 posts
Posted: Saturday, April 18, 2020 - 12:09 PM UTC
After some discussion over on the KV Facebook group, I realized that I needed to add external fuel tanks on the fenders. I'd been hoping to get away without doing so, since the hybrid vehicles were built in October 1942, the same month as the external fuel tanks appeared. However, the hybrids were completed late in the month and the tanks were introduced on Oct 9, so I had to include them for accuracy.
I didn't want to cover up all the work I'd done to weather the snow camoflage on the fenders however, so I decided just to add the mounting brackets, not the straps and tanks. This would be plausible since the tanks were normally fitted for road marches but frequently removed before going into action.
To ensure I got the spacing and alignment correct, I made myself a jig from thin styrene. Slipping that between the fender brackets and against the outer lip of the fender, I was able to correctly align the inner upright portions of each bracket.
I then removed the jig, leaving the bracket sections in place.
I then added the center and outer upright section of each bracket.

The brackets look a little thick right now, but I'll sand them down to achieve a more scale appearance. I experimented with 5-thou styrene but they were two flimsy so I switched to 10-thou styrene which is stronger. Sanding the edges carefully will reduce the thickness and give the right appearance.
You'll also note the bare plastic on the center of each fender section. When the external fuel tanks were introduced, the spare track links and their mounts were moved forward, alongside the turret. I'll repaint those sections after I finish adding the fuel tank mounting brackets.
I didn't want to cover up all the work I'd done to weather the snow camoflage on the fenders however, so I decided just to add the mounting brackets, not the straps and tanks. This would be plausible since the tanks were normally fitted for road marches but frequently removed before going into action.
To ensure I got the spacing and alignment correct, I made myself a jig from thin styrene. Slipping that between the fender brackets and against the outer lip of the fender, I was able to correctly align the inner upright portions of each bracket.
I then removed the jig, leaving the bracket sections in place.
I then added the center and outer upright section of each bracket.
The brackets look a little thick right now, but I'll sand them down to achieve a more scale appearance. I experimented with 5-thou styrene but they were two flimsy so I switched to 10-thou styrene which is stronger. Sanding the edges carefully will reduce the thickness and give the right appearance.
You'll also note the bare plastic on the center of each fender section. When the external fuel tanks were introduced, the spare track links and their mounts were moved forward, alongside the turret. I'll repaint those sections after I finish adding the fuel tank mounting brackets.
MrNeil
Joined: November 01, 2005
KitMaker: 266 posts
Armorama: 262 posts
Posted: Wednesday, April 22, 2020 - 10:05 AM UTC
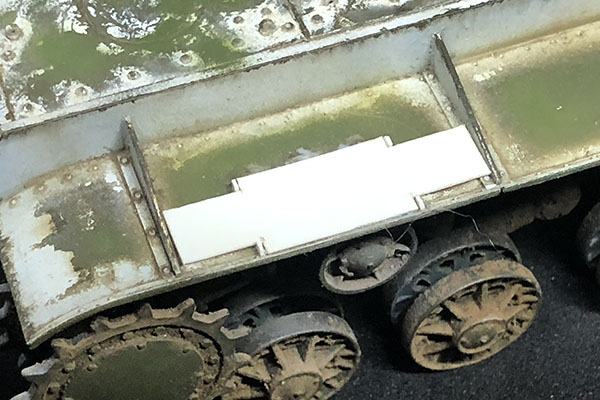
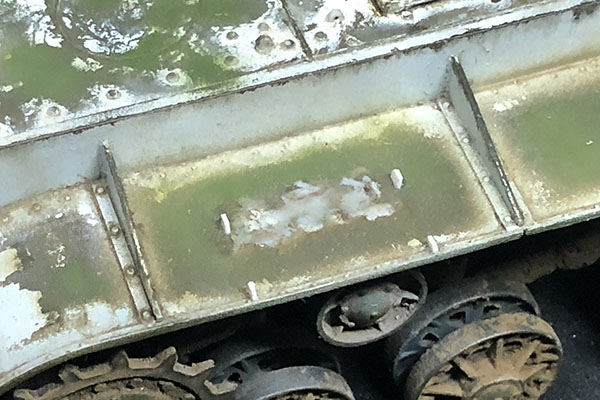
Further work on the external fuel tank brackets. The bases are now in place, ready for the upper horizontal sections to go on.
The spare track links were relocated when the external fuel tanks were added, so I carefully detached them and moved them forward alongside the turret.
As you can see, some touch-up work is going to be needed on the fenders
The spare track links were relocated when the external fuel tanks were added, so I carefully detached them and moved them forward alongside the turret.
As you can see, some touch-up work is going to be needed on the fenders
Pongo_Arm

Joined: January 27, 2017
KitMaker: 147 posts
Armorama: 147 posts
Posted: Wednesday, April 22, 2020 - 10:43 AM UTC
Fantastic build, so...time to do an IS series book now?
MrNeil
Joined: November 01, 2005
KitMaker: 266 posts
Armorama: 262 posts
Posted: Wednesday, April 22, 2020 - 10:50 AM UTC
Quoted Text
Fantastic build, so...time to do an IS series book now?
Thank you
And I did start an IS book years ago but had to put it on hold due to lack of time and the need to go to Europe for research and photography...which was an issue of time and expense. One day I hope to wake that project up again.
Pongo_Arm
Joined: January 27, 2017
KitMaker: 147 posts
Armorama: 147 posts
Posted: Wednesday, April 22, 2020 - 11:27 AM UTC
Well your KV book is one of my favorites, hope you can do it some day.
MrNeil
Joined: November 01, 2005
KitMaker: 266 posts
Armorama: 262 posts
Posted: Monday, April 27, 2020 - 11:22 AM UTC
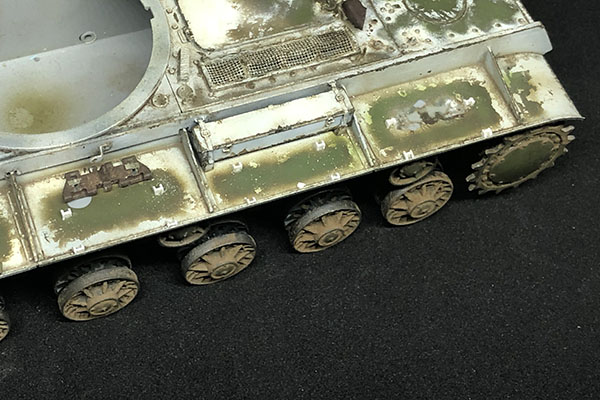
Once the bases for the fuel tank brackets were in place and I'd cleaned up the edges a little, I added the top sections from 1mm x 1.5mm rectangles of 10-thou styrene. The inner ones have a hole in the center, drilled with a #79 drill. Why #79, you ask? Because I broke my #80 drill bit and the LHS is closed because of the pandemic.
I drilled the same diameter hole in the outer brackets but carefully opened up one end into a slot with the tip of a #11 blade.
Now for some paint...
I drilled the same diameter hole in the outer brackets but carefully opened up one end into a slot with the tip of a #11 blade.
Now for some paint...
MrNeil
Joined: November 01, 2005
KitMaker: 266 posts
Armorama: 262 posts
Posted: Saturday, May 02, 2020 - 12:14 PM UTC
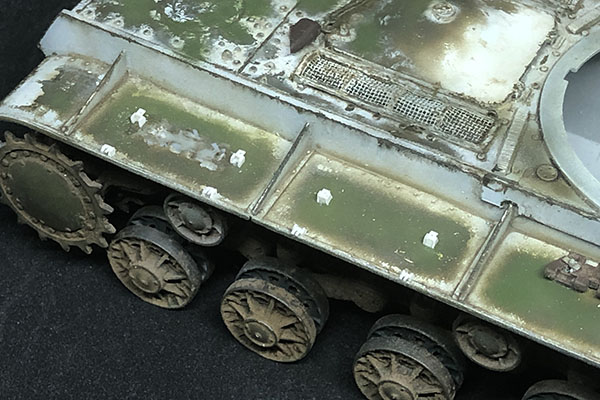
I airbrushed the fuel tank mounting brackets and the surrounding areas on the fenders with a mix of the Dark Base and Base colors from Ammo by Mig's Russian 4BO Modulation set.
After letting the paint dry overnight, I stippled Vallejo Model Color White onto the brackets and the fenders around their bases to simulate very worn winter camo that had taken a beating from the elements and soldiers' boots.
I then worked with several Raw Umber oil washes and some pigments to blend the new winter camo with the existing colors already on the model.

Note the relocated spare track links, which were moved forward alongside the turret when the external fuel tanks were added.
After letting the paint dry overnight, I stippled Vallejo Model Color White onto the brackets and the fenders around their bases to simulate very worn winter camo that had taken a beating from the elements and soldiers' boots.
I then worked with several Raw Umber oil washes and some pigments to blend the new winter camo with the existing colors already on the model.
Note the relocated spare track links, which were moved forward alongside the turret when the external fuel tanks were added.
 |

WEB HOSTING BY


Copyright ©2021 Armorama and Kitmaker Network, a subsidiary of Silver Star Enterprises
All Rights Reserved. Please read our Conditions of Use and Privacy Policy.
All Rights Reserved. Please read our Conditions of Use and Privacy Policy.