

1⁄35SEMOVENTE DA 75/18
7
Comments

Background
The Semovente da 75/18 was built after observing the success of German SPGs such as the Stug III, the design for the Semovente da 75/18 was quickly applied to be based on the Italian M13/40, and later M14/41 medium tanks. The Semovente da 75/18 was used with success in the North African and Sicilian campaigns by the Italians where it was one of the only AFVs capable of taking on and knocking out allied tanks such as the Sherman. Within a week of the allied invasion of the Italian mainland, Italy surrendered. However, Germany was prepared for this and immediately moved in to disarm Italian units before the allies had chance, leading to large amounts of Italian equipment falling into German hands, including numerous Semovente da 75/18s. These were taken on as the Stug M42 mit 75/18 858(i) and were employed by various German units throughout the remainder of the Italian campaign.The kit
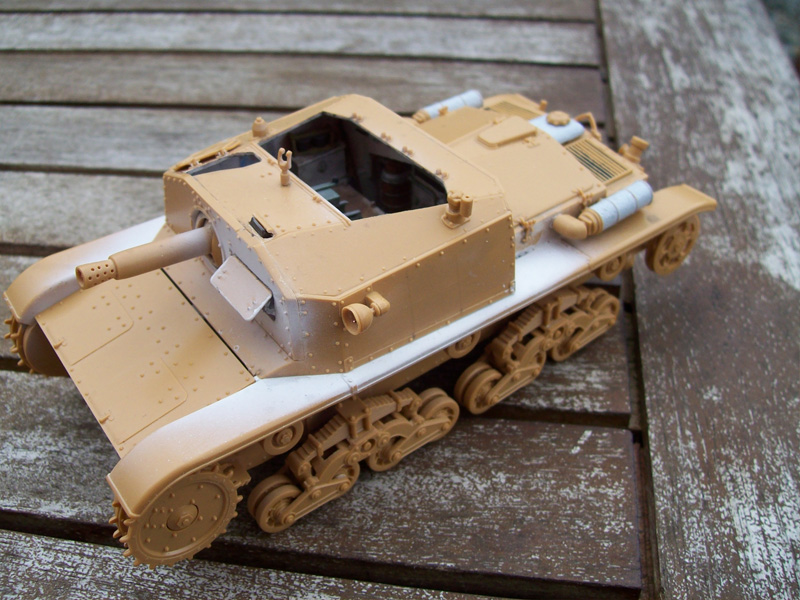
I had wanted to build a Semovente for a while, in particular as one used by a fallschirmjager unit near Rome. This would allow me to fulfil my interest in captured AFVs, assault guns and fallschirmjager figures in one go! On a visit to my LHS (which is actually over 70 miles away!) I picked up Italeris recent re-release of their Semovente 75/18 (later version on a M14/40 chassis) and considering the age of the kit, was seriously impressed at the detail of the kit, sufficiently enough to purchase one straight away! The kit I believe is the same as the Zevezda kit, and apart from the old OOP Tamiya offering (which I dont believe is as good) is the only version of this kit in styrene. The moulding is fairly crisp and the attention to detail is good, with all underside hull tub details being included, and other nice touches such as wing nuts for certain parts. There are prominent mould seams and some flash however, and most parts will require cleaning up before use. The kit even includes a partial interior, which although a bit minimal is necessary for an AFV with such large hatches if you want to show them open. The only bad moulding in the box is that of the Italian crew figures, which are seriously basic and out-dated, luckily I wont be needing them!Interior
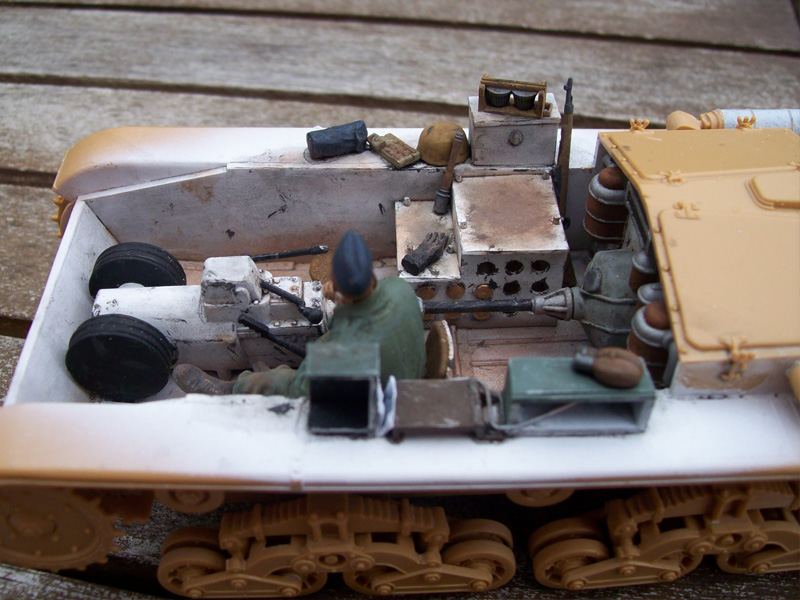
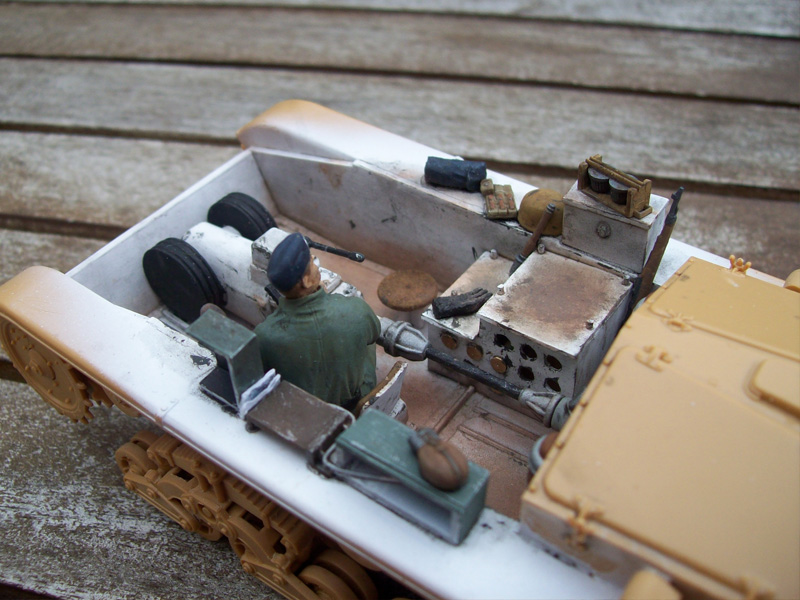
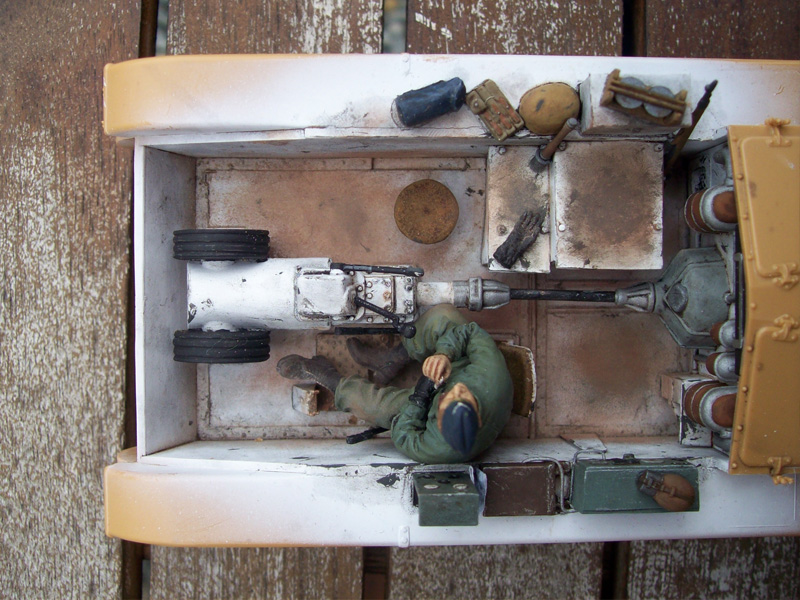
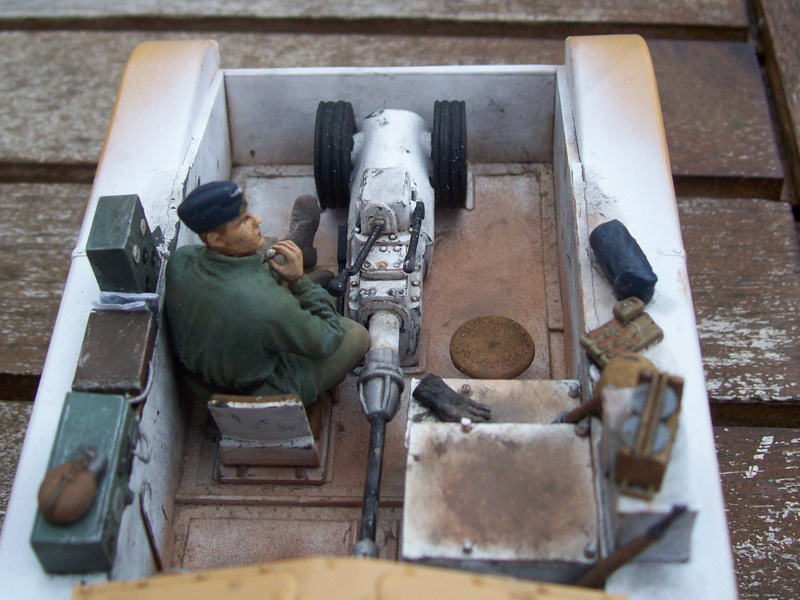
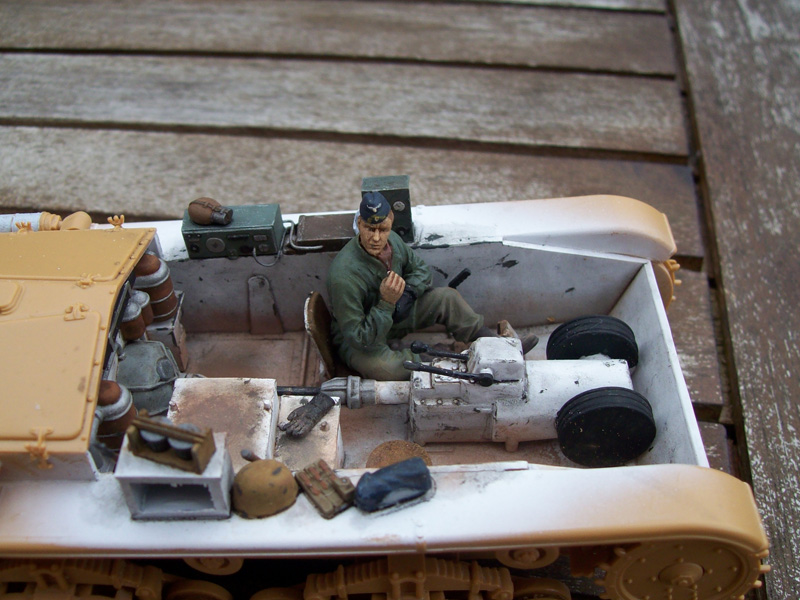
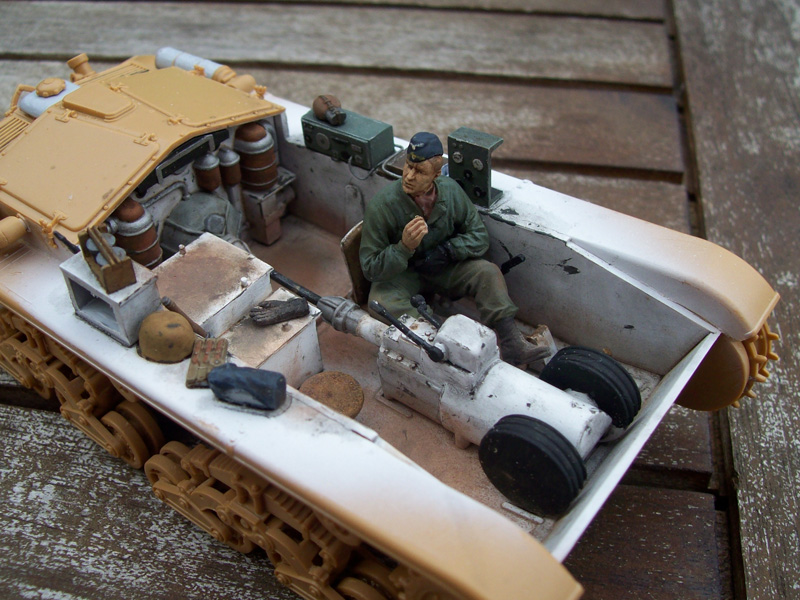
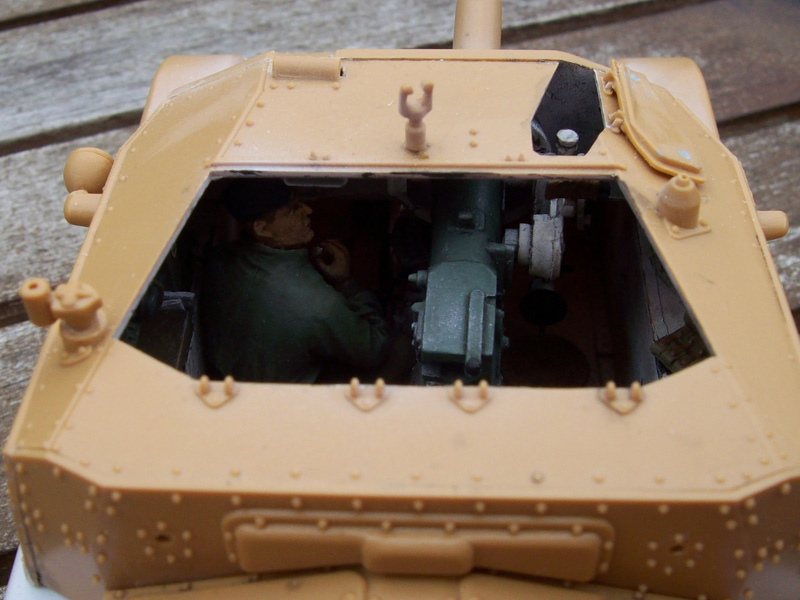
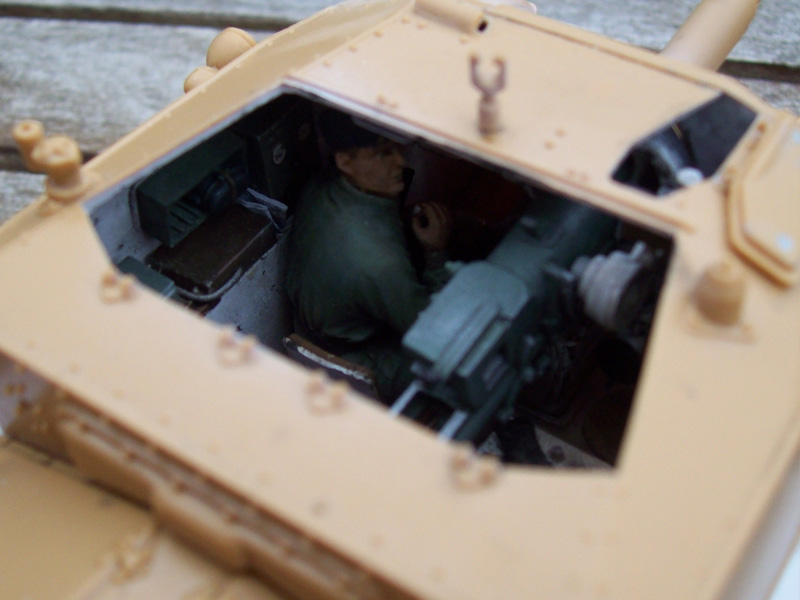
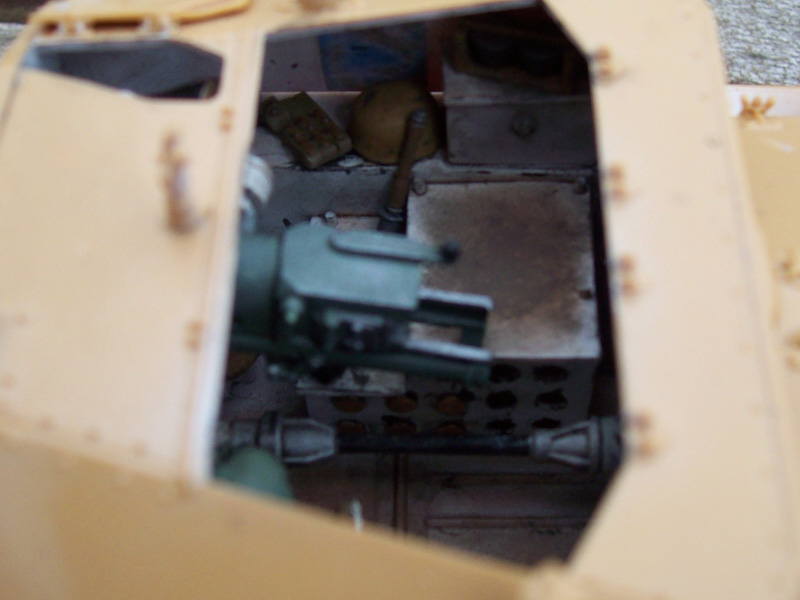
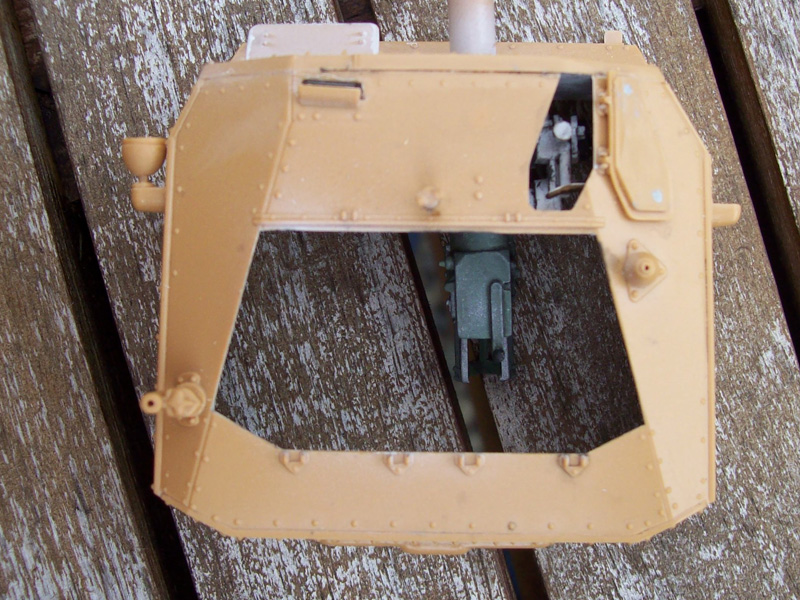
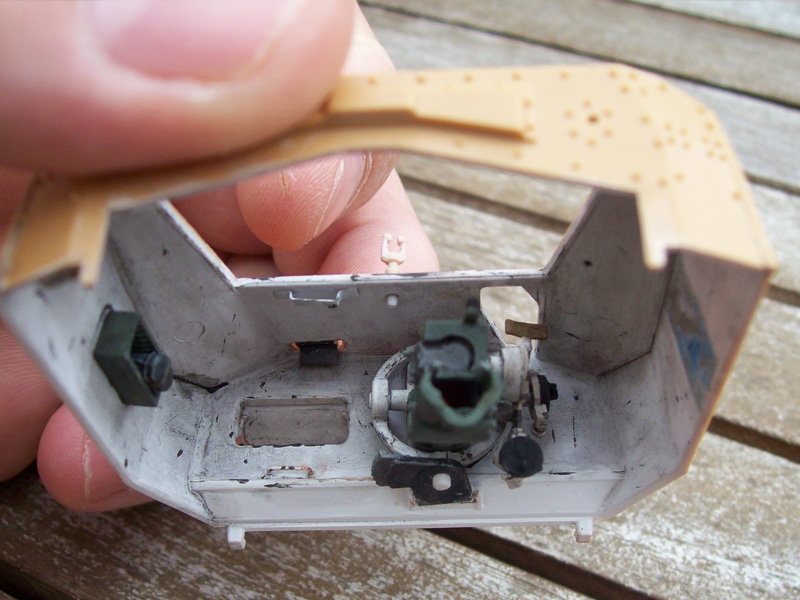
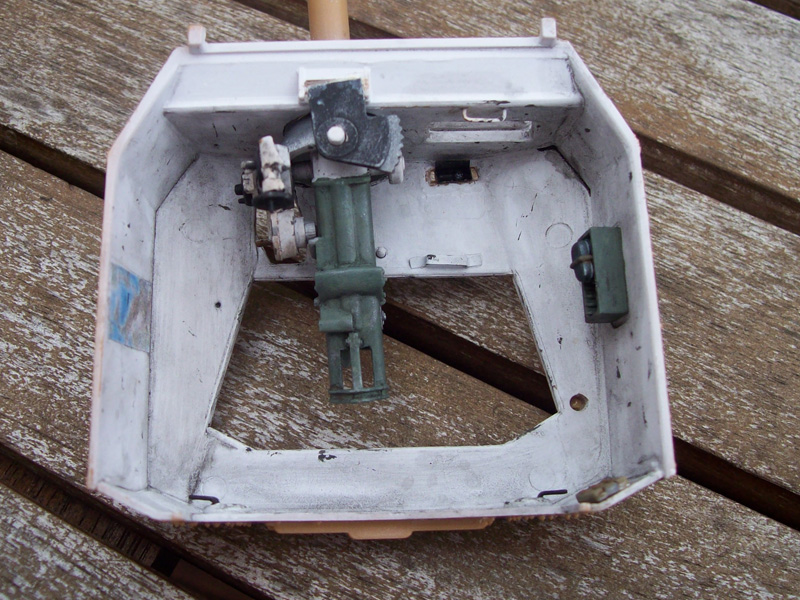
I started off with the interior as it would take the most time and needed to be completed before I could finish off the upper hull. The Kit interior provides a rear firewall, transmission, drivers seat, pedals and levers and two seats for the gunner and commander. This is only really the bare essentials and needs some refining as a little research shows that the positions of the two rear seats is incorrect and that several key components are missing. However, I wasnt trying to create a really accurate replica as I planned to put figures in the hatches and so not a great deal would be visible. First thing to do was remove the prominent ejection pin marks on the base of the hull interior, most of these are raised but were a pain to remove, other builders may wish to separate the base of the hull tub from the sides and then re-fit them to make this easier? A glaring omission is the lack of a shell storage case on the right side of the hull which was scratch built to approximate dimensions using photo references from plastic card. Holes were drilled in marked locations and some spare 75mm shells from the spares bin added to a few. I then moved one of the rear seats forward to the front of the shell storage case where it should be located and with a bit of careful cutting and sanding made the seat round instead of square as it should be. Mr. Surfacer was then stippled onto the seat to give the effect of a fabric covering. To complete the left side of the hull a stowage bin was added above the rear fender, the kit machine gun that would be placed here was omitted as it was of Italian design and may not have been used by a German crew. On the other fender a radio set and drivers control panel were scratch built from various parts from the spares bin to mimic those seen in reference photos. The drivers seat and controls along with the transmission were built as per kit instructions. The upper hull part of the interior also had some detailing done, with the inside of the rear viewing ports being made from spare wheel parts from a panzer IV to represent those on the real thing. An ammunition rack for the AA machine gun was taken from a Panzer I turret and fixed to the left hand hull wall. The gun breech was made as per the kit instructions, with the only addition being a piece of plastic card added to represent the breech block as the kit part is simply hollow. A periscope from a Sherman PE set was added in the periscope hole in the roof and a grab handle was also added above the driver, although I didnt add any of the internal brace and rivet details to the upper hull as it would have taken a serious amount of time, and would not be visible on the finished product.Exterior
Far less work went into detailing the exterior as the kit represents the vehicle very well, and so the majority was built as per the kit instructions. This included all of the running gear, the only addition being cuts and wear added to the rubber parts of the road wheels. The fenders also had their edges thinned for better scale appearance. The exhausts had their ends hollowed out and received several coats of Mr. Surfacer to help represent their rusted appearance, a light coat was also applied to a cast part of the engine deck. The Jack was moved to the left rear of the hull onto one of the spare road wheel mounts as this appeared to be common practice from reference photos. The same went for the spare track links included in the kit that were applied to the front glacis as it was common for crews to up-armour their vehicles in this way. The kit lights are very poor, and so while one was omitted and a small hole drilled to represent where it would be mounted, the other was hollowed out using a round bur on a rotary tool and some wire added inside to represent a broken light missing its glass. Again reference pictures show this to be a common occurrence as their positioning on the outside edges of the hull meant they were easily damaged. Jerry cans were carried in racks along the edge of the vehicles and these were built from spare PE fret and PE locking clasps. Spare PE clasps were also used to replace the moulded on detail on the two side fender stowage boxes. Aerials were made from stretched spruce and a rear aerial support made from copper wire and spare PE fret as this detail is missing in the kit. One thing I forgot to do was add a seam running along the centre of the outside edge of the front glacis plate of the upper hull. This is because the Italians used two steel plates sandwiched together here for better protection.Stowage
I feel an AFV is the crews home during wartime and so some stowage needs adding inside and out to reflect that. Inside I added the usual array of webbing bits and small arms that wouldnt be carried on ones person in the tight confines of an AFV, along with a couple of 75mm shells, spare ammo, a grenade, a glove for the driver, and my personal favourite; a map of Italy on the upper hull wall, shrunk down from a map found on the internet. Outside the first thing to do was add some jerry cans to the scratch built racks, I used one of the kit Italian pattern jerry cans with the moulded on rack removed and a replacement handle and spout from Italeris Jerry can set, and a German jerry can from the same set was used to fill the other rack for variety. An MG34 taken from a DML set with a PE AA foresight added and the barrel drilled out was used instead of the kit Italian MG, as I figure the German crew would prefer their own kit so to speak. A tarpaulin was taken from an academy accessory set and was partly re-carved to bring out the details, before being added to the right rear corner of the upper hull. The kit tools were used in the rear rack except for the spade which was replaced with one made from a wire handle and PE German pattern spade head. My favourite item (added with a degree of artistic license) was the addition of a Fallschirmjager air drop supply crate stowed on the rear engine deck taken, from a DML Gen 2 figure set (Fallschirmjager - Holland 1940). I have no evidence of this ever being done, and I dont know how often, if ever, Fallschirmjager troops used in a ground roll were re-supplied from the air, but I liked the idea and ran with it. I added a tarpaulin over this made from tissue paper soaked in white glue, and tucked a water jerry can in between the crate and the pioneer tool clamps to fill the gap. The whole bundle was later tied down using cotton thread.


About the Author


Comments

What's a pity that the rubber tracks are so bad we can even see the join on the right one.
Cheers
seb
OCT 21, 2008 - 10:17 AM

Hi James
Are these the reference photos you used?
http://www.ambbrescia.com/photofile/Veicoli_terrestri_uniformi/_1/m75_18sum41/m41_75_18.html
I've built the Tamiya equivalent as well as Italeri's and the Tamiya interior is marginally more accurate as far as layout goes, but not as detailed. The Breda Modello 30 Italeri give you for the interior puzzled me too and I wondered if Italeri had managed to include it after looking at an M13/40 based Semovente as they used the Modello 30 as an AA MG instead of the Breda Modello 38 of the M41s. Just a guess though.
David
OCT 21, 2008 - 09:05 PM
Nice job on that one, James. Good to see what nice builds can be achieved with old kits.
Thanks for sharing
OCT 21, 2008 - 11:55 PM

Hi Guys, glad you enjoyed the article.
-Darren; thanks for putting up with my many e-mails and getting this up on the site, appreciated!
-Seb; the tracks themselves actually have quite good detail for their age, although of course suffer from the issues that rubber band tracks have. For this build I couldn't justify spending twice the price of the kit on indy links. The join you see was due to some over zealous heated screwdriver work that prevented this side from closing properly. Obviously hiding it under the roadwheels didn't prevent your eagle eye from spotting it!
-David; Yes that site was the inspiration for some of the interior scratching and the interior colour scheme, the other big online reference used was the beutepanzer site which has several pics of Semovente's in German service.
I havn't built the Tamiya kit (which looks like will be re-released with new figs soon) but I know it includes the ammo storage bin that is missing in this kit.
Can't comment on the Italian MG's with any certainty but what you say sounds plausible. It's unlikely they would have had both, my feeling is that it was added simply as something else to put in the interior.
-Jesper; Thanks for your kind words. I'm a big advocate of not writing off old kits, with some TLC they can make some lovely builds.
Thanks guys, I welcome any more questions.
James
OCT 22, 2008 - 01:35 AM

It's always nice to see these older kits being built and still enjoyed.
Nothing wrong with exercising a little modeling skills to update older kits instead of simply writing them off.
Having built both the Tamyia and Italeri kits back in the land of real teeth, I always liked the finer details on the Italeri kit, over the Tamyia kit's more chunkier parts. But just my opinion of the two kits.
OCT 22, 2008 - 05:42 AM
Dave,
Thanks for the comments. As mentioned I havn't built the Tamiya kit, but having seen it built and under construction i'd be inclined to agree with your assesment. I'd definately recommend the Italeri/Zvezda offering anyway.
James
OCT 24, 2008 - 01:35 AM
Copyright ©2021 by James McFarlane. Images and/or videos also by copyright holder unless otherwise noted. The views and opinions expressed herein are solely the views and opinions of the authors and/or contributors to this Web site and do not necessarily represent the views and/or opinions of Armorama, KitMaker Network, or Silver Star Enterrpises. All rights reserved. Originally published on: 2008-10-21 00:00:00. Unique Reads: 29021

WEB HOSTING BY


Copyright ©2021 Armorama and Kitmaker Network, a subsidiary of Silver Star Enterprises
All Rights Reserved. Please read our Conditions of Use and Privacy Policy.
All Rights Reserved. Please read our Conditions of Use and Privacy Policy.